记微软OpenHack机器学习挑战赛
有幸参加了微软OpenHack挑战赛,虽然题目难度不大,但是很有意思,学到了很多东西,还有幸认识了微软梁健老师,谢谢您的帮助!同时还认识同行的很多朋友,非常高兴,把这段难忘的比赛记录一下~~也分享一下代码,给那些没有参加的朋友,
数据集(文末链接)
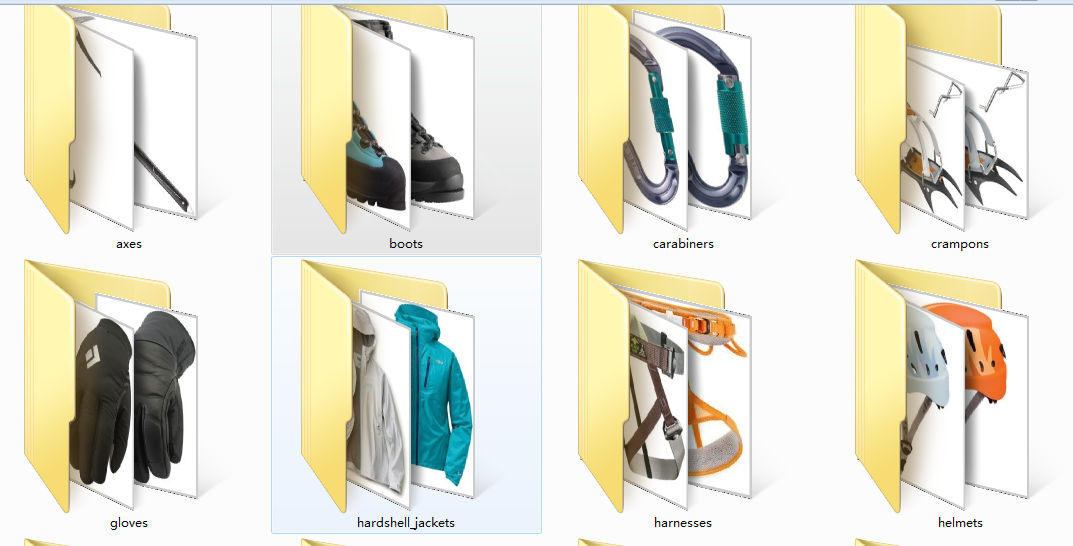
首先每支队伍会收到一个数据集,它是一个登山公司提供的装备图片,有登山镐,鞋子,登山扣,不知道叫什么的雪地爪?手套,冲锋衣,安全带。。。一共12个类别,每个类别几百个样本,我们的任务就是对这些图片分类和识别
简单看一下:
赛题:
赛题共有6道,简单描述一下:
1、搭建环境(略过)
2、图像正规化(包括颜色和大小)
3、通过机器学习方法对图像分类,precision>0.8
4、通过深度学习方法对图像分类,precision>0.9
5、部署(略过)
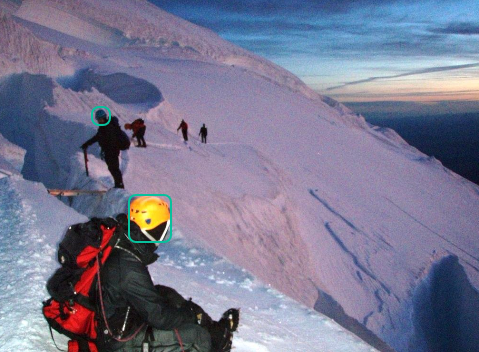
6、目标检测(用全新的数据集,检测雪地中的登山者是否带头盔!!航拍图像,有点难度~)
_______________________________________
下面是每道题目的详细描述和代码
题目2
完成以下任务:
选择一种基本颜色,例如白色并填充所有图片尺寸不是1:1比例的图像
不通过直接拉伸的方式,重塑至128x128x3像素的阵列形状
确保每个图像的像素范围从0到255(包含或[0,255]),也称为“对比度拉伸”(contrast stretching).
标准化或均衡以确保像素在[0,255]范围内.
成功完成的标准
团队将在Jupyter Notebook中运行一个代码单元,绘制原始图像,然后绘制填充后的像素值归一化或均衡图像, 展示给教练看.
团队将在Jupyter notebook 为教练运行一个代码单元,显示的像素值的直方图应该在0到255的范围内(包括0和255).
def normalize(src):

    arr = array(src)

    arr = arr.astype('float')

    # Do not touch the alpha channel

    for i in range(3):

        minval = arr[...,i].min()

        maxval = arr[...,i].max()

        if minval != maxval:

            arr[...,i] -= minval

            arr[...,i] *= (255.0/(maxval-minval))

    arr = arr.astype(uint8)

    return Image.fromarray(arr,'RGB')

import matplotlib.pyplot as plt

from PIL import ImageColor

from matplotlib.pyplot import imshow

from PIL import Image

from pylab import *

import copy

plt.figure(figsize=(10,10)) #设置窗口大小

# src = Image.open("100974.jpeg")

src = Image.open("rose.jpg")

src_array = array(src)

plt.subplot(2,2,1), plt.title('src')

plt.imshow(src), plt.axis('off')

ar=src_array[:,:,0].flatten()

ag=src_array[:,:,1].flatten()

ab=src_array[:,:,2].flatten()

plt.subplot(2,2,2),  plt.title('src hist')

plt.axis([0,255,0,0.03])

plt.hist(ar, bins=256, normed=1,facecolor='red',edgecolor='r',hold=1) #原始图像直方图

plt.hist(ag, bins=256, normed=1,facecolor='g',edgecolor='g',hold=1) #原始图像直方图

plt.hist(ab, bins=256, normed=1,facecolor='b',edgecolor='b') #原g始图像直方图

dst = normalize(src)

dst_array = array(dst)

plt.subplot(2,2,3), plt.title('dst')

plt.imshow(dst), plt.axis('off')

ar=dst_array[:,:,0].flatten()

ag=dst_array[:,:,1].flatten()

ab=dst_array[:,:,2].flatten()

plt.subplot(2,2,4),  plt.title('dst hist')

plt.axis([0,255,0,0.03])

plt.hist(ar, bins=256, normed=1,facecolor='red',edgecolor='r',hold=1) #原始图像直方图

plt.hist(ag, bins=256, normed=1,facecolor='g',edgecolor='g',hold=1) #原始图像直方图

plt.hist(ab, bins=256, normed=1,facecolor='b',edgecolor='b') #原g始图像直方图

题目3
使用一个非参数化分类方法(参考 参考文档)来创建一个模型,预测新的户外装备图像的分类情况,训练来自挑战2的预处理过的128x128x3的装备图像。所使用的算法可以从scikit-learn库中挑选现有的非参数化算法来做分类。向教练展示所提供的测试数据集的精确度,并且精确度分数需要超过80%。
dir_data ="data/preprocess_images/"

equipments = ['axes', 'boots', 'carabiners', 'crampons', 'gloves', 'hardshell_jackets', 'harnesses', 'helmets',

              'insulated_jackets', 'pulleys', 'rope', 'tents']

train_data = []

y = []

import os

from PIL import Image

for equip_name in equipments:

    dir_equip = dir_data + equip_name

    for filename in os.listdir(dir_equip):

        if(filename.find('jpeg')!=-1):

            name = dir_equip + '/' + filename

            img = Image.open(name).convert('L')

            train_data.append(list(img.getdata()))

            y.append(equip_name)
from sklearn import svm

from sklearn.cross_validation import train_test_split

train_X,test_X, train_y, test_y = train_test_split(train_data, y, test_size = 0.3, random_state = 0)

from sklearn import neighbors

from sklearn.metrics import precision_recall_fscore_support as score

from sklearn.metrics import precision_score,recall_score

clf_knn = neighbors.KNeighborsClassifier(algorithm='kd_tree')

clf_knn.fit(train_X, train_y)

y_pred = clf_knn.predict(test_X)
print(__doc__)

import itertools

import numpy as np

import matplotlib.pyplot as plt

from sklearn import svm, datasets

from sklearn.model_selection import train_test_split

from sklearn.metrics import confusion_matrix

def plot_confusion_matrix(cm, classes,

                          normalize=False,

                          title='Confusion matrix',

                          cmap=plt.cm.Blues):

    """

    This function prints and plots the confusion matrix.

    Normalization can be applied by setting `normalize=True`.

    """

    if normalize:

        cm = cm.astype('float') / cm.sum(axis=1)[:, np.newaxis]

        print("Normalized confusion matrix")

    else:

        print('Confusion matrix, without normalization')

    print(cm)

    plt.imshow(cm, interpolation='nearest', cmap=cmap)

    plt.title(title)

    plt.colorbar()

    tick_marks = np.arange(len(classes))

    plt.xticks(tick_marks, classes, rotation=45)

    plt.yticks(tick_marks, classes)

    fmt = '.2f' if normalize else 'd'

    thresh = cm.max() / 2.

    for i, j in itertools.product(range(cm.shape[0]), range(cm.shape[1])):

        plt.text(j, i, format(cm[i, j], fmt),

                 horizontalalignment="center",

                 color="white" if cm[i, j] > thresh else "black")

    plt.tight_layout()

    plt.ylabel('True label')

    plt.xlabel('Predicted label')

# Compute confusion matrix

# cnf_matrix = confusion_matrix(y_test, y_pred)

np.set_printoptions(precision=2)

confusion_mat = confusion_matrix(test_y, y_pred, labels = equipments)

# Plot non-normalized confusion matrix

plt.figure(figsize=(10,10))

plot_confusion_matrix(confusion_mat, classes=equipments,

                      title='Confusion matrix, without normalization')

# Plot normalized confusion matrix

plt.figure(figsize=(10,10))

plot_confusion_matrix(confusion_mat, classes=equipments, normalize=True,

                      title='Normalized confusion matrix')

plt.show()
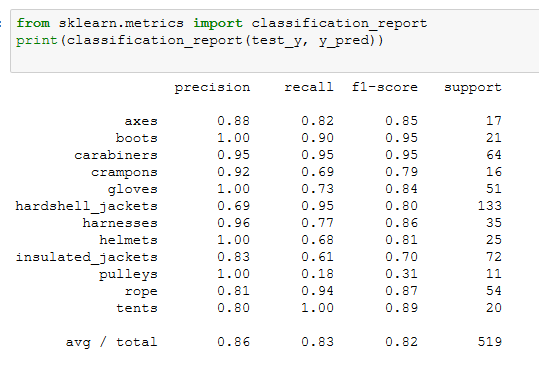
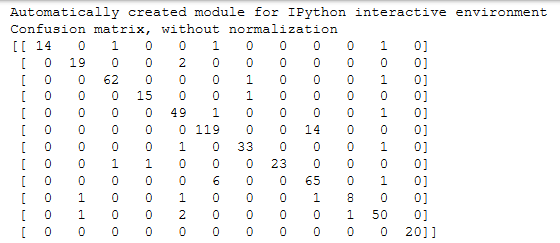
因为要求精确度>0.8,sklearn中的很多算法应该都能满足,我选择了准确度比较高的KNN来建模,应该足够用了

算一下presion和recall,轻松超越0.8
题目4
挑战完成标准,使用深度学习模型,如CNN分析复杂数据
团队将在Jupyter Notebook上为教练运行一个代码单元,展示模型的准确度为90%或更高
准确度如果要>0.9,sklearn中的机器学习算法就很难达到了,关键时刻只能上CNN
import matplotlib.pyplot as plt

from PIL import ImageColor

from matplotlib.pyplot import imshow

from PIL import Image

from pylab import *

dir_data ="data/preprocess_images/"

equipments = ['axes', 'boots', 'carabiners', 'crampons', 'gloves', 'hardshell_jackets', 'harnesses', 'helmets',

              'insulated_jackets', 'pulleys', 'rope', 'tents']

train_data = []

y = []

import os

from PIL import Image

i=0

for equip_name in equipments:

    dir_equip = dir_data + equip_name

    for filename in os.listdir(dir_equip):

        if(filename.find('jpeg')!=-1):

            name = dir_equip + '/' + filename

            img = Image.open(name).convert('L')

            train_data.append(array(img).tolist())

            y.append(i)

    i += 1

train_data = np.asarray(train_data)
from sklearn import svm

from sklearn.cross_validation import train_test_split

import numpy as np

import keras

num_classes=12

img_rows=128

img_cols=128

train_X, test_X, train_y, test_y = train_test_split(train_data, y, test_size = 0.3, random_state = 0)

train_X = train_X.reshape(train_X.shape[0], img_rows, img_cols, 1)

test_X = test_X.reshape(test_X.shape[0], img_rows, img_cols, 1)

train_X = train_X.astype('float32')

test_X = test_X.astype('float32')

train_X /= 255

test_X /= 255

print('x_train shape:', train_X.shape)

print(train_X.shape[0], 'train samples')

print(test_X.shape[0], 'test samples')

# convert class vectors to binary class matrices

train_y = keras.utils.to_categorical(train_y, num_classes)

test_y = keras.utils.to_categorical(test_y, num_classes)
from keras.layers import Dense, Activation, Convolution2D, MaxPooling2D, Flatten

from keras.models import Sequential

from keras.layers import Convolution2D,MaxPooling2D, Conv2D

import keras

model = Sequential()

model.add(Conv2D(32, kernel_size=(3, 3),

                 activation='relu',

                 input_shape=(128, 128, 1)))

model.add(MaxPooling2D(pool_size=(2, 2)))

model.add(Conv2D(64, (3, 3), activation='relu'))

model.add(MaxPooling2D(pool_size=(2, 2)))

# model.add(Dropout(0.25))

model.add(Flatten())

model.add(Dense(128, activation='relu'))

# model.add(Dropout(0.5))

model.add(Dense(12, activation='softmax'))

model.compile(loss=keras.losses.categorical_crossentropy,

              optimizer=keras.optimizers.Adadelta(),

              metrics=['accuracy'])

model.fit(train_X, train_y,

          batch_size=128,

          epochs=50,

          verbose=1,

          validation_data=(test_X, test_y))

score = model.evaluate(test_X, test_y, verbose=0)

print('Test loss:', score[0])

print('Test accuracy:', score[1])
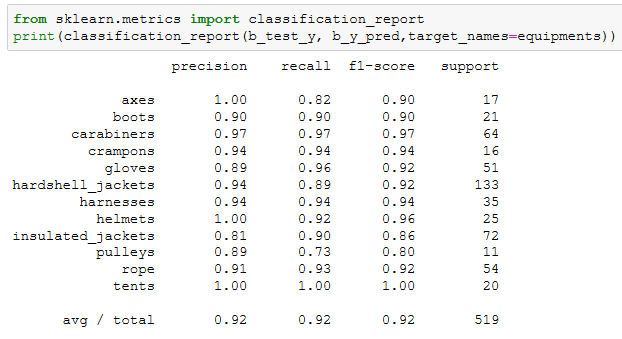
CNN的混淆矩阵比KNN的好了不少
训练了好多次,不断调整各个卷积层和参数,终于达到了一个比较好的效果~~
题目6
使用深度学习框架,基于一个常用的模型,比如Faster R-CNN,训练一个目标检测的模型。这个模型需要能够检测并且使用方框框出图片中出现的每一个头盔。
这道题目首先要自己标注样本,几百张图像标注完累的半死。。。这里我们使用VOTT来标注,它会自动生成一个样本描述文件,很方便。Faster R-CNN的程序我们参考了git上的一个红细胞检测的项目,https://github.com/THULiusj/CosmicadDetection-Keras-Tensorflow-FasterRCNN,代码非常多就不贴了
最后来一张效果图
本文数据集和VOTT工具 链接:
https://pan.baidu.com/s/1FFw0PLJrrOhwR6J1HexPJA
提取码 s242
记微软OpenHack机器学习挑战赛的更多相关文章
- 微软分布式机器学习工具包DMTK——初窥门径
在现在机器学习如日中天的大背景下,微软亚洲研究院的实习岗位中,机器学习组的工作也是维护DMTK,参与算法改进,那么在此之前我们得了解DMTK是个啥. DMTK由一个服务于分布式机器学习的框架和一组分布 ...
- 年轻的心与渐行渐近的梦——记微软-斯坦福产品设计创新课程ME310
作者:中国科学技术大学 王牧 Stanford D. School 2014年6月,沐浴着加州的阳光,在斯坦福大学(下文简称Stanford)完成汇报后,历时一年的创新设计课程ME310的项目结束 ...
- 机器学习数据集,主数据集不能通过,人脸数据集介绍,从r包中获取数据集,中国河流数据集
机器学习数据集,主数据集不能通过,人脸数据集介绍,从r包中获取数据集,中国河流数据集 选自Microsoft www.tz365.Cn 作者:Lee Scott 机器之心编译 参与:李亚洲.吴攀. ...
- 【机器学习Machine Learning】资料大全
昨天总结了深度学习的资料,今天把机器学习的资料也总结一下(友情提示:有些网站需要"科学上网"^_^) 推荐几本好书: 1.Pattern Recognition and Machi ...
- 【转】自学成才秘籍!机器学习&深度学习经典资料汇总
小编都深深的震惊了,到底是谁那么好整理了那么多干货性的书籍.小编对此人表示崇高的敬意,小编不是文章的生产者,只是文章的搬运工. <Brief History of Machine Learn ...
- 机器学习(Machine Learning)&深度学习(Deep Learning)资料
<Brief History of Machine Learning> 介绍:这是一篇介绍机器学习历史的文章,介绍很全面,从感知机.神经网络.决策树.SVM.Adaboost到随机森林.D ...
- 机器学习(Machine Learning)&深入学习(Deep Learning)资料
<Brief History of Machine Learning> 介绍:这是一篇介绍机器学习历史的文章,介绍很全面,从感知机.神经网络.决策树.SVM.Adaboost 到随机森林. ...
- 机器学习(Machine Learning)&深度学习(Deep Learning)资料【转】
转自:机器学习(Machine Learning)&深度学习(Deep Learning)资料 <Brief History of Machine Learning> 介绍:这是一 ...
- 机器学习&深度学习经典资料汇总,data.gov.uk大量公开数据
<Brief History of Machine Learning> 介绍:这是一篇介绍机器学习历史的文章,介绍很全面,从感知机.神经网络.决策树.SVM.Adaboost到随机森林.D ...
随机推荐
- 【题解】Coins(二进制拆分+bitset)
[题解]Coins(二进制拆分+bitset) [vj] 俗话说得好,bitset大法吼啊 这道题要不是他多组数据卡死了我复杂度算出来等于九千多万的选手我还不会想这种好办法233 考虑转移的实质是怎样 ...
- FastJson处理Map List 对象
Fastjson是一个Java语言编写的高性能功能完善的JSON库. Fastjson是一个Java语言编写的JSON处理器,由阿里巴巴公司开发. 1.遵循http://json.org标准,为其官 ...
- 【linux】自动删除7天前的文件
下面的脚本是删除/home目录下7天前的文件 #!/bin/bash -exec rm -f {} \; 把这个脚本保存在/tmp目录下,命名为:clearfile.sh 加入计划任务 crontab ...
- Java for LeetCode 113 Path Sum II
Given a binary tree and a sum, find all root-to-leaf paths where each path's sum equals the given su ...
- mySql执行效率分析
1.关于SQL查询效率,100w数据,查询只要1秒,与您分享: 机器情况p4: 2.4内存: 1 Gos: windows 2003数据库: ms sql server 2000目的: 查询性能测试, ...
- hadoop —— teragen & terasort
这两个类所在目录: hadoop-examples-0.20.2-cdh3u6.jar 中: 代码: TeraGen.java: /** * Licensed to the Apache Softwa ...
- 51Nod 1084 矩阵取数问题 V2 —— 最小费用最大流 or 多线程DP
题目链接:http://www.51nod.com/onlineJudge/questionCode.html#!problemId=1084 1084 矩阵取数问题 V2 基准时间限制:2 秒 空 ...
- Linux之make的用法讲解
在 Linux环境下使用 GNU 的 make工具能够比较容易的构建一个属于你自己的工程,整个工程的编译只需要一个命令就可以完成编译.连接以至于最后的执行.不过这需要我们投入一些时间去完成一个或者多个 ...
- PYTHON 爬虫笔记十:利用selenium+PyQuery实现淘宝美食数据搜集并保存至MongeDB(实战项目三)
利用selenium+PyQuery实现淘宝美食数据搜集并保存至MongeDB 目标站点分析 淘宝页面信息很复杂的,含有各种请求参数和加密参数,如果直接请求或者分析Ajax请求的话会很繁琐.所以我们可 ...
- html5--1.16 内联框架
html5--1.16 内联框架 学习要点: 1.iframe内联框架2.综合实例1 1.iframe内联框架 1.iframe元素用来在文档中添加一个内联框架. 2.iframe为body元素的子元 ...