论文《Piexel Recurrent Nerual Network》总结
论文《Piexel Recurrent Nerual Network》总结
论文:《Pixel Recurrent Nerual Network》
时间:2016
作者:Aaron van den Oord, Nal Kalchbrenner, Koray Kavukcuoglu
期刊:CCF A类会议 ICML
谷歌学术引用量:326
意义:将RNN和CNN用于像素的生成
由于这篇论文在阅读的时候有一些前置知识不是很懂,因此根据这篇论文的引用,以及引用论文的引用论文大概略读了以下论文
[1]Theis, Lucas, and Matthias Bethge. "Generative image modeling using spatial LSTMs." Advances in Neural Information Processing Systems. 2015.
[2]Williams, R. J., and D. Zipser. "Gradient-based learning algorithm for recurrent connectionist networks." Northern Univ., College Comp. Sci. Tech. Rep., NU-CCs-90-9 (1990).
[3]Graves, Alex, and Jürgen Schmidhuber. "Offline handwriting recognition with multidimensional recurrent neural networks." Advances in neural information processing systems. 2009.
[4]Graves, Alex, S. Fernández, and J. Schmidhuber. "Multi-dimensional Recurrent Neural Networks." International Conference on Artificial Neural Networks Springer, Berlin, Heidelberg, 2007:549-558.
[5]Theis, Lucas, R. Hosseini, and M. Bethge."Mixtures of Conditional Gaussian Scale Mixtures Applied Multiscale Image Representations." Plos One 7.7(2011):e39857.
Mulit-Dimensional Recurrent Neural Networks
在理解《Pixel Recurrent Nerual Network》之前需要明白论文《Multi-dimensional Recurrent Neural Networks》的几个概念。简单的说一下论文《Multi-dimensional Recurrent Neural Networks》将LSTM的维度扩展成多个维度。在前向传播的时候,在数据序列上的每一个点,在神经网络隐藏层上收到一个外在的输入和它自己在前一步所有维度的激活元(activations)。
具体的过程如Figure 1:2D RNN Forward pass 所示。
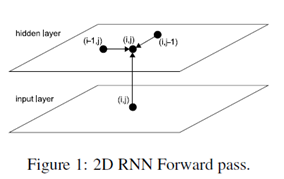
很显然,数据必须在收到之前的激活元(activations)时,这些激活元必须已经生成了。
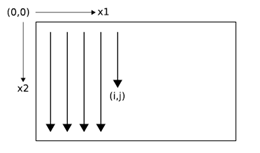
在反向传播的每一个tiemstep,隐藏层收到的数据来自两个方面,一个是error derivatives和另一个是'future' derivatives。下图展示了两个维度的反向传播过程。

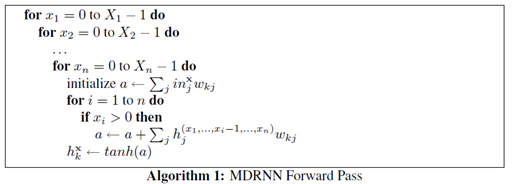
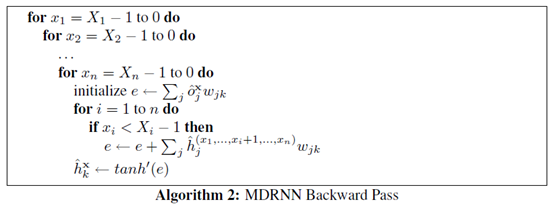
MDRNN(Multi-Dimensional Recurrent Nerual Networks)的前向和反向传播算法过程如下:
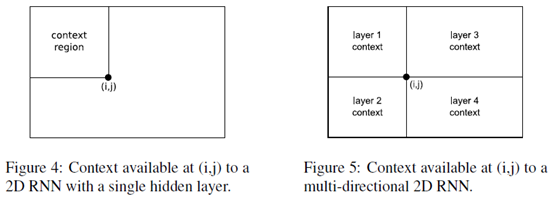
Multi-directional MDRNNs
在很早的时候就提出了BRNN(bidirectional recurrent neural networks)双向循环神经网络。可以将双向的循环神经网络的思想扩展到n维,使用 分离的隐藏层
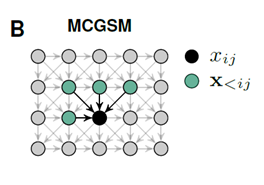
MCGSM(Mixtures of conditional Gaussian scale mixtures)
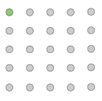
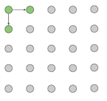
按照常规的思路我们生成下一个像素的时候,会依赖于之前的所有像素。
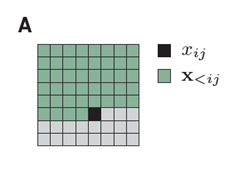
黑色是我们要生成的像素,绿色是之前的所有像素。
论文《Mixtures of conditional Gaussian scale mixtures applied to multiscale iamge representations》提出了MCGSM用于图像的生成,该思想简单的说,就是生成该像素只依赖于他周边之前的像素点
Spatial LSTMs
论文《Generative Image Modeling Using Spatial LSTMs》提出了Spatial LSTMs用于图像的生成。简单的说Spatial LSTMs 是一个两个维度的LSTM。
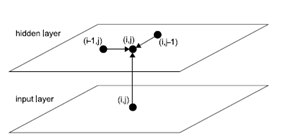
Spatial LSTMs用于像素的生成过程如下
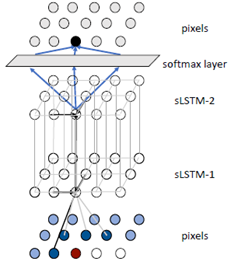
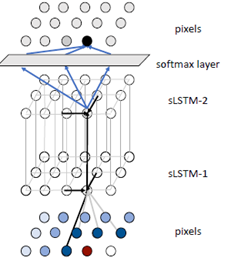
底层是输入的数据采用MCGSM获得数据传向中间层Spatial LSTM,中间层的Spatial LSTM通过MDRNN的前向传播算法计算出当前点的值传给第二层Spatial LSTM,最后一层连接softmax layer 会输出255个值。在softmax layer中采用采样算法获取当前点的生成。
Piexel Recurrent Nerual Network
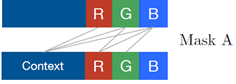
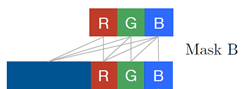
有了前面的前置知识之后就可以阅读论《Piexel Recurrent Nerual Network》。因为数据生成是通过之前的生成的点来进行生成的。因此论文提出了两种Mask(Mack A, Mask B)用于屏蔽未来的数据对当前数据的影响。
MaskA:只使用之前的数据,而不使用自己的R,G,B的值进行生成。
MaskB: 使用之前的数据,并且使用自己的R,G,B的值进行生成。

MaskA的数据表示形式如下
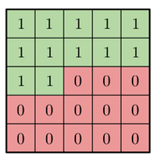
如果是MaskB的话,最中心的值为1
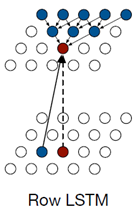
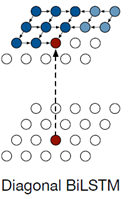
论文还提出了自己的LSTM结构Row LSTM 以及 Diagonal BiLSTM
Row LSTM: Row LSTM每个点的生成依赖于前面的三个点。
Diagonal BiLSTM:首先Diagonal BiLSTM是一个双向链表,其次每次扩展的时候都会沿着这个方向进行
论文还提出了PixelCNN
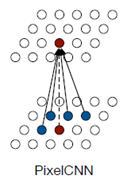
PixelCNN和普通的CNN的区别是在进行卷积操作的时候,会先和前面提到的mask进行相乘,取消掉将来点的影响。
有了这些知识就可以生成图片了,通过Diagonal BiLSTM图片直观的生成顺序如下
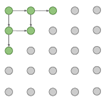
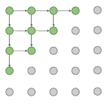
沿着左上角一直往右下角生成
网络的整体结构论文给出了如下的结构
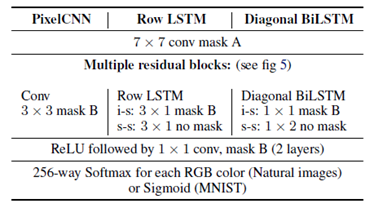
和前面提到的Spatial LSTMs用于生成图片的结构有点像,只是LSTM使用的是论文自己设计出来的Row LSTM或者Diagonal BiLSTM。在LSTM层的前面和后面多了几层PixelCNN层。
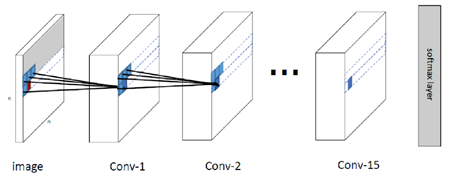
PiexelCNN的实现
由于PiexelRNN是多层的LSTM结构计算量过于庞大,没有高性能的计算机无法实现。下面用PiexelCNN实现图像的生成。
该模型的整体结构如下
下面给出了PiexelCNN的核心代码
构造PixelCNN卷积层的代码
def conv2d(
inputs,
num_outputs,
kernel_shape, # [kernel_height, kernel_width]
mask_type, # None, "A" or "B",mask的类别
strides=[1, 1], # [column_wise_stride, row_wise_stride]
padding="SAME",
activation_fn=None,
weights_initializer=WEIGHT_INITIALIZER,
weights_regularizer=None,
biases_initializer=tf.zeros_initializer,
biases_regularizer=None,
scope="conv2d"):
with tf.variable_scope(scope):
mask_type = mask_type.lower()
batch_size, height, width, channel = inputs.get_shape().as_list()
kernel_h, kernel_w = kernel_shape
stride_h, stride_w = strides
assert kernel_h % 2 == 1 and kernel_w % 2 == 1, \
"kernel height and width should be odd number"
center_h = kernel_h // 2
center_w = kernel_w // 2
weights_shape = [kernel_h, kernel_w, channel, num_outputs]
weights = tf.get_variable("weights", weights_shape,
tf.float32, weights_initializer, weights_regularizer)
if mask_type is not None:
mask = np.ones(
(kernel_h, kernel_w, channel, num_outputs), dtype=np.float32)
mask[center_h, center_w+1: ,: ,:] = 0.
mask[center_h+1:, :, :, :] = 0.
if mask_type == 'a':
mask[center_h,center_w,:,:] = 0.
weights *= tf.constant(mask, dtype=tf.float32)
tf.add_to_collection('conv2d_weights_%s' % mask_type, weights)
outputs = tf.nn.conv2d(inputs,
weights, [1, stride_h, stride_w, 1], padding=padding, name='outputs')
tf.add_to_collection('conv2d_outputs', outputs)
if biases_initializer != None:
biases = tf.get_variable("biases", [num_outputs,],
tf.float32, biases_initializer, biases_regularizer)
outputs = tf.nn.bias_add(outputs, biases, name='outputs_plus_b')
if activation_fn:
outputs = activation_fn(outputs, name='outputs_with_fn')
return outputs
PixelCNN网络的整体结构构造
#构造输入层PixelCNN
self.l[scope] = conv2d(self.l['normalized_inputs'], conf.hidden_dims, [7, 7], "A", scope=scope)
#构造中间几层的PixelCNN
l_hid = self.l[scope]
for idx in range(conf.recurrent_length):
    scope = 'CONV%d' % idx

													self.l[scope] = l_hid = conv2d(l_hid, 3, [3, 3], "B", scope=scope)
#构造输出层的PixelCNN
for idx in range(conf.out_recurrent_length):
  scope = 'CONV_OUT%d' % idx

										self.l[scope] = l_hid = tf.nn.relu(conv2d(l_hid, conf.out_hidden_dims, [1, 1], "B", scope=scope))
#构造输出层的softmax layer
self.l['conv2d_out_logits'] = conv2d(l_hid, 1, [1, 1], "B", scope='conv2d_out_logits')
self.l['output'] = tf.nn.sigmoid(self.l['conv2d_out_logits'])
#损失函数
self.loss = tf.reduce_mean(tf.nn.sigmoid_cross_entropy_with_logits(

						logits=self.l['conv2d_out_logits'], labels=self.l['normalized_inputs'], name='loss'))

论文《Piexel Recurrent Nerual Network》总结的更多相关文章
- 《Amazon Aurora: Design Considerations for High Throughput Cloud-Native Relational Databases》论文总结
Aurora总结 说明:本文为论文 <Amazon Aurora: Design Considerations for High Throughput Cloud-Native Relation ...
- Amazon Aurora: Design Considerations for High Throughput Cloud-Native Relational Databases
INTRODUCTION In modern distributed cloud services, resilience and scalability are increasingly ach ...
- Google Spanner vs Amazon Aurora: Who’ll Get the Enterprise?
https://www.clustrix.com/bettersql/spanner-vs-aurora/ Google Spanner versus Amazon Aurora In July 20 ...
- Amazon Aurora解读(SIGMOD 2017)
Amazon在SIGMOD 2017发表了论文<Amazon Aurora: DesignConsiderations for High Throughput Cloud-Native Rela ...
- 利用 AWS DMS 在线迁移 MongoDB 到 Amazon Aurora
将数据从一种数据库迁移到另一种数据库通常都非常具有挑战性,特别是考虑到数据一致性.应用停机时间.以及源和目标数据库在设计上的差异性等因素.这个过程中,运维人员通常都希望借助于专门的数据迁移(复制)工具 ...
- (转)Amazon Aurora MySQL 数据库配置最佳实践
转自:https://zhuanlan.zhihu.com/p/165047153 Amazon Aurora MySQL 数据库配置最佳实践 AWS云计算 已认证的官方帐号 1 人赞同了该文章 ...
- Game: Map Design Considerations 游戏地图设计指南
依据前文伏击战场景手稿, 用Tile Studio "草草"制作出该场景的地图: 生成的C源码: #ifndef _open_war_1Gfx_c #define _open_wa ...
- 一篇文章带你看懂AWS re:Invent 2018大会,揭秘Amazon Aurora
本文由云+社区发表 | 本文作者: 刘峰,腾讯云NewSQL数据库产品负责人.曾职于联想研究院,Teradata北京研发中心,从事数据库相关工作8年.2017年加入腾讯数据库产品中心,担任NewSQL ...
- 'Cloud Native': What It Means, Why It Matters
When HP announced July 28 that it was acquiring ActiveState's PaaS business, senior vice president B ...
- On cloud, be cloud native
本来不想起一个英文名,但是想来想去都没能想出一个简洁地表述该意思的中文释义,所以就用了一个英文名称,望见谅. Cloud Native是一个刚刚由VMware所提出一年左右的名词.其表示在设计并实现一 ...
随机推荐
- Springboot2.X集成Quartz集群
为什么要使用Quzrtz集群 在项目进行集群部署时,如果业务在执行中存在互斥关系,没有对定时任务进行统一管理,就会引起业务的多次执行,不能满足业务要求.这时就需要对任务进行管理,要保证一笔业务在所有的 ...
- arcgis jsapi接口入门系列(7):鼠标在地图画线
初始化,每个map执行一次就行 drawPolylineInit: function () { //画几何对象初始化 //新建一个图形图层用于存放画图过程中的图形 let layer = new th ...
- Ubuntu16.04 + cuda8.0 + GTX1080安装教程
1. 安装Ubuntu16.04 不考虑双系统,直接安装 Ubuntu16.04,从 ubuntu官方 下载64位版本: ubuntu-16.04-desktop-amd64.iso . 在MAC下制 ...
- webpack前端构建工具学习总结(四)之自动化生成项目中的html页面
接续上文:webpack前端构建工具学习总结(三)之webpack.config.js配置文件 插件的介绍文档:https://www.npmjs.com/package/html-webpack-p ...
- java字符串拼接技巧(StringBuilder使用技巧)
在平时的开发中,我们可能会遇到需要拼接如下格式的字符串(至少我是遇到了很多次): 1,2,3,4,5,6,7,8,9,10,11,12,12,12,12,34,234,2134,1234,1324,1 ...
- flex常用属性
<1>align-items: 垂直方向的对齐方式 align-items: stretch(拉伸,布满父容器) | center(垂直居中) | flex-start(上对齐) | fl ...
- 洛谷 P1126 机器人搬重物 (BFS)
题目链接:https://www.luogu.org/problemnew/show/P1126 吐槽:这题很阴险 一开始没把格子图转化成点图:30分 转化成点图,发现样例过不去,原来每步要判断vis ...
- 用事件队列解决GUI的操作顺序问题(Qt中处理方法)
GUI操作顺序问题引发异常: 有时候我们使用写GUI程序的时候会遇到这样的问题:比如在程序中,建立了一个列表的GUI.这个列表是随着时间不断更新的,而且操作也会读取这个列表GUI的内容. 如果这个程序 ...
- Bootstrap 响应式表格
响应式表格 通过把任意的 .table 包在 .table-responsive class 内,您可以让表格水平滚动以适应小型设备(小于 768px).当在大于 768px 宽的大型设备上查看时,您 ...
- Log4J的配置与使用详解
一.简介 Log4j是Apache的一个开放源代码项目,通过使用Log4j,我们可以控制日志信息输送的目的地是控制台.文件.GUI组件.甚至是套接口服务器.NT的事件记录器.UNIX Syslog守护 ...