[web开发] Vue + spring boot + echart 微博爬虫展示平台
1.微博登录
2.爬取数据
3.mysql存储
4.pyechart本地展示
5.用vue搭建网站web展示
先放图:


1.微博登录
新浪微博的登录不是简单的post就能解决的,他的登录有加密,所以我们要使用一定的解密算法才能正常登录微博,得到我们想要的数据。
先不要慌,第一步当然是import我们需要的库
from urllib import request,parse

import http.cookiejar

import base64

import json

import rsa

import binascii

from PIL import Image

from bs4 import BeautifulSoup

import pymysql
要登录,那肯定要先拿到验证码
    def GetCode(self):

        url="https://login.sina.com.cn/cgi/pin.php?r=694905&s=0&p=gz-52086a8a846fadcdacf4fb058324aa387858"#验证码地址

        img=self.opener.open(url)

        f=open('vv.png','wb')

        f.write(img.read())

        f.close()

        im=Image.open('vv.png')

        im.show()
拿到了验证码还不够,登录之前还有个预登录,拿到我们后面加密需要的参数
def prelogin(self):

        url="https://login.sina.com.cn/sso/prelogin.php?entry=weibo&callback=sinaSSOController.preloginCallBack&su=NDc5MTkyNzQyJTQwcXEuY29t&rsakt=mod&checkpin=1&client=ssologin.js(v1.4.19)&_=1529471491358"

        a=self.opener.open(url).read().decode('utf-8')

        a=a[a.find("(")+1:a.find(")")]

        b=json.loads(a)

        return b

‘’‘

sinaSSOController.preloginCallBack({"retcode":0,"servertime":1540617565,"pcid":"gz-65c55b3534f8a1df1330b4708fb6d1b57273","nonce":"ONED4A","pubkey":"EB2A38568661887FA180BDDB5CABD5F21C7BFD59C090CB2D245A87AC253062882729293E5506350508E7F9AA3BB77F4333231490F915F6D63C55FE2F08A49B353F444AD3993CACC02DB784ABBB8E42A9B1BBFFFB38BE18D78E87A0E41B9B8F73A928EE0CCEE1F6739884B9777E4FE9E88A1BBE495927AC4A799B3181D6442443","rsakv":"","is_openlock":0,"showpin":0,"exectime":10})’‘’
然后用这些参数对登录参数进行加密,说实在话具体的加密细节我也不记得了,当时做的时候拿了个记事本把所有东西记下来然后分析,也查了很多博客的资料才做好。
def GetMixUser(self,username,password):

        username_struct={'username':username}

        rsaPubkey=int(self.pre['pubkey'],16)

        key=rsa.PublicKey(rsaPubkey, 65537)

        message = str(self.pre['servertime']) + '\t' + self.pre['nonce'] + '\n' + password

        passwd = rsa.encrypt(message.encode('utf-8'), key)

        upass = binascii.b2a_hex(passwd)

        uname=base64.b64encode(parse.urlencode(username_struct).encode('utf-8')).decode('utf-8')[12:]

        mix={'uname':uname,'upass':upass.decode('utf-8')}

        return mix
拿到加密后的登录参数,可以提交了
def login(self,username,password,code):

        mix=self.GetMixUser(username,password)

        uname=mix['uname']

        upass=mix['upass']

        url="https://login.sina.com.cn/sso/login.php?client=ssologin.js(v1.4.19)"

        print("登录中……")

        postData={

            "door":code,

            "encoding":"utf-8",

            "entry":"weibo",

            "from":"null",

            "gateway":1,

            "nonce":self.pre['nonce'],

            "prelt":72,

            "pwencode":"rsa2",

            "qrcode_flag":False,

            "returntype":"META",

            "savestate":7,

            "servertime":self.pre['servertime'],

            "service":"miniblog",

            "rsakv":self.pre['rsakv'],

            "su":uname,

            "sp":upass,

            "url":"https://weibo.com/ajaxlogin.php?framelogin=1&callback=parent.sinaSSOController.feedBackUrlCallBack",

            "useticket":1,

            "vsnf":1

        }

        postData=parse.urlencode(postData).encode('utf-8')

        result=self.opener.open(url,postData).read().decode('gbk')

        url1=result[result.find("replace")+9:result.find(')')-1]

        result=self.opener.open(url1).read().decode("gbk")

        if(result.find("身份")!=-1):

            return False

        result=result[result.find('location')+18:]

        url2=result[:result.find(')')-1]

        self.opener.open(url2).read().decode("gbk")

        return True
2.爬取信息
先得到用户follow的列表
    def GetUserList(self,uid,pageNum):

        url="https://weibo.com/"+str(uid)+"/follow?page="+str(pageNum)

        try:

            result=self.opener.open(url).read().decode('utf-8')

            html = result.replace('\\n', '').replace('\\t', '').replace('\\r', '').replace('\\', '')

            html = html[html.find("<!--关注/粉丝列表-->"):html.find("<!--关欧盟隐私协议弹窗-->")]

            soup = BeautifulSoup(html, "html.parser")

            list_a = soup.findAll(name='div', attrs={"class": "info_name W_fb W_f14"})

            name = []

            uid = []

            for a in list_a:

                try:

                    b = a.find(name="a")

                    b = b['usercard']

                    b = b[3:13:]

                    uid.append(b)

                    name.append(a.text)

                    print("加入用户:" + a.text)

                except:

                    print("No Data")

            dic = {"name": name, "uid": uid}

            return dic

        except:

            pass
再拿到这些用户的主页微博言论,我们得到他们发的所有博文
def GetTalks(self,uid):

        rlist = []

        i=0

        html=""

        while(True):

            try:

                result=self.opener.open("https://weibo.com/u/"+str(uid)+"?page="+str(i)).read().decode("utf-8")

                html = result.replace("\\t", "").replace("\\n", "").replace("\\r", "").replace("\\", "")

                html = html[html.find("<div class=\"WB_feed WB_feed_v3 WB_feed_v4\""):]

            except:

                pass

            soup=BeautifulSoup(html,"html.parser")

            list_a = soup.find_all(name="div", attrs={"class": "WB_text W_f14"})

            i = i + 1

            if list_a:

                print("第" + str(i) + "页")

                for a in list_a:

                    at=a.text

                    at=at.replace(" ","")

                    if at:

                        rlist.append(at)

                        print("内容存入:"+at)

            else:

                break

        return rlist
3.数据存储
我暂时只做了这些,然后存储到数据库吧。mysql的基础语句很简单,我也就会这么几句,不会的百度吧。。
def sqllogin(self):

        db=pymysql.connect(host='localhost',user='root',db='weibouser',passwd='root',charset='utf8mb4')

        return db

    def sqlProcess(self,db):

        while(True):

            cursor=db.cursor()

            cursor.execute("SELECT * FROM USERS WHERE TAG =1")           #1 表示 未处理 2 表示 正在处理 3 表示完成处理

            result=cursor.fetchone()

            if(result):

                cursor.execute("UPDATE USERS SET TAG=2 WHERE USERID='%s'" % (result[2]))

                talks=self.GetTalks(uid=result[2])

                for i in range(1,4):

                   uids=""

                   names=""

                   userlist = self.GetUserList(uid=result[2], pageNum=i)

                   try:

                        uids=userlist['uid']

                        names=userlist['name']

                   except:

                       break

                   if int(result[4])!=3:

                       for t in range(len(uids)):

                           try:

                               if self.IfExist(db,"users","name",names[t])==False:

                                    cursor.execute("INSERT INTO USERS (NAME,USERID,TAG,CLASS) VALUES ('%s','%s',%d,%d)" % (names[t], uids[t], 1, int(result[4])+1))  # 数据库写userlist

                                    cursor.execute("INSERT INTO FOLLOWS (USERID,FUID,FUNAME) VALUES ('%s','%s','%s')" % (result[2], uids[t],names[t]))

                           except:

                               print("Error")

                for talk in talks:

                    try:

                        cursor.execute("INSERT INTO USERTALKS (USERID,NAME,TALK)VALUES ('%s','%s','%s')" % (result[2],result[1],talk))#数据库写评论

                    except:

                        print("Error")

                cursor.execute("UPDATE USERS SET TAG=3 WHERE USERID='%s'"%(result[2]))

            else:

                break

    def AnotherProcess(self,db):

        cursor=db.cursor();

        cursor.execute("SELECT * FROM USERS WHERE 1");

        results=cursor.fetchall()

        for result in results:

            sex="女"

            try:

                r = self.opener.open("https://weibo.com/u/"+result[2]).read().decode("utf-8")

                html = r.replace("\\t", "").replace("\\n", "").replace("\\r", "").replace("\\", "")

                if html.find("female") == -1:

                    sex="男"

            except:

                pass

            soup = BeautifulSoup(html, "html.parser")

            keywords=soup.find(attrs={"name":"keywords"})['content']

            description=soup.find(attrs={"name":"description"})['content']

            cursor.execute("INSERT INTO USERDETAILS (NAME,DESCRIPTION,KEYWORDS,SEX)VALUES('{}','{}','{}','{}')".format(result[1],description,keywords,sex))
4.echart本地展示
import pymysql

from pyecharts import Graph

class DrawCharts:

    raw_nodes = []

    links = []

    def __init__(self):

        self.CreatRelation()

        self.DrawCharts()

    def CreatRelation(self):

        db=pymysql.connect(host='localhost',user='root',db='weibouser',passwd='root',charset='utf8mb4')

        cursor=db.cursor()

        cursor.execute("SELECT * FROM USERS WHERE 1");

        users=cursor.fetchall()

        for user in users:#上海大学

            cursor.execute("SELECT * FROM FOLLOWS WHERE USERID='%s'"%(user[2]));

            results=cursor.fetchall()

            if results:

                for result in results:

                    links.append({"source":user[1],"target":result[4]})

                    print(user[1]+"->"+result[4])

        for i in range(3):

            cursor.execute("SELECT * FROM USERS WHERE CLASS=%d"%(i+1))

            results=cursor.fetchall()

            for result in results:

                self.raw_nodes.append({"name": result[1], "symbolSize": 30-i*13,"category":i})

        db.close()

    def DrawCharts(self):

        graph = Graph("微博关注关系图", width=1200, height=600)

        categories=[

            {

            "name":"一级深度",

            "itemStyle":

                {

                    "normal":{

                        "color":'#CC0033',

                        "borderColor": "#5182ab",

                        "borderWidth": 1.8,

                        "show":"True"

                    }

                }

            },

            {

                "name": "二级深度",

                "itemStyle":

                    {

                        "normal": {

                            "color": '#f44242',

                            "borderColor": "#5182ab",

                            "borderWidth": 1.8,

                            "show":"True"

                        }

                    }

            },

            {

                "name": "三级深度",

                "itemStyle":

                    {

                        "normal": {

                            "color": '#663366',

                            "borderColor": "#5182ab",

                            "borderWidth": 1.8,

                            "show":"True"

                        }

                    }

            }

        ]

        graph.add("",self.raw_nodes,self.links,label_pos="right",graph_repulsion=10, is_legend_show=False,categories=categories,

                  label_text_color=None,is_label_show=True)

        graph.render()
效果就不发了,运行起来比较卡,因为节点太多了,当时老师说怎么怎么加速,也不说细节,我当时一脸懵逼,也就没管了,大不了减少节点数量嘛。
5.web展示
前端两段关键代码。。
<style scoped>
.layout-con{
height: 100%;
width: 100%;
}
.menu-item span{
display: inline-block;
overflow: hidden;
width: 69px;
text-overflow: ellipsis;
white-space: nowrap;
vertical-align: bottom;
transition: width .2s ease .2s;
}
.menu-item i{
transform: translateX(0px);
transition: font-size .2s ease, transform .2s ease;
vertical-align: middle;
font-size: 16px;
}
.collapsed-menu span{
width: 0px;
transition: width .2s ease;
}
.collapsed-menu i{
transform: translateX(5px);
transition: font-size .2s ease .2s, transform .2s ease .2s;
vertical-align: middle;
font-size: 22px;
}
</style>
<template>
<div class="layout">
<Layout :style="{minHeight: '100vh'}">
<Sider collapsible :collapsed-width="78" v-model="isCollapsed">
<Menu active-name="1-1" theme="dark" width="auto" :class="menuitemClasses">
<MenuItem name="1-1" @click.native="tab_search_onclick()">
<Icon type="search"></Icon>
<span>搜索</span> </MenuItem>
<MenuItem name="1-2" @click.native="tab_follow_onclick()">
<Icon type="person"></Icon>
<span>follow关系</span>
</MenuItem>
<MenuItem name="1-3" @click.native="tab_words_onclick()">
<Icon type="cloud"></Icon>
<span >热词云图</span>
</MenuItem>
</Menu>
</Sider>
<Layout>
<Header :style="{background: '#fff', boxShadow: '0 2px 3px 2px rgba(0,0,0,.1)',height:'100px'}">
<img src="../assets/logo.png" style="height: 100%"/>
</Header>
<Content :style="{padding: '0 16px 16px'}"> <Card style="margin-top: 20px">
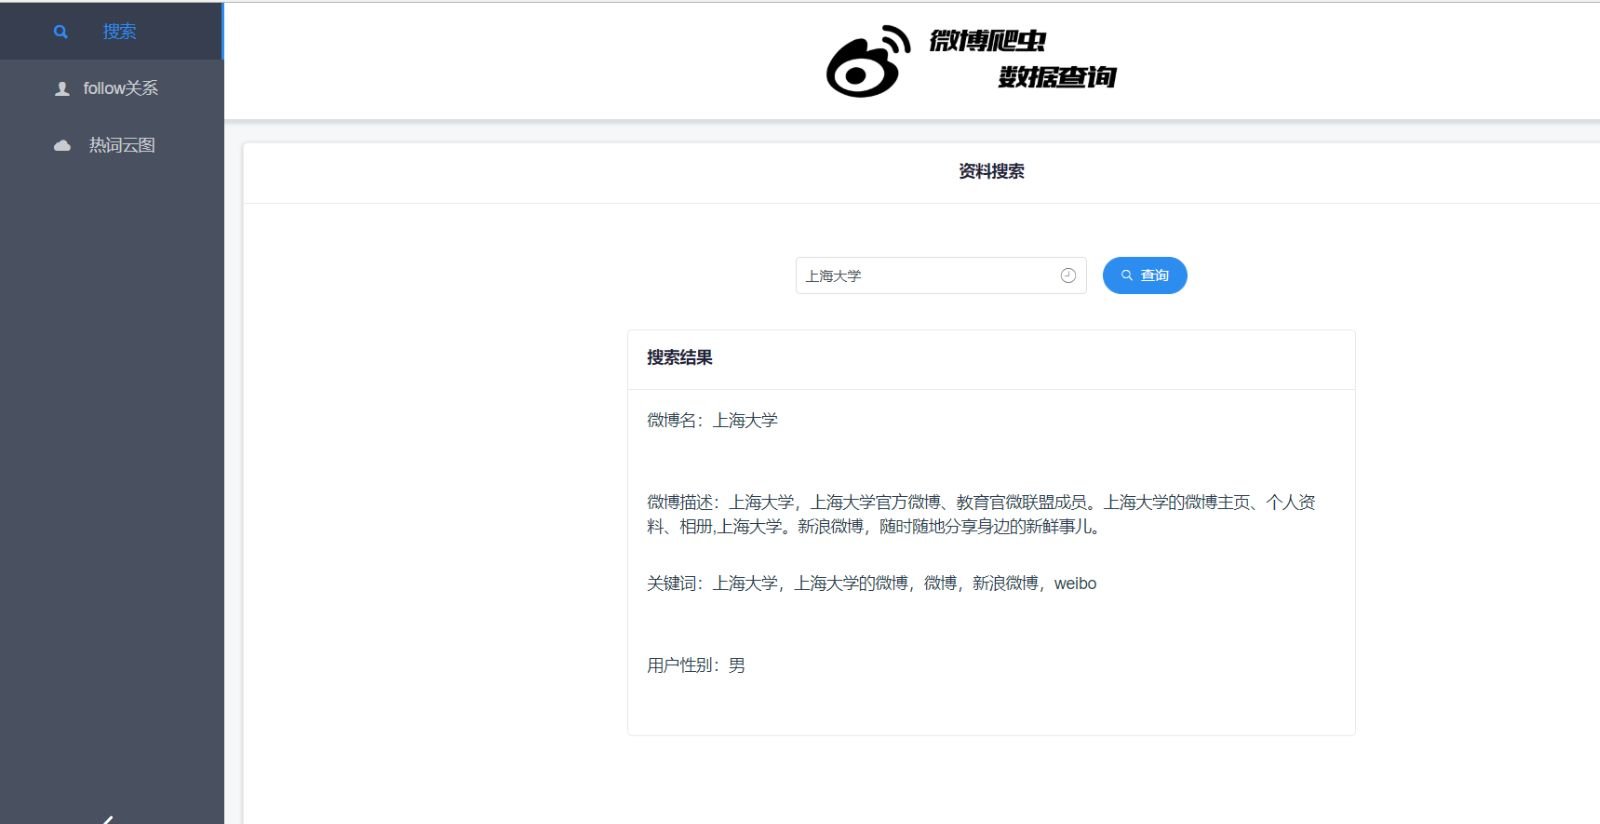
<p slot="title">{{Content_Title}}</p>
<div style="height: 650px">
<div v-show="v_search">
<div style="margin-bottom: 30px;margin-top: 30px">
<Input v-model="input_word" icon="ios-clock-outline" placeholder="请输入微博用户名称!" style="width: 250px;margin-right: 10px"></Input>
<Button type="primary" shape="circle" icon="ios-search" @click="fs_search">查询</Button>
</div>
<div style="width: 50%;margin: auto">
<Card :bordered="true" style="height: 350px;text-align: left">
<p slot="title">{{Search_Card_Title}}</p>
<p v-for="item in items" style="height: 70px">{{item.message}}</p>
</Card>
</div>
</div>
<div v-show="v_follows">
<div style="width: 80%;margin: auto">
<Card :bordered="true" style="height: 580px;width: 100%;margin-top: 50px">
<p slot="title">{{Follow_Card_Title}}</p>
<div id="Follow_Chart" style="height: 500px;width:800px;margin: auto;"></div>
</Card>
</div> </div>
<div v-show="v_words">
<div style="width: 50%;margin: auto">
<Card :bordered="true" style="height: 330px;margin-top:50px ">
<p slot="title">{{Words_Card_Title}}</p>
<div id="Words_Chart" style="height: 250px;width:500px;margin: auto"></div>
</Card>
</div>
</div>
</div>
</Card>
</Content>
</Layout>
</Layout>
</div>
</template>
<script>
let echarts = require('echarts');
require('echarts-wordcloud');
require("echarts/lib/chart/graph/forceLayout");
export default {
data () {
return {
isCollapsed: false,
items:[],
Search_Card_Title:'搜索结果',
Content_Title:"资料搜索",
Follow_Card_Title:"关系图绘制结果",
Words_Card_Title:"词云绘制结果",
input_word:'',
v_search:true,
v_follows:false,
v_words:false
};
},
computed: {
menuitemClasses: function () {
return [
'menu-item',
this.isCollapsed ? 'collapsed-menu' : ''
]
}
},
methods:{
fs_search(){
let axios=this.$axios;
let word=this.input_word;
function getDetails(){
return axios.get("http://localhost:9090/details?name="+word);
}
function getUsers(){
return axios.get("http://localhost:9090/words?name="+word);
}
function getNodes() {
return axios.get("http://localhost:9090/nodes?name="+word);
}
function getLinks(){
return axios.get("http://localhost:9090/links?name="+word);
} axios.all([getDetails(),getUsers(),getNodes(),getLinks()]).then(axios.spread((details,users,nodes,links)=>{
this.draw_relations(nodes.data,links.data);
this.set_details(details.data);
this.draw_words(users.data);
this.$Notice.success({
title: '绘制成功',
desc: '您搜索的用户'+word+'关系图和热词已经成功绘制!'
});
})).catch(res=>{
this.$Notice.error({
title: '绘制失败',
desc: '您搜索的用户'+word+'关系图或热词绘制失败,请检查网络或输入信息!'
});
})
},
tab_search_onclick:function(){
this.v_search=true;
this.v_follows=false;
this.v_words=false;
this.Content_Title="资料搜索"
},
tab_follow_onclick:function(){
this.v_follows=true;
this.v_words=false;
this.v_search=false;
this.Content_Title="follow关系";
},
draw_words:function(words_data){
let mychart=echarts.init(document.getElementById('Words_Chart'));
mychart.setOption({
tootip: {
show: true
},
series: {
name: '词云图',
type: 'wordCloud',
textStyle: {
normal: {
color: function () {
return 'rgb(' + [
Math.round(Math.random() * 160),
Math.round(Math.random() * 160),
Math.round(Math.random() * 160)
].join(',') + ')'
}
}
},
textRotation: [0, 90, -45, 45],
autoSize: true,
data:
words_data
}
})
},
set_details(details){
this.items.push({"message":"微博名:"+details["name"]});
this.items.push({"message":"微博描述:"+details["description"]});
this.items.push({"message":"关键词:"+details["keywords"]});
this.items.push({"message":"用户性别:"+details["sex"]});
},
draw_relations:function(nodes,links){
let mychart=echarts.init(document.getElementById("Follow_Chart"));
let option={
title: { // 图表标题
text: "关注关系图", // 标题文本
left : '3%', // 标题距离左侧边距
top : '3%', // 标题距顶部边距
textStyle : { // 标题样式
color : '#000', // 标题字体颜色
fontSize : '30', // 标题字体大小
}
}, series: [{
type: "graph", // 系列类型:关系图
top: '10%', // 图表距离容器顶部的距离
roam: true, // 是否开启鼠标缩放和平移漫游。默认不开启。如果只想要开启缩放或者平移,可以设置成 'scale' 或者 'move'。设置成 true 为都开启
focusNodeAdjacency: true, // 是否在鼠标移到节点上的时候突出显示节点以及节点的边和邻接节点。[ default: false ]
force: { // 力引导布局相关的配置项,力引导布局是模拟弹簧电荷模型在每两个节点之间添加一个斥力,每条边的两个节点之间添加一个引力,每次迭代节点会在各个斥力和引力的作用下移动位置,多次迭代后节点会静止在一个受力平衡的位置,达到整个模型的能量最小化。
// 力引导布局的结果有良好的对称性和局部聚合性,也比较美观。
repulsion: 1000, // [ default: 50 ]节点之间的斥力因子(关系对象之间的距离)。支持设置成数组表达斥力的范围,此时不同大小的值会线性映射到不同的斥力。值越大则斥力越大
// [ default: 30 ]边的两个节点之间的距离(关系对象连接线两端对象的距离,会根据关系对象值得大小来判断距离的大小),
// 这个距离也会受 repulsion。支持设置成数组表达边长的范围,此时不同大小的值会线性映射到不同的长度。值越小则长度越长。如下示例:
// 值最大的边长度会趋向于 10,值最小的边长度会趋向于 50 edgeLength: [10, 50]
},
layout: "force", // 图的布局。[ default: 'none' ]
// 'none' 不采用任何布局,使用节点中提供的 x, y 作为节点的位置。
// 'circular' 采用环形布局;'force' 采用力引导布局.
// 标记的图形
//symbol: "path://M19.300,3.300 L253.300,3.300 C262.136,3.300 269.300,10.463 269.300,19.300 L269.300,21.300 C269.300,30.137 262.136,37.300 253.300,37.300 L19.300,37.300 C10.463,37.300 3.300,30.137 3.300,21.300 L3.300,19.300 C3.300,10.463 10.463,3.300 19.300,3.300 Z",
symbol: 'circle',
lineStyle: { // 关系边的公用线条样式。其中 lineStyle.color 支持设置为'source'或者'target'特殊值,此时边会自动取源节点或目标节点的颜色作为自己的颜色。
normal: {
color: '#000', // 线的颜色[ default: '#aaa' ]
width: 1, // 线宽[ default: 1 ]
type: 'solid', // 线的类型[ default: solid ] 'dashed' 'dotted'
opacity: 0.5, // 图形透明度。支持从 0 到 1 的数字,为 0 时不绘制该图形。[ default: 0.5 ]
curveness: 0 // 边的曲度,支持从 0 到 1 的值,值越大曲度越大。[ default: 0 ]
}
},
label: { // 关系对象上的标签
normal: {
show: true, // 是否显示标签
position: "inside", // 标签位置:'top''left''right''bottom''inside''insideLeft''insideRight''insideTop''insideBottom''insideTopLeft''insideBottomLeft''insideTopRight''insideBottomRight'
textStyle: { // 文本样式
fontSize: 16
}
}
},
data: nodes,
links: links
}], animationEasingUpdate: "cubicOut", // 数据更新动画的缓动效果。[ default: cubicOut ] "quinticInOut"
// 数据更新动画的时长。[ default: 300 ]
};
mychart.setOption(option);
},
tab_words_onclick:function(){
this.Content_Title="用户词云";
this.v_words=true;
this.v_follows=false;
this.v_search=false;
}, },
name:"HelloWorld"
}
</script>
后端关键代码
//用户的具体信息domain
package com.example.demo;

import org.hibernate.engine.loading.internal.CollectionLoadContext;

import javax.persistence.*;

@Entity

@Table(name = "userdetails")

public class UserDetails {

    @Id

    @GeneratedValue(strategy = GenerationType.AUTO)

    private int num;

    @Column(name="description")

    public String description;

    @Column(name="keywords")

    public String keywords;

    @Column(name="sex")

    public String sex;

    @Column(name="name")

    public String name;

    void setName(String name){

        this.name=name;

    }

    void setDescription(String description){

        this.description=description;

    }

    void setKeywords(String keywords){

        this.keywords=keywords;

    }

    void setSex(String sex){

        this.sex=sex;

    }

    String getName(){

        return this.name;

    }

    String getDescription(){

        return this.description;

    }

    String getKeywords(){

        return this.keywords;

    }

    String getSex(){

        return this.sex;

    }

}
//最重要的controller
package com.example.demo;

import org.springframework.stereotype.Controller;

import org.springframework.web.bind.annotation.CrossOrigin;

import org.springframework.web.bind.annotation.RequestMapping;

import org.springframework.web.bind.annotation.ResponseBody;

import org.springframework.beans.factory.annotation.Autowired;

import java.util.ArrayList;

import java.util.List;

@Controller

@CrossOrigin

public class IndexController {

    @Autowired

    private UserRepositroy userRepositroy;

    @RequestMapping(value="users")

    @ResponseBody

    public Object GetUser(){

       List<User> userlist=userRepositroy.findAll();

        return userlist;

    }

    @RequestMapping(value="links")

    @ResponseBody

    public Object GetLinks(String name){

        List<Follows> followsList =followsRepositroy.findByName(name);

        List<RetnLinks> links =new ArrayList<RetnLinks>();

        for(int i=0;i<followsList.size();i++){

            RetnLinks l=new RetnLinks();

            l.setSource(followsList.get(i).getName());

            l.setTarget(followsList.get(i).getFuname());

            links.add(l);

        }

    return links;

    }

    @RequestMapping(value="nodes")

    @ResponseBody

    public Object GetNodes(String name){

        List<Follows> followsList=followsRepositroy.findByName(name);

        List<RetnNodes> nodes =new ArrayList<RetnNodes>();

        RetnNodes r=new RetnNodes();

        r.setName(name);

        r.setCategory(1);

        r.setSymbolSize(30);

        nodes.add(r);

        for(int i=0;i<followsList.size();i++){

            RetnNodes rs=new RetnNodes();

            rs.setName(followsList.get(i).getFuname());

            rs.setCategory(2);

            rs.setSymbolSize(20);

            nodes.add(rs);

        }

        return nodes;

    }

    @RequestMapping(value="words")

    @ResponseBody

    public Object GetWords(String name){

        List<User> userlist=userRepositroy.findByName(name);

        String word = userlist.get(0).getKeywords();

        String value=userlist.get(0).getKeyvalue();

        String[] array_word= word.split(",");

        String[] array_value= value.split(",");

        List<RetnWords> words=new ArrayList<RetnWords>();

        for(int i=0;i<50;i++){

            RetnWords w=new RetnWords();

            w.setName(array_word[i]);

            w.setValue(Double.parseDouble(array_value[i]));

            words.add(w);

        }

        return words;

    }

    @Autowired

    private FollowsRepositroy followsRepositroy;

    @RequestMapping(value="follows")

    @ResponseBody

    public Object GetFollows(String name){

        List<Follows> followslist=followsRepositroy.findByName(name);

        return followslist;

    }

    @Autowired

    private DetailsRepositroy detailsRepositroy;

    @RequestMapping(value="details")

    @ResponseBody

    public Object GetDetails(String name){

        UserDetails userDetails=detailsRepositroy.findOneByName(name);

        return userDetails;

    }

}
其他的都是类似的。无限重复改名。
[web开发] Vue + spring boot + echart 微博爬虫展示平台的更多相关文章
- [web开发] Vue+Spring Boot 上海大学预约系统开发记录
前端界面 使用Quasar将组件都排好,用好css. Quasar 入门 # 确保你在全局安装了vue-cli # Node.js> = 8.9.0是必需的. $ npm install -g ...
- 在Linux上从零开始部署前后端分离的Vue+Spring boot项目
最近做了一个前后端分离的商城项目来熟悉开发的整个流程,最后希望能有个正式的部署流程,于是试着把项目放在云服务器上,做了一下发现遇到了不少问题,借此记录一下整个部署的过程. 使用的技术栈如标题所说大体上 ...
- spring boot + vue + element-ui全栈开发入门——spring boot后端开发
前言 本文讲解作为后端的spring boot项目开发流程,如果您还不会配置spring boot环境,就请点击<玩转spring boot——快速开始>,如果您对spring boot还 ...
- 全栈的自我修养: 001环境搭建 (使用Vue,Spring Boot,Flask,Django 完成Vue前后端分离开发)
全栈的自我修养: 环境搭建 Not all those who wander are lost. 彷徨者并非都迷失方向. Table of Contents @ 目录 前言 环境准备 nodejs v ...
- 分享一个前后端分离的web项目(vue+spring boot)
Github地址:https://github.com/smallsnail-wh 前端项目名为wh-web 后端项目名为wh-server 项目展示地址为我的github pages(https:/ ...
- Java Web系列:Spring Boot 基础
Spring Boot 项目(参考1) 提供了一个类似ASP.NET MVC的默认模板一样的标准样板,直接集成了一系列的组件并使用了默认的配置.使用Spring Boot 不会降低学习成本,甚至增加了 ...
- Building a RESTful Web Service Using Spring Boot In Eclipse
一.构建restful web service 创建Maven的java web工程,maven的pom文件加入依赖包 创建包hello Greeting.java package hello; pu ...
- Java Web系列:Spring Boot 基础 (转)
Spring Boot 项目(参考1) 提供了一个类似ASP.NET MVC的默认模板一样的标准样板,直接集成了一系列的组件并使用了默认的配置.使用Spring Boot 不会降低学习成本,甚至增加了 ...
- Vue + Spring Boot从零开始搭建个人网站(一) 之 项目前端Vue.js环境搭建
前言: 最近在考虑搭建个人网站,想了想决定采用前后端分离模式 前端使用Vue,负责接收数据 后端使用Spring Boot,负责提供前端需要的API 就这样开启了我边学习边实践之旅 Vue环境搭建步骤 ...
随机推荐
- SQL Server(二)——语句 转
表的创建: 1.创建列(字段):列名+类型 2.设置主键列(primary key):能够唯一标识一条数据 3.设置唯一(unique):内容不能重复 4.外键关系:一张表(从表)其中的某列引用自另外 ...
- 安装 Twisted 解决ImportError: No module named zope.interface错误
转自:http://blog.csdn.net/mickey_miki/article/details/7911323 步骤1:下载Twisted http://twistedmatrix.com/t ...
- 51nod1100(计算斜率)
题目链接:https://www.51nod.com/onlineJudge/questionCode.html#!problemId=1100 题意:中文题啦- 思路:算斜率不用多说吧?本题唯一一个 ...
- python2与python3 版本区别
目录 编码 输入输出 中文 除法 长整形 内置函数map xrange init reduce 字符串类型 dict字典 经典类 新式类 未完待补充 编码 python2默认编码器为ascii码(只支 ...
- Nacos深入浅出(六)
其实我们发现在我们本地新生成了文件,这个文件就是nacos; 这个文件怎么那么眼熟,不就是我们的controller中的注解里面的参数value么: @Controller @NacosPropert ...
- java 文件相关问题
1.文件路径 分隔符 System.out.println(File.separator); System.out.println(File.pathSeparator); /*mac os 和 li ...
- King's Pilots
题目链接 (双层图, 一层维护工作,一层维护政策) #include <bits/stdc++.h> using namespace std; inline int read() { ...
- from appium import webdriver 报错
from appium import webdriver 报错 看看你的文件是不是就叫appium
- VUE中模块与组件
组件:我们项目中,每一个资源(.js,.css,.vue,...)都是一个模块,这些模块是相互独立,但是我们可以通过类似于webpack构建工具把它们整合在一起,你可以理解为模块就是一个一个积木,通过 ...
- linux查看系统版本(适用于centos、ubutun,其他类型没有进行测试)
方法一:cat /etc/issue 或more /etc/issue root@salt-master:~# cat /etc/issueUbuntu 16.04.2 LTS \n \l 方法二:l ...