ASP.NET网站权限设计实现(三)——套用JQuery EasyUI列表显示数据、分页、查询
一、说明:
JQuery EasyUI下载地址:http://jquery-easyui.wikidot.com/download,最新版本1.2.2。
首先预览一下界面:
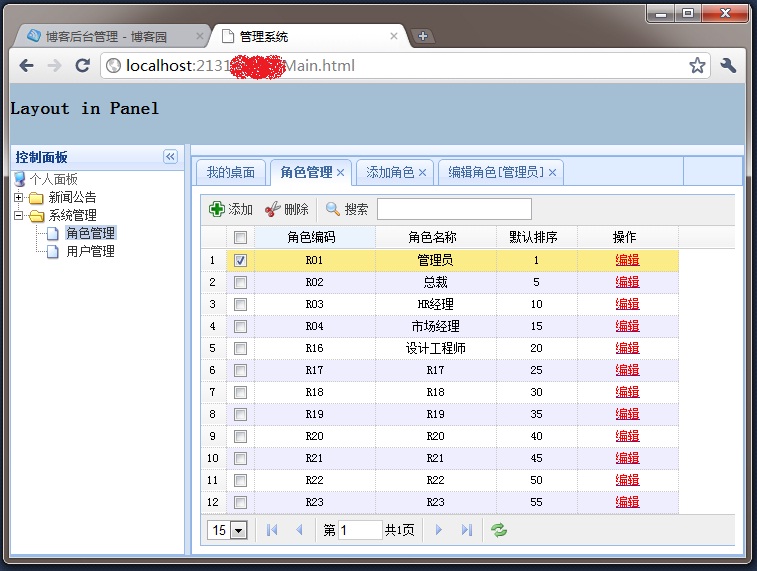
本例实现的功能:
1、多标签
2、分页列表显示数据
3、获取选中行的标识值,删除选中行
实现以上功能主要使用了:
1、layout:布局
2、tabs:多标签
3、datagrid:表格显示数据,并可以分页
4、messager:消息框
5、window:窗口
要了解用法,下载之后,参阅demo文件夹下的demo和官方文档。
二、功能实现分解
1、布局(参考layout的各个demo),可以参考上面的界面截图来看下面代码(Main.html):
<html>

<head>

    <meta http-equiv="Content-Type" content="text/html; charset=UTF-8">

    <title>系统</title>

    <link rel="stylesheet" type="text/css" href="Style/dtree.css">

    <link rel="stylesheet" type="text/css" href="JQueryEasyUI/themes/default/easyui.css">

    <script type="text/javascript" src="JQueryEasyUI/jquery-1.4.4.min.js"></script>

    <script type="text/javascript" src="JQueryEasyUI/jquery.easyui.min.js"></script>

    <script type="text/javascript">

        //<--Tabs Begin-->

        $(function () {

            $('#tt').tabs({

                tools: [{

                    iconCls: 'icon-add',

                    handler: function () {

                        alert('add');

                    }

                }, {

                    iconCls: 'icon-save',

                    handler: function () {

                        alert('save');

                    }

                }]

            });

        });

        function addTab(tit, link) {

            if ($('#tt').tabs('exists', tit)) {

                $.messager.alert('提示消息', '窗口已经打开。','info');

            } else {

                $('#tt').tabs('add', {

                    title: tit,

                    //href: link,

                    content: '<iframe scrolling="yes" frameborder="0"  src="' + link + '" style="width:100%;height:98%;"></iframe>',

                    fit: true,

                    closable: true

                });

            }

        }

        //<--Tabs End-->


    </script>

</head>

<body class="easyui-layout">

    <div region="north" border="false" style="overflow: hidden; height: 60px; background: #A4BED4;">

        <h2>Head Part</h2>

    </div>

    <div region="south" split="false" style="height: 2px; background: #efefef;">

    </div>


    <div region="west" split="true" title="控制面板" style="width: 180px;">

        <div id="divTree">

            <img src="JQueryEasyUI/themes/gray/images/panel_loading.gif" />

        </div>

    </div>

    <!--overflow:hidden; 设置div无滚动条-->

    <div region="center" title=" " style="background: #efefef;overflow:hidden;">

        <div id="tt" style="width: auto; height: auto;">

            <div title="我的桌面" style="padding: 10px;">

            </div>

        </div>

    </div>

</body>

</html>
代码说明:
1)addTab函数中添加tab代码中有个参数是content,接受文本格式的数据,content的值就是创建新的tab后显示在tab中内容,这里用了一个iframe加载另外一个页面的内容;
3)title:标签标题;
4)其它参数请参阅官方文档 。
2、树形菜单,参考 ,JQuery EasyUI中也有Tree,这里没有使用。
3、添加多标签
把2中的添加Tree的JS代码修改一下添加到<script></script>就可以了
1)引用dTree.js:
<script type="text/javascript" src="Scripts/dtree.js"></script>
2)修改后的代码
        //<!--Tree Begin-->

        d = new dTree('d');

        d.add(0, -1, '个人面板');

        function getData(id) {

            $.ajax({

                url: 'ASHX/ModuleHandler.ashx?parentID=' + id,

                type: 'post',

                datatype: 'json',

                success: function (returnJsonValue) {

                    if (returnJsonValue.length > 0) {

                        //格式化为JSON数据格式

                        var json = eval("(" + returnJsonValue + ")");

                        //遍历集合,添加树节点

                        $.each(json.Module, function (key, value) {

                            if (id == 0) {

                                d.add(value.ModuleCode, value.ParentCode, value.ModuleName, '', value.ModuleName,'', 'Style/dtreeimg/folder.gif', 'Style/dtreeimg/folderopen.gif');

                            }

                            else {

                                d.add(value.ModuleCode, value.ParentCode, value.ModuleName, "javascript:addTab('" + value.ModuleName + "','" + value.ModuleLinkUrl + "')", value.ModuleName, '');

                            }

                            //根据模块的ParentID递归绑定数据

                            getData(value.ModuleCode);

                        })

                    }

                    else {

                        $("#divTree").html(d.toString());

                    }

                }

            })

        }

        $(getData(0));

        //<!--Tree End-->
这样修改之后,当点击Tree的Node的时候,就会在【我的桌面】标签后依次添加新的标签,标签的内容就是iframe中嵌入的网页。
4、列表显示角色(RoleList.html),使用datagrid,可以看JQuery EasyUI中demo/datagrid.html这个demo
1)构造datagrid:设置表格显示哪些列,列名及与数据源中列名的对应,如果使用了toolbar,还要设置一下各Button的事件处理代码,其它属性根据需要设置(对属性不清楚的,查阅官方文档);
下面是全部前台代码:
<!DOCTYPE html PUBLIC "-//W3C//DTD HTML 4.01 Transitional//EN" "http://www.w3.org/TR/html4/loose.dtd">

<html>

<head>

    <meta http-equiv="Content-Type" content="text/html; charset=UTF-8">

    <title>角色列表</title>

    <link rel="stylesheet" type="text/css" href="../JQueryEasyUI/themes/default/easyui.css">

    <link rel="stylesheet" type="text/css" href="../JQueryEasyUI/themes/icon.css">

    <script type="text/javascript" src="../JQueryEasyUI/jquery-1.4.4.min.js"></script>

    <script type="text/javascript" src="../JQueryEasyUI/jquery.easyui.min.js"></script>

    <script type="text/javascript" src="../JQueryEasyUI/locale/easyui-lang-zh_CN.js"></script>

    <script type="text/javascript">

        $(function () {

            $('#roleList').datagrid({

                title: '',

                loadMsg: "数据加载中,请稍后……",

                nowrap: false,

                striped: true,

                collapsible: true,

                url: '../ashx/RoleHandler.ashx',

                pageList: [10, 15, 20, 25, 30, 40, 50],

                pageSize: 15,

                sortName: 'RoleSort',

                sortOrder: 'asc',

                remoteSort: false,

                idField: 'RoleCode',

                frozenColumns: [[

                    { field: 'ck', checkbox: true },

                    { title: '角色编码', field: 'RoleCode', width: 120, align: 'center', sortable: true }

                ]],

                columns: [[

                    { field: 'RoleName', title: '角色名称', width: 120, align: 'center', sortable: true },

                    { field: 'RoleSort', title: '默认排序', width: 80, align: 'center', sortable: true },

                    { field: 'opt', title: '操作', width: 100, align: 'center',

                        formatter: function (value, rec) {

                            return '<a href="#" onclick="parent.addTab(\'编辑角色[' + rec.RoleName + ']\', \'Role/Edit.aspx?RoleCode=' + rec.RoleCode + '&RoleName=' + rec.RoleName + '\')"><span style="color:red">编辑</span></a>';

                        }

                    }

                ]],

                pagination: true,

                rownumbers: true,

                onLoadSuccess: function () {

                    $('.datagrid-toolbar').append($('#txtSearch'));

                    $('#txtSearch').show();

                },

                toolbar: [

                 {

                     id: 'btnadd',

                     text: '添加',

                     iconCls: 'icon-add',

                     handler: function () {

                         parent.addTab('添加角色', 'Role/Edit.aspx');

                     }

                 }, {

                     id: 'btncut',

                     text: '删除',

                     iconCls: 'icon-cut',

                     handler: function () {

                         var codes = getSelections();

                         if (codes == '') {

                             $.messager.alert('提示消息', '请选择要删除的数据!', 'info');

                         } else {

                             $.messager.confirm('提示消息', '确定要删除所选数据吗?', function (r) {

                                 if (r) {

                                     $('#processWindow').window('open', 'aadasdsads');

                                     $.ajax({

                                         url: '../ashx/RoleHandler.ashx?Codes=' + codes,

                                         type: 'post',

                                         datatype: 'text',

                                         success: function (returnValue) {

                                             if (returnValue) {

                                                 $('#processWindow').window('close');

                                                 $('#roleList').datagrid('reload');

                                                 $('#roleList').datagrid('clearSelections');

                                             }

                                         }

                                     });

                                 }

                             });

                         }

                     }

                 }, '-',

                {

                    id: 'btnSearch',

                    text: '搜索',

                    disabled: false,

                    iconCls: 'icon-search',

                    handler: function () {

                        $('#roleList').datagrid('options').url = '../ashx/RoleHandler.ashx?RoleName=' + escape($('#txtSearch').val());

                        $('#roleList').datagrid("reload");

                    }

                }

                ]

            });

        });

        function getSelections() {

            var ids = [];

            var rows = $('#roleList').datagrid('getSelections');

            for (var i = 0; i < rows.length; i++) {

                ids.push(rows[i].RoleCode);

            }

            return ids.join(',');

        }

    </script>

</head>

<body>

    <table id="roleList">

    </table>

    <div id="processWindow" class="easyui-window" closed="true" modal="true" title="提示消息"

        style="width: 300px; height: 60px;">

        <div id="windowContent" class="general-font">

            <img src="../JQueryEasyUI/themes/gray/images/panel_loading.gif" />

            操作进行中,请稍后...

        </div>

    </div>

    <input type="text" id="txtSearch" title="请输入角色名称" style="display: none;" />

</body>

</html>
2)查询数据并生成JSON格式的数据返回
(1)datagrid请求的URL是../ashx/RoleHandler.ashx,在RoleHandler.ashx的ProcessRequest(HttpContext context)方法中构造后输出即可。如何将查询出来的数据构造为JSON格式的数据,参考这里。
(2)JsonName请使用“rows”,不要使用实体类名
5、添加
调用主窗体中的addTab方法创建新标签,定义toolbar时已经写了相关代码
id: 'btnadd',

text: '添加',

iconCls: 'icon-add',

handler: function () {

  parent.addTab('添加角色', 'Role/Edit.aspx');

}
6、编辑
在定义列的时候已经写了相关代码
{ field: 'opt', title: '操作', width: 100, align: 'center',

     formatter: function (value, rec) {

           return '<a href="#" onclick="parent.addTab(\'编辑角色[' + rec.RoleName + ']\', \'Role/Edit.aspx?RoleCode=' + rec.RoleCode + '&RoleName=' + rec.RoleName + '\')"><span style="color:red">编辑</span></a>';

     }

}
7、删除
调用getSelections()函数获得选中项的标识值的列表(以","间隔),然后请求一般处理程序RoleHandler.ashx并把获取的值的列表作为参数实现删除。
$('#roleList').datagrid('clearSelections') ,清空已获得的选中项的标识值的列表。
8、查询
没找到可以直接在toolbar中添加查询输入框等的方法,于是通过下面方法来实现
1)在body中添加如下代码:<input type="text" id="txtSearch" title="请输入角色名称" style="display: none;" />
2)添加datagrid的onLoadSuccess事件及处理代码:
onLoadSuccess: function () {

    $('.datagrid-toolbar').append($('#txtSearch'));

    $('#txtSearch').show();

}
$('.datagrid-toolbar') 就是datagrid的toobar。
3)toolbar中的搜索按钮定义及事件处理代码
id: 'btnSearch',

text: '搜索',

disabled: false,

iconCls: 'icon-search',

handler: function () {

    $('#roleList').datagrid('options').url = '../ashx/RoleHandler.ashx?RoleName=' + escape($('#txtSearch').val());

    $('#roleList').datagrid("reload");

}
9、分页
要显示分页栏(pager),在定义datagrid代码中需将属性pagination的值设置为true,这时默认一页显示10行数据,可选择的pageSize为10,20,30,40,50,如果不用默认可以自定义:
pageSize: 15,
当客户端发起新的请求时,rows(每页显示的行数)和page(新的页码值)会作为参数一起传递,所以服务器端只要获得这两个参数的值就知道一行显示多少条数据和页码是多少了。
context.Request["rows"] ;
context.Request["page"] ;
【别自作聪明用context.Request.QueryString["rows"],道理都明白】
pager的其它事件可以不做任何处理。
全部参考代码(略去引用命名空间):
    public class RoleHttpHandler : IHttpHandler

    {

        #region IHttpHandler Members

        public bool IsReusable

        {

            get { return true; }

        }

        public void ProcessRequest(HttpContext context)

        {

            context.Response.ContentType = "text/plain";

            BaseSqlHelper helper = new BaseSqlHelper();

            if (!String.IsNullOrEmpty(GetRoleCodes(context)))

            {

                String codes = GetRoleCodes(context);

                codes = "'" + codes.Replace(",", "','") + "'";

                helper.ExecuteNonQuery(string.Format("delete from Roles where RoleCode in({0})", codes));

                context.Response.Write("true");

            }

            else

            {

                DataTable dt = new DataTable();

                string sqlWhere = string.Format(" from Roles where RoleVisible=1 and RoleName like '%{0}%'", GetRoleName(context));

                helper.FillDataTable("select * " + sqlWhere, GetPageSize(context), GetPageIndex(context), dt);

                IList<Roles> list = new List<Roles>();

                if (dt != null && dt.Rows.Count > 0)

                {

                    foreach (DataRow dr in dt.Rows)

                    {

                        list.Add(new Roles()

                        {

                            RoleCode = dr["RoleCode"].ToString(),

                            RoleName = dr["RoleName"].ToString(),

                            RoleSort = int.Parse(dr["RoleSort"].ToString())

                        });

                    }

                }

                if (list.Count > 0)

                {

                    dt.Clear();

                    BaseFormatToJson toJson = new BaseFormatToJson();

                    string data = toJson.ListToJson<Roles>(list, "rows");

                    data = data.Substring(1);

                    context.Response.Write(

                        "{ \"total\":" +

                        helper.ExecuteScalar("select count(*) "+sqlWhere) + "," +data);

                }

            }

        }

        public String GetRoleCodes(HttpContext context)

        {

            return context.Request["Codes"];

        }

        public Int32 GetPageSize(HttpContext context)

        {

            try

            {

                return Int32.Parse(context.Request["rows"].ToString());

            }

            catch

            {

                return 10;

            }

        }

        public Int32 GetPageIndex(HttpContext context)

        {

            try

            {

                return Int32.Parse(context.Request["page"].ToString());

            }

            catch

            {

                return 1;

            }

        }

        public String GetRoleName(HttpContext context)

        {

            return context.Request["RoleName"];

        }

        #endregion

    }

}
10、禁止点击行时选中行,要选中行,仅能通过点击行前的CheckBox ,代码加在onLoadSuccess事件中:
onLoadSuccess: function () {

                    $('.datagrid-toolbar').append($('#txtSearch'));

                    $('#txtSearch').show();

                    //禁止点击行就选中

                    function bindRowsEvent() {

                        var panel = $('#List').datagrid('getPanel');

                        var rows = panel.find('tr[datagrid-row-index]');

                        rows.unbind('click').bind('click', function (e) {

                            return false;

                        });

                        rows.find('div.datagrid-cell-check input[type=checkbox]').unbind().bind('click', function (e) {

                            var index = $(this).parent().parent().parent().attr('datagrid-row-index');

                            if ($(this).attr('checked')) {

                                $('#List').datagrid('selectRow', index);

                            } else {

                                $('#List').datagrid('unselectRow', index);

                            }

                            e.stopPropagation();

                        });

                    }

                    setTimeout(function () {

                        bindRowsEvent();

                    }, 10);

                },
11、我使用IE、FF、Chrome的最新版本进行测试,结果还是对IE(9 Beta)的兼容性最好。
ASP.NET网站权限设计实现(三)——套用JQuery EasyUI列表显示数据、分页、查询的更多相关文章
- 套用JQuery EasyUI列表显示数据、分页、查询
声明,本博客从csdn搬到cnblogs博客园了,以前的csdn不再更新,朋友们可以到这儿来找我的文章,更多的文章会发表,谢谢关注! 有时候闲的无聊,看到extjs那么肥大,真想把自己的项目改了,最近 ...
- ASP.NET网站权限设计实现(二)——角色权限绑定
1.关于使用的几张表的说明 (1)Module:模块表,记录模块名称.编码等模块基本数据. (2)Permissions:权限表,记录所有模块权限distinct之后的数据. (3)Modu ...
- ASP.NET网站权限设计实现(一)——使用PowerDesigner进行数据库设计
这里用PowerDesigner做一个初步的设计,后面可能会有修改. 1.启动PowerDesigner新建物理数据模型 2.工具栏 3.新建表模型 4.添加第一张表,可以双击表或右键菜单打开下面窗口 ...
- WisDom.Net 框架设计(五) 权限设计
WisDom.Net --权限设计 1.需求分析 基本在所有的管理系统中都离不开权限管理.可以这么说,权限管理是管理系统的核心所在. 权限管理说白一些就是每个人能够做什么,不能够做什么.可以说 ...
- ASP.NET 网站管理工具介绍
有没有感觉对 web.config 的操作很烦呢? 老是手动来编辑 web.config 确实挺麻烦的, 不过自 ASP.NET 2.0 起便有了 ASP.NET 网站管理工具, 这个工具呢,其实就是 ...
- asp.net web网站权限系统的简单设计
权限设计总结一句话就是:拥有权限的主体来管控系统的各种资源资源,及在资源上体现的各种操作. 概括来说就是,权限离不开三要素: 1:权限的主体 2:管控的资源 3:各种操作 现对三要素分别做简单的阐述 ...
- ASP.NET MVC +EasyUI 权限设计(三)基础模块
请注明转载地址:http://www.cnblogs.com/arhat 在上一章中呢,我们基本上搭建好了环境,那么本章我们就从基础模块开始写起.由于用户,角色,动作三个当中,都是依赖与动作的,所以本 ...
- ASP.NET MVC+EF框架+EasyUI实现权限管理系列(13)-权限设计
原文:ASP.NET MVC+EF框架+EasyUI实现权限管理系列(13)-权限设计 ASP.NET MVC+EF框架+EasyUI实现权限管系列 (开篇) (1):框架搭建 (2):数据 ...
- ASP.NET MVC +EasyUI 权限设计(二)环境搭建
请注明转载地址:http://www.cnblogs.com/arhat 今天突然发现博客园出问题了,老魏使用了PC,手机,平板都访问博客园了,都是不能正常的访问,原因是不能加载CSS,也就是不能访问 ...
随机推荐
- win7下安装node及出现的npm问题
按照官网下载安装,选择 Windows Installer (.msi):,一直next安装,默认安装在C:\Program Files\nodejs下,环境变量会自动添加 如果安装后,打开cmd输入 ...
- 简话Angular 03 Angular内置表达式大全
一句话: 大多数html标签属性和事件都有一个对应的ng指令 说明:这些指令和原生html最大的区别就是可以动态更新.比如一个div的样式用ng-class后,我们就可以随意应用css class. ...
- 简话Angular 01 初识Angular 数据绑定
1. Angular有哪些突出优点 1) MVC 基于Html-Javascript 2) 依赖注入 3) 数据双向绑定,响应式页面设计 4) 模块化,自定义指令 2. 简话数据绑定 1) 代码: & ...
- 'PostBuildEvent' failed with error code '1' 'Unspecified error'( PostBuildEvent”失败,错误代码为“1”。“未指定的错误” )
这种错误很坑,2年前遇到一次,现在有遇到了(主要记不得上次怎么解决了的) 主要在于js文件文件修改保存的时候得以ansi格式保存,不能以utf-8 http://files.cnblogs.com/f ...
- DevExpress v17.2新版亮点—.NET Reporting篇(二)
用户界面套包DevExpress v17.2日前终于正式发布,本站将以连载的形式为大家介绍各版本新增内容.本文将介绍了.NET Reporting v17.2 的新功能,快来下载试用新版本! 支持AS ...
- 《C语言中分配了动态内存后一定要释放吗?》
问:比如main函数里有一句 malloc(),后面没有free()1.那么当main结束后,动态分配的内存不会随之释放吗?2.如果程序结束能自动释放,那么还加上free(),是出于什么考虑? 答: ...
- Bypass WAF
一.绕过命令执行: 很多WAF会限制参数字符不能为可以执行的命令,诸如ls.nc等,如果直接使用这些字符会直接被WAF拦截,但是可以通过这种的方式绕过这一限制 1.? 符号:这个符号表示条件测试,比如 ...
- Java内存不足之PermGen space错误探究
一.Java 程序的运行机制与普通程序,如C或C++ 程序的运行机制有很大的区别. 普通程序运行之前必须首先编译成可执行的二进制码或机器码.机器码是与底层的硬件结构相关的,即使书写源代码的时候没有利用 ...
- golang多进程测试代码
package main import ( "fmt" "runtime" ) func test(c chan bool, n int) { x := 0 f ...
- FreeModbus undefined reference to `pthread_create'
/********************************************************************************* * FreeModbus unde ...