APScheduler学习
说明
安装:
pip install apscheduler
首先来看一个周一到周五每天早上6点半喊我起床的例子:
 from apscheduler.schedulers.blocking import BlockingScheduler

 from datetime import datetime

 # 输出时间

 def job():

     print(datetime.now().strftime("%Y-%m-%d %H:%M:%S"))

 # BlockingScheduler

 scheduler = BlockingScheduler()

 scheduler.add_job(job, 'cron', day_of_week='1-5', hour=6, minute=30)

 scheduler.start()
APScheduler四个组件
触发器(trigger)
- date: 特定的时间点触发
- interval: 固定时间间隔触发
- cron: 在特定时间周期性地触发
作业存储(job store)
执行器(executor)
- ProcessPoolExecutor
- ThreadPoolExecutor
调度器(scheduler)
配置调度器
 from apscheduler.schedulers.blocking import BlockingScheduler

 from datetime import datetime

 def job():

     print(datetime.now().strftime("%Y-%m-%d %H:%M:%S"))

 # 定义BlockingScheduler

 sched = BlockingScheduler()

 sched.add_job(job, 'interval', seconds=5)

 sched.start()
 from datetime import datetime

 from pymongo import MongoClient

 from apscheduler.schedulers.blocking import BlockingScheduler

 from apscheduler.jobstores.memory import MemoryJobStore

 from apscheduler.jobstores.mongodb import MongoDBJobStore

 from apscheduler.executors.pool import ThreadPoolExecutor, ProcessPoolExecutor

 # MongoDB 参数

 host = '127.0.0.1'

 port = 27017

 client = MongoClient(host, port)

 # 输出时间

 def job():

     print(datetime.now().strftime("%Y-%m-%d %H:%M:%S"))

 # 存储方式

 jobstores = {

     'mongo': MongoDBJobStore(collection='job', database='test', client=client),

     'default': MemoryJobStore()

 }

 executors = {

     'default': ThreadPoolExecutor(10),

     'processpool': ProcessPoolExecutor(3)

 }

 job_defaults = {

     'coalesce': False,

     'max_instances': 3

 }

 scheduler = BlockingScheduler(jobstores=jobstores, executors=executors, job_defaults=job_defaults)

 scheduler.add_job(job, 'interval', seconds=5, jobstore='mongo')

 scheduler.start()

对 job 的操作
添加 job
- add_job()
- scheduled_job()
 from apscheduler.schedulers.blocking import BlockingScheduler

 sched = BlockingScheduler()

 # 装饰器

 @sched.scheduled_job('interval', id='my_job_id', seconds=5)

 def job_function():

     print("Hello World")

 # 开始

 sched.start()
移除 job
- remove_job()
- job.remove()
 job = scheduler.add_job(myfunc, 'interval', minutes=2)

 job.remove()

 # id

 scheduler.add_job(myfunc, 'interval', minutes=2, id='my_job_id')

 scheduler.remove_job('my_job_id')
暂停和恢复 job
 apscheduler.job.Job.pause()

 apscheduler.schedulers.base.BaseScheduler.pause_job()
恢复一个 job:
 apscheduler.job.Job.resume()

 apscheduler.schedulers.base.BaseScheduler.resume_job()
希望你还记得 apscheduler.job.Job 是 add_job() 返回的实例
获取 job 列表
修改 job
 job.modify(max_instances=6, name='Alternate name')

 modify_job('my_job_id', trigger='cron', minute='*/5')
关闭 job
 scheduler.shutdown()

 scheduler.shutdown(wait=False)
scheduler 事件
 def my_listener(event):

     if event.exception:

         print('The job crashed :(')

     else:

         print('The job worked :)')

 # 添加监听器

 scheduler.add_listener(my_listener, EVENT_JOB_EXECUTED | EVENT_JOB_ERROR)
trigger 规则
date
- run_date (datetime|str) – the date/time to run the job at
- timezone (datetime.tzinfo|str) – time zone for run_date if it doesn’t have one already
 from datetime import date

 from apscheduler.schedulers.blocking import BlockingScheduler

 sched = BlockingScheduler()

 def my_job(text):

     print(text)

 # The job will be executed on November 6th, 2009

 sched.add_job(my_job, 'date', run_date=date(2009, 11, 6), args=['text'])

 sched.add_job(my_job, 'date', run_date=datetime(2009, 11, 6, 16, 30, 5), args=['text'])

 sched.add_job(my_job, 'date', run_date='2009-11-06 16:30:05', args=['text'])

 # The 'date' trigger and datetime.now() as run_date are implicit

 sched.add_job(my_job, args=['text'])

 sched.start()
cron
- year (int|str) – 4-digit year
- month (int|str) – month (1-12)
- day (int|str) – day of the (1-31)
- week (int|str) – ISO week (1-53)
- day_of_week (int|str) – number or name of weekday (0-6 or mon,tue,wed,thu,fri,sat,sun)
- hour (int|str) – hour (0-23)
- minute (int|str) – minute (0-59)
- second (int|str) – second (0-59)
- start_date (datetime|str) – earliest possible date/time to trigger on (inclusive)
- end_date (datetime|str) – latest possible date/time to trigger on (inclusive)
- timezone (datetime.tzinfo|str) – time zone to use for the date/time calculations (defaults to scheduler timezone)
中文释义:
|
参数
|
说明
|
|
(int|str)
|
表示参数既可以是int类型,也可以是str类型
|
|
(datetime | str)
|
表示参数既可以是datetime类型,也可以是str类型
|
|
year(int or str)
|
年,4位数字
|
|
month(int or str)
|
月(范围1-12)
|
|
day(int or str)
|
日(范围1-31)
|
|
week(int or str)
|
周(范围1-53)
|
|
day_of_week(int or str)
|
周内第几天或者星期几(范围0-6或者mon,tue,wed,thu,fri,stat,sun)
|
|
hour(int or str)
|
时(0-23)
|
|
minute(int or str)
|
分(0-59)
|
|
second(int or str)
|
秒(0-59)
|
|
start_date(datetime or str)
|
最早开始日期(含)
|
|
end_date(datetime or str)
|
最晚结束日期(含)
|
| timezone(datetime.tzinfo or str) | 指定时区 |
表达式:
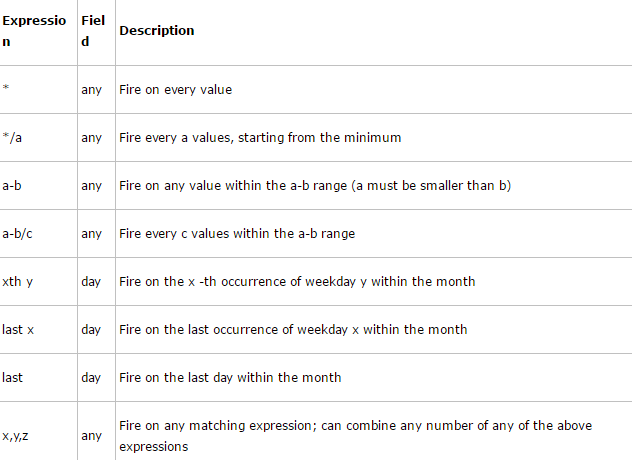
示例:
 from apscheduler.schedulers.blocking import BlockingScheduler

 def job_function():

     print("Hello World")

 # BlockingScheduler

 sched = BlockingScheduler()

 # Schedules job_function to be run on the third Friday

 # of June, July, August, November and December at 00:00, 01:00, 02:00 and 03:00

 sched.add_job(job_function, 'cron', month='6-8,11-12', day='3rd fri', hour='0-3')

 # Runs from Monday to Friday at 5:30 (am) until 2014-05-30 00:00:00

 sched.add_job(job_function, 'cron', day_of_week='mon-fri', hour=5, minute=30, end_date='2014-05-30')

 sched.start()
interval
- weeks (int) – number of weeks to wait
- days (int) – number of days to wait
- hours (int) – number of hours to wait
- minutes (int) – number of minutes to wait
- seconds (int) – number of seconds to wait
- start_date (datetime|str) – starting point for the interval calculation
- end_date (datetime|str) – latest possible date/time to trigger on
- timezone (datetime.tzinfo|str) – time zone to use for the date/time calculations
 from datetime import datetime

 from apscheduler.schedulers.blocking import BlockingScheduler

 def job_function():

     print("Hello World")

 # BlockingScheduler

 sched = BlockingScheduler()

 # Schedule job_function to be called every two hours

 sched.add_job(job_function, 'interval', hours=2)

 # The same as before, but starts on 2010-10-10 at 9:30 and stops on 2014-06-15 at 11:00

 sched.add_job(job_function, 'interval', hours=2, start_date='2010-10-10 09:30:00', end_date='2014-06-15 11:00:00')

 sched.start()
踩坑记录:
1、cron编写场景为每周五上午十点执行一次时,day_of_week字段为4,即当前星期数-1,也可以写成'fri'
文章来源:
APScheduler学习的更多相关文章
- 定时任务框架APScheduler学习详解
APScheduler简介 在平常的工作中几乎有一半的功能模块都需要定时任务来推动,例如项目中有一个定时统计程序,定时爬出网站的URL程序,定时检测钓鱼网站的程序等等,都涉及到了关于定时任务的问题,第 ...
- python 学习定时任务apscheduler模块
最近在解决定时任务问题找到了apscheduler模块,贴一段代码 from apscheduler.schedulers.blocking import BlockingSchedulerimpor ...
- 使用APScheduler启动Django服务时自动运行脚本(可设置定时运行)
Django搭建的服务器一般都用作WEB网站进行访问,通常的形式是用户访问网站或点击按钮发送请求,Django检测到请求后进行相应的试图函数处理后返回页面给用户. 但是,我们有时会需要有一些后台自动运 ...
- 全网最全的Windows下Anaconda2 / Anaconda3里正确下载安装用来定时任务apscheduler库(图文详解)
不多说,直接上干货! Anaconda2 里 PS C:\Anaconda2\Scripts> PS C:\Anaconda2\Scripts> pip.exe install apsc ...
- Python中定时任务框架APScheduler
前言 大家应该都知道在编程语言中,定时任务是常用的一种调度形式,在Python中也涌现了非常多的调度模块,本文将简要介绍APScheduler的基本使用方法. 一.APScheduler介绍 APSc ...
- 学习Python要知道哪些重要的库和工具
本文转自:https://github.com/jobbole/awesome-python-cn 环境管理 管理 Python 版本和环境的工具 p:非常简单的交互式 python 版本管理工具. ...
- Python中定时任务框架APScheduler的快速入门指南
前言 大家应该都知道在编程语言中,定时任务是常用的一种调度形式,在Python中也涌现了非常多的调度模块,本文将简要介绍APScheduler的基本使用方法. 一.APScheduler介绍 APSc ...
- 一个Python爬虫工程师学习养成记
大数据的时代,网络爬虫已经成为了获取数据的一个重要手段. 但要学习好爬虫并没有那么简单.首先知识点和方向实在是太多了,它关系到了计算机网络.编程基础.前端开发.后端开发.App 开发与逆向.网络安全. ...
- 从直播编程到直播教育:LiveEdu.tv开启多元化的在线学习直播时代
2015年9月,一个叫Livecoding.tv的网站在互联网上引起了编程界的注意.缘于Pingwest品玩的一位编辑在上网时无意中发现了这个网站,并写了一篇文章<一个比直播睡觉更奇怪的网站:直 ...
随机推荐
- FlyWay工作原理
本文译自Flyway官方文档,原文地址https://flywaydb.org/getstarted/how 当你最开始将FlyWay指向一个空数据库时. 它会试着去查找schema历史表,如果此时数 ...
- postman设置全局变量
//处理token var jsn = JSON.parse(responseBody) console.log(jsn.access_token) //把access_token设置到全局变量中 p ...
- 01-使用pipenv管理项目环境
一.使用pipenv管理项目环境 首先为什么我们不在真实环境下做开发呢?真实环境的一些包被其他服务所依赖,我们安装的包和模块都混杂在一起,这样不便于项目管理,还有可能出现意想不到的错误,于是就出现了包 ...
- 【GTK编程】安装与测试
版权声明:本文为博主原创文章,转载请注明出处. https://www.cnblogs.com/YaoYing/ 前言 领导让做个类似平板触摸的GUI程序,通过触摸两块区域,实现背景图片的左右切换.本 ...
- CodeForces - 556D Case of Fugitive (贪心+排序)
Andrewid the Android is a galaxy-famous detective. He is now chasing a criminal hiding on the planet ...
- Java String indexOf()方法
public class Test { public static void main(String[] args) { String s = "xXccxxxXX"; // 从头 ...
- JS正则表达式语法(含ES6)(表格简要总结)
文章目录 JS正则表达式 1. JS中正则表达式定义 2. 直接量字符 3. 字符类 4. 重复字符 5. 选择,分组和引用 6. 指定匹配位置 7. 修饰符 8. String 方法 9. RegE ...
- JS---案例:设置div的宽度
案例:设置div的宽度 <!DOCTYPE html> <html lang="en"> <head> <meta charset=&qu ...
- JS---BOM基本知识 (顶级对象,系统对话框,加载事件,location对象, history对象, navigator对象)
BOM JavaScript分三个部分: 1. ECMAScript标准---基本语法 2. DOM--->Document Object Model 文档对象模型,操作页面元素的 3. BOM ...
- git 常用操作汇总
1. 如何查看当前分支是从哪个分支创建来的? git reflog --date=local 当前分支名称 2. 查看当前分支 git branch 当前分支前面会显示 * 号 3.切换到某个分支 ...