
嵌入式Linux内核+根文件系统构建工具-Buildroot 快速入手指导【转】
本文转载自:https://my.oschina.net/freeblues/blog/596448
嵌入式Linux内核+根文件系统构建工具-Buildroot 快速入手指导
buildroot 是一款专门用来定制嵌入式 Linux 的内核和根文件系统(rootfs) 的开源工具, 非常强大兼方便, 不过对于新手来说, 过多的配置项明显有些难度, 本文的目标就是简要介绍这款工具, 让新手迅速入门.
目标:
- 1 新手需要了解的2个目录和1个文件
- 2 熟悉该工具的基本命令 ;
- 3 构建出一个内核和一个根文件系统
练习:
- 1 查看针对特定开发板的典型配置文件的选项
- 2 利用工具自带的配置文件生成一个 Linux 内核和根文件系统;
首先是获取该工具, 在 github 上, 命令如下:
git clone https://github.com/buildroot/buildroot
进入目录, 查看:
pi@rpi /opt/github/buildroot $ ls -al

total 420

drwxr-xr-x   15 root root   4096 Dec 24 21:18 .

drwxr-xr-x   73 git  git    4096 Jan  3 08:01 ..

drwxr-xr-x    2 root root   4096 Dec 24 21:15 arch

drwxr-xr-x   25 root root   4096 Dec 24 21:15 board

drwxr-xr-x   15 root root   4096 Dec 24 21:15 boot

-rw-r--r--    1 root root 146433 Dec 24 21:15 CHANGES

-rw-r--r--    1 root root  44501 Dec 24 21:16 .config

-rw-r--r--    1 root root  19111 Dec 24 21:15 Config.in

-rw-r--r--    1 root root  42879 Dec 24 21:15 Config.in.legacy

drwxr-xr-x    2 root root   4096 Dec 24 21:15 configs

-rw-r--r--    1 root root  17987 Dec 24 21:15 COPYING

-rw-r--r--    1 root root   1246 Dec 24 21:15 .defconfig

drwxr-xr-x    5 root root   4096 Dec 24 21:15 docs

drwxr-xr-x   15 root root   4096 Dec 24 21:15 fs

drwxr-xr-x    8 root root   4096 Dec 24 21:18 .git

-rw-r--r--    1 root root    125 Dec 24 21:15 .gitignore

drwxr-xr-x    2 root root   4096 Dec 24 21:15 linux

-rw-r--r--    1 root root  34899 Dec 24 21:15 Makefile

-rw-r--r--    1 root root   2432 Dec 2421:15 Makefile.legacy

drwxr-xr-x    3 root root   4096 Dec 24 21:18 output

drwxr-xr-x 1266 root root  36864 Dec 24 21:15 package

-rw-r--r--    1 root root    972 Dec 2421:15 README

drwxr-xr-x   11 root root   4096 Dec 24 21:15 support

drwxr-xr-x    3 root root   4096 Dec 24 21:15 system

drwxr-xr-x    5 root root   4096 Dec 24 21:15 toolchain

pi@rpi /opt/github/buildroot $
1. 新手需要了解的2个目录和1个文件
先说目录:
- 目录1:
configs
一个是 configs 目录, 存放着工具提供的一些特定系统的构建配置, 换句话说就是一些使用比较广泛的 Linux 嵌入式系统的构建配置文件, 例如, 我们熟悉的树莓派1 raspberrypi_defconfig 和2 raspberrypi2_defconfig 的构建配置文件就在其中, 我们可以看一下内容:
pi@rpi /opt/github/buildroot $ ls ./configs

altera_sockit_defconfig        calao_usb_a9g20_lpw_defconfig        minnowboard_defconfig              qemu_ppc_virtex_ml507_defconfig

armadeus_apf27_defconfig       ci20_defconfig                       minnowboard_max_defconfig          qemu_sh4_r2d_defconfig

armadeus_apf28_defconfig       cubieboard2_defconfig                mx53loco_defconfig                 qemu_sparc_ss10_defconfig

armadeus_apf51_defconfig       cubieboard_defconfig                 nitrogen6x_defconfig               qemu_x86_64_defconfig

armadeus_apf9328_defconfig     freescale_imx28evk_defconfig         olimex_imx233_olinuxino_defconfig  qemu_x86_defconfig

arm_foundationv8_defconfig     freescale_imx31_3stack_defconfig     openblocks_a6_defconfig            qemu_xtensa_lx60_defconfig

at91rm9200df_defconfig         freescale_imx6dlsabreauto_defconfig  pandaboard_defconfig               qmx6_defconfig

at91sam9260dfc_defconfig       freescale_imx6dlsabresd_defconfig    qemu_aarch64_virt_defconfig        raspberrypi2_defconfig

at91sam9260eknf_defconfig      freescale_imx6qsabreauto_defconfig   qemu_arm_nuri_defconfig            raspberrypi_defconfig

at91sam9261ek_defconfig        freescale_imx6qsabresd_defconfig     qemu_arm_versatile_defconfig       raspberrypi_dt_defconfig

at91sam9263ek_defconfig        freescale_imx6sololiteevk_defconfig  qemu_arm_vexpress_defconfig        riotboard_defconfig

at91sam9g20dfc_defconfig       freescale_mpc8315erdb_defconfig      qemu_microblazebe_mmu_defconfig    s6lx9_microboard_defconfig

at91sam9g45m10ek_defconfig     freescale_p1010rdb_pa_defconfig      qemu_microblazeel_mmu_defconfig    sheevaplug_defconfig

atmel_xplained_defconfig       freescale_p2020ds_defconfig          qemu_mips64el_malta_defconfig      telit_evk_pro3_defconfig

beaglebone_defconfig           gnublin_defconfig                    qemu_mips64_malta_defconfig        ts5x00_defconfig

calao_qil_a9260_defconfig      integrator926_defconfig              qemu_mipsel_malta_defconfig        udoo_quad_defconfig

calao_snowball_defconfig       kb9202_defconfig                     qemu_mips_malta_defconfig          wandboard_defconfig

calao_tny_a9g20_lpw_defconfig  lego_ev3_defconfig                   qemu_ppc64_pseries_defconfig       zedboard_defconfig

calao_usb_a9260_defconfig      loongson1c_smartloong_defconfig      qemu_ppc_g3beige_defconfig

calao_usb_a9263_defconfig      mini2440_defconfig                   qemu_ppc_mpc8544ds_defconfig

pi@rpi /opt/github/buildroot $
- 目录2:
output
另一个是 output 目录, 存放着你构建好之后的输出, 在 output/images/ 目录下放着构建好的内核和根文件系统, 我们可以在开始构建之前看看该目录的结构:
pi@rpi /opt/github/buildroot $ tree ./output

./output

└── build

    └── buildroot-config

        ├── conf.o

        ├── lxdialog

        │   ├── checklist.o

        │   ├── inputbox.o

        │   ├── menubox.o

        │   ├── textbox.o

        │   ├── util.o

        │   └── yesno.o

        ├── mconf

        ├── mconf.o

        ├── zconf.hash.c

        ├── zconf.lex.c

        └── zconf.tab.o

3 directories, 12 files

pi@rpi /opt/github/buildroot $
- 文件:
.config
一个文件就是 .config, 它就是构建时使用的配置文件, 举个例子, 如果我们打算使用工具自带的配置文件来构建树莓派2的内核和根文件系统, 那么首先把它从 configs 目录拷出来, 覆盖掉当前目录下的 .config 文件, 命令如下:
cp ./configs/ raspberrypi2_defconfig ./.config
讲解了简单的2个目录和1个文件, 接下来说一下基本命令
2. 熟悉该工具的基本命令
buildroot 基本的命令就是 make, 对于新手来说只需要执行2次:
- 第1次带参数执行用来定制系统: 定制系统的命令为:
make menuconfig
执行后会启动一个配置菜单, 进去之后可以根据你自己的需要增加或裁剪系统功能, 然后选择保存, 所有的配置会被保存为当前目录下的 .config 文件.
执行界面就是这个样子: 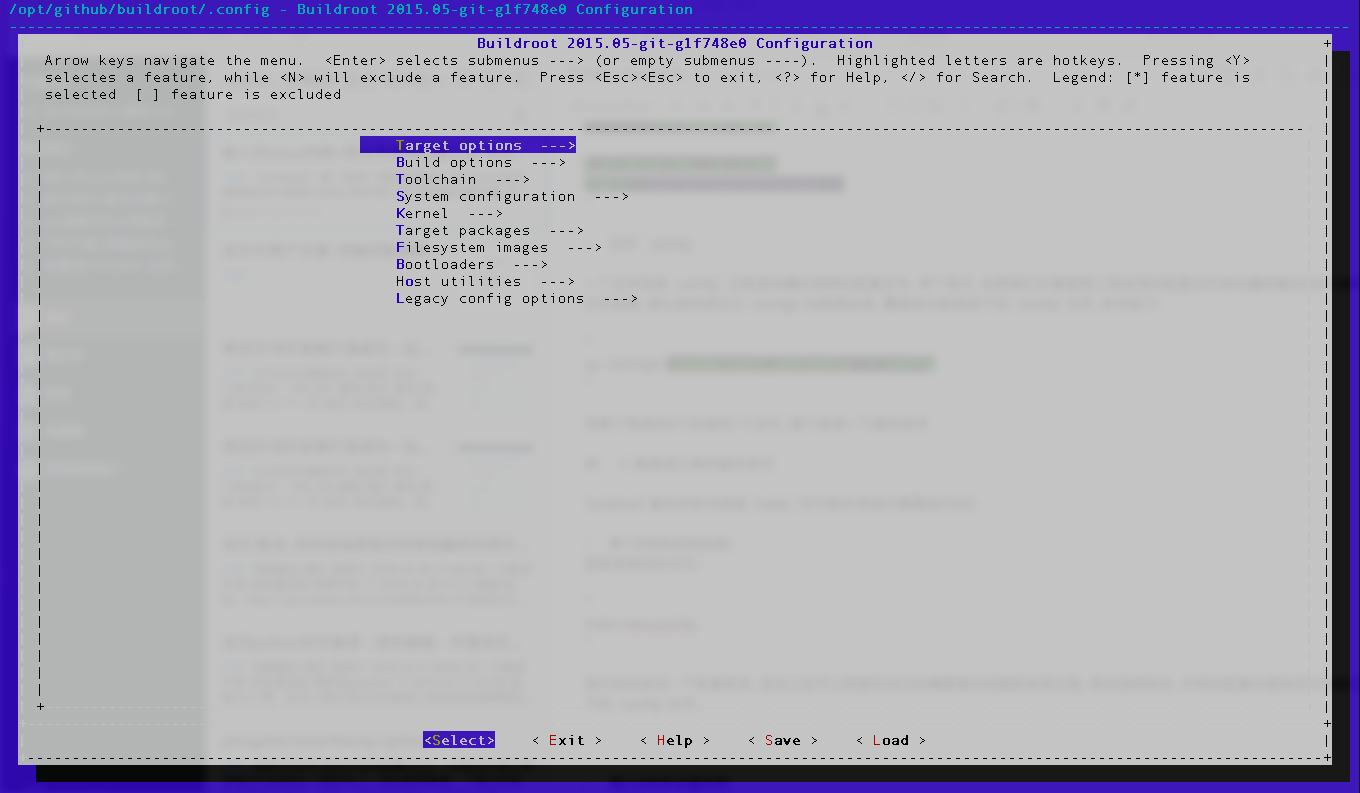
也可以通过 load 选项加载工具自带的配置文件, 看看典型配置是什么样的.
- 第2次不带参数执行用来构建系统: 构建命令为:
make
会构建比较长的时间, 构建完成后可以查看刚才说过的 ./output/images/ 目录, 恰好我刚刚完成一次对龙芯智龙开源开发板的根文件系统构建, 我们可以看看:
git@debian:/opt/github/pengphai-buildroot$ ls -al ./output

总用量 28

drwxr-xr-x  6 git git 4096 8月   6 06:51 .

drwxr-xr-x 16 git git 4096 8月   6 06:51 ..

drwxr-xr-x 54 git git 4096 8月   6 07:36 build

drwxr-xr-x  5 git git 4096 8月   6 07:12 host

drwxr-xr-x  2 git git 4096 8月   6 07:36 images

lrwxrwxrwx  1 git git   81 8月   6 06:51 staging -> /opt/github/pengphai-buildroot/output/host/usr/mipsel-buildroot-linux-gnu/sysroot

drwxr-xr-x 19 git git 4096 8月   6 07:36 target

git@debian:/opt/github/pengphai-buildroot$ ls -al ./output/images

总用量 22956

drwxr-xr-x 2 git git     4096 8月   6 07:36 .

drwxr-xr-x 6 git git     4096 8月   6 06:51 ..

-rw------- 1 git git 23498112 8月   6 07:36 rootfs.yaffs2img

git@debian:/opt/github/pengphai-buildroot$
3. 构建出一个内核和一个根文件系统
命令很简单, 我们以树莓派2为例, 直接使用工具自带的配置文件, 命令如下:
pi@rpi /opt/github/buildroot $ sudo cp ./configs/raspberrypi2_defconfig ./config

pi@rpi /opt/github/buildroot $ sudo make
我是在树莓派2上执行的构建, 所以应该会有一个漫长的构建过程
===补充说明, 刚发现树莓派2的配置文件还有很多项没配置, 需要用户选择, 后续我写一个完全配置好的, 这个例子只会让新手疑惑
--结束
嵌入式Linux内核+根文件系统构建工具-Buildroot 快速入手指导【转】的更多相关文章
- linux 内核根文件系统
参考: http://blog.csdn.net/guopeixin/article/details/5962482 http://www.yunweipai.com/archives/1184.ht ...
- 小白自制Linux开发板 三. Linux内核与文件系统移植
上一篇完成了uboot的移植,但是想要愉快的在开发板上玩耍还需要移植Linux内核和文件系统. 1.Linux内核 事实上对于F1C100S/F1C200S,Linux官方源码已经对licheepi ...
- ubuntu下linux内核源码阅读工具和调试方法总结
http://blog.chinaunix.net/uid-20940095-id-66148.html 一 linux内核源码阅读工具 windows下当然首选source insight, 但是l ...
- 制作嵌入式linux内核
拿到一个嵌入式linux内核代码,首先make distclean 接下来,如果在x86平台,就直接make menuconfig,如果是在ARM平台,就直接make menuconfig ARCH= ...
- 嵌入式linux内核制作、根文件系统制作
嵌入式系统构成: 主要由bootloader.kernel.以及根文件系统三部分组成. 内核制作步骤: 制作嵌入式平台使用的linux内核制作方法与pc平台上的linux内核基本一致 1.清除原有配置 ...
- Linux之根文件系统的构建20160611
说一下LINUX根文件系统的构建: 制作文件系统 1. 交叉编译busybox 安装:make install CONFIG_PREFIX=/work/nfs_root/fs_mini_mdev_ne ...
- ARM-Linux移植之(四)——根文件系统构建
相关工具版本: busybox-1.7.0 arm-linux-4.3.2 linux-2.6.22 1.配置busybox并安装. 在我们的根文件系统中的/bin和/sbin目录下有各种命令的应 ...
- Linux内核,文件系统移植过程中出现的一些问题与解决办法
1.bootm地址和load address一样 此种情况下,bootm不会对uImage header后的zImage进行memory move的动作,而会直接go到entry point开始执行. ...
- 用SD卡下载uboot、linux内核和文件系统
1. 移植mtd-utils: a) 下载utd-utils 下载地址为ftp://ftp.infradead.org/pub/mtd-utils/b) 交叉编译mtd-utilsi 修改Make ...
随机推荐
- Android开发——查询/杀死手机里正在运行的进程
0. 前言 以前有同学好像做过一个叫"自习君"的App,开启后自动检测用户这一天的自习时间,在学校里宣传广告还打了不少.其实实现原理非常简单,在SQlite数据库(也可以通过文件) ...
- 03003_Http响应
1.Http协议 (1)状态码: (2)常用的状态码如下: 200 :请求成功: 302 :请求重定向: 304 :请求资源没有改变,访问本地缓存: 404 :请求资源不存在.通常是用户路径编写错误, ...
- 66. No EntityManager with actual transaction available for current thread【从零开始学】
[从零开始学习Spirng Boot-常见异常汇总] 具体异常信息: org.springframework.dao.InvalidDataAccessApiUsageException: No En ...
- 使用using current logfile实现DG备库实时更新
DG1是主库,DG2是备库:运行在最大可用模式. 实验一:未使用using current logfile参数时,备库在最大可用模式下,不能实时同步备库的更新 -此时需要等待主库进行归档---侧面证明 ...
- php的抽象类
php的抽象类 //定义一个老虎类 abstract class Tiger{ public abstract function climb(); } //定义一个孟加拉虎类 class MTiger ...
- for-else和wihle-else组合用法
当for和else组合一起使用的时候,for循环正常执行完毕,会执行else语句,否则,不会执行else语句 for i in range(10): if i == 2: break else: pr ...
- hdu6080(最小环)
题目 http://acm.hdu.edu.cn/showproblem.php?pid=6080 分析 很妙的思路,将里面的点集当作A,将外面的点集当作B 然后O(n^2)枚举两两B点,设一个是u, ...
- HashMap排序的问题
那么已知一个HashMap<Integer,User>集合, User有name(String)和 age(int)属性.请写一个方法实现对HashMap 的排序功能,该方法接收 Hash ...
- Node.js开发Web后台服务(转载)
原文:http://www.cnblogs.com/best/p/6204116.html 目录 一.简介 二.搭建Node.js开发环境 2.1.安装Node.js 2.2.安装IDE开发Node. ...
- jmeter的master远程运行和停止slave
jmeter可以部署成master-slave或者叫client-server模式,一个master(client)可以同时控制多个slave(server). 在linux系统下,master(cl ...