
RTSP 流相关工具介绍
RTSP (Real Time Streaming Protocol),实时流协议,是一种应用层协议,专为流媒体使用。本文将介绍 GStreamer, VLC, FFmpeg 这几个工具,如何发送、接收 RTSP 流。
前提
GStreamer
安装:
sudo apt install libgstreamer1.0-0 gstreamer1.0-plugins-base gstreamer1.0-plugins-good gstreamer1.0-plugins-bad gstreamer1.0-plugins-ugly gstreamer1.0-libav gstreamer1.0-doc gstreamer1.0-tools gstreamer1.0-x gstreamer1.0-alsa gstreamer1.0-gl gstreamer1.0-gtk3 gstreamer1.0-qt5 gstreamer1.0-pulseaudio
查看所有插件:
# conda deactivate

gst-inspect-1.0 -a
播放 ~/Videos/test.mp4 文件:
gst-launch-1.0 filesrc location=~/Videos/test.mp4 ! decodebin ! autovideosink
播放 /dev/video0 webcam:
gst-launch-1.0 v4l2src device=/dev/video0 \

! video/x-raw, format=YUY2, width=640, height=480, framerate=30/1 \

! autovideosink
/dev/video0 相关信息,可见后文“关于 Webcam”。
GStreamer RTSP Server
编译 test-launch 例子:
sudo apt install libgstreamer1.0-dev libgstrtspserver-1.0

git clone https://github.com/GStreamer/gst-rtsp-server.git

cd gst-rtsp-server/

git checkout 1.18

cd examples/

gcc test-launch.c -o test-launch $(pkg-config --cflags --libs gstreamer-rtsp-server-1.0)
用 test-launch 发送 RTSP 测试流:
$ ./test-launch "videotestsrc ! x264enc ! rtph264pay name=pay0 pt=96"

stream ready at rtsp://127.0.0.1:8554/test
用 gst-launch 接收 RTSP 测试流:
gst-launch-1.0 playbin uri=rtsp://127.0.0.1:8554/test
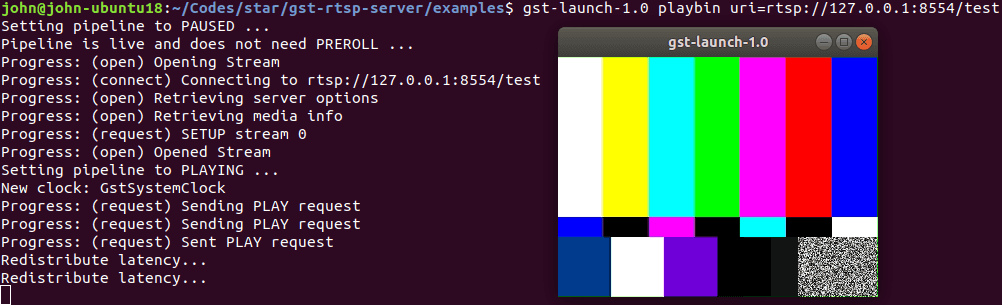
发送 RTSP,以 test-launch
发送 ~/Videos/test.mp4 文件:
./test-launch "filesrc location=/home/john/Videos/test.mp4 ! decodebin ! x264enc ! rtph264pay name=pay0 pt=96"
发送 /dev/video0 webcam:
./test-launch "v4l2src device=/dev/video0 ! video/x-raw,format=YUY2,width=640,height=480 ! videoconvert ! x264enc ! rtph264pay name=pay0 pt=96"
接收 RTSP,以 gst-launch
gst-launch-1.0 playbin uri=rtsp://127.0.0.1:8554/test

# or

gst-launch-1.0 rtspsrc location=rtsp://127.0.0.1:8554/test ! decodebin ! autovideosink
参考
- GStreamer
- GStreamer RTSP Server
- Stream webcam with GStreamer (RTSP)
- x264 [error]: baseline profile doesn't support 4:2:2
VLC
安装:
sudo snap install vlc

# allow camera permission

snap connect vlc:camera :camera
查看可用模块:
vlc --list
播放 ~/Videos/test.mp4 文件:
vlc file:///home/john/Videos/test.mp4
播放 /dev/video0 webcam:
vlc v4l2:///dev/video0:chroma=mjpg:width=640:height=480:fps=30
发送 RTSP,以 vlc
发送 ~/Videos/test.mp4 文件:
vlc file:///home/john/Videos/test.mp4 \

--sout '#transcode{vcodec=h264}:rtp{sdp=rtsp://:8554/test}'
发送 /dev/video0 webcam:
vlc v4l2:///dev/video0:chroma=yuyv:width=640:height=480:fps=30 \

--sout '#transcode{vcodec=h264,width=640,height=480}:rtp{sdp=rtsp://:8554/test}'
接收 RTSP,以 vlc
vlc rtsp://127.0.0.1:8554/test
参考
FFmpeg
安装:
sudo apt install ffmpeg
发送 RTSP,以 ffserver
配置 ffserver.conf:
HTTPPort 8091

HTTPBindAddress 0.0.0.0

RTSPPort 1554

MaxHTTPConnections 2000

MaxClients 1000

MaxBandwidth 1000

CustomLog -

<Stream test.mp4>

  File "/home/john/Videos/test.mp4"

  Format rtp

</Stream>
开启 ffserver:
$ nohup ffserver -f ffserver.conf &

$ tail nohup.out

  libavcodec     57.107.100 / 57.107.100

  libavformat    57. 83.100 / 57. 83.100

  libavdevice    57. 10.100 / 57. 10.100

  libavfilter     6.107.100 /  6.107.100

  libavresample   3.  7.  0 /  3.  7.  0

  libswscale      4.  8.100 /  4.  8.100

  libswresample   2.  9.100 /  2.  9.100

  libpostproc    54.  7.100 / 54.  7.100

Wed Apr 21 11:28:39 2021 Opening feed file '/home/john/Videos/test.mp4' for stream 'test.mp4'

Wed Apr 21 11:28:39 2021 FFserver started.
接收 RTSP,以 ffplay
ffplay rtsp://127.0.0.1:1554/test.mp4
参考
关于 Media
$ sudo apt install ffmpeg

$ ffprobe ~/Videos/test.mp4

ffprobe version 3.4.8-0ubuntu0.2 Copyright (c) 2007-2020 the FFmpeg developers

  built with gcc 7 (Ubuntu 7.5.0-3ubuntu1~18.04)

  configuration: --prefix=/usr --extra-version=0ubuntu0.2 --toolchain=hardened --libdir=/usr/lib/x86_64-linux-gnu --incdir=/usr/include/x86_64-linux-gnu --enable-gpl --disable-stripping --enable-avresample --enable-avisynth --enable-gnutls --enable-ladspa --enable-libass --enable-libbluray --enable-libbs2b --enable-libcaca --enable-libcdio --enable-libflite --enable-libfontconfig --enable-libfreetype --enable-libfribidi --enable-libgme --enable-libgsm --enable-libmp3lame --enable-libmysofa --enable-libopenjpeg --enable-libopenmpt --enable-libopus --enable-libpulse --enable-librubberband --enable-librsvg --enable-libshine --enable-libsnappy --enable-libsoxr --enable-libspeex --enable-libssh --enable-libtheora --enable-libtwolame --enable-libvorbis --enable-libvpx --enable-libwavpack --enable-libwebp --enable-libx265 --enable-libxml2 --enable-libxvid --enable-libzmq --enable-libzvbi --enable-omx --enable-openal --enable-opengl --enable-sdl2 --enable-libdc1394 --enable-libdrm --enable-libiec61883 --enable-chromaprint --enable-frei0r --enable-libopencv --enable-libx264 --enable-shared

  libavutil      55. 78.100 / 55. 78.100

  libavcodec     57.107.100 / 57.107.100

  libavformat    57. 83.100 / 57. 83.100

  libavdevice    57. 10.100 / 57. 10.100

  libavfilter     6.107.100 /  6.107.100

  libavresample   3.  7.  0 /  3.  7.  0

  libswscale      4.  8.100 /  4.  8.100

  libswresample   2.  9.100 /  2.  9.100

  libpostproc    54.  7.100 / 54.  7.100

Input #0, mov,mp4,m4a,3gp,3g2,mj2, from '/home/john/Videos/test.mp4':

  Metadata:

    major_brand     : isom

    minor_version   : 512

    compatible_brands: isomiso2avc1mp41

    encoder         : Lavf58.20.100

  Duration: 00:10:22.04, start: 0.000000, bitrate: 4205 kb/s

    Stream #0:0(und): Video: h264 (Main) (avc1 / 0x31637661), yuv420p, 1920x1080, 4204 kb/s, 25 fps, 25 tbr, 1200k tbn, 2400k tbc (default)

    Metadata:

      handler_name    : VideoHandler
关于 Webcam
$ sudo apt install v4l-utils

$ v4l2-ctl --list-devices

HD Webcam: HD Webcam (usb-0000:00:14.0-13):

	/dev/video0

	/dev/video1

$ v4l2-ctl -d 0 --list-formats-ext

ioctl: VIDIOC_ENUM_FMT

	Index       : 0

	Type        : Video Capture

	Pixel Format: 'MJPG' (compressed)

	Name        : Motion-JPEG

		Size: Discrete 640x480

			Interval: Discrete 0.033s (30.000 fps)

		Size: Discrete 1280x720

			Interval: Discrete 0.033s (30.000 fps)

		Size: Discrete 640x360

			Interval: Discrete 0.033s (30.000 fps)

		Size: Discrete 352x288

			Interval: Discrete 0.033s (30.000 fps)

		Size: Discrete 320x240

			Interval: Discrete 0.033s (30.000 fps)

		Size: Discrete 176x144

			Interval: Discrete 0.033s (30.000 fps)

		Size: Discrete 160x120

			Interval: Discrete 0.033s (30.000 fps)

	Index       : 1

	Type        : Video Capture

	Pixel Format: 'YUYV'

	Name        : YUYV 4:2:2

		Size: Discrete 640x480

			Interval: Discrete 0.033s (30.000 fps)

			Interval: Discrete 0.050s (20.000 fps)

		Size: Discrete 1280x720

			Interval: Discrete 0.100s (10.000 fps)

		Size: Discrete 640x360

			Interval: Discrete 0.033s (30.000 fps)

		Size: Discrete 352x288

			Interval: Discrete 0.033s (30.000 fps)

		Size: Discrete 320x240

			Interval: Discrete 0.033s (30.000 fps)

		Size: Discrete 176x144

			Interval: Discrete 0.033s (30.000 fps)

		Size: Discrete 160x120

			Interval: Discrete 0.033s (30.000 fps)
GoCoding 个人实践的经验分享,可关注公众号!
RTSP 流相关工具介绍的更多相关文章
- nginx+ffmpeg搭建rtmp转播rtsp流的flash服务器
本文概要: nginx是非常优秀的开源服务器,用它来做hls或者rtmp流媒体服务器是非常不错的选择.本文介绍了一种简易方法快速搭建rtmp流媒体服务器,也叫rtsp转播,数据源不是读取文件,而是采用 ...
- 用VLC读取摄像头产生RTSP流,DSS主动取流转发(一)(二) 【转】
http://blog.csdn.net/fm0517/article/details/38110633 http://blog.csdn.net/fm0517/article/details/381 ...
- 用VLC读取摄像头产生RTSP流,DSS侦听并转发(二)
用VLC读取摄像头产生RTSP流,DSS侦听并转发(二) 之前介绍过<用VLC读取摄像头产生RTSP流,DSS主动取流转发(一)>本文介绍另一种方法. 摄像机地址是192.1.101.51 ...
- FFmpeg开发笔记(九):ffmpeg解码rtsp流并使用SDL同步播放
前言 ffmpeg播放rtsp网络流和摄像头流. Demo 使用ffmpeg播放局域网rtsp1080p海康摄像头:延迟0.2s,存在马赛克 使用ffmpeg播放网络rtsp文件流 ...
- 使用vlc播放器播放rtsp流视频
可参考: 使用vlc播放器做rtsp服务器 web网页中使用vlc插件播放相机rtsp流视频 使用vlc进行二次开发做自己的播放器 首先需要安装vlc播放器,下载及安装步骤略 使用vlc播放器播放rt ...
- web网页中使用vlc插件播放相机rtsp流视频
可参考: 使用vlc播放器做rtsp服务器 使用vlc播放器播放rtsp视频 使用vlc进行二次开发做自己的播放器 vlc功能还是很强大的,有很多的现成的二次开发接口,不需配置太多即可轻松做客户端播放 ...
- 用vlc SDK创建一个播放视频文件和RTSP流视频的Demo
#include <stdio.h> #include <tchar.h> #include <time.h> #include <windows.h> ...
- Storm流分组介绍
Storm流分组介绍 流分组是拓扑定义的一部分,每个Bolt指定应该接收哪个流作为输入.流分组定义了流/元组如何在Bolt的任务之间进行分发.在设计拓扑的时候需要定义数据 ...
- VS2015编译FFMPEG,修改FFmpeg缓冲区大小解决实时流解码丢包问题,FFmpeg错误rtsp流地址卡死的问题,设置超时
之前尝试过很多网上利用Windows编译FFmpeg的文章,都没有办法编译X64位的FFmpeg,有些教程中有专门提到编译64位的FFmpeg需要下载mingw-w64-install,但是编译的过程 ...
随机推荐
- STM32之SPI通信
SPI总线简介 >SPI总线介绍 SPI接口是Motorola首先提出的全双工三线同步串行外围接口,采用主从模式(Master Slave)架构:支持多slave模式应用,一般仅支持单Maste ...
- window.onresize绑定事件以及解绑事件
问题描述 在Vue工程中,添加样式,部分需要做到自适应,需要添加resize事件,由于是单页面应用,如果组件初始化的时候绑定事件,在切换页面的时候不去注销事件,如果来回切换,会让resize事件执行多 ...
- 行业动态 | 通过使用Apache Cassandra实现实时供应链管理
借助基于Apache Cassandra的DataStax Enterprise,C&S Wholesale确实得到了他们所需要的东西--一个持续在线的仓库运作整体视图. 视图中包含了原本 ...
- 第34天学习打卡(GUI编程之组件和容器 frame panel 布局管理 事件监听 多个按钮共享一个事件 )
GUI编程 组件 窗口 弹窗 面板 文本框 列表框 按钮 图片 监听事件 鼠标 键盘事件 破解工具 1 简介 GUi的核心技术:Swing AWT 1.界面不美观 2.需要jre环境 为什么要学习GU ...
- HDOJ-1024(动态规划+滚动数组)
Max Sum Plus Plus HDOJ-1024 动态转移方程:dp[i][j]=max(dp[i][j-1]+a[j],max(dp[i-1][k])+a[j]) (0<k<j) ...
- C语言中储存类别和内存管理
C语言中储存类别和内存管理 储存类别 C语言提供了多种储存类别供我们使用,并且对应的有对应的内存管理策略,在了解C中的储存类型前,我们先了解一下与储存类型相关的一些概念. 1. 基础概念 对象:不同于 ...
- SQL-MYSQL的时间格式转换(持续补充)
======================SQLSERVER===================================== SELECT CONVERT(varchar(100), GE ...
- Spring 中的事务
前言: 之前总结了事务以及数据库中事务相关的知识点,Spring 对于事务做了相应的封装,便于业务开发中使用事务. 项目中使用Spring中的事务首先时基于Mysql数据库中InnoDB 引擎的,如果 ...
- Centos mini系统下的Hadoop集群搭建
1.事前了解 1.1 Hadoop 百度百科:https://baike.baidu.com/item/Hadoop/3526507?fr=aladdin Hadoop是一个由Apache基金会所开发 ...
- PyCharm之python package和directory的区别
python作为一门解释性的脚本语言.python中模块就是指一个py文件,如果我们将所有相关的代码都放在一个py文件中,则该py文件既是程序又是是模块,但是程序和模块的设计目的是不同的,程序的目的是 ...