【Ray Tracing in One Weekend 超详解】 光线追踪1-4
我们上一篇写了Chapter5 的第一个部分表面法线,那么我们来学剩下的部分,以及Chapter6.
Chapter5:Surface normals and multiple objects.
我们这一节主要向场景中添加对象。
依据代码重用原则,此时应该抽象出对象创、绘制的公共部分
All what we do are followed by object-oriented !
我们先来抽象并定义一些基本的类型
1>.ray.
这个不用说了,但是我们发现,在后面涉及到的所有的向量和精度类型均取决于ray,所以,我们不妨把所有的抽象类放入统一的命名空间,把类型方面的定义放在空间内,而不是每次都需要ray::vec_type
/// ray.h

// -----------------------------------------------------

// [author]        lv

// [begin ]        2018.12

// [brief ]        the ray-class for the ray-tracing project

//                from the 《ray tracing in one week》

// -----------------------------------------------------

#ifndef RAY_H

#define RAY_H

#include <lvgm\type_vec\type_vec.h>        //https://www.cnblogs.com/lv-anchoret/p/10163085.html

namespace rt

{

    using rtvar = lvgm::precision;

    using rtvec = lvgm::vec3<rtvar>;

    class ray

    {

    public:

        ray()

            :_a{ rtvec() }

            , _b{ rtvec() }

        {  }

        ray(const rtvec& a, const rtvec& b)

            :_a(a)

            , _b(b)

        {  }

        ray(const ray& r)

            :_a(r._a)

            , _b(r._b)

        {    }

        inline rtvec origin()const { return _a; }

        inline rtvec direction()const { return _b; }

        inline rtvec go(const rtvar t)const { return _a + t * _b; }

    private:

        rtvec _a;

        rtvec _b;

    };

}

#endif    //ray_h
ray.h
2>.intersect.
这个类名的由来是依据书中描述光线追踪的一句话,我觉得总结的很精炼,我自己将它理解为对光线追踪的一个定义:
Ray Tracer is of the form calculate which ray goes from the eye to a pixel, compute what that ray intersects, and compute a color for that intersection ppoint.
而我们这个类完成的就是前半部分:计算光线相交点,或者说是交叉点,或者说是撞击点。
所以讲基类命名为intersect
因为在实际操作中可能需要对根进行条件过滤,所以,我们在hit中增加了关于系数t的上限和下限,增加灵活度,强化用户体验。
/// intersect.h

// -----------------------------------------------------

// [author]        lv

// [begin ]        2018.12

// [brief ]        the intersect-class for the ray-tracing project

//                from the 《ray tracing in one week》

// -----------------------------------------------------

#ifndef INTERSECT_H

#define INTERSECT_T

#include "ray.h"

namespace rt

{

    struct hitInfo

    {

        lvgm::precision _t;        //ray 中的系数t

        rtvec _p;            //相交点、撞击点

        rtvec _n;            //_p点的表面法线

    };

    class intersect

    {

    public:

        intersect() {  }

        constexpr static rtvar inf() { return 0x3f3f3f3f; }        //最大值

        virtual bool hit(const ray& sight, rtvar t_min, rtvar t_max, hitInfo& rec)const = ;

        virtual ~intersect() {  }

    };

}

#endif    //INTERSECT_H
intersect.h
3>.sphere.
球体函数,撞击函数和之前的hit一样,只不过我们优先选取比较小的根,因为它离我们的视线更近,因为我们看东西也是先看到的是近处的,远处的被遮挡了。如果一个根都没有,那么我们返回false
/// sphere.h

// -----------------------------------------------------

// [author]        lv

// [begin ]        2018.12

// [brief ]        the sphere-class for the ray-tracing project

//                from the 《ray tracing in one week》

// -----------------------------------------------------

#ifndef SPHERE_H

#define SPHERE_H

namespace rt

{

    class sphere :public intersect

    {

    public:

        sphere() {  }

        /*

        @para1: 球心坐标

        @para2: 球半径

        */

        sphere(const rtvec& h, rtvar r) :_heart(h), _radius(r) {  }

        /*

        @brief: 撞击函数,求取撞击点相关记录信息

        @param: sight->视线

                系数t的上下界->筛选撞击点

                rec->返回撞击点信息

        @retur: 是否存在合法撞击点

        */

        virtual bool hit(const ray& sight, rtvar t_min, rtvar t_max, hitInfo& rec)const override;

        /*

        @ get-functions

        */

        inline const rtvar r()const { return _radius; }

        inline const rtvec& heart()const { return _heart; }

        inline rtvar& r() { return _radius; }

        inline rtvec& heart() { return _heart; }

    private:

        rtvec _heart;

        rtvar _radius;

    };

    bool sphere::hit(const ray& sight, rtvar t_min, rtvar t_max, hitInfo& rec)const

    {

        rtvec trace = sight.origin() - _heart;

        rtvar a = dot(sight.direction(), sight.direction());

        rtvar b = 2.0 * dot(trace, sight.direction());

        rtvar c = dot(trace, trace) - _radius * _radius;

        rtvar delt = b*b - 4.0*a*c;

        if (delt > )

        {

            rtvar x = (-b - sqrt(delt)) / (2.0*a);

            if (x < t_max && x > t_min)

            {

                rec._t = x;

                rec._p = sight.go(rec._t);

                rec._n = (rec._p - _heart) / _radius;

                return true;

            }

            x = (-b + sqrt(delt)) / (2.0*a);

            if (x < t_max && x > t_min)

            {

                rec._t = x;

                rec._p = sight.go(x);

                rec._n = (rec._p - _heart) / _radius;

                return true;

            }

        }

        return false;

    }

}

#endif
sphere.h
4>.intersections.
顾名思义,这个就是用于记录多个交叉点的一个表
它包含一个二维指针,高维指的是一个有关于基类指针的数组,低维度就是指向基类——intersect的一个多态指针。
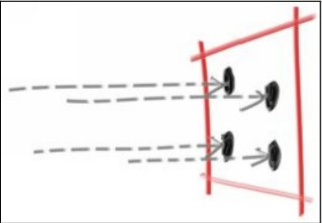
而它的hit函数就是,遍历每一个sphere对象,求取得到视线穿过的离eye最近的交叉点。扫描屏幕的每一条视线均如此做,可翻阅上一篇,我们的3条line的那个实线和虚线图,对于每一条视线,如果与多个对象存在交叉点,那么最短的那一条是实线,我们求取的始终是实线部分,而实线的长,就是t
/// intersections.h

// -----------------------------------------------------

// [author]        lv

// [begin ]        2018.12

// [brief ]        the intersections-class for the ray-tracing project

//                from the 《ray tracing in one week》

// -----------------------------------------------------

#ifndef INTERSECTIONS_H

#define INTERSECTIONS_H

namespace rt

{

    class intersections :public intersect

    {

    public:

        intersections() {  }

        intersections(intersect** list, size_t n) :_list(list), _size(n) {  }

        virtual bool hit(const ray& sight, rtvar t_min, rtvar t_max, hitInfo& rec)const override;

    private:

        intersect** _list;

        size_t _size;

    };

    bool intersections::hit(const ray& sight, rtvar t_min, rtvar t_max, hitInfo& rec)const

    {

        hitInfo t_rec;

        bool hitSomething = false;

        rtvar far = t_max;            //刚开始可以看到无限远

        for (int i = ; i < _size; ++i)

        {

            if (_list[i]->hit(sight, t_min, far, t_rec))

            {

                hitSomething = true;

                far = t_rec._t;            //将上一次的最近撞击点作为视线可达最远处

                rec = t_rec;

            }

        }

        return hitSomething;

    }

}

#endif //INTERSECTIONS_H
intersections.h
5>.camera
获取视线
/// camera.h

// -----------------------------------------------------

// [author]        lv

// [begin ]        2018.12

// [brief ]        the camera-class for the ray-tracing project

//                from the 《ray tracing in one week》

// -----------------------------------------------------

#ifndef CAMERA_H

#define CAMERA_H

#include "ray.h"

namespace rt

{

    class camera

    {

    public:

        camera(

            const rtvec& eye = rtvec(.,.,.),

            const rtvec& start = rtvec(-., -., -.),

            const rtvec& horizon = rtvec(., ., .),

            const rtvec& vertical = rtvec(., ., .))

            :_eye{ eye }

            ,_start{start}

            ,_horizontal{horizon}

            ,_vertical{vertical}

        { }

        inline const ray get_ray(const rtvar u,const rtvar v)const

        {    return ray{ _eye, _start + u*_horizontal + v*_vertical };    }

        inline const ray get_ray(const lvgm::vec2<rtvar>& para)const

        {    return ray{_eye, _start + para.u()*_horizontal + para.v()*_vertical};    }

        inline const rtvec& eye()const { return _eye; }

        inline const rtvec& start()const { return _start; }

        inline const rtvec& horizontal()const { return _horizontal; }

        inline const rtvec& vertical()const { return _vertical; }

    private:

        rtvec _eye;

        rtvec _start;

        rtvec _horizontal;

        rtvec _vertical;

    };

}

#endif
camera.h
------------ 完毕 --------------
进入正题,我们今天来做多对象的场景
我们还选用原来的球,那么再添加一个看似草原的东东(我一开始认为是草原)。
先上图:
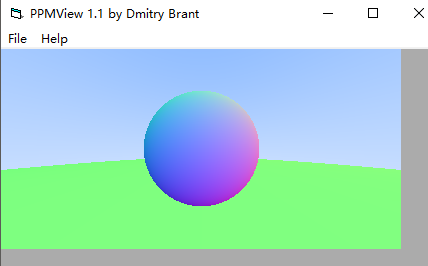
其实这个还是比较简单的,我们在很远处,想像那个坐标系统,如果我们在(0,-100.5,-1)处放一个半径为100的球,是不就是这样了,然后,在屏幕空间内,小球的几何表面比大球的几何表面离眼睛更近,自然就会把小球凸显出来
代码:
#define LOWPRECISION

#include <fstream>

#include "intersect.h"

#include "sphere.h"

#include "intersections.h"

#include "camera.h"

#define stds std::

using namespace rt;

rtvec lerp(const ray& sight, const intersect* world)

{

    hitInfo rec;

    if (world->hit(sight, ., intersect::inf(), rec))

        return 0.5*rtvec(rec._n.x() + ., rec._n.y() + ., rec._n.z() + .);

    else

    {

        rtvec dirUnit = sight.direction().ret_unitization();

        rtvar t = 0.5*(dirUnit.y() + .);

        return (. - t)*rtvec(., ., .) + t*rtvec(0.5, 0.7, 1.0);

    }

}

void build_5_2()

{

    stds ofstream file("graph5-2.ppm");

    size_t W = , H = ;

    if (file.is_open())

    {

        file << "P3\n" << W << " " << H << "\n255\n" << stds endl;

        intersect** list = new intersect*[];

        list[] = new sphere(rtvec(, , -), 0.5);

        list[] = new sphere(rtvec(, -100.5, -), );

        intersect* world = new intersections(list, );

        camera cma;

        for (int y = H - ; y >= ; --y)

            for (int x = ; x < W; ++x)

            {

                lvgm::vec2<rtvar> para{ rtvar(x) / W,rtvar(y) / H };

                rtvec color = lerp(cma.get_ray(para), world);

                int r = int(255.99 * color.r());

                int g = int(255.99 * color.g());

                int b = int(255.99 * color.b());

                file << r << " " << g << " " << b << stds endl;

            }

        stds cout << "complished" << stds endl;

        file.close();

        if (list[])delete list[];

        if (list[])delete list[];

        if (list)delete[] list;

    }

    else

        stds cerr << "open file error" << stds endl;

}

int main()

{

    build_5_2();

}
Chapter6:Antialiasing
这一章也是超简单。
用最简单的采样模式对锯齿进行修缮。
引用书中的图片:
我们扫描屏幕的每一个点,得到的水平步长和垂直步长u和v,但是我们采用的都是整数点,而对于屏幕上的点来说应该是有无数个的对不对,而每个点对应的颜色都是不一样的,如果我们把屏幕分辨率调的非常高,也就是把屏幕划分地更加细微,锯齿就会更小。
所以,我们发现,在选取某个整数坐标点进行着色的时候,我们其实是用整数坐标的点的颜色覆盖了周围很多本应该是其他颜色的点,就比如说上面的红色方格,我们之前选取的是方格中心的位置,进行计算得到那一处的像素值,然后用它来代替整个方框的颜色
现在我们赋予方格中心周围的在方格内部的其他点点的表达自己的权利。
就像投票
位于城市中心的周围的小村庄也有发言权,他们各个小村庄之间的权利是平等的,我们收集够一定的票数,然后把值取平均作为最后的像素值。
假设每个整数点之间相隔一个单位,这样我们每个方格的像素充分考虑了周围[0,1)的像素值,在未触及下一个整数坐标点的所有范围都考虑在内,那么我们相邻两个像素的颜色差就不会那么突兀,就可以显得非常平滑了
之前锯齿很明显,是因为每个像素格点只考虑了自己应有的颜色,未考虑两个相邻格点之间的渐变像素值,导致相邻的两个格点像素值差别较大,不平滑,所以出现锯齿。
当然,增大分辨率是将相邻两个点的坐标更加贴近,使得颜色差别不大。
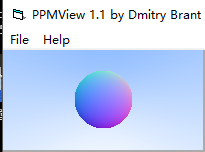
我做一个Chapter5-1的球,然后再用采样的方法,采取周围50个随机点的像素值取均值,进行对比
分辨率均为200*100
原图
采样抗锯齿图:

可以看出来平滑了很多
方法:采样总值 = Σpixel_value(每个坐标分量+一个[0,1)随机值形成的周围采样坐标)
采样结果 = 采样总值/样本数
std::uniform_real_distribution默认产生[0,1)的随机值
std::mt19937是一种随机生成算法,用此算法去初始化上面那个即可
测试如下:
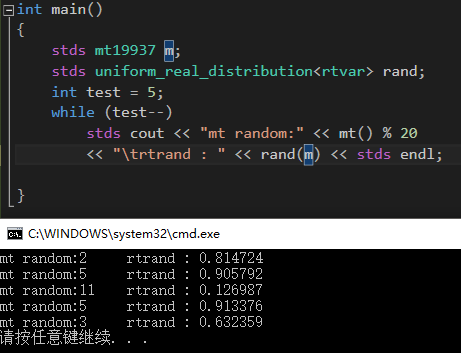
事实证明,完全可以完成我们的需要
代码:
#define LOWPRECISION

#include <fstream>

#include "intersect.h"

#include "sphere.h"

#include "intersections.h"

#include "camera.h"

#include <random>

#define stds std::

using namespace rt;

stds mt19937 mt;

stds uniform_real_distribution<rtvar> rtrand;

rtvec lerp(const ray& sight, const intersect* world)

{

    hitInfo rec;

    if (world->hit(sight, ., intersect::inf(), rec))

        return 0.5*rtvec(rec._n.x() + ., rec._n.y() + ., rec._n.z() + .);

    else

    {

        rtvec dirUnit = sight.direction().ret_unitization();

        rtvar t = 0.5*(dirUnit.y() + .);

        return (. - t)*rtvec(., ., .) + t*rtvec(0.5, 0.7, 1.0);

    }

}

void build_6_1()

{

    stds ofstream file("graph6-2.ppm");

    size_t W = , H = ;

    if (file.is_open())

    {

        file << "P3\n" << W << " " << H << "\n255\n" << stds endl;

        intersect** list = new intersect*[];

        list[] = new sphere(rtvec(, , -), 0.5);

        //list[1] = new sphere(rtvec(0, -100.5, -1), 100);

        intersect* world = new intersections(list, );

        camera cma;

        for (int y = H - ; y >= ; --y)

            for (int x = ; x < W; ++x)

            {

                rtvec color;

                for (int cnt = ; cnt < ; ++cnt)

                {

                    lvgm::vec2<rtvar> para{

                        (rtrand(mt) + x) / W,

                        (rtrand(mt) + y) / H };

                    color += lerp(cma.get_ray(para), world);

                }

                color /= ;

                int r = int(255.99 * color.r());

                int g = int(255.99 * color.g());

                int b = int(255.99 * color.b());

                file << r << " " << g << " " << b << stds endl;

            }

        stds cout << "complished" << stds endl;

        file.close();

        if (list[])delete list[];

        if (list)delete[] list;

        if (world)delete world;

    }

    else

        stds cerr << "open file error" << stds endl;

}

int main()

{

    build_6_1();

}
感谢您的阅读,生活愉快~
【Ray Tracing in One Weekend 超详解】 光线追踪1-4的更多相关文章
- 【Ray Tracing The Next Week 超详解】 光线追踪2-9
我们来整理一下项目的代码 目录 ----include --hit --texture --material ----RTdef.hpp ----ray.hpp ----camera.hpp ---- ...
- 【Ray Tracing The Next Week 超详解】 光线追踪2-6 Cornell box
Chapter 6:Rectangles and Lights 今天,我们来学习长方形区域光照 先看效果 light 首先我们需要设计一个发光的材质 /// light.hpp // ------- ...
- 【Ray Tracing The Next Week 超详解】 光线追踪2-7 任意长方体 && 场景案例
上一篇比较简单,很久才发是因为做了一些好玩的场景,后来发现这一章是专门写场景例子的,所以就安排到了这一篇 Preface 这一篇要介绍的内容有: 1. 自己做的光照例子 2. Cornell box画 ...
- 【Ray Tracing The Next Week 超详解】 光线追踪2-8 Volume
Preface 今天有两个东东,一个是体积烟雾,一个是封面图 下一篇我们总结项目代码 Chapter 8:Volumes 我们需要为我们的光线追踪器添加新的物体——烟.雾,也称为participat ...
- 【Ray Tracing The Next Week 超详解】 光线追踪2-5
Chapter 5:Image Texture Mapping 先看效果: 我们之前的纹理是利用的是撞击点p处的位置信息,比如大理石纹理 而我们今天的图片映射纹理采用2D(u,v)纹理坐标来进行. 在 ...
- 【Ray Tracing in One Weekend 超详解】 光线追踪1-8 自定义相机设计
今天,我们来学习如何设计自定义位置的相机 ready 我们只需要了解我们之前的坐标体系,或者说是相机位置 先看效果 Chapter10:Positionable camera 这一章我们直接用概念 ...
- 【Ray Tracing The Next Week 超详解】 光线追踪2-4 Perlin noise
Preface 为了得到更好的纹理,很多人采用各种形式的柏林噪声(该命名来自于发明人 Ken Perlin) 柏林噪声是一种比较模糊的白噪声的东西:(引用书中一张图) 柏林噪声是用来生成一些看似杂乱 ...
- 【Ray Tracing The Next Week 超详解】 光线追踪2-3
Preface 终于到了激动人心的纹理章节了 然鹅,看了下,并不激动 因为我们之前就接触过 当初有一个 attenuation 吗? 对了,这就是我们的rgb分量过滤器,我们画出的红色.蓝色.绿色等 ...
- 【Ray Tracing The Next Week 超详解】 光线追踪2-2
Chapter 2:Bounding Volume Hierarchies 今天我们来讲层次包围盒,乍一看比较难,篇幅也多,但是咱们一步一步来,相信大家应该都能听懂 BVH 和 Perlin text ...
随机推荐
- 消除JQuery Mobile 列表样式右侧箭头
有时候我们看到JQM上面有一些呈现跟我们要的很像如下面这个Listview效果 程序代码如下: view sourceprint? 1.<ul data-role="listvie ...
- 压力测试以及编译安装httpd2.4
压力测试以及编译安装httpd2.4 作者:尹正杰 版权声明:原创作品,谢绝转载!否则将追究法律责任. 一.使用 deflate_module模块压缩页面优化传输速度 我们的httpd软件自带的有一个 ...
- ZCMU 1894: Power Eggs
http://acm.zcmu.edu.cn/JudgeOnline/problem.php?id=1894 题意: 有M个鹰蛋,N层楼,鹰蛋的硬度是E,也就是说在1~E层楼扔下去不会碎,E+1层楼扔 ...
- bzoj千题计划223:bzoj2816: [ZJOI2012]网络
http://www.lydsy.com/JudgeOnline/problem.php?id=2816 每种颜色搞一个LCT 判断u v之间有边直接相连: 如果u和v之间有边相连,那么他们的深度相差 ...
- 原生JavaScript技巧大收集(1~10)
1.原生JavaScript实现字符串长度截取 01 function cutstr(str, len) { 02 var temp; 03 var icount = 0; 04 ...
- 20155206 2016-2017-2 《Java程序设计》第8周学习总结
20155206 2016-2017-2 <Java程序设计>第8周学习总结 教材学习内容总结 第十五章 通用API 15.1 日志 日志API简介 java.util.logging包提 ...
- LVTTL与LVCMOS区别
TTL电平的VIH/VIL一般是2V/0.8V,VOH/VOL一般是 2.4V/0.4V,不论是3.3V还是5V的TTL都一样的:CMOS的VIH/VIL一般是70%VCC/30%VCC,VOH/VO ...
- linux笔记_day10_shell编程
1.shell编程 编程语言 静态语言:编译型语言 强类型(变量在使用前,必须事先声明) 事先转换成可执行语言 动态语言:解释型语言 弱类型(变量用时声明,拿来直接用,甚至不区分数据类型,一般默认都为 ...
- python2.7中MySQLdb的安装与使用详解
Python2.7中MySQLdb的使用 import MySQLdb #1.建立连接 connect = MySQLdb.connect( '127.0.0.1', #数据库地址 'root', # ...
- MYSQL问题解决
1. MySQL错误日志里出现: 140331 10:08:18 [ERROR] Error reading master configuration 140331 10:08:18 [ERROR] ...