串口调试助手--Qt
串口调试助手----------该程序使用Qt框架,C ++语言编译而成
项目文件介绍:
main.cpp 该文件为该程序的入口程序
mainwindow.h 该文件为该程序的主要声明部分
mainwindow.cpp 该文件为该程序的主要定义部分
mainwindow.ui 该文件为该程序的ui界面设计
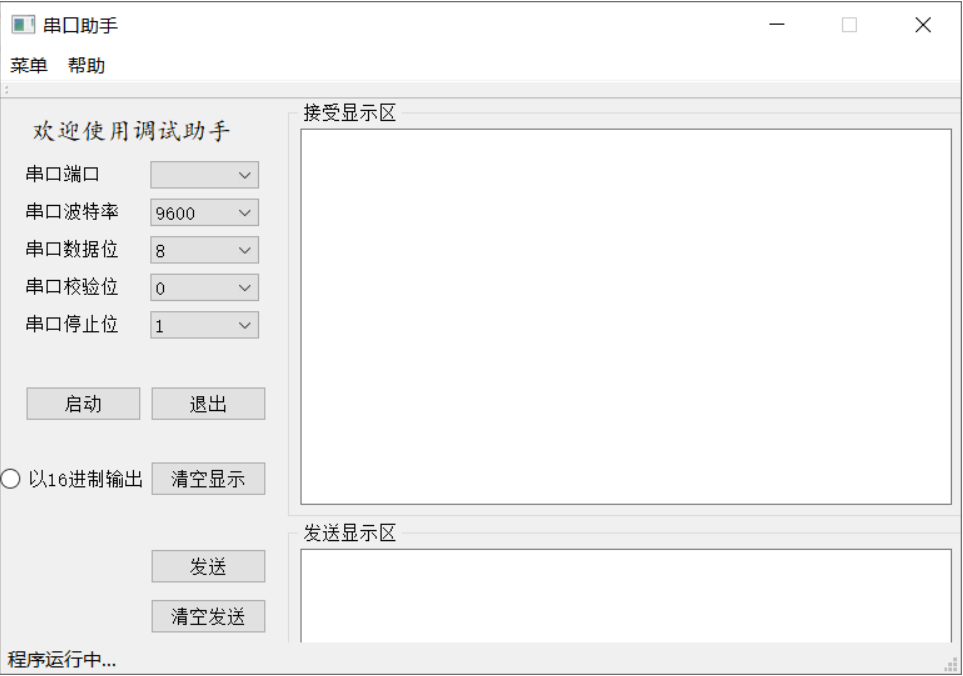
界面.png 界面的显示效果
该文件中获取串口是通过读取Windows系统下的注册表中的信息得到的, - 使用Qt中的定时器来每个3s读取一次注册表
串口通信方面:通过使用Qt的封装的QSerialPort来实现
main.cpp
#include "mainwindow.h"

#include <QApplication>

int main(int argc, char *argv[])

{

    QApplication a(argc, argv);

    MainWindow w;

    w.show();

    return a.exec();

}
mainwindow.h
#ifndef MAINWINDOW_H

#define MAINWINDOW_H

#include <QMainWindow>

#include <QSerialPort>

#include <QTimer>

namespace Ui {

class MainWindow;

}

class MainWindow : public QMainWindow

{

    Q_OBJECT

public:

    explicit MainWindow(QWidget *parent = nullptr);

    ~MainWindow();

    /*

     * 功能:获取电脑中串口的端口

     * 参数:无

     * 返回值:无

     */

    void Get_Serial_Port(void);

    /*

     * 功能:当串口有数据的时候执行

     * 参数:无

     * 返回值:无

     */

    void readData(void);

    /*

     * 功能:每个3s执行的任务

     * 参数:无

     * 返回值:无

     */

    void myThread(void);

private slots:

    /*

     * 功能:点击pushButton按钮功能

     * 参数:无

     * 返回值:无

     */

    void on_pushButton_clicked();

    /*

     * 功能:点击清空按钮功能,清空显示区的显示

     * 参数:无

     * 返回值:无

     */

    void on_pushButton_2_clicked();

    void on_pushButton_3_clicked();

    void on_pushButton_4_clicked();

    void on_pushButton_5_clicked();

private:

    Ui::MainWindow  *ui;

    //串口类指针

    QSerialPort     *Serial;

    //时间类指针

    QTimer          *time;

};

#endif // MAINWINDOW_H
mainwindow.cpp
#include "mainwindow.h"

#include "ui_mainwindow.h"

#include "windows.h"

#include "QVector"

#include "QDebug"

#include "stdio.h"

#include "QMessageBox"

#include <stdlib.h>

#define MAX_KEY_LENGTH 255

#define MAX_VALUE_NAME 16383

/*

 * 功能:读取注册表下的子项

 * 参数:hkey:注册表的根

 *      lpSubkey:注册表根下的路径

 *      retArray:返回要查找的路径下的值的数组

 * 返回值:无

 */

static void Get_Regedit(HKEY hkey,LPCSTR lpSubKey,QVector<QString> &retArray);

MainWindow::MainWindow(QWidget *parent) :

    QMainWindow(parent),

    ui(new Ui::MainWindow)

{

    ui->setupUi(this);

    //时间类初始化

    time = new QTimer(this);

    connect(time,&QTimer::timeout,this,&MainWindow::myThread);

    time->start();

    //状态栏显示

    ui->statusBar->showMessage("程序运行中...");

    //初始化串口的显示

    this->Get_Serial_Port();

    QStringList temp;

    //波特率的显示

    temp << "" << "" << "" << "" << "" << "";

    ui->comboBox_2->addItems(temp);

    //数据位的显示

    temp.clear();

    temp << "" << "" << "" << "";

    ui->comboBox_3->addItems(temp);

    //奇偶检验位的显示

    temp.clear();

    temp << "" << "" << "";

    ui->comboBox_4->addItems(temp);

    //停止位的显示

    temp.clear();

    temp << "" << "1.5" << "";

    ui->comboBox_5->addItems(temp);

    this->Serial = new QSerialPort(nullptr);

}

MainWindow::~MainWindow()

{

    delete ui;

}

/*

 * 功能:获取电脑中串口的端口

 * 参数:无

 * 返回值:无

 */

void MainWindow::Get_Serial_Port()

{

    QVector<QString> retArray;

    ui->comboBox->clear();

    Get_Regedit(HKEY_LOCAL_MACHINE,\

                "HARDWARE\\DEVICEMAP\\SERIALCOMM",\

                retArray);

    qDebug() << retArray.size();

    QVector<QString>::iterator iter;

    for (iter=retArray.begin();iter!=retArray.end();iter++)

    {

        qDebug() <<  *iter << "\0";

        ui->comboBox->addItem(*iter);

    }

}

/*

 * 功能:点击pushButton按钮功能,打开串口

 * 参数:无

 * 返回值:无

 */

void MainWindow::on_pushButton_clicked()

{

    if(!Serial->isOpen())

    {

        qDebug() << ui->comboBox->currentText();

        //设置串口的端口名称

        Serial->setPortName(ui->comboBox->currentText());

        //toInt:将字符串转换为数字

        //设置串口的波特率

        Serial->setBaudRate((ui->comboBox_2->currentText()).toInt(nullptr,));

        //设置串口的数据位

        Serial->setDataBits((QSerialPort::DataBits((ui->comboBox_3->currentText()).toInt(nullptr,))));

        //设置串口的奇偶校验位

        Serial->setParity(QSerialPort::Parity((ui->comboBox_4->currentText()).toInt(nullptr,)));

        //设置串口的停止位

        Serial->setStopBits(QSerialPort::StopBits((ui->comboBox_5->currentText()).toInt(nullptr,)));

        //设置串口的流

        Serial->setFlowControl(QSerialPort::NoFlowControl);

        BOOL isSerial = Serial->open(QIODevice::ReadWrite);

        if(!isSerial)

        {

            qDebug() << "串口打开错误!";

            return;

        }

        //创建一个信号与槽,使得串口有数据可以读取的时候可以执行readData()函数

        connect(Serial,&QSerialPort::readyRead,this,&MainWindow::readData);

        ui->pushButton->setText("已启动");

    }

    else

    {

        ui->pushButton->setText("启动");

        Serial->close();

    }

}

/*

 * 功能:读取注册表下的子项

 * 参数:hkey:注册表的根

 *      lpSubkey:注册表根下的路径

 *      retArray:返回要查找的路径下的值的数组

 * 返回值:无

 */

static void Get_Regedit(HKEY hkey,LPCSTR lpSubKey,QVector<QString> &retArray)

{

    HKEY  phkey = nullptr;

    BOOL isSuccess = false;

    /*

     * 功能:打开注册表,返回值为是否打开成功

     */

    isSuccess = RegOpenKeyA(hkey,lpSubKey,&phkey);

    if(isSuccess != ERROR_SUCCESS)

    {

        qDebug() << "注册表打开失败!";

        return;

    }

    qDebug() << "注册表打开成功!";

    /*

     * 功能:读取注册表下的子项

     */

    DWORD i =;

    LSTATUS retCode = ERROR_SUCCESS;

    CHAR achValue[MAX_VALUE_NAME];

    DWORD cchValue = MAX_VALUE_NAME;

    BYTE Data[MAX_VALUE_NAME];

    DWORD cbData = MAX_VALUE_NAME;

    do

    {

        cchValue = MAX_VALUE_NAME;

        cbData = MAX_VALUE_NAME;

        achValue[] = '\0';

        Data[] = '\0';

        QString temp = "";

        retCode = RegEnumValueA(phkey, i,achValue,&cchValue,nullptr,nullptr,Data,&cbData);

        if (retCode == ERROR_SUCCESS && achValue[] != '\0')

        {

            qDebug() << i++ << achValue << " ";

            BYTE j = ;

            while(Data[j] != '\0')

                temp += (CHAR)(Data[j++]);

            qDebug() << temp;

            retArray.append(temp);

        }

    }while(achValue[] != '\0');

    /*

     * 功能:关闭注册表,返回值为是否打开成功

     */

    isSuccess = RegCloseKey(phkey);

    if(isSuccess != ERROR_SUCCESS)

    {

        qDebug() << "注册表关闭失败!";

        return;

    }

    qDebug() << "注册表关闭成功!";

    return;

}

/*

 * 功能:点击清空按钮功能,清空显示区的显示

 * 参数:无

 * 返回值:无

 */

void MainWindow::on_pushButton_2_clicked()

{

    ui->textBrowser->setText("");

}

/*

 * 功能:当串口有数据的时候执行,在显示区域显示

 *      串口接受到的值

 * 参数:无

 * 返回值:无

 */

void MainWindow::readData(void)

{

    //是否选择了该按钮,选择以16进制进行输出

    if(ui->radioButton->isChecked())

    {

        QByteArray temp = Serial->readAll().toHex();

        for(int i = ;i < temp.length();++i)

        {

            //在16进制开始加入"0x"

            if(i %  == )

                ui->textBrowser->insertPlainText("0x");

            ui->textBrowser->insertPlainText((QString)temp.at(i));

            //在16进制结束加上空格" "

            if(i %  == )

                ui->textBrowser->insertPlainText(" ");

        }

    }

    //没有选择则按照ASCII码输出

    else

        ui->textBrowser->insertPlainText(Serial->readAll());

    ui->textBrowser->moveCursor(QTextCursor::End);

}

/*

 * 功能:向串口中发送数据

 * 参数:无

 * 返回值:无

 */

void MainWindow::on_pushButton_3_clicked()

{

    //判断串口是否处于打开状态

    if(Serial->isOpen())

    {

        QByteArray temp = ui->textEdit->toPlainText().toUtf8();

        qDebug() << temp;

        Serial->write(temp);

    }

    else

    {

        //串口没有连接的时候发送数据就会出错

        QMessageBox messageBox(QMessageBox::Icon(),"警告","串口未连接",QMessageBox::Yes,nullptr);

        messageBox.exec();

    }

}

/*

 * 功能:清空发送区

 * 参数:无

 * 返回值:无

 */

void MainWindow::on_pushButton_4_clicked()

{

    ui->textEdit->clear();

}

/*

 * 功能:退出程序

 * 参数:无

 * 返回值:无

 */

void MainWindow::on_pushButton_5_clicked()

{

    if(Serial->isOpen())

        Serial->close();

    this->close();

}

/*

 * 功能:每个3s执行的任务,判断端口和串口是否打开

 * 参数:无

 * 返回值:无

 */

void MainWindow::myThread()

{

    qDebug() << "线程OK ";

    if(Serial->isReadable())

        ui->pushButton->setText("已启动");

    else

        ui->pushButton->setText("启动");

    this->Get_Serial_Port();

}
mainwindow.ui
<?xml version="1.0" encoding="UTF-8"?>

<ui version="4.0">

 <class>MainWindow</class>

 <widget class="QMainWindow" name="MainWindow">

  <property name="geometry">

   <rect>

    <x>0</x>

    <y>0</y>

    <width>768</width>

    <height>500</height>

   </rect>

  </property>

  <property name="minimumSize">

   <size>

    <width>768</width>

    <height>500</height>

   </size>

  </property>

  <property name="maximumSize">

   <size>

    <width>768</width>

    <height>500</height>

   </size>

  </property>

  <property name="windowTitle">

   <string>串口助手</string>

  </property>

  <widget class="QWidget" name="centralWidget">

   <widget class="QPushButton" name="pushButton">

    <property name="geometry">

     <rect>

      <x>20</x>

      <y>230</y>

      <width>93</width>

      <height>28</height>

     </rect>

    </property>

    <property name="text">

     <string>启动</string>

    </property>

   </widget>

   <widget class="QPushButton" name="pushButton_2">

    <property name="geometry">

     <rect>

      <x>120</x>

      <y>290</y>

      <width>93</width>

      <height>28</height>

     </rect>

    </property>

    <property name="text">

     <string>清空显示</string>

    </property>

   </widget>

   <widget class="QComboBox" name="comboBox">

    <property name="geometry">

     <rect>

      <x>120</x>

      <y>50</y>

      <width>87</width>

      <height>22</height>

     </rect>

    </property>

   </widget>

   <widget class="QComboBox" name="comboBox_2">

    <property name="geometry">

     <rect>

      <x>120</x>

      <y>80</y>

      <width>87</width>

      <height>22</height>

     </rect>

    </property>

   </widget>

   <widget class="QComboBox" name="comboBox_3">

    <property name="geometry">

     <rect>

      <x>120</x>

      <y>110</y>

      <width>87</width>

      <height>22</height>

     </rect>

    </property>

   </widget>

   <widget class="QComboBox" name="comboBox_4">

    <property name="geometry">

     <rect>

      <x>120</x>

      <y>140</y>

      <width>87</width>

      <height>22</height>

     </rect>

    </property>

   </widget>

   <widget class="QComboBox" name="comboBox_5">

    <property name="geometry">

     <rect>

      <x>120</x>

      <y>170</y>

      <width>87</width>

      <height>22</height>

     </rect>

    </property>

   </widget>

   <widget class="QRadioButton" name="radioButton">

    <property name="geometry">

     <rect>

      <x>0</x>

      <y>295</y>

      <width>115</width>

      <height>19</height>

     </rect>

    </property>

    <property name="text">

     <string>以16进制输出</string>

    </property>

   </widget>

   <widget class="QPushButton" name="pushButton_3">

    <property name="geometry">

     <rect>

      <x>120</x>

      <y>360</y>

      <width>93</width>

      <height>28</height>

     </rect>

    </property>

    <property name="text">

     <string>发送</string>

    </property>

   </widget>

   <widget class="QGroupBox" name="groupBox">

    <property name="geometry">

     <rect>

      <x>230</x>

      <y>4</y>

      <width>551</width>

      <height>331</height>

     </rect>

    </property>

    <property name="title">

     <string>接受显示区</string>

    </property>

    <widget class="QTextBrowser" name="textBrowser">

     <property name="geometry">

      <rect>

       <x>10</x>

       <y>20</y>

       <width>521</width>

       <height>301</height>

      </rect>

     </property>

    </widget>

   </widget>

   <widget class="QGroupBox" name="groupBox_2">

    <property name="geometry">

     <rect>

      <x>230</x>

      <y>340</y>

      <width>541</width>

      <height>121</height>

     </rect>

    </property>

    <property name="title">

     <string>发送显示区</string>

    </property>

    <widget class="QTextEdit" name="textEdit">

     <property name="geometry">

      <rect>

       <x>10</x>

       <y>20</y>

       <width>521</width>

       <height>91</height>

      </rect>

     </property>

    </widget>

   </widget>

   <widget class="QPushButton" name="pushButton_4">

    <property name="geometry">

     <rect>

      <x>120</x>

      <y>400</y>

      <width>93</width>

      <height>28</height>

     </rect>

    </property>

    <property name="text">

     <string>清空发送</string>

    </property>

   </widget>

   <widget class="QLabel" name="label">

    <property name="geometry">

     <rect>

      <x>20</x>

      <y>50</y>

      <width>71</width>

      <height>21</height>

     </rect>

    </property>

    <property name="text">

     <string>串口端口</string>

    </property>

   </widget>

   <widget class="QLabel" name="label_2">

    <property name="geometry">

     <rect>

      <x>20</x>

      <y>83</y>

      <width>80</width>

      <height>15</height>

     </rect>

    </property>

    <property name="text">

     <string>串口波特率</string>

    </property>

   </widget>

   <widget class="QLabel" name="label_3">

    <property name="geometry">

     <rect>

      <x>20</x>

      <y>113</y>

      <width>80</width>

      <height>15</height>

     </rect>

    </property>

    <property name="text">

     <string>串口数据位</string>

    </property>

   </widget>

   <widget class="QLabel" name="label_4">

    <property name="geometry">

     <rect>

      <x>20</x>

      <y>143</y>

      <width>80</width>

      <height>15</height>

     </rect>

    </property>

    <property name="text">

     <string>串口校验位</string>

    </property>

   </widget>

   <widget class="QLabel" name="label_5">

    <property name="geometry">

     <rect>

      <x>20</x>

      <y>173</y>

      <width>80</width>

      <height>15</height>

     </rect>

    </property>

    <property name="text">

     <string>串口停止位</string>

    </property>

   </widget>

   <widget class="QLabel" name="label_6">

    <property name="geometry">

     <rect>

      <x>25</x>

      <y>5</y>

      <width>191</width>

      <height>41</height>

     </rect>

    </property>

    <property name="font">

     <font>

      <family>楷体</family>

      <pointsize>12</pointsize>

     </font>

    </property>

    <property name="text">

     <string>欢迎使用调试助手</string>

    </property>

   </widget>

   <widget class="QPushButton" name="pushButton_5">

    <property name="geometry">

     <rect>

      <x>120</x>

      <y>230</y>

      <width>93</width>

      <height>28</height>

     </rect>

    </property>

    <property name="text">

     <string>退出</string>

    </property>

   </widget>

  </widget>

  <widget class="QStatusBar" name="statusBar"/>

  <widget class="QMenuBar" name="menuBar">

   <property name="geometry">

    <rect>

     <x>0</x>

     <y>0</y>

     <width>768</width>

     <height>26</height>

    </rect>

   </property>

   <widget class="QMenu" name="menu">

    <property name="title">

     <string>菜单</string>

    </property>

    <addaction name="separator"/>

    <addaction name="actiondsa"/>

   </widget>

   <widget class="QMenu" name="menu_2">

    <property name="title">

     <string>帮助</string>

    </property>

   </widget>

   <addaction name="menu"/>

   <addaction name="menu_2"/>

  </widget>

  <widget class="QToolBar" name="toolBar">

   <property name="windowTitle">

    <string>toolBar</string>

   </property>

   <attribute name="toolBarArea">

    <enum>TopToolBarArea</enum>

   </attribute>

   <attribute name="toolBarBreak">

    <bool>false</bool>

   </attribute>

  </widget>

  <action name="actiondsa">

   <property name="text">

    <string>退出</string>

   </property>

  </action>

 </widget>

 <layoutdefault spacing="6" margin="11"/>

 <resources/>

 <connections/>

</ui>
界面的实际效果为:
串口调试助手--Qt的更多相关文章
- Ubuntu Linux TinySerial串口调试助手 可视化界面 安装使用
ubuntu Linux下串口调试助手使用 Tiny Serial为一个开源项目,欢迎大家使用,基于Qt开发的串口调试助手,有一般串口助手的基本功能,更多功能正在完善. Github地址:https: ...
- 问题解决——使用串口调试助手发送控制字符 协议指令 <ESC>!?
外行指挥内行的结果就是,你必须按照他想的去做,等做不出来再用自己的办法,而且必须如此. -------------------------------------------------------- ...
- USB转串口连接线与串口调试助手的使用
---作者吴疆,未经允许,严禁转载,违权必究--- ---欢迎指正,需要源码和文件可站内私信联系--- -----------点击此处链接至博客园原文----------- 功能说明:宇泰UT-890 ...
- 串口调试助手---VB源码
watermark/2/text/aHR0cDovL2Jsb2cuY3Nkbi5uZXQv/font/5a6L5L2T/fontsize/400/fill/I0JBQkFCMA==/dissolve/ ...
- 基于串口调试助手的WIFI模块调试-FPGA简单联网(点灯)
根据正点原子的<ATK-ESP8266 WIFI用户手册>,使用XCOM V2.2串口调试助手测试WIFI模块[26].在本系统中运用到的功能主要是TCP/IP模式中的TCP Client ...
- 基于开源串口调试助手修改的qcom
代码已上传码云: https://gitee.com/fensnote/qcom.git 源代码用于串口编程的学习很有价值,谢谢Qter的开源项目,感谢花心萝卜工作室的修改版本. 开源的qt开发的串口 ...
- 11-51单片机ESP8266学习-AT指令(ESP8266作为TCP客户端,连接TCP服务器,用串口调试助手和手机TCP调试助手测试)
写完题目刚想起来一件事情,如果手机作为客户端(不连接路由器的情况下),手机连接模块的无线会分配一个IP地址,,,这个IP地址事先我也不知道....我先看看AT指令里面有没有一个指令可以打印一下连接自己 ...
- 4-51单片机ESP8266学习-AT指令(测试TCP服务器--使用串口调试助手--不连接路由器)
上一篇连接 http://www.cnblogs.com/yangfengwu/p/8757513.html 源码链接:https://pan.baidu.com/s/1wT8KAOIzvkOXXN ...
- C# 串口调试助手源码
本方法,禁用跨进程错误(做法不太好,但是对于单片机出身的人来说,好理解,能用就行). 基本功能: 1.点串口号的下拉菜单自动当前检索设备管理器的COM 2.发送模式可选,hex和string两种 3. ...
随机推荐
- TortoiseSVN 使用教程
TortoiseSVN 使用教程 TortoiseSVN 是 Subversion 版本控制系统的一个免费开源客户端,可以超越时间的管理文件和目录. TortoiseSVN 安装 下载地址:https ...
- poj2456
Aggressive cows Time Limit: 1000MS Memory Limit: 65536K Total Submissions: 24979 Accepted: 11594 ...
- world: 对比两个文档
1. 2. 3. 4.
- SQL-W3School-函数:SQL NOW() 函数
ylbtech-SQL-W3School-函数:SQL NOW() 函数 1.返回顶部 1. NOW() 函数 NOW 函数返回当前的日期和时间. 提示:如果您在使用 Sql Server 数据库,请 ...
- Bitmap之compress图片压缩
package com.loaderman.customviewdemo; import android.app.Activity; import android.graphics.Bitmap; i ...
- java递归删除目录下所有内容
java递归删除目录下所有内容 private static boolean deleteDir(File dir) {if (dir.isDirectory()) { String[] ...
- java的servlet执行过程是怎么样的?
java的servlet执行过程是怎么样 答: Servlet执行过程:程序第一次访问,会调用servlet的init()方法初始化(只执行一次),每次程序执行都会根据请求调用doGet()或者d ...
- svn add 命令 递归目录下所有文件
svn add 命令 递归目录下所有文件 摘自:https://blog.csdn.net/yefl007/article/details/46506281 即使被忽略了也可以使用此命令. svn a ...
- 一个小时学会Git(转载)
---恢复内容开始--- 一个小时学会Git 最近要与部门同事一起做技术分享,我选择了Git,因为Git 是一种在全球范围都广受欢迎的版本控制系统.在开发过程中,为了跟踪代码,文档,项目等信息 ...
- Yarn简单介绍及内存配置
本文出自:http://blog.chinaunix.net/uid/28311809/abstract/1.html 在这篇博客中,主要介绍了Yarn对MRv1的改进,以及Yarn简单的内存配置和Y ...