ios https适配(单向验证)
版权声明:本文为博主原创文章,未经博主允许不得转载。
https是http+tls。是在http和tcp之间添加了一层ssl加密验证,ssl将http发送的信息在将要发到传输层时进行了加密,同样数据从传输层到达http层时需要ssl解密。

如果iOS通过https访问的站点(服务器)证书是ca机构颁发的话,不需要多余的代码,请求以前http的时候怎么写现在还怎么写,只是把请求url的http改成https,但是如果站点的证书是自签证书(如通过java keytool自生成),ios默认是验证不通过的,请求会失败,那么需要在http请求回调里面做两步多余的处理,回调如下:
//证书验证处理

- (void)connection:(NSURLConnection *)connection didReceiveAuthenticationChallenge:(NSURLAuthenticationChallenge *)challenge;

//信任自签证书站点

- (BOOL)connection:(NSURLConnection *)connection canAuthenticateAgainstProtectionSpace:(NSURLProtectionSpace *)protectionSpace;
具体代码:
 - (void)connection:(NSURLConnection *)connection didReceiveAuthenticationChallenge:(NSURLAuthenticationChallenge *)challenge {

     if (([challenge.protectionSpace.authenticationMethod

           isEqualToString:NSURLAuthenticationMethodServerTrust])) {

         if ([challenge.protectionSpace.host isEqualToString:TRUSTED_HOST]) {//TRUSTED_HOST主机名

             NSLog(@"Allowing bypass...");

             NSURLCredential *credential = [NSURLCredential credentialForTrust:

                                            challenge.protectionSpace.serverTrust];

             [challenge.sender useCredential:credential

                  forAuthenticationChallenge:challenge];

         }

     }

     [challenge.sender continueWithoutCredentialForAuthenticationChallenge:challenge];

 }

 - (BOOL)connection:(NSURLConnection *)connection canAuthenticateAgainstProtectionSpace:(NSURLProtectionSpace *)protectionSpace

 {

     return [protectionSpace.authenticationMethod isEqualToString:NSURLAuthenticationMethodServerTrust];

 }
这两个回调相当于做了https请求的全局设置,设置的作用是信任该站点的证书,一般在第一次发https请求的时候设置信任,以后客户端就可以和服务端正常地进行https通信了。
ios原生和uiwebview h5发送https请求的问题都可以通过上面代码处理,uiwebview一样对不信任证书站点会访问失败,原生里面做了对该站点的信任后对h5同样有效,也就是说一旦原生http请求对该站点信任则h5对该站点的访问也会正常。在stackoverflow上面看到一个例子,就是只有uiwebview控件需要对不信任证书站点访问的一种处理方式,既在uiviewview第一次发送https请求的时候在回调里面取消掉这次请求,既在shouldStartLoadWithRequest这个uiwebview回调的时候返回no,并同时用原生http去请求这个地址,并处理回调
设置信任后在原生请求即将收到信息回复的时候(即didReceiveResponse)取消掉该请求,并让uiwebview重新请求。这样信任了站点以后uiwebview请求该站点都可以成功。具体代码来自stackoverflow(http://stackoverflow.com/questions/11573164/uiwebview-to-view-self-signed-websites-no-private-api-not-nsurlconnection-i):
 #pragma mark - Webview delegate

 // Note: This method is particularly important. As the server is using a self signed certificate,

 // we cannot use just UIWebView - as it doesn't allow for using self-certs. Instead, we stop the

 // request in this method below, create an NSURLConnection (which can allow self-certs via the delegate methods

 // which UIWebView does not have), authenticate using NSURLConnection, then use another UIWebView to complete

 // the loading and viewing of the page. See connection:didReceiveAuthenticationChallenge to see how this works.

 - (BOOL)webView:(UIWebView *)webView shouldStartLoadWithRequest:(NSURLRequest *)request navigationType:(UIWebViewNavigationType)navigationType;

 {

     NSLog(@"Did start loading: %@ auth:%d", [[request URL] absoluteString], _authenticated);

     if (!_authenticated) {

         _authenticated = NO;

         _urlConnection = [[NSURLConnection alloc] initWithRequest:_request delegate:self];

         [_urlConnection start];

         return NO;

     }

     return YES;

 }

 #pragma mark - NURLConnection delegate

 - (void)connection:(NSURLConnection *)connection didReceiveAuthenticationChallenge:(NSURLAuthenticationChallenge *)challenge;

 {

     NSLog(@"WebController Got auth challange via NSURLConnection");

     if ([challenge previousFailureCount] == )

     {

         _authenticated = YES;

         NSURLCredential *credential = [NSURLCredential credentialForTrust:challenge.protectionSpace.serverTrust];

         [challenge.sender useCredential:credential forAuthenticationChallenge:challenge];

     } else

     {

         [[challenge sender] cancelAuthenticationChallenge:challenge];

     }

 }

 - (void)connection:(NSURLConnection *)connection didReceiveResponse:(NSURLResponse *)response;

 {

     NSLog(@"WebController received response via NSURLConnection");

     // remake a webview call now that authentication has passed ok.

     _authenticated = YES;

     [_web loadRequest:_request];

     // Cancel the URL connection otherwise we double up (webview + url connection, same url = no good!)

     [_urlConnection cancel];

 }

 // We use this method is to accept an untrusted site which unfortunately we need to do, as our PVM servers are self signed.

 - (BOOL)connection:(NSURLConnection *)connection canAuthenticateAgainstProtectionSpace:(NSURLProtectionSpace *)protectionSpace

 {

     return [protectionSpace.authenticationMethod isEqualToString:NSURLAuthenticationMethodServerTrust];

 }
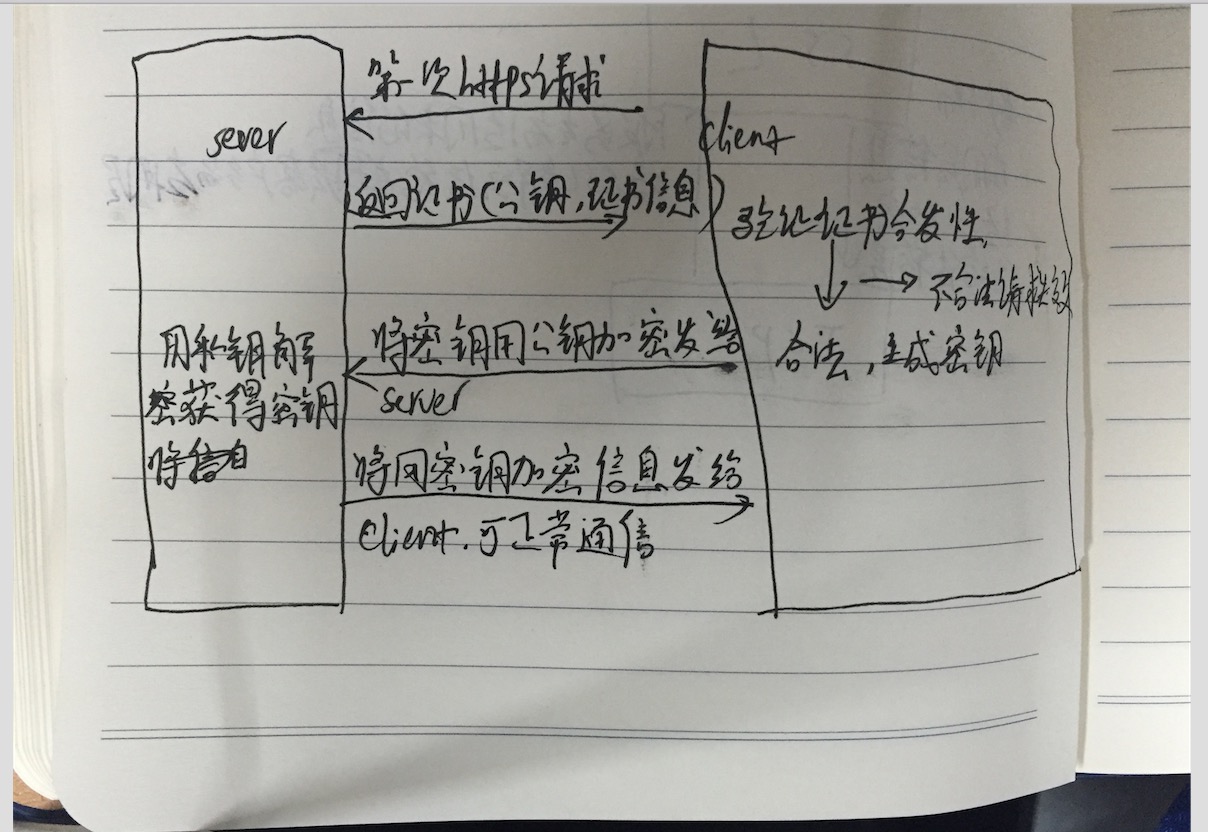
单向验证的原理网上很多,大致流程就是客户端第一次发送https请求到服务端,服务端将证书发送给客户端,该证书包含了公钥和证书的信息,客户端进行证书验证,验证颁发机构是否合法,是否过期,加密方式等。如果验证成功则生成一个随机值(秘钥),该值用来和服务端进行对称加密通信,并用公钥加密,发送给服务端。服务器用证书里的私钥解密获得客户端的密钥,然后服务端和客户端就可以进行https通信了。
个人认为ssl的处理逻辑是客户端会将验证后生成的秘钥保存在本地的某文件里,并在客户端发送https请求时从文件里读取密钥并用证书规定的加密方式加密,然后发送给传输层传输。
AFNetwork添加证书验证
    // /先导入证书

    NSString *cerPath = [[NSBundle mainBundle] pathForResource:@"xxx" ofType:@"cer"];//证书的路径

    NSData *certData = [NSData dataWithContentsOfFile:cerPath];

    // AFSSLPinningModeCertificate 使用证书验证模式

    AFSecurityPolicy *securityPolicy = [AFSecurityPolicy policyWithPinningMode:AFSSLPinningModeCertificate];

    // allowInvalidCertificates 是否允许无效证书(也就是自建的证书),默认为NO

    // 如果是需要验证自建证书,需要设置为YES

    securityPolicy.allowInvalidCertificates = YES;

    securityPolicy.validatesDomainName = NO;

    securityPolicy.pinnedCertificates = @[certData];
使用Keytool生成证书:
1、为服务器生产证书:
keytool -genkey -keyalg RSA -dname "cn=127.0.0.1,ou=inspur,o=none,l=hunan,st=changsha,c=cn" -alias server -keypass -keystore server.keystore -storepass -validity
cn改成你服务器地址
l:省份
st:城市
2、生成csr
csr是用于提交CA认证的文件
keytool -certReq -alias server -keystore server.keystore -file ca.csr
3、生成cer
生成的ca.cer文件用于客户端证书导入信任服务器
keytool -export -alias server -keystore server.keystore -file ca.cer -storepass
4、tomcat配置
<Connector SSLEnabled="true" clientAuth="false"

        maxThreads="" port=""

        protocol="org.apache.coyote.http11.Http11Protocol"

        scheme="https" secure="true" sslProtocol="TLS"

        keystoreFile="/User/xxx/server.keystore" keystorePass=""/>
keystoreFile为文件路径
配置好后,重启tomcat可以使用https访问web工程,端口8443。
ios https适配(单向验证)的更多相关文章
- IOS Https适配摸索
转:http://www.jianshu.com/p/f312a84a944c https封面 在WWDC 2016开发者大会上,苹果宣布了一个最后期限:到2017年1月1日 App Store中的所 ...
- iOS开发 - 用AFNetworking实现https单向验证,双向验证
https相关 自苹果宣布2017年1月1日开始强制使用https以来,htpps慢慢成为大家讨论的对象之一,不是说此前https没有出现,只是这一决策让得开发者始料未及,博主在15年的时候就做过ht ...
- Https 单向验证 双向验证
通讯原理 participant Client participant Server Client->>Server: 以明文传输数据,主要有客户端支持的SSL版本等客户端支持的加密信息 ...
- iOS 10 适配 ATS(app支持https通过App Store审核)
iOS 10 适配 ATS 一. HTTPS 其实HTTPS从最终的数据解析的角度,与HTTP没有任何的区别,HTTPS就是将HTTP协议数据包放到SSL/TSL层加密后,在TCP/IP层组成IP数据 ...
- HTTPS实战之单向验证和双向验证
转载自:https://mp.weixin.qq.com/s/UiGEzXoCn3F66NRz_T9crA 原创: 涛哥 coding涛 6月9日 作者对https 解释的入目三分啊 (全文太长,太懒 ...
- iOS 10 适配 ATS
一. HTTPS 其实HTTPS从最终的数据解析的角度,与HTTP没有任何的区别,HTTPS就是将HTTP协议数据包放到SSL/TSL层加密后,在TCP/IP层组成IP数据报去传输,以此保证传输数据的 ...
- iOS 9 适配中出现的坑
整理 iOS 9 适配中出现的坑(图文) 2015-10-22 iOS开发 库克表示:“现在在中国有150多万的开发者在iOS当中开发应用程序,我们鼓励更多的人开发应用程序,也鼓励更多的创业加入.” ...
- 使用HttpClient连接池进行https单双向验证
https单双向验证环境的搭建参见:http://www.cnblogs.com/YDDMAX/p/5368404.html 一.单向握手 示例程序: package com.ydd.study.he ...
- iOS 9 适配需要注意的问题
iOS 9 适配需要注意的问题 1`网络适配_改用更安全的HTTPS iOS9把所有的http请求都改为https了:iOS9系统发送的网络请求将统一使用TLS 1.2 SSL.采用TLS 1.2 协 ...
随机推荐
- compile vim with lua & python support
vim在macosx 10.9默认没有带lua和python支持,因为装的有些插件是lua写的,有些是python写的,运行不起来,于是决定自己编译一个,下载vim源码,执行以下命令就可以编译vim: ...
- 不能从const char *转换为LPCWSTR
编译器有时候会根据编码方式来选择定义为LPCWSTR还是LPCTSTR LPSTR: 32bit指针 指向一个字符串,每个字符占1字节. 相当于 char * LPCSTR: 32-bit指针 指 ...
- OpenGL法向量变换
OpenGL光照开启时,法向量用于决定特定顶点或面上接受到光照的多少.光照处理过程作用于观察坐标空间,因此,模型对象坐标系的法向量也需要使用GL_MODELVIEW矩阵变换到观察坐标系. 然而,法向量 ...
- Ansible Tower
# Generated by iptables-save v1.4.7 on Tue Aug 23 04:58:34 2016 *filter :INPUT ACCEPT [0:0] :FORWARD ...
- mysql操作记录
use mysql;select host,user,password from user; grant all privileges on *.* to root@'%' identified by ...
- IDEA创建maven项目使用命令打包遇到的问题及解决方法
maven项目命令打包springboot项目 首先打开tomcat命令工具(如图所示):
- mac ssh localhost
转自:http://blog.csdn.net/cwj649956781/article/details/37913637 mac 无法ssh localhost,错误提示:bash: /usr/lo ...
- tcpdump抓SQL[转]
转自:http://www.cnblogs.com/LMySQL/p/5060604.html 前言:假设如果有个服务器几十个链接突然达到上千个链接,show processlist,general_ ...
- C指针详解(经典,非常详细)
前言:复杂类型说明要了解指针,多多少少会出现一些比较复杂的类型,所以我先介绍一下如何完全理解一个复杂类型,要理解复杂类型其实很简单,一个类型里会出现很多运算符,他们也像普通的表达式一样,有优先级,其优 ...
- 停掉Linux固定的进程
ps -ef | grep php 查看进程ID,和信息 kill -s 9 1827 相关命令 ps -ef , ps -aux , pgrep php ,