Spring Boot+redis存储session,满足集群部署、分布式系统的session共享
本文讲述spring-boot工程中使用spring-session机制进行安全认证,并且通过redis存储session,满足集群部署、分布式系统的session共享。
java工程中,说到权限管理和安全认证,我们首先想到的是Spring Security和Apache Shiro,这两者均能实现用户身份认证和复杂的权限管理功能。但是如果我们只是想实现身份认证(如是否登录、会话是否超时),使用session管理即可满足。本文目录如下:
目录:
1. 创建spring-boot项目
2. 用户管理
3. 用户身份认证
4. spring-session配置
5. 使用redis共享session
一、创建spring-boot项目
1、工程使用idea+gradle搭建,jdk1.8,spring-boot版本2.0.2.RELEASE,数据库postgreSQL,持久层spring-data-jpa;
2、新建spring-boot项目,工程type选择Gradle Project;
3、勾选初始化依赖如下:
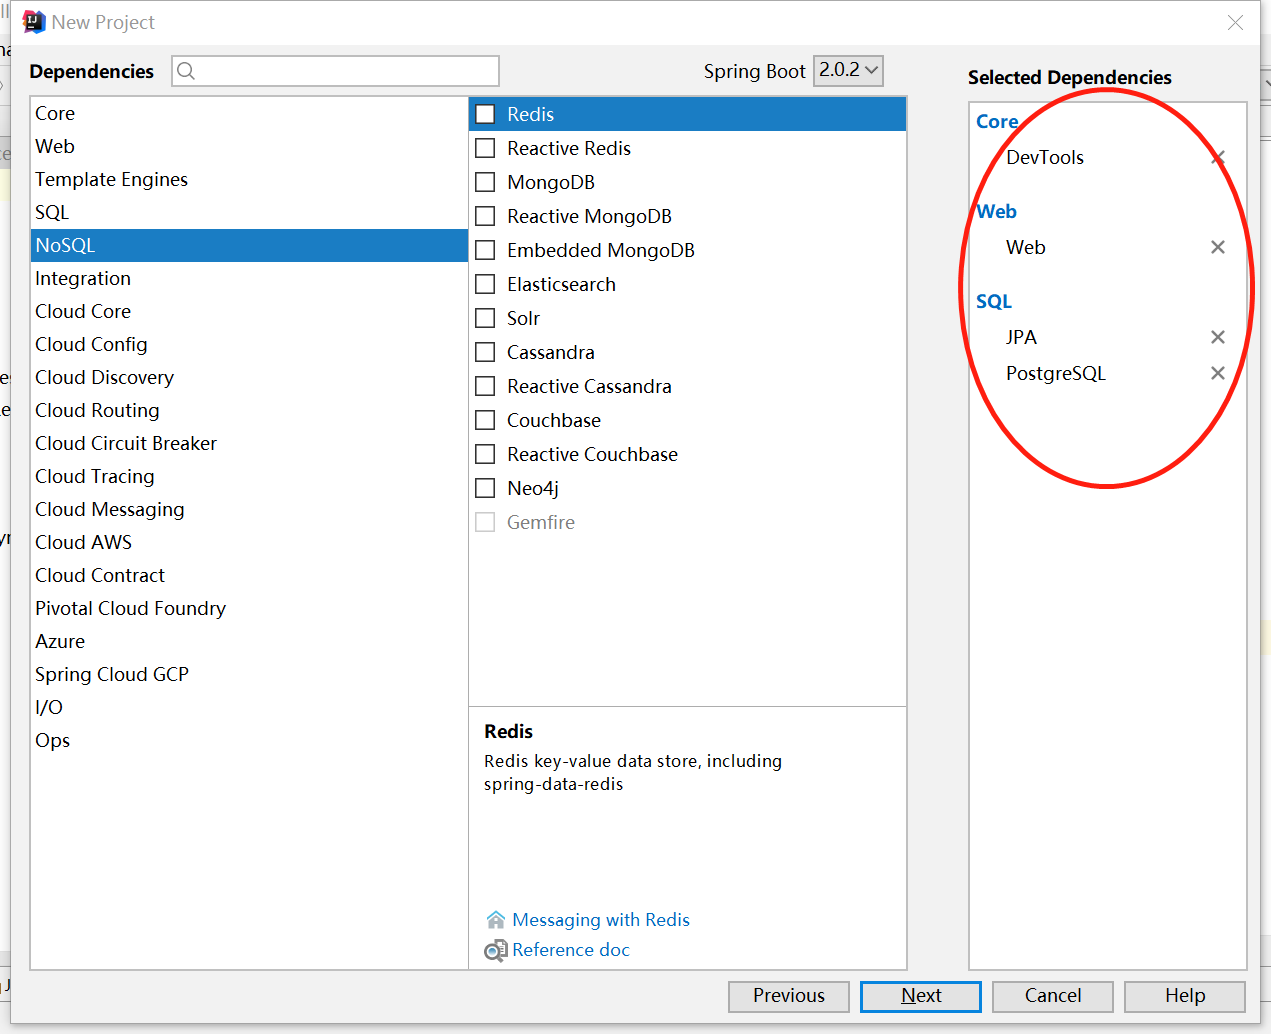
创建完成后gradle.build文件内容如下:
buildscript {

    ext {

        springBootVersion = '2.0.2.RELEASE'

    }

    repositories {

        mavenCentral()

    }

    dependencies {

        classpath("org.springframework.boot:spring-boot-gradle-plugin:${springBootVersion}")

    }

}

apply plugin: 'java'

apply plugin: 'idea'

apply plugin: 'org.springframework.boot'

apply plugin: 'io.spring.dependency-management'

group = 'louie.share'

version = '0.0.1-SNAPSHOT'

sourceCompatibility = 1.8

targetCompatibility = 1.8

repositories {

    mavenCentral()

}

dependencies {

    compile('org.springframework.boot:spring-boot-starter-data-jpa')

    compile('org.springframework.boot:spring-boot-starter-web')

    runtime('org.springframework.boot:spring-boot-devtools')

    runtime('org.postgresql:postgresql')

    testCompile('org.springframework.boot:spring-boot-starter-test')

}
4、application.yml配置数据库及jpa
spring:

  datasource:

    driver-class-name: org.postgresql.Driver

    url: jdbc:postgresql://127.0.0.1:5432/louie

    data-username: louie

    password: louie1234

  jpa:

    database: postgresql

    hibernate:

      ddl-auto: update
二、用户管理
1、创建User实体类
import org.hibernate.annotations.GenericGenerator;

import javax.persistence.Entity;

import javax.persistence.GeneratedValue;

import javax.persistence.Id;

import javax.persistence.Table;

import java.io.Serializable;

/**

 * 用户实体

 * @author louie

 * @date created in 2018-5-12 17:28

 */

@Entity

@Table(name = "b_id_user")

public class User implements Serializable{

   @Id

    @GenericGenerator(name = "idGenerator",strategy = "uuid")

    @GeneratedValue(generator = "idGenerator")

    private String id;

    @NotBlank(message = "account can not be empty")

    private String account;

    @NotBlank(message = "password can not be empty")

    private String password;

    @NotBlank(message = "name can not be empty")

    private String name;

    //省略getter、setter

}
2、用户服务接口
import louie.share.sessionredis.bean.User;

/**

 * 用户服务接口

 * @author louie

 * @date created in 2018-5-12 17:40

 */

public interface UserService {

    /**

     * save user

     * @param user

     * @return 保存后的用户信息

     */

    User saveUser(User user);

    /**

     * find user by account

     * @param account

     * @return

     */

    User findByAccount(String account);

    /**

     * user login

     * @param account

     * @param password

     * @return

     */

    BaseResponse login(String account,String password);

}
这里省略接口的实现,您可以访问我的github和码云查看该工程的源代码(代码地址见文档底部)。
3、用户管理控制器
import louie.share.sessionredis.bean.BaseResponse;

import louie.share.sessionredis.bean.User;

import louie.share.sessionredis.service.UserService;

import org.springframework.beans.factory.annotation.Autowired;

import org.springframework.web.bind.annotation.PathVariable;

import org.springframework.web.bind.annotation.RequestMapping;

import org.springframework.web.bind.annotation.RequestMethod;

import org.springframework.web.bind.annotation.RestController;

/**

 * 用户管理相关控制器

 * @author louie

 * @date created in 2018-5-12 17:26

 */

@RestController

@RequestMapping(value = "/user")

public class UserController {

    @Autowired

    private UserService userService;

    /**

     * save user

     * @param user

     * @return

     */

    @RequestMapping(value = "/save",method = RequestMethod.POST)

    public User save(User user){

        return userService.saveUser(user);

    }

    /**

     * find user by account

     * @param account

     * @return

     */

    @RequestMapping(value = "/find/{account}",method = RequestMethod.GET)

    public User find(@PathVariable String account){

        return userService.findByAccount(account);

    }

    /**

     * user login

     * @param account

     * @param password

     * @return

     */

    @RequestMapping(value = "/login",method = RequestMethod.POST)

    public BaseResponse login(String account,String password){

        return userService.login(account,password);

    }

}
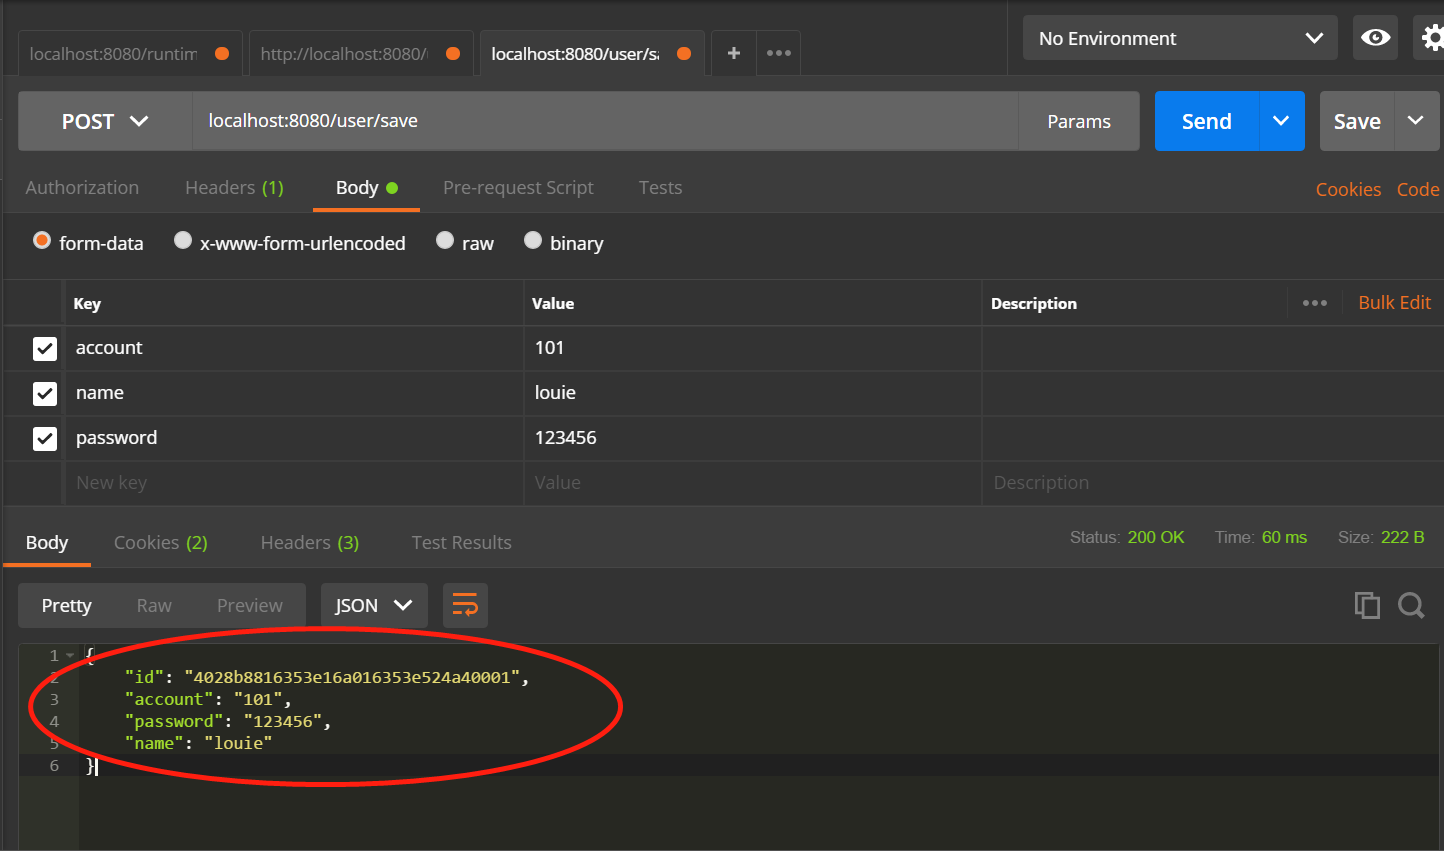
4、创建用户
运行Application类启动服务,使用postMan访问http://localhost:8080/user/save服务创建用户:
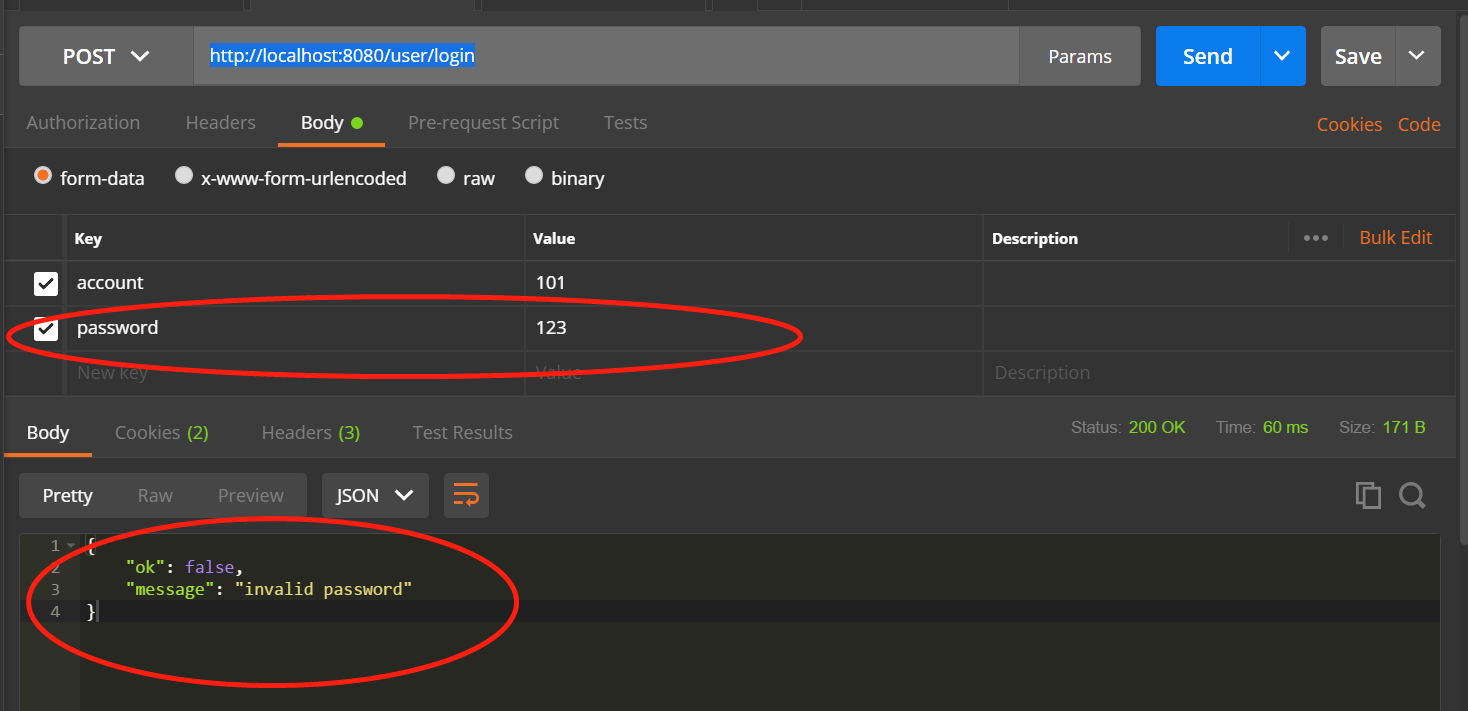
三、用户身份认证
1、使用postMan访问http://localhost:8080/user/login进行用户登录校验:
四、spring-session配置
该部分为重点内容了,目的是实现访问资源时的安全认证、超时控制和用户登出功能。
1、修改用户登录login控制,登录成功后将用户信息写入session
/**

     * user login

     * @param account

     * @param password

     * @return

     */

    @RequestMapping(value = "/login",method = RequestMethod.POST)

    public BaseResponse login(String account, String password,HttpSession session){

        BaseResponse response = userService.login(account,password);

        if (response.isOk()){

            session.setAttribute(session.getId(),response.getData());

        }

        return response;

    }
2、新增用户登出logout功能,将用户信息移除session
    /**

     * user logout

     * @param session

     * @return

     */

    @RequestMapping(value = "/logout")

    public String logout(HttpSession session){

        session.removeAttribute(session.getId());

        return "user logout success";

    }
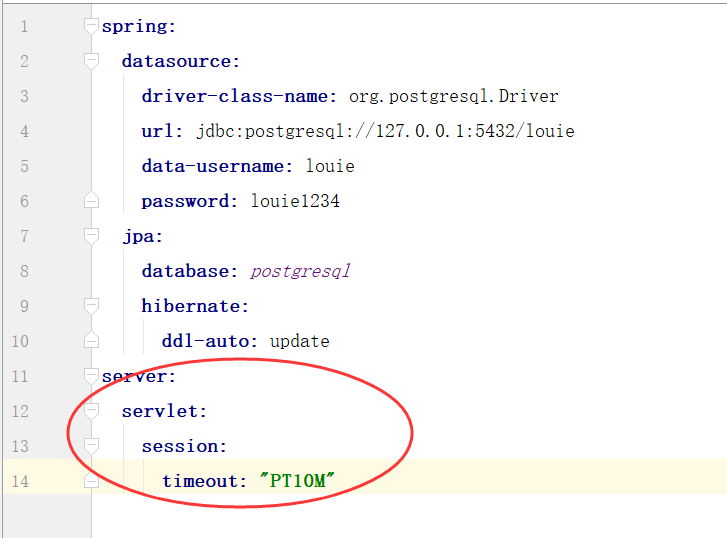
3、设置session过期时间
spring:

  datasource:

    driver-class-name: org.postgresql.Driver

    url: jdbc:postgresql://127.0.0.1:5432/louie

    data-username: louie

    password: louie1234

  jpa:

    database: postgresql

    hibernate:

      ddl-auto: update

server:

  servlet:

    session:

      timeout: "PT10M"
以下是为session有效时长为10分钟:
4、添加拦截器,通过session判断用户是否有效
import com.alibaba.fastjson.JSON;

import louie.share.sessionredis.bean.BaseResponse;

import org.springframework.context.annotation.Configuration;

import org.springframework.web.servlet.HandlerInterceptor;

import org.springframework.web.servlet.config.annotation.InterceptorRegistry;

import org.springframework.web.servlet.config.annotation.WebMvcConfigurer;

import javax.servlet.http.HttpServletRequest;

import javax.servlet.http.HttpServletResponse;

import javax.servlet.http.HttpSession;

import java.io.IOException;

/**

 * @author louie

 * @date created in 2018-5-12 19:02

 */

@Configuration

public class SessionCofig implements WebMvcConfigurer{

    @Override

    public void addInterceptors(InterceptorRegistry registry) {

        registry.addInterceptor(new SecurityInterceptor())

                //排除拦截

                .excludePathPatterns("/user/login")

                .excludePathPatterns("/user/logout")

                //拦截路径

                .addPathPatterns("/**");

    }

    @Configuration

    public class SecurityInterceptor implements HandlerInterceptor{

        @Override

        public boolean preHandle(HttpServletRequest request, HttpServletResponse response, Object handler) throws IOException {

            HttpSession session = request.getSession();

            if (session.getAttribute(session.getId()) != null){

                return true;

            }

            response.getWriter().write(JSON.toJSONString(

                    new BaseResponse(){{

                        setOk(false);

                        setMessage("please login first");

                    }}

            ));

            return false;

        }

    }

}
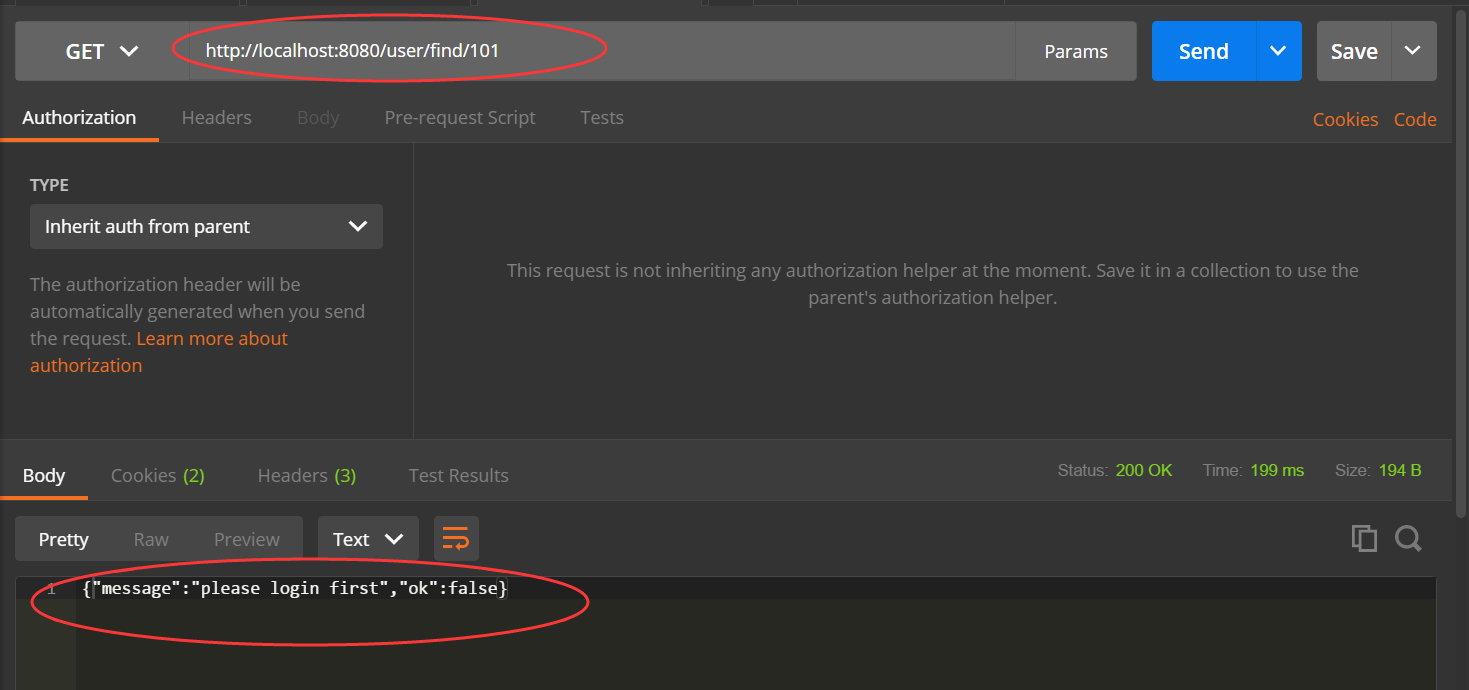
5、使用postMan访问http://localhost:8080/user/find/101,用户未登录,被拦截:
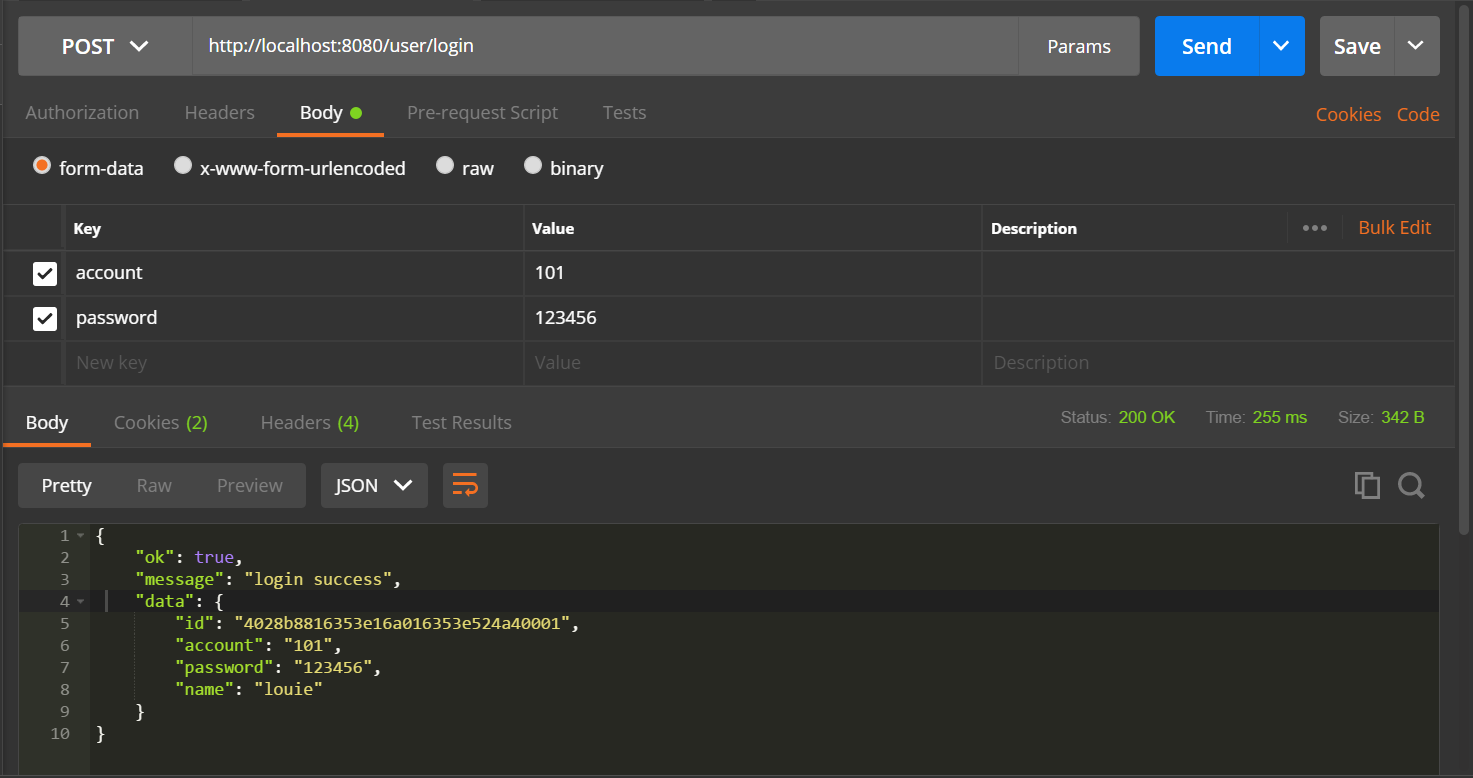
访问http://localhost:8080/user/login登录:
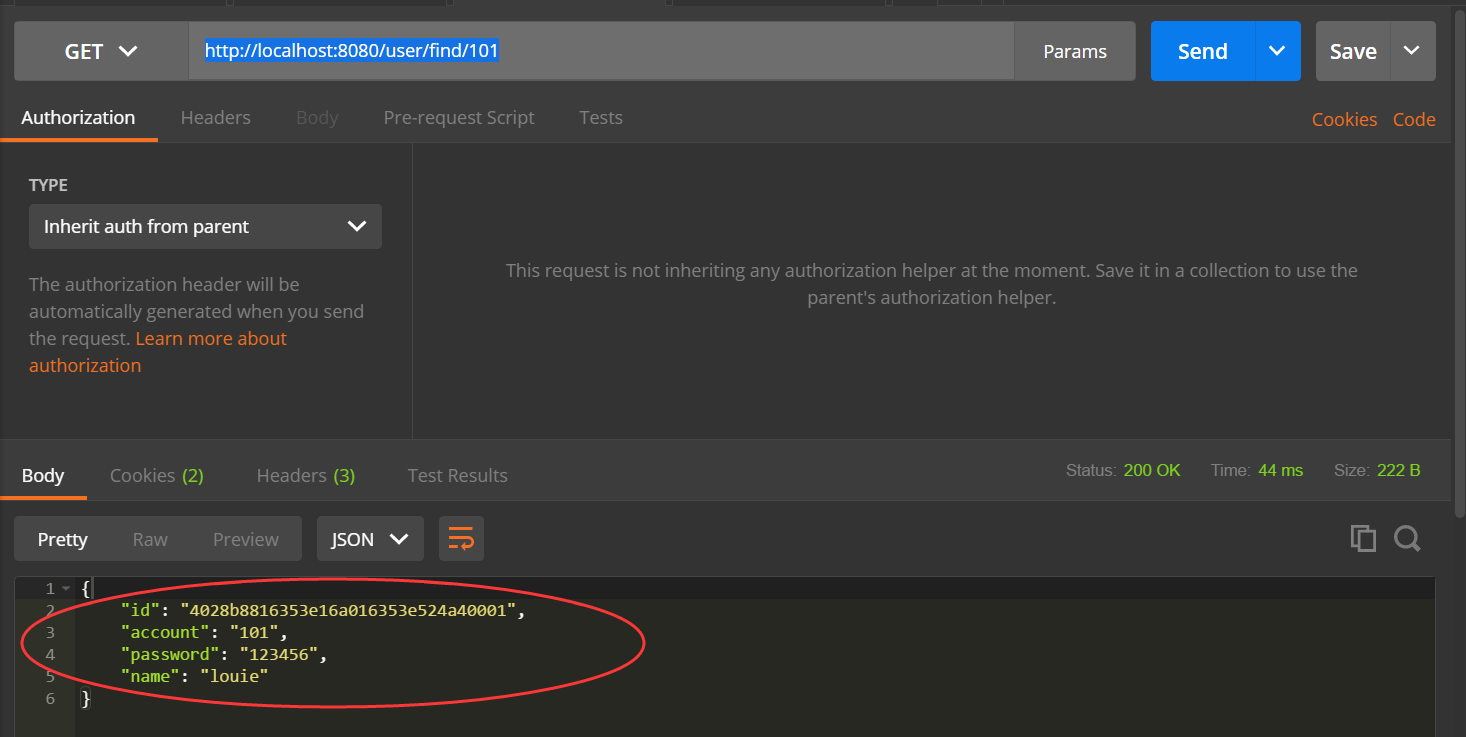
再次访问访问http://localhost:8080/user/find/101:
五、使用redis存储session
1、添加依赖
compile('org.springframework.boot:spring-boot-starter-data-redis')

compile('org.springframework.session:spring-session-data-redis')
2、application.yml中添加配置
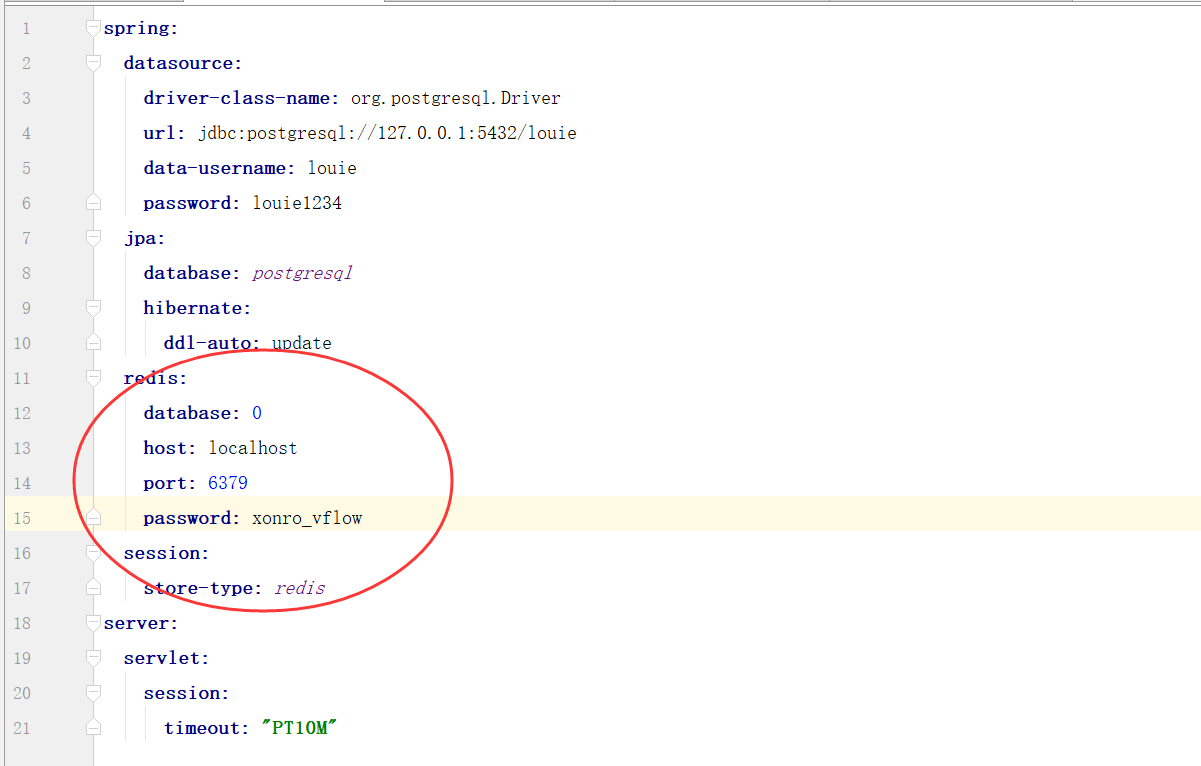
源代码:
spring:

  datasource:

    driver-class-name: org.postgresql.Driver

    url: jdbc:postgresql://127.0.0.1:5432/louie

    data-username: louie

    password: louie1234

  jpa:

    database: postgresql

    hibernate:

      ddl-auto: update

  redis:

    database: 0

    host: localhost

    port: 6379

    password: xonro_vflow

  session:

    store-type: redis

server:

  servlet:

    session:

      timeout: "PT10M"
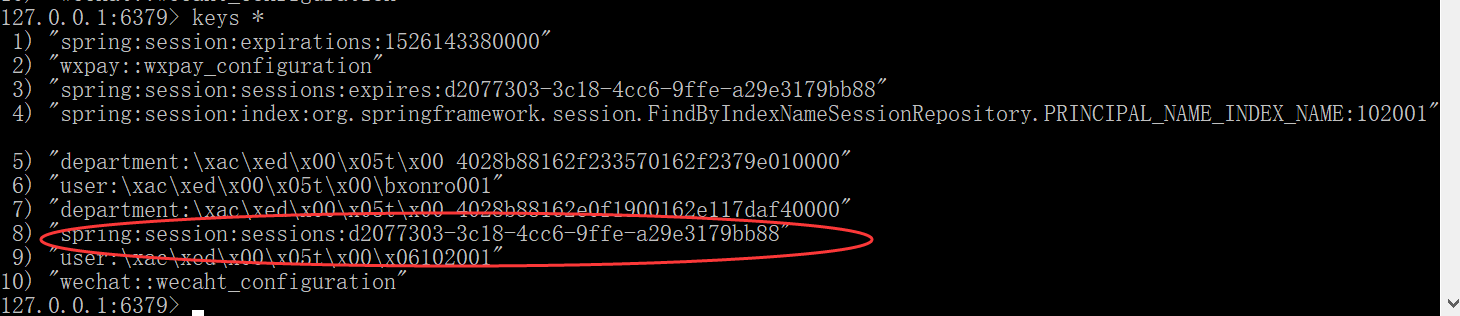
3、启动redis和application类,用户登录,查看redis内容:
debug查看:
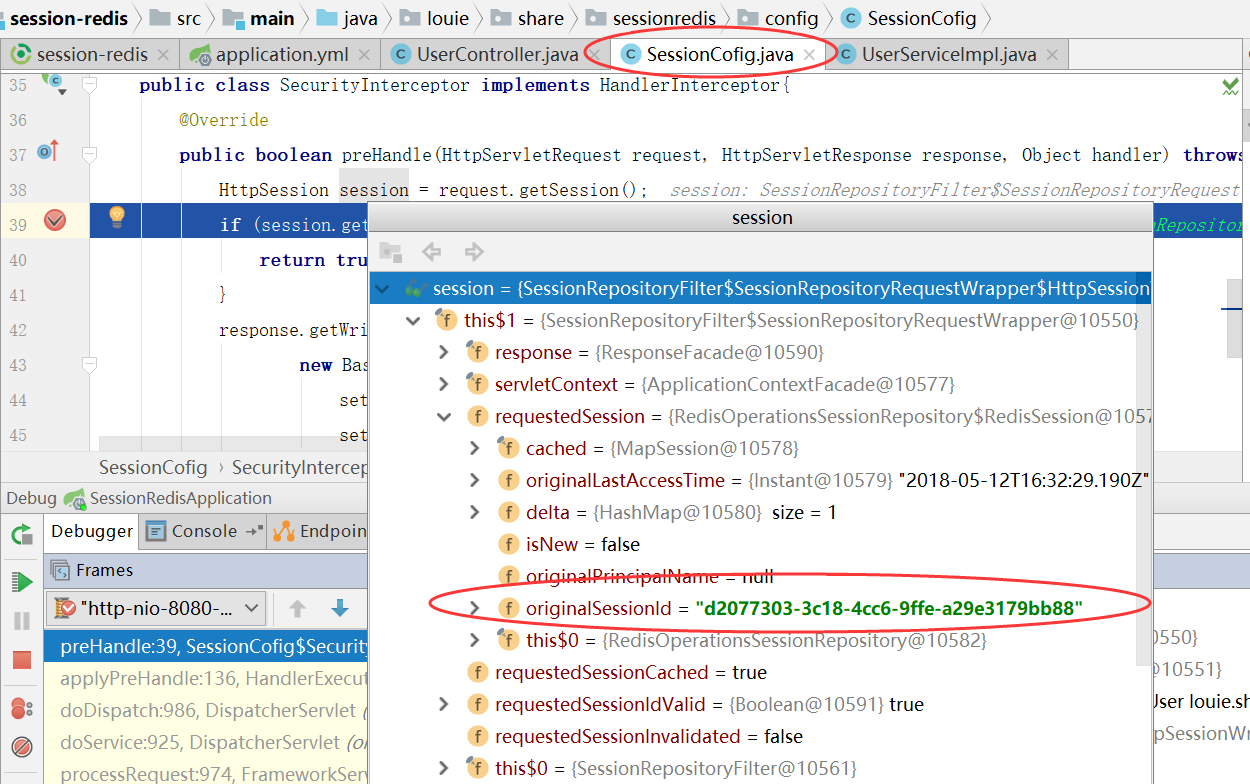
redis内容:
工程代码已共享至github和码云,欢迎探讨学习。
-END-

Spring Boot+redis存储session,满足集群部署、分布式系统的session共享的更多相关文章
- Redis 中常见的集群部署方案
Redis 的高可用集群 前言 几种常用的集群方案 主从集群模式 全量同步 增量同步 哨兵机制 什么是哨兵机制 如何保证选主的准确性 如何选主 选举主节点的规则 哨兵进行主节点切换 切片集群 Redi ...
- 使用Tomcat+Redis来实现集群部署中的Session共享问题
一.工作中因为要使用到Tomcat集群部署,此时就涉及到了Session共享问题,主要有三种解决方案: 1.使用数据库来存储Session 2.使用Cookie来存储Session 3.使用Redis ...
- 使用Tomcat-redis-session-manager来实现Tomcat集群部署中的Session共享
一.工作中因为要使用到Tomcat集群部署,此时就涉及到了Session共享问题,主要有三种解决方案: 1.使用数据库来存储Session 2.使用Cookie来存储Session 3.使用Redis ...
- spring集成Redis(单机、集群)
一.单机redis配置 1. 配置redis连接池 <bean id="jedisPoolConfig" class="redis.clients.jedis.Je ...
- redis 配置文件解释 以及集群部署
redis是一款开源的.高性能的键-值存储(key-value store),和memcached类似,redis常被称作是一款key-value内存存储系统或者内存数据库,同时由于它支持丰富的数据结 ...
- redis 3.0的集群部署
转载请注明出处:http://hot66hot.iteye.com/admin/blogs/2050676 最近研究redis-cluster,正好搭建了一个环境,遇到了很多坑,系统的总结下,等到re ...
- (转)redis 3.0的集群部署
一:关于redis cluster 1:redis cluster的现状 reids-cluster计划在redis3.0中推出,可以看作者antirez的声明:http://antirez.com/ ...
- Redis 3.0.0 集群部署
简述: 1.0.1:redis cluster的现状 目前redis支持的cluster特性 1):节点自动发现 2):slave->master 选举,集群容错 3):Hot reshardi ...
- NAT集群部署solo之session server
author:JevonWei 版权声明:原创作品 使用Nginx做代理服务器,部署solo,使用session server做会话黏滞 拓扑图 环境 tomcatA 172.16.253.108 t ...
随机推荐
- IIC基本概念和基本时序
1. IIC基本概念和基本时序 1.1 I2C串行总线概述 I2C总线是PHLIPS公司推出的一种串行总线,是具备多主机系统所需的包括总线裁决和高低速器件同步功能的高性能串行总线. 1.I2C总线具有 ...
- [leetcode]27. Remove Element删除元素
Given an array nums and a value val, remove all instances of that value in-place and return the new ...
- 为了应对异常情况,提供最原始的python第三方库的安装方法:手动安装。往往是Windows用户需要用到这种方法。
进入pypi.python.org,搜索你要安装的库的名字,这时候有3中可能: 第一种是exe文件,这种最方便,下载满足你的电脑系统和python环境的对应的exe,再一路点击next就可以安装. 第 ...
- PHP开发——数组
数组的概念 l 数组是一组数的集合.如:$arr = array(1,2,3,4,5,6) l 标量数据类型是一个值的容器,而数组就是多个值的容器. 数组的分类 l 枚举数组:数组元素的下标(索 ...
- jquery.validate.js的简单示例
一.官方资料 官网 github 二.html <!DOCTYPE html> <html> <head> <meta charset="utf-8 ...
- Laravel-nestedset that base left and right values tree package
This is a Laravel 4-5 package for working with trees in relational databases. Laravel 5.5, 5.6, 5.7, ...
- [Selenium] 在Chrome的开发者工具中验证检查XPath/CSS selectors
Evaluate and validate XPath/CSS selectors in Chrome Developer Tools Method 1 : From Elements panel U ...
- spring源码分析之初始化过程
1.org.springframework.web.context.ContextLoaderListener 一个ServletContextListener,web容器启动监听器 1.1内有成员C ...
- Noxim Overview
PE+Router= Tile Node Architectural Elements: Buffer.h, Router.h, LocalRoutingTable.h, Tile.h, NoC.h, ...
- 引用数据类型 Scanner和 Random
键盘录入Scanner 获取键盘录入的数据,对获取数据的具体操作进行了封装,只需要调用方法,即可得到键盘录入的数据 A:导包 import java.util.Scanner; ...