python 操作消息队列
图示
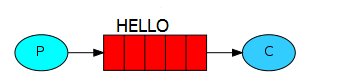
其中P指producer,即生产者;C指consumer,即消费者。中间的红色表示消息队列,实例中表现为HELLO队列。
往队列里插入数据前,查看消息队列
$sudo rabbitmqctl  list_queues

Listing queues ...

celeryev.db53a5e0-1e6a-4f06-a9f7-2c104c4612fb

...done.
插入消息队列代码
#in_queue.py
#coding=utf8

import pika

connection = pika.BlockingConnection(pika.ConnectionParameters('localhost'))

channel = connection.channel()

#声明队列,如果消息发送到不存在的队列,rabbitmq会自动清除这些消息

channel.queue_declare(queue='HELLO')

for i in range(10):

    #exchange表示交换器,可以精确的制定消息应发到哪个队列,route_key设置队列的名称,body表示发送的内容

    channel.basic_publish(exchange='', routing_key='HELLO', body='Hello World!' + str(i))

    print " [%d] Sent 'Hello World!'" % i

#关闭连接

connection.close()
执行结果
$python  in_queue.py

 [0] Sent 'Hello World!'

 [1] Sent 'Hello World!'

 [2] Sent 'Hello World!'

 [3] Sent 'Hello World!'

 [4] Sent 'Hello World!'

 [5] Sent 'Hello World!'

 [6] Sent 'Hello World!'

 [7] Sent 'Hello World!'

 [8] Sent 'Hello World!'

 [9] Sent 'Hello World!'
此时查看消息队列
$sudo rabbitmqctl  list_queues

Listing queues ...

HELLO    10

celeryev.db53a5e0-1e6a-4f06-a9f7-2c104c4612fb    0

...done.
可以看到队列HELLO里面有10条数据。
读取消息队列数据
#out_queue.py
#coding=utf8

import pika

connection = pika.BlockingConnection(pika.ConnectionParameters('localhost'))

channel = connection.channel()

channel.queue_declare(queue='HELLO')

def callback(ch, method, properties, body):

    print " [x] Received %r" % (body,)

channel.basic_consume(callback, queue='HELLO', no_ack=True)

print ' [*] Waiting for messages. To exit press CTRL+C'

channel.start_consuming()
执行结果
$python out_queue.py

 [*] Waiting for messages. To exit press CTRL+C

 [x] Received 'Hello World!0'

 [x] Received 'Hello World!1'

 [x] Received 'Hello World!2'

 [x] Received 'Hello World!3'

 [x] Received 'Hello World!4'

 [x] Received 'Hello World!5'

 [x] Received 'Hello World!6'

 [x] Received 'Hello World!7'

 [x] Received 'Hello World!8'

 [x] Received 'Hello World!9'
此时查看消息队列
$sudo rabbitmqctl  list_queues

Listing queues ...

HELLO    0

celeryev.db53a5e0-1e6a-4f06-a9f7-2c104c4612fb    0

...done.
可以看到队列HELLO中的数据被读走了,条数为0。
未完待续
http://www.01happy.com/ubuntu-rabbitmq-and-python-practice/
python 操作消息队列的更多相关文章
- rabbit mq的php使用 php-amqplib操作消息队列
rabbit mq的php使用 php-amqplib操作消息队列 有大神翻译的教程,非常清楚可以参考: https://xiaoxiami.gitbook.io/rabbitmq_into_chin ...
- python之消息队列
引言 你是否遇到过两个(多个)系统间需要通过定时任务来同步某些数据?你是否在为异构系统的不同进程间相互调用.通讯的问题而苦恼.挣扎?如果是,那么恭喜你,消息服务让你可以很轻松地解决这些问题.消息服务擅 ...
- Python RabbitMQ消息队列
python内的队列queue 线程 queue:不同线程交互,不能夸进程 进程 queue:只能用于父进程与子进程,或者同一父进程下的多个子进程,进行交互 注:不同的两个独立进程是不能交互的. ...
- 架构设计之NodeJS操作消息队列RabbitMQ
一. 什么是消息队列? 消息(Message)是指在应用间传送的数据.消息可以非常简单,比如只包含文本字符串,也可以更复杂,可能包含嵌入对象. 消息队列(Message Queue)是一种应用间的通信 ...
- python使用消息队列RabbitMq(入门)
windows平台开发和使用 安装 安装Erlang:https://pan.baidu.com/s/1QcZDaI205uaue7mMWh5cSA 安装RabbitMQ:https://pan.ba ...
- nodejs操作消息队列RabbitMQ
一. 什么是消息队列 消息队列(Message Queue,简称MQ),从字面意思上看,本质是个队列,FIFO先入先出,只不过队列中存放的内容是message而已.其主要用途:不同进程Process/ ...
- Python RabbitMQ 消息队列
RabbitMQ是一个在AMQP基础上完整的,可复用的企业消息系统.他遵循Mozilla Public License开源协议. MQ全称为Message Queue, 消息队列(MQ)是一种应用程序 ...
- python使用消息队列RabbitMq(进阶)
import pika connection = pika.BlockingConnection(pika.ConnectionParameters( 'localhost')) channel = ...
- php中对共享内存,消息队列的操作
http://www.cnblogs.com/fengwei/archive/2012/09/12/2682646.html php作为脚本程序,通常生命周期都很短,如在web应用中,一次请求就是ph ...
随机推荐
- ajax与HTML5 history pushState/replaceState实例
一.本文就是个实例展示 三点: 我就TM想找个例子,知道如何个使用,使用语法什么的滚粗 跟搜索引擎搞基 自己备忘 精力总是有限的,昨天一冲动,在上海浦东外环之外订了个90米的房子,要借钱筹首付.贷款和 ...
- 种树 & 乱搞
题意: 在一个(n+1)*(m+1)的网格点上种k棵树,树必须成一条直线,相邻两棵树距离不少于D,求方案数. SOL: 这题吧...巨坑无比,本来我的思路是枚举每一个从(0,0)到(i,j)的矩形,然 ...
- ACM: 限时训练题解-Street Lamps-贪心-字符串【超水】
Street Lamps Bahosain is walking in a street of N blocks. Each block is either empty or has one la ...
- jquery delay()介绍及使用指南
.delay()是用来在jQuery动画效果和类似队列中是最好的.但是,由于其本身的限制,比如无法取消延时——.delay(),它不是JavaScript的原生 setTimeout函数的替代品,这可 ...
- jQuery取得select选中的值
$("#sxselect").change(function(){ alert($("#sxselect option:selected").val()); } ...
- Oracle connect by 树查询之二
先用scott用户下的emp表做实验.emp表有个字段,一个是empno(员工编号),另一个是mgr(上级经理编号)下面是表中所有数据 1 select * from emp start with e ...
- 一键搞定JavaEE应用,JRE+Tomcat+Mysql-JaveEE绿色运行环境JTM0.9版
本文转载自[http://www.blogjava.net/huliqing/archive/2009/01/09/247375.html] 这是一个集成了jre,tomcat,mysql的绿色运行环 ...
- JS中的window.setTimeout()详解
相关用法: setTimeout (表达式,延时时间)setInterval (表达式,交互时间)其中延时时间/交互时间是以豪秒为单位的(1000ms=1s) setTimeout 在执行时,是在载入 ...
- Odoo 中group domain的优化应用
首先一个前提是 odoo 默认情况下 一个menu 只能绑定一个action 而这个action中只有一个domain,而我们的需求是需要点击菜单,然后根据用户所属的组的不同而选择不同的action, ...
- Linux下安装PHP
从php官网下载好需要php的压缩包,我下的是5.5.37版, 解压:# tar -xvf php-5.5.37.tar.gz 移至解压出的文件夹:# cd php-5.5.37 检查安装环境:# . ...