京东云上centos8.2 安装 consul1.11.1
做个笔记下
--
前言
部分内容有参考网友的,但是地址不记得了!
安装内容基本参考官网的和上一个网友的
官网地址:
https://www.consul.io/downloads
以下是使用root方式安装的。
如果是consul,则建议先创建consul用户,再以consul登录
安装
sudo yum install -y yum-utils
sudo yum-config-manager --add-repo https://rpm.releases.hashicorp.com/RHEL/hashicorp.repo
sudo yum -y install consul
注意:root用户,省略sudu
配置
启动服务配置-修改启动文件consul.service
[Unit]
Description="HashiCorp Consul - A service mesh solution"
Documentation=https://www.consul.io/
Requires=network-online.target
After=network-online.target
ConditionFileNotEmpty=/etc/consul.d/consul.hcl
[Service]
EnvironmentFile=/etc/consul.d/consul.env
User=root
Group=root
ExecStart=/usr/bin/consul agent -config-dir=/etc/consul.d/
#不持久化 -dev
#ExecStart=/usr/bin/consul agent -dev -config-dir=/etc/consul.d/
ExecReload=/bin/kill --signal HUP $MAINPID
KillMode=process
KillSignal=SIGTERM
Restart=on-failure
LimitNOFILE=65536
[Install]
WantedBy=multi-user.target
--
consul参数配置
具体可以看 https://www.consul.io/docs/agent/options
可以命令行,可以是json,hcl之类的,主要是为了兼容老习惯
添加额外的参数文件(在/etc/consul.d/下添加sever.json,注意只要是json结尾即可,叫啥无所谓)
{
"datacenter": "dc1",
"data_dir": "/data/data/consul",
"log_level": "INFO",
"node_name": "foobar",
"server": true,
"ports": {
"http": 8500,
"https": -1,
"dns": 8600,
"grpc": -1,
"serf_lan": 8001,
"serf_wan": 8002,
"server": 8003
}
}
另外,这个版本中,有个默认的 /etc/consul.d/consul.hcl
修改几个参数:
# 任意客户端都可以链接--2021
client_addr = "0.0.0.0"
# 启动内置ui-web管理--2021dd
ui_config{
enabled = true
}
bind_addr = "0.0.0.0"
advertise_addr = "127.0.0.1"
# 指定只有一个节点,否则总是会提示 No cluster leader
bootstrap_expect=1
这些配置的大体意思就是 使用server模式(单节点)启动,web端口为8500,任意客户端可以连接!
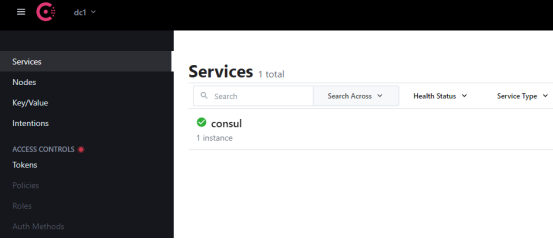
最后看下启动后的界面
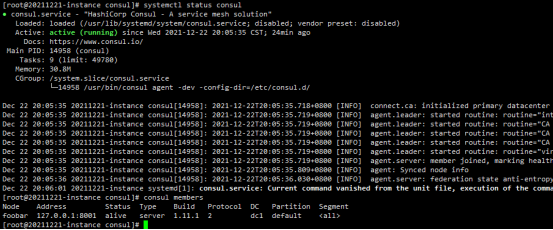
看下管理界面
最后,能不能用,还得通过springboot来验证:https://www.cnblogs.com/MrSi/p/13961890.html
--- 根据以上的提示
Springboot工程验证
1.使用sts创建一个springboot工程,pom配置如下
<?xml version="1.0" encoding="UTF-8"?>

<project xmlns="http://maven.apache.org/POM/4.0.0" xmlns:xsi="http://www.w3.org/2001/XMLSchema-instance"

    xsi:schemaLocation="http://maven.apache.org/POM/4.0.0 https://maven.apache.org/xsd/maven-4.0.0.xsd">

    <modelVersion>4.0.0</modelVersion>

    <parent>

        <groupId>org.springframework.boot</groupId>

        <artifactId>spring-boot-starter-parent</artifactId>

        <version>2.6.2</version>

        <relativePath/> <!-- lookup parent from repository -->

    </parent>

    <groupId>org.lzf</groupId>

    <artifactId>vehicle-base</artifactId>

    <version>0.0.1-SNAPSHOT</version>

    <name>consul-test</name>

    <description>Demo project for Spring Boot</description>

    <properties>

        <java.version>1.8</java.version>

        <spring-cloud.version>2021.0.0</spring-cloud.version>

    </properties>

    <dependencies>

        <dependency>

            <groupId>org.springframework.cloud</groupId>

            <artifactId>spring-cloud-starter-bootstrap</artifactId>

        </dependency>

        <!--  添加热部署 -->

        <dependency>

           <groupId>org.springframework.boot</groupId>

           <artifactId>spring-boot-devtools</artifactId>

        </dependency>

        <dependency>

            <groupId>org.springframework.boot</groupId>

            <artifactId>spring-boot-starter-jdbc</artifactId>

        </dependency>

        <dependency>

            <groupId>org.springframework.boot</groupId>

            <artifactId>spring-boot-starter-web</artifactId>

        </dependency>

        <dependency>

            <groupId>org.springframework.cloud</groupId>

            <artifactId>spring-cloud-starter-consul-config</artifactId>

        </dependency>

        <dependency>

            <groupId>org.springframework.cloud</groupId>

            <artifactId>spring-cloud-starter-consul-discovery</artifactId>

        </dependency>

         <!-- 引入 Spring Boot Actuator 组件,因为需要通过它提供健康检查的接口给 Consul -->

        <dependency>

            <groupId>org.springframework.boot</groupId>

            <artifactId>spring-boot-starter-actuator</artifactId>

        </dependency>

        <dependency>

            <groupId>mysql</groupId>

            <artifactId>mysql-connector-java</artifactId>

            <scope>runtime</scope>

        </dependency>

        <dependency>

            <groupId>org.springframework.boot</groupId>

            <artifactId>spring-boot-starter-test</artifactId>

            <scope>test</scope>

        </dependency>

    </dependencies>

    <dependencyManagement>

        <dependencies>

            <dependency>

                <groupId>org.springframework.cloud</groupId>

                <artifactId>spring-cloud-dependencies</artifactId>

                <version>${spring-cloud.version}</version>

                <type>pom</type>

                <scope>import</scope>

            </dependency>

        </dependencies>

    </dependencyManagement>

    <build>

        <plugins>

            <plugin>

                <groupId>org.springframework.boot</groupId>

                <artifactId>spring-boot-maven-plugin</artifactId>

            </plugin>

        </plugins>

    </build>

</project>
2.创建一个application.properties
#开发-热部署

spring.devtools.restart.enabled=true

server.port=8762

# Spring

spring.application.name=customer-service

#actuator监控信息

info.app.name=应用服务器-8762

info.company.name=org.lzf

info.build.artifactId=cloud-customer

info.build.version=1.0-SNAPSHOT

#其余省略
3.创建一个boostrap.yml
spring:

  cloud:

    consul:

      config:

        enabled: true

        format: YAML

        data-key: data

        watch:

          enabled: true

        prefix: config

      discovery:

        enabled: true

        heartbeat:

          enabled: true

        health-check-interval: 5s

        health-check-path: /actuator/health

        instance-id: customer-service.8762

        prefer-ip-address: true

      enabled: true

      host: 114.67.246.199

      port: 8500
4.启动类记得加注解 @EnableDiscoveryClient
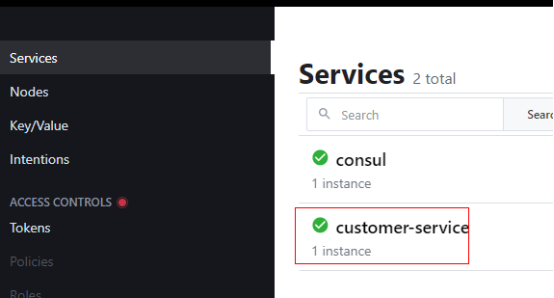
最后检测是ok的:
京东云上centos8.2 安装 consul1.11.1的更多相关文章
- 阿里云服务器 centos 7 安装postgresql 11
Postgresql简介 官方网站:https://www.postgresql.org/ 简介参考zhihu文章 https://www.zhihu.com/question/20010554 关于 ...
- 矩池云上nvidia opencl安装及测试教程
本教程租用的是2080ti,3.7多框架镜像. 添加nvidia-cuda的阿里源 curl -fsSL https://mirrors.aliyun.com/nvidia-cuda/ubuntu18 ...
- 矩池云上如何快速安装tensorRT
国内镜像 https://mirrors.cloud.tencent.com/nvidia-machine-learning/ubuntu1804/x86_64/ 检查系统版本 source /etc ...
- 矩池云上如何快速安装nvcc
若您想要使用 nvcc,但是所选的镜像中没有预装 nvcc,可按照如下操作自行安装. 1.检查系统版本 source /etc/os-release && echo $VERSION_ ...
- JAE京东云引擎Git上传管理代码教程和京东云数据库导入导出管理
文章目录 Git管理准备工作 Git工具上传代码 发布代码装程序 mywebsql管理 京东云引擎小结 JAE京东云引擎是京东推出的支持Java.Ruby.Python.PHP.Node.js多语 ...
- 干货 | 利用京东云Web应用防火墙实现Web入侵防护
摘要 本指南描述如何利用京东云Web应用防火墙(简称WAF),对一个简单的网站(无论运行在京东云.其它公有云或者IDC)进行Web完全防护的全过程.该指南包括如下内容: 准备环境 在京东云上准备Web ...
- 干货 | 运维福音——Terraform自动化管理京东云
干货 | 运维福音--Terraform自动化管理京东云 原创: 张宏伟 京东云开发者社区 昨天 Terraform是一个高度可扩展的IT基础架构自动化编排工具,主张基础设施即代码,可通过代码集中管 ...
- 干货 | 京东云Kubernetes集群+Traefik实战
摘要 Traefik支持丰富的annotations配置,可配置众多出色的特性,例如:自动熔断.负载均衡策略.黑名单.白名单.所以Traefik对于微服务来说简直就是一神器. 利用Traefik,并结 ...
- Developer Friendly | 基础设施即代码的事实标准Terraform已支持京东云!
Developer Friendly | 基础设施即代码的事实标准Terraform已支持京东云! Chef.Puppet.Ansible.SaltStack 都可以称为配置管理工具,这些工具的主要目 ...
- 京东云数据库 RDS助力企业便捷运维
iPhone6发布那年,京东在国贸等商圈送货最快速度数分钟,包括从下单到送达.这是一个极端的富含营销因素例子.即便如此,常态来看,隔天到货的这种业务模式,也是基于同样的支撑:营销业务.物流业务,大数据 ...
随机推荐
- dotnet 使用 WpfAnalyzers 辅助分析 WPF 应用代码缺陷
引入 WpfAnalyzers 代码分析工具,相当于给团队加入一个免费的代码审查工具人,可以帮忙在日常开发找到很多代码缺陷.加入 WpfAnalyzers 代码分析工具,可以减少代码编写里的低级缺陷, ...
- dotnet 教你写一个可以搞炸本机所有 WCF 应用的程序方法
作为团队里面挖掘机出身的我,怎么能不多挖一些坑好将小伙伴们都埋进去呢.本文来告诉大家一个有趣且简单的方法,此方法可以将本机的 WCF 玩坏,不敢说真的搞炸本机所有 WCF 应用,但搞炸大部分基于 WC ...
- html+jq实现全国省的单选,弹框输入input
<!DOCTYPE html> <html> <head> <meta charset="UTF-8"> <meta name ...
- 在网页上直接运行Win11,5秒内用AI克隆自己的声音 | 蛮三刀酱的Github周刊第二期
大家好,这里是每周更新的Github精彩分享周刊,我是每周都在搬砖的蛮三刀酱. 我会从Github热门趋势榜里选出 高质量.有趣,牛B 的开源项目进行分享. 1. PowerShell:不止于Wind ...
- python3解析FreeSWITCH会议室列表信息
操作系统 :CentOS 7.6_x64 FreeSWITCH版本 :1.10.9 Python版本:3.9.12 进行FreeSWITCH会议室相关功能开发过程中,会遇到需要解析会议室列表信息并进行 ...
- 几个函数的使用例子:更新VBRK-XBLNR,IB01设备BOM创建,LI11N输入库存盘点
最近用到一些函数,网上的相关资料不多,这里记录一下. 本文链接:https://www.cnblogs.com/hhelibeb/p/17012303.html 1,使用 RV_INVOICE_HEA ...
- java调用webservice接口
1.直接AXIS调用远程的webservice 注意:不同版本的Axis相差很大,大家最好以apache网站上的例子为准,这里仅仅用于说明其基本用法. import org.apache.axis.c ...
- apisix~jwt-auth插件
在网关开启jwt-auth插件之后,你的网关就具有了jwt解析和校验的功能,主要是校验jwt token的有效性,包含过期时间和签名等. https://apisix.apache.org/docs/ ...
- JDK源码阅读-------自学笔记(八)(数组演示冒泡排序和二分查找)
冒泡排序 算法 比较相邻的元素.如果第一个比第二个大,就交换他们两个 对每一对相邻元素作同样的工作,从开始第一对到结尾的最后一对.在这一点,最后的元素应该会是最大的数 针对所有的元素重复以上的步骤,除 ...
- C 语言编程 — 数据类型转换
目录 文章目录 目录 前文列表 数据类型转换 隐式(自动)类型转换 常用的算术转换 显式(强制)类型转换 前文列表 <程序编译流程与 GCC 编译器> <C 语言编程 - 基本语法& ...