
当云原生网关遇上图数据库,NebulaGraph 的 APISIX 最佳实践

本文介绍了利用开源 API 网关 APISIX 加速 NebulaGraph 多个场景的落地最佳实践:负载均衡、暴露接口结构与 TLS Termination。
API 网关介绍
什么是 API 网关
API 网关是位于客户端和服务器之间的“中间人”,用于管理、监控和保护 API。它可以在 API 之前执行一些操作,例如:身份验证、授权、缓存、日志记录、审计、流量控制、安全、防火墙、压缩、解压缩、加密、解密等。
API 网关可以工作在 TCP/IP 4 层和 OSI 7 层。跑在 7 层的 API 网关可以使用多种协议,例如:HTTP、HTTPS、WebSocket、gRPC、MQTT 等。在这些应用层协议中做一些操作,比如,请求的重写、转发、合并、重试、缓存、限流、熔断、降级、鉴权、监控、日志、审计等等。
这里举例一下借助 API 网关可以做的具体的事:
- 在网关层增加认证层,比如:JWT 认证、OAuth2 认证、OpenID 认证等等,这样不需要在每个服务中都做具体的认证集成工作,进而节省许多开发成本。
- 借助网关给跳板机 SSH 流量增加无需客户端修改的复杂认证,比如:跳转任何客户端的 SSH 登录,给出一个网址或者输入框,引导登陆者通过网页的 SSO 认证(包含多因素认证),再通过网关转发到 SSH 服务。
- 甚至在网关层做 Serverless 数据库!TiDB 社区的同学们就在做这个事儿,他们从普通的 MySQL 客户端的登录请求中解析能推断出转到需要的 TiDB 示例的信息,并且在需要 cold start 唤醒实例的时候把连接保持住,可以参考这篇文章:TiDB Gateway。
- 如果你特别惨在维护屎山项目,不得不针对旧版本的应用程序对新版本的服务端进行兼容,这时候 API 网关也可以通过一些请求重写,把旧版本的请求转换成新版本的请求。
只要脑洞大,理论上 API 网关可以做很多事。但显然不是所有的事情都是适合在这一层去做的,通常那些比较通用的事情才适合在这一层去做,上面我只是给出一些典型和极端的具体例子。
Apache APISIX
API 网关是从 LB、Reverse Proxy 项目演进过来的。随着云原生的兴起,API 网关也逐渐成为了云原生的一部分,流行的开源网关有:
而且其中很多都是基于 Nginx/OpenResty 的下游项目。这里就以 Apache APISIX 为例,介绍一下 NebulaGraph 借助 API 网关的几个实践。
NebulaGraph 介绍
NebulaGraph 是一个开源的分布式图数据库,它的特点是:
- 高性能:可达到每秒百万级的读写,具有极高的扩展性,在千亿点、万亿边的数据规模下支持毫秒级的查询。
- 易扩展:分布式的架构可在多台机器上扩展。每台机器上可以运行多个服务进程,它的查询层是无状态的计算存储分离架构,可以容易地引入不同配置、不同类型的计算层,实现同一集群上 TP、AP、图计算等不同负载的混合查询。
- 易使用:类 SQL 的原生查询语言,易于学习和使用,同时支持 openCypher。
- 丰富生态:NebulaGraph 的生态系统正在不断壮大,目前已经有了多个客户端,包括 Java、Python、Go、C++、JavaScript、Spark、Flink 等,同时也有了多个可视化工具,包括 NebulaGraph Studio、NebulaGraph Dashboard、NebulaGraph Explorer 等。
本文讨论的问题
本文给出了基于 NebulaGraph 集群应用中涉及到 API 网关的几个场景。
- 查询接口的负载均衡
- 底层存储接口的暴露
- 传输层的加密
查询接口负载均衡
首先是图数据库查询接口 graphd 的负载均衡与高可用的问题。
NebulaGraph 内核由三种服务组成:graphd、metad 和 storaged:
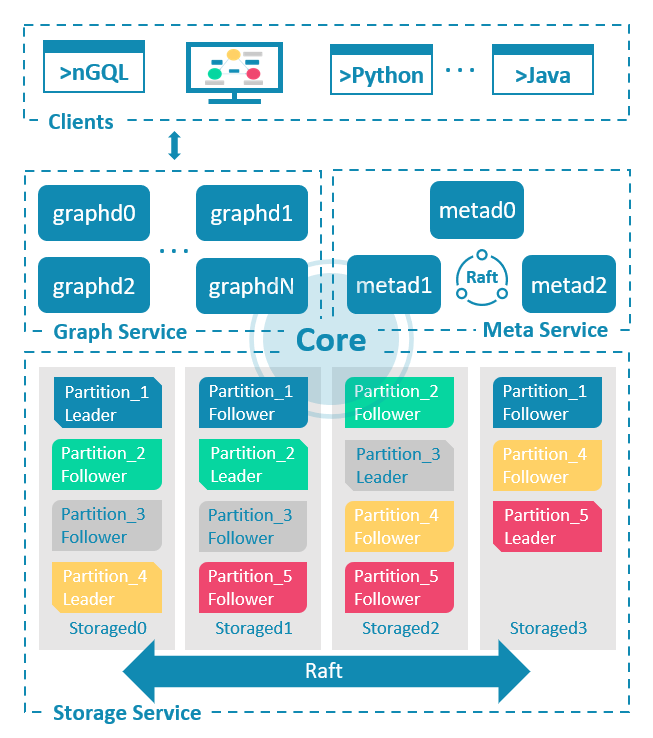
所以,在默认情况下,集群只会暴露 graphd 的接口,提供给客户端连接,执行 nGQL 的查询。其中,graphd 是无状态的,这意味着可以在多个 graphd 之间做负载均衡。这里,我们有两种方法:基于客户端的(Client-Side LB)与基于代理的。
客户端的负载均衡
客户端的负载均衡,就是在客户端,也就是应用程序中,实现负载均衡的逻辑。NebulaGraph 的各个语言的客户端里边已经内置了轮询(Round-Robin)负载均衡,我们只需要在客户端配置多个 graphd 的地址就可以了。比如,我们在创建连接池的时候,指定了两个不同的 graphd 的地址(对应不同进程实例),下面以 Python 代码为例:
from nebula3.gclient.net import ConnectionPool

from nebula3.Config import Config

config = Config()

config.max_connection_pool_size = 10

connection_pool = ConnectionPool()

connection_pool.init([('127.0.0.1', 9669), ('127.0.0.1', 49433)], config)
在取得连接的时候,就会从连接池中随机取得一个连接:
In [10]: connection0 = connection_pool.get_connection()

In [11]: connection1 = connection_pool.get_connection()

# 这两个连接的 graphd 地址是不同的

In [12]: connection0._port, connection1._port

Out[12]: (9669, 49433)
这种客户端负载均衡的问题在于配置、实现细节与应用代码耦合在一起,如果需要修改负载均衡的策略,就要修改应用代码,这样就会增加应用的复杂度。
代理的负载均衡
基于代理的负载均衡,就是在应用程序之前,增加一个代理层,来实现负载均衡的逻辑。这样,应用程序就不需要关心负载均衡的问题了。在 K8s 里的话,我们可以使用 K8s 的 Service 来实现这个代理层。
这是一个在 Minikube 中为 NebulaGraph 集群中 graphd 创建的 Service:
cat <<EOF | kubectl create -f -

apiVersion: v1

kind: Service metadata:

  labels:

    app.kubernetes.io/cluster: nebula

    app.kubernetes.io/component: graphd     app.kubernetes.io/managed-by: nebula-operator

    app.kubernetes.io/name: nebula-graph

  name: nebula-graphd-svc-nodeport

  namespace: default

spec:

  externalTrafficPolicy: Local

  ports:

  - name: thrift

    port: 9669

    protocol: TCP

    targetPort: 9669

    nodePort: 30000

  - name: http

    port: 19669

    protocol: TCP

    targetPort: 19669

    nodePort: 30001

  selector:

    app.kubernetes.io/cluster: nebula

    app.kubernetes.io/component: graphd     app.kubernetes.io/managed-by: nebula-operator

    app.kubernetes.io/name: nebula-graph

  type: NodePort

EOF
创建后,我们就可以通过它暴露的单独端口来访问 NebulaGraph 集群中的 graphd 了:
In [13]: connection_pool = ConnectionPool()

    ...: connection_pool.init([('192.168.49.2', 9669)], config)

Out[13]: True

In [14]: connection0 = connection_pool.get_connection()

In [15]: connection1 = connection_pool.get_connection()

In [16]: connection0._ip, connection1._ip

Out[16]: ('192.168.49.2', '192.168.49.2')
可以看到,在连接层面上来看,客户端只知道代理的地址,而不知道 NebulaGraph 集群中的 graphd 的地址,这样就实现了客户端与 NebulaGraph 集群中的 graphd 的解耦。
然而,当我们在 Connection 之上创建 Session 的时候,就能看到实际上客户端的不同请求是落在了不同的 graphd 上的:
In [17]: session = connection_pool.get_session('root', 'nebula')

In [18]: session._session_id

Out[18]: 1668670607568178

In [19]: session1 = connection_pool.get_session('root', 'nebula')

In [20]: session1._session_id

Out[20]: 1668670625563307

# 得到每一个 session 的 ID

In [21]: session.execute("SHOW SESSIONS")

# 它们分别对应了两个不同的 graphd 实例

Out[21]: ResultSet(keys: ['SessionId', 'UserName', 'SpaceName', 'CreateTime', 'UpdateTime', 'GraphAddr', 'Timezone', 'ClientIp'], values: [1668670607568178, "root", "", utc datetime: 2022-11-17T07:36:47.568178, timezone_offset: 0, utc datetime: 2022-11-17T07:36:47.575303, timezone_offset: 0, "nebula-graphd-0.nebula-graphd-svc.default.svc.cluster.local:9669", 0, "172.17.0.1"],[1668670625563307, "root", "", utc datetime: 2022-11-17T07:37:05.563307, timezone_offset: 0, utc datetime: 2022-11-17T07:37:03.638910, timezone_offset: 0, "nebula-graphd-1.nebula-graphd-svc.default.svc.cluster.local:9669", 0, "172.17.0.1"])
底层存储接口的暴露
在 NebulaGraph 中,可以通过 StorageClient 来访问底层的存储接口,这个接口可以用来做一些分析型、数据全扫描计算的工作。
然而,存储层的分布式服务实例不像 graphd 那样,它们是有状态的。这其实与 K8s 或者 Docker Compose 的部署模型是相违背的。如果访问的应用 storaged 客户端在集群外部,我们需要在 NebulaGraph 集群中的每一个存储实例上都部署一个代理 Service。这非常不方便,有时候还是一种浪费。
此外,由于 NebulaGraph 内部服务发现机制和 storaged 客户端的实现机制决定,每一个 storaged 服务实体都是由其内部的 host:port 唯一确定和寻址的,这给我们中间的代理工作也带来了一些麻烦。
总结来看,我们的需求是:
- 能够从集群外部访问 NebulaGraph 的存储层每一个实例
- 每一个实例的访问地址(host:port)和内部的地址是完全一致的
为了实现这个需求,我之前的做法是为每一个实例单独部署一个 graphd 代理(消耗一个地址,保证端口不变),再在外部手动搭一个 Nginx 作为代理,配合 DNS 把内部的地址解析 Nginx 上,然后通过域名找到上游(每一个单独的 graphd 代理)。本文的延伸阅读 1、2 中给出了相关的实验步骤。
最近,我找到了一个相对优雅的可维护的方式:
- 在 NebulaGraph 集群同一个命名空间下引入一个 APISIX 网关;
- 利用 APISIX 中的 Nginx TCP 代理的封装 stream-proxy 来暴露 storaged 的接口;
- 为了最终只利用一个集群的出口(Service,我们利用其支持的 TLSv1.3 中的 extend host name 字段:SNI 来路由上游),做到用不同域名的 TCP over TLS 指向后端的不同 storaged;
- 只需要 Storage 客户端能支持 TLSv1.3(发送 SNI),并且能解析所有 storaged 的地址到 APISIX 的 Service 上即可;
示例图:
           ┌────────────────────────────────────────────────────────────────────────────────────┐

           │  K8s Cluster                                                                       │

           │                                                      ┌──────────────────────────┐  │

           │          ┌────────────────────────────────────┐      │ NebulaGraph Cluster      │  │

           │          │  APISIX API-GATEWAY                │      │       ┌──────────────┐   │  │

           │          │                                    │      │       │ storaged-0   │   │  │

           │          │                                    │ ┌────┼──────│              │   │  │

           │          │                                    │ │    │       │              │   │  │

           │          │   ┌────────────────────────────┐   │ │    │       └──────────────┘   │  │

           │          │   │ stream-proxy               │   │ │    │                          │  │

  ┌─────┐  │ .─────.  │   │                ┌────┐      │   │ │    │       ┌──────────────┐   │  │

  │     │  │╱       ╲ │   │  - addr: 9559  │    │──────┼───┼─┘    │       │ storaged-1   │   │  │

━━┫ DNS ┣━━( Service )╋━━━╋   tls: true   │    │      │   │ ┌────┼──────│              │   │  │

  │     │  │`.     ,' │   │                │    │──────┼───┼─┘    │       │              │   │  │

  └─────┘  │  `───'   │   │                │    │      │   │      │       └──────────────┘   │  │

           │          │   │                │SNI │      │   │      │                          │  │

           │          │   │                │    │──────┼───┼─┐    │       ┌──────────────┐   │  │

           │          │   │                │    │      │   │ │    │       │ storaged-2   │   │  │

           │          │   │                │    │      │   │ └────┼──────│              │   │  │

           │          │   │                │    │──────┼───┼─┐    │       │              │   │  │

           │          │   │                └────┘      │   │ │    │       └──────────────┘   │  │

           │          │   └────────────────────────────┘   │ │    │                          │  │

           │          │                                    │ │    │       ┌──────────────┐   │  │

           │          │                                    │ │    │       │ storaged-3   │   │  │

           │          │                                    │ └────┼──────│              │   │  │

           │          │                                    │      │       │              │   │  │

           │          │                                    │      │       └──────────────┘   │  │

           │          └────────────────────────────────────┘      └──────────────────────────┘  │

           │                                                                                    │

           └────────────────────────────────────────────────────────────────────────────────────┘
这样做的好处是:
- 在 APISIX 中比较优雅地维护代理的配置,并且可以用到 APISIX 现代化的流量管理能力;
- 不需要为每一个 storaged 单独创建 Service,只需要一个 Service、集群地址就可以了;
- 为流量增加了 TLSv1.3 的加密,提高了安全性。同时,没有给 NebulaGraph 集群内部的南北流量带来的性能损耗;
在本文的结尾,给出了实验过程,包含了本文提到的所有要点和细节。
传输层的加密
我们在前一个问题中提及到了,在 APISIX 网关中 terminate TLSv1.3 的连接,借助 SNI 信息路由 storaged 的方法。其实,单独将 graphd 接口的 TLS 交给网关来做,好处也是非常明显的:
- 证书管理在统一的网关控制面做,更加方便;
- 证书运维无 NebulaGraph 集群配置侵入(NebulaGraph 原生支持 TLS 加密,但是加密之后带来了集群内部通信的开销,而且配置和集群其他层面配置在一起,证书更新涉及进程重启,不够灵活);
具体的方法在后边实操中也是有体现的。
实操:利用 APISIX 的 stream-proxy 暴露 storaged 的接口
实验环境:Minikube
本实验在本地的 Minikube 上做。首先,启动一个 Minikube。因为 APISIX 内部的 etcd 需要用到 storageclass,我们带上穷人版的 storageclass 插件。同时,为了在 K8s 外部访问 storaged 的时候用和内部相同的域名和端口,将把 node-port 允许的端口扩充到小于 9779 的范围。
    --addons="default-storageclass" \

    --extra-config=apiserver.service-node-port-range=1-65535
实验环境:NebulaGraph on K8s
这里,我们使用 Nebula Operator 来部署 NebulaGraph 集群,具体的部署方法可以参考 Nebula Operator 文档:https://docs.nebula-graph.com.cn/3.3.0/nebula-operator/1.introduction-to-nebula-operator/。
咱们做实验,就偷个懒,用我写的 Nebula-Operator-KinD 来一键部署:
curl -sL nebula-kind.siwei.io/install-on-K8s.sh | bash
实验环境:APISIX on K8s
首先,是安装。在 Helm 参数中指定打开 stream-proxy 的开关:
helm repo add apisix https://charts.apiseven.com

helm repo add bitnami https://charts.bitnami.com/bitnami

helm repo update

helm install apisix apisix/apisix \

  --set gateway.type=NodePort \

  --set gateway.stream.enabled=true \

  --set ingress-controller.enabled=true

# dashboard 也装上,方便我们绕过 admin API call 做一些方便的操作。

helm install apisix-dashboard apisix/apisix-dashboard
因为截止到现在,APISIX 的 Helm Chart 之中并没有提供 stream-proxy TCP 的监听端口的 TLS 支持的配置格式,见:https://github.com/apache/apisix-helm-chart/issues/348。我们需要手动更改 APISIX 的 ConfigMap,把 stream-proxy 的 TLS 配置加上:
kubectl edit ConfigMap apisix
我们编辑把 stream_proxy.tcp 改写成这样:
     stream_proxy:                 # TCP/UDP proxy

       only: false

       tcp:                        # TCP proxy port list

         - addr: 9779

           tls: true

         - addr: 9559

           tls: true
这里我们需要重建 APISIX Pod,因为 APISIX 的 stream-proxy 的 TLS 配置是在启动的时候加载的,所以我们需要重建 APISIX Pod:
kubectl delete $(kubectl get po -l "app.kubernetes.io/name=apisix" -o name)
开始实验
这个实验的目标是把 NebulaGraph 的 storaged 的接口暴露出来,让外部的客户端可以访问到,而暴露的方式如图:
           ┌────────────────────────────────────────────────────────────────────────────────────┐

           │  K8s Cluster                                                                       │

           │                                                      ┌──────────────────────────┐  │

           │          ┌────────────────────────────────────┐      │ NebulaGraph Cluster      │  │

           │          │  APISIX API-GATEWAY                │      │       ┌──────────────┐   │  │

           │          │                                    │      │       │ storaged-0   │   │  │

           │          │                                    │ ┌────┼──────│              │   │  │

           │          │                                    │ │    │       │              │   │  │

           │          │   ┌────────────────────────────┐   │ │    │       └──────────────┘   │  │

           │          │   │ stream-proxy               │   │ │    │                          │  │

  ┌─────┐  │ .─────.  │   │                ┌────┐      │   │ │    │       ┌──────────────┐   │  │

  │     │  │╱       ╲ │   │  - addr: 9559  │    │──────┼───┼─┘    │       │ storaged-1   │   │  │

━━┫ DNS ┣━━( Service )╋━━━╋   tls: true   │    │      │   │ ┌────┼──────│              │   │  │

  │     │  │`.     ,' │   │                │    │──────┼───┼─┘    │       │              │   │  │

  └─────┘  │  `───'   │   │                │    │      │   │      │       └──────────────┘   │  │

           │          │   │                │SNI │      │   │      │                          │  │

           │          │   │                │    │──────┼───┼─┐    │       ┌──────────────┐   │  │

           │          │   │                │    │      │   │ │    │       │ storaged-2   │   │  │

           │          │   │                │    │      │   │ └────┼──────│              │   │  │

           │          │   │                │    │──────┼───┼─┐    │       │              │   │  │

           │          │   │                └────┘      │   │ │    │       └──────────────┘   │  │

           │          │   └────────────────────────────┘   │ │    │                          │  │

           │          │                                    │ │    │       ┌──────────────┐   │  │

           │          │                                    │ │    │       │ storaged-3   │   │  │

           │          │                                    │ └────┼──────│              │   │  │

           │          │                                    │      │       │              │   │  │

           │          │                                    │      │       └──────────────┘   │  │

           │          └────────────────────────────────────┘      └──────────────────────────┘  │

           │                                                                                    │

           └────────────────────────────────────────────────────────────────────────────────────┘
我们已经有了所有的框架,我们要往里填箭头和圆圈就行。
$ kubectl get po

NAME                                         READY   STATUS     RESTARTS      AGE

apisix-6d89854bc5-5m788                      1/1     Running    1 (31h ago)   2d4h

apisix-dashboard-b544bd766-nh79j             1/1     Running    8 (31h ago)   2d10h

apisix-etcd-0                                1/1     Running    2 (31h ago)   2d10h

apisix-etcd-1                                1/1     Running    2 (31h ago)   2d10h

apisix-etcd-2                                1/1     Running    2 (31h ago)   2d10h

nebula-graphd-0                              1/1     Running    2 (31h ago)   3d4h

nebula-metad-0                               1/1     Running    2 (31h ago)   3d4h

nebula-storaged-0                            1/1     Running    2 (31h ago)   3d4h

nebula-storaged-1                            1/1     Running    2 (31h ago)   3d4h

nebula-storaged-2                            1/1     Running    2 (31h ago)   3d4h
配置 APISIX 的 stream-proxy
参考 APISIX 文档:https://apisix.apache.org/docs/apisix/stream-proxy/#accept-tls-over-tcp-connection。
我们用 APISIX 的 API 来配置 stream-proxy:
apisix_api_key="edd1c9f034335f136f87ad84b625c8f1"

apisix_pod=$(kubectl get po -l \

    "app.kubernetes.io/name=apisix" -o name)

kubectl exec -it $apisix_pod -- \

    curl http://127.0.0.1:9180/apisix/admin/stream_routes/1 \

    -H "X-API-KEY: $apisix_api_key" -X PUT -d \

'{

    "sni": "nebula-storaged-0.nebula-storaged-headless.default.svc.cluster.local",

    "upstream": {

        "nodes": {

            "172.17.0.13:9779": 1

        },

        "type": "roundrobin"

    }

}'

kubectl exec -it $apisix_pod -- \

    curl http://127.0.0.1:9180/apisix/admin/stream_routes/2 \

    -H "X-API-KEY: $apisix_api_key" -X PUT -d \

'{

    "sni": "nebula-storaged-1.nebula-storaged-headless.default.svc.cluster.local",

    "upstream": {

        "nodes": {

            "172.17.0.18:9779": 1

        },

        "type": "roundrobin"

    }

}'

kubectl exec -it $apisix_pod -- \

    curl http://127.0.0.1:9180/apisix/admin/stream_routes/3 \

    -H "X-API-KEY: $apisix_api_key" -X PUT -d \

'{

    "sni": "nebula-storaged-2.nebula-storaged-headless.default.svc.cluster.local",

    "upstream": {

        "nodes": {

            "172.17.0.5:9779": 1

        },

        "type": "roundrobin"

    }

}'
这里需要注意,目前,APISIX 的 stream-proxy 上游节点不支持域名解析是受限于上游的 lua 库,详见 issue:https://github.com/apache/apisix/issues/8334。理想情况下,这里应该给出每一个 storaged 的 SNI 相同的地址作为 upstream.nodes。像这样:
kubectl exec -it $apisix_pod -- \

    curl http://127.0.0.1:9180/apisix/admin/stream_routes/1 \

    -H "X-API-KEY: $apisix_api_key" -X PUT -d \

'{

    "sni": "nebula-storaged-0.nebula-storaged-headless.default.svc.cluster.local",

    "upstream": {

        "nodes": {

            "nebula-storaged-0.nebula-storaged-headless.default.svc.cluster.local": 1

        },

        "type": "roundrobin"

    }

}'
配置 APISIX 中 storaged 地址的 TLS 证书
在生产环境下,我们应该以云原生的方式去管理自签或者公共信任的证书。这里,我们就手动利用 MKCert 工具来做这件事儿。
安装 MKCert:
# 首次运行,需要安装 mkcert,并且生成根证书

# macOS 的话

brew install mkcert

# ubuntu 的话

apt-get install wget libnss3-tools

# 然后再去 https://github.com/FiloSottile/mkcert/releases/ 下载 mkcert
签发证书:
mkcert '*.nebula-storaged-headless.default.svc.cluster.local'
利用 APISIX Dashboard 将证书导入到 APISIX 之中。单独开一个终端,运行:
export POD_NAME=$(\

    kubectl get pods \

    -l "app.kubernetes.io/name=apisix-dashboard,app.kubernetes.io/instance=apisix-dashboard" \

    -o jsonpath="{.items[0].metadata.name}")

export CONTAINER_PORT=$(\

    kubectl get pod $POD_NAME \

    -o jsonpath="{.spec.containers[0].ports[0].containerPort}")

kubectl \

    port-forward $POD_NAME 8080:$CONTAINER_PORT --address='0.0.0.0'
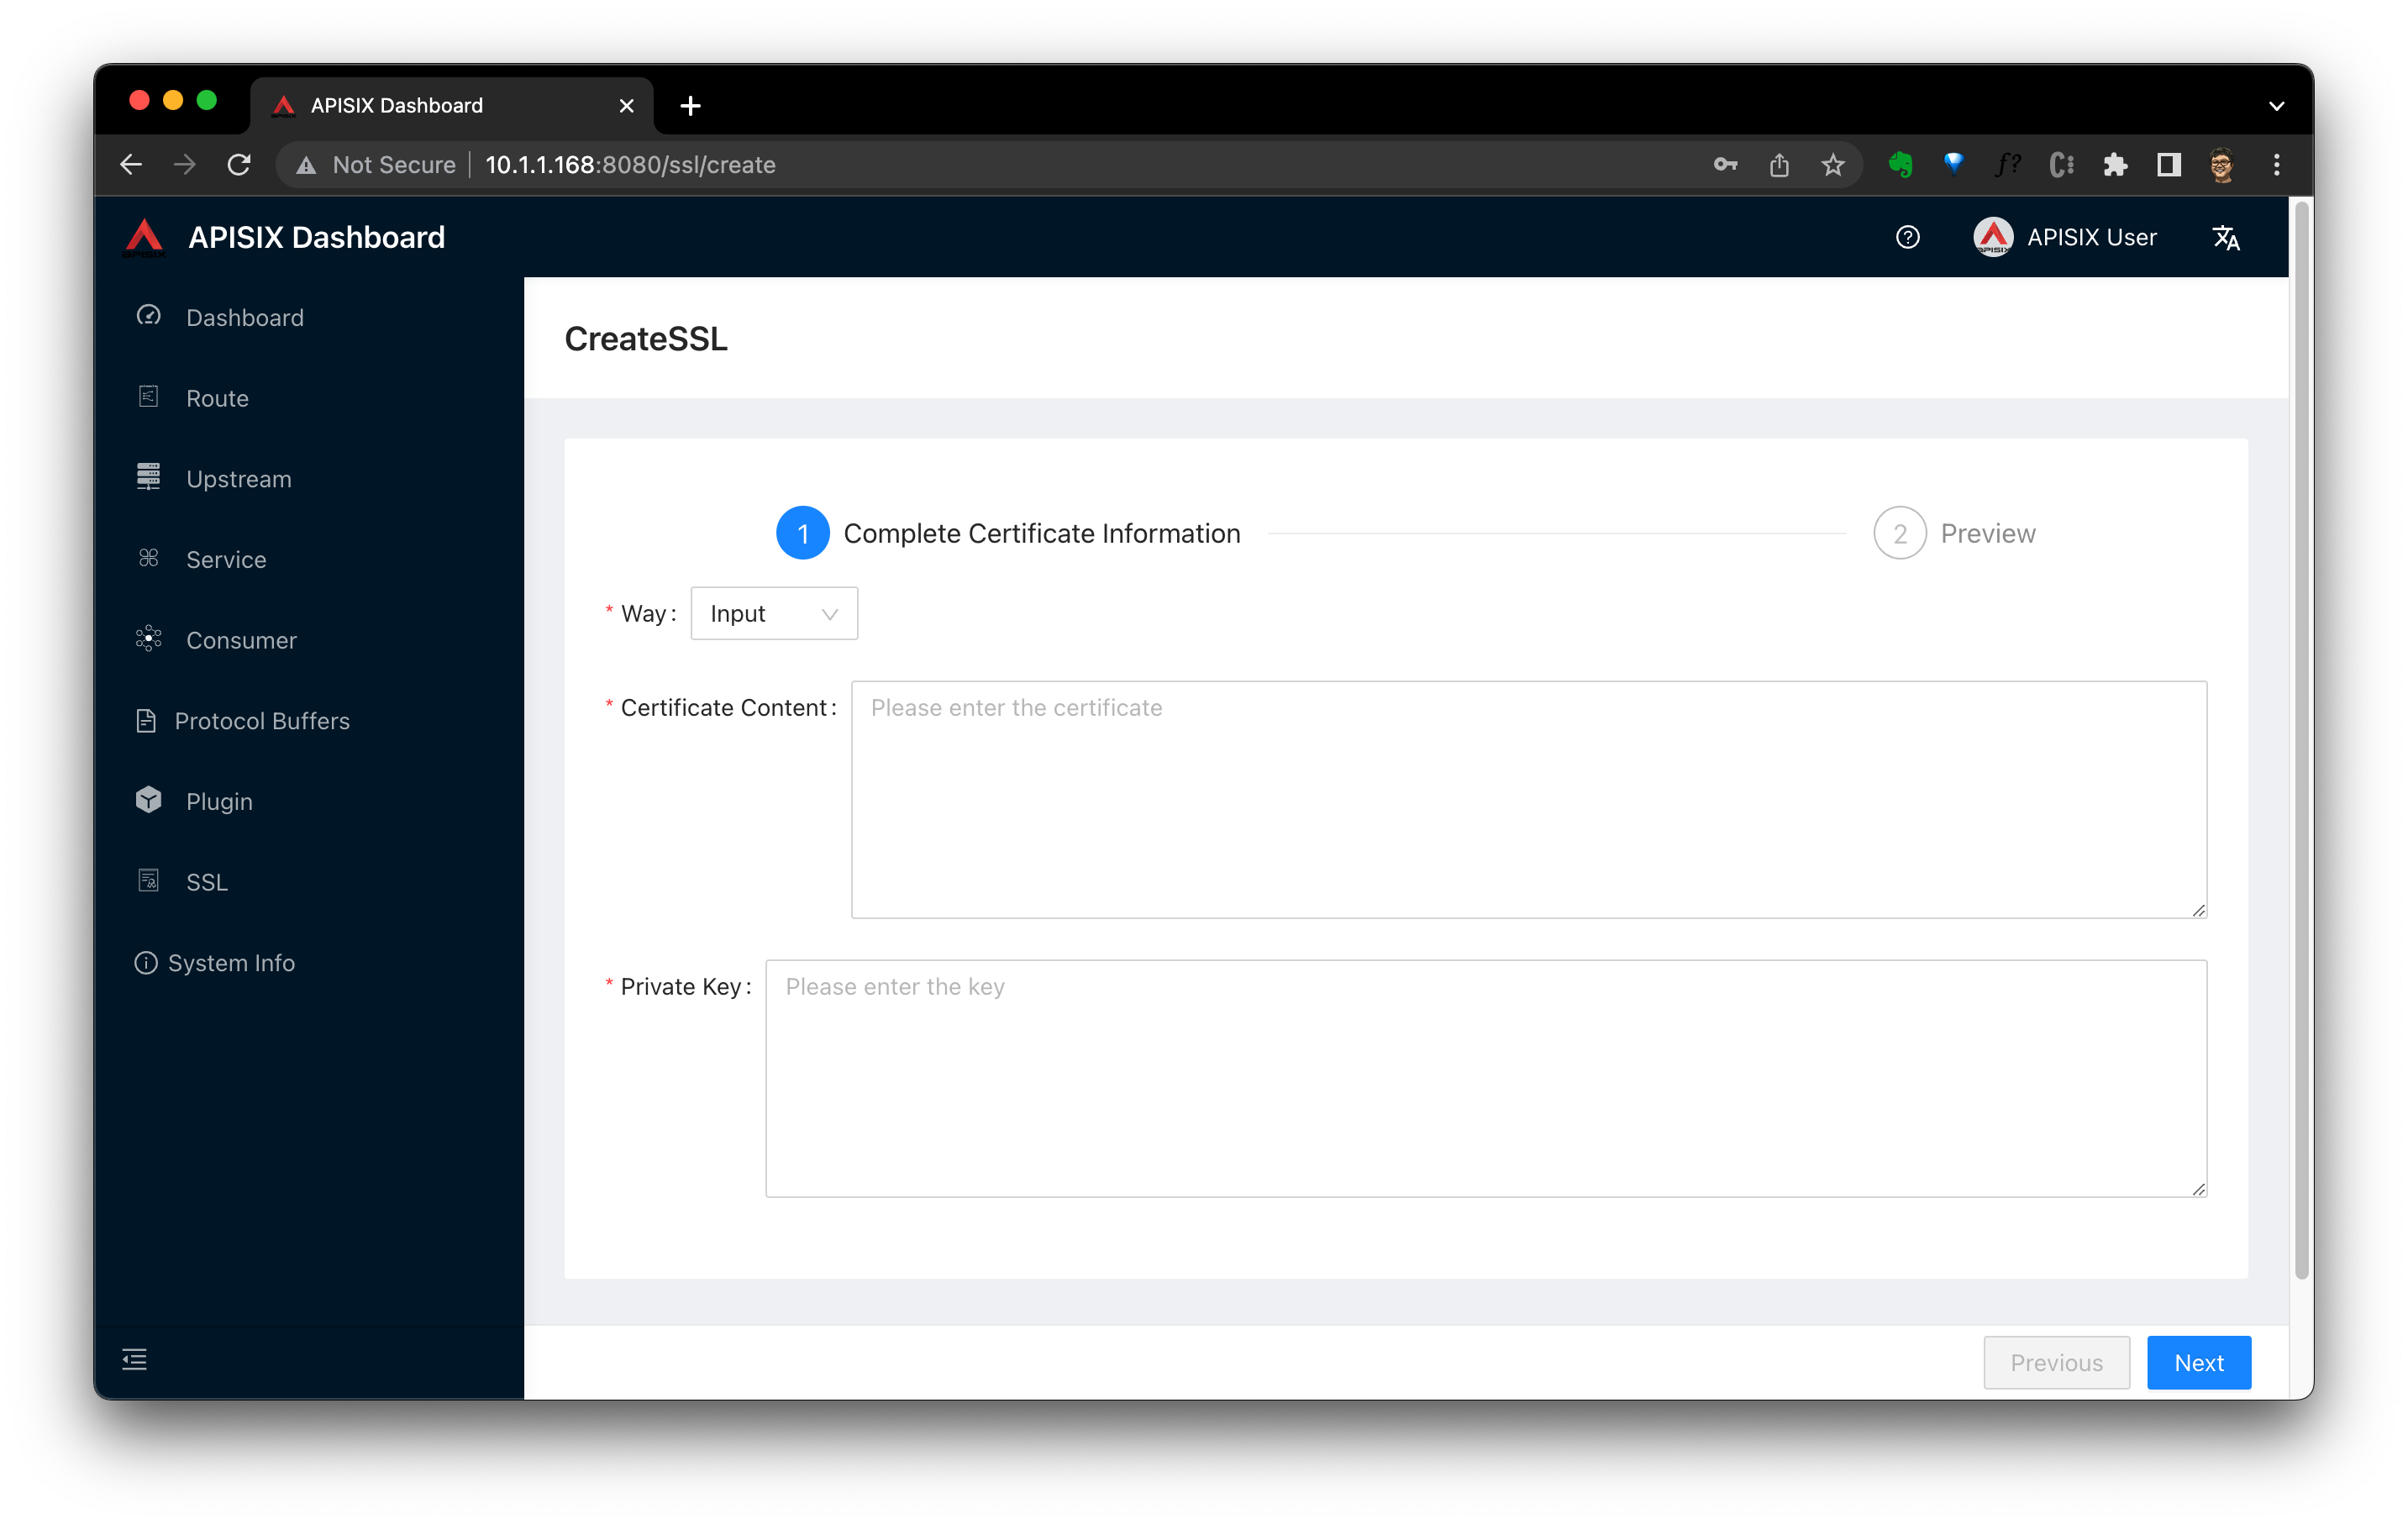
浏览器访问:http://10.1.1.168:8080/ssl/list,账号密码都是 admin。点击 Create 按钮,将刚刚生成的证书导入到 APISIX 之中。
增加 APISIX 的 NodePort Service
创建一个 NodePort Service,用于暴露 APISIX 的 9779 端口。这样,我们就可以通过外部的 IP 地址访问到 APISIX 了。
cat <<EOF | kubectl apply -f -

spec:

  selector:

    app.kubernetes.io/instance: apisix

    app.kubernetes.io/name: apisix

  ports:

    - protocol: TCP

      port: 9779

      targetPort: 9779

      name: thrift

      nodePort: 9779

  type: NodePort

EOF
因为前边 Minikube 中我们配置了端口的范围覆盖到了 9779,所以我们可以看到,这个 NodePort Service 的端口在宿主机上也可以从 Minikube ip 的同一个端口访问到:
$ minikube service apisix-svc

$ minikube service list

|------------------------|---------------------------------|-------------------|---------------------------|

|       NAMESPACE        |              NAME               |    TARGET PORT    |            URL            |

|------------------------|---------------------------------|-------------------|---------------------------|

...

| default                | apisix-svc                      | thrift/9779       | http://192.168.49.2:9779  |<---

...

|------------------------|---------------------------------|-------------------|---------------------------|
当然,Minikube 假设我们的服务都是 HTTP 的,给出的 URL 是 HTTP:// 的。不用理会它,我们心里知道它是 TCP over TLS 就好了。
配置 K8s 外部 DNS
这里需要配置一个 DNS 服务,让我们可以通过 nebula-storaged-0.nebula-storaged-headless.default.svc.cluster.local 等三个域名通过 Minikube 的 NodePort Service 访问到 NebulaGraph 的 storaged 服务。
获得 Minikube 的 IP 地址:
$ minikube ip

192.168.49.2
配置 /etc/hosts
192.168.49.2 nebula-storaged-0.nebula-storaged-headless.default.svc.cluster.local

192.168.49.2 nebula-storaged-1.nebula-storaged-headless.default.svc.cluster.local

192.168.49.2 nebula-storaged-2.nebula-storaged-headless.default.svc.cluster.local

192.168.49.2 nebula-metad-0.nebula-metad-headless.default.svc.cluster.local
验证 NebulaGraph Storage Client 可以从所有的节点中获取到数据
这里,为了方便,我们用到 Python 的客户端。
由于在写本文的时候,NebulaGraph Python 客户端的 StorageClient 尚未支持 TLS,对它支持的 PR 刚好是我为了本实验写的:https://github.com/vesoft-inc/nebula-python/pull/239。
所以,这里从个人分支安装这个客户端:
git clone https://github.com/wey-gu/nebula-python.git

cd nebula-python

python3 -m pip install .

python3 -m pip install ipython

# 进入 ipython

ipython
我们在 iPython 中交互式验证:
from nebula3.mclient import MetaCache, HostAddr

from nebula3.sclient.GraphStorageClient import GraphStorageClient

from nebula3.Config import SSL_config

import ssl

import os

meta_cache = MetaCache([('nebula-metad-0.nebula-metad-headless.default.svc.cluster.local', 9559)],

                       50000)

storage_addrs = [HostAddr(host='nebula-storaged-0.nebula-storaged-headless.default.svc.cluster.local', port=9779),

                 HostAddr(host='nebula-storaged-1.nebula-storaged-headless.default.svc.cluster.local', port=9779),

                 HostAddr(host='nebula-storaged-2.nebula-storaged-headless.default.svc.cluster.local', port=9779)]

# 自签证书配置

current_dir = os.path.abspath(".")

ssl_config = SSL_config()

ssl_config.cert_reqs = ssl.CERT_OPTIONAL

ssl_config.cert_reqs = ssl.CERT_OPTIONAL

ssl_config.ca_certs = os.path.join(

    os.path.expanduser("~/.local/share/mkcert"), 'rootCA.pem'

)

ssl_config.keyfile = os.path.join(

    current_dir, 'nebula-storaged-headless.default.svc.cluster.local+1-key.pem'

)

ssl_config.certfile = os.path.join(

    current_dir, 'nebula-storaged-headless.default.svc.cluster.local+1.pem'

)

# 实例化 StorageClient

graph_storage_client = GraphStorageClient(meta_cache, storage_addrs, 5000, ssl_config)

# 验证可以从所有的节点中获取到数据

resp = graph_storage_client.scan_vertex(

        space_name='basketballplayer',

        tag_name='player')

while resp.has_next():

    result = resp.next()

    for vertex_data in result:

        print(vertex_data)
结果:
("player112" :player{name: "Jonathon Simmons", age: 29})

("player117" :player{name: "Stephen Curry", age: 31})

("player119" :player{name: "Kevin Durant", age: 30})

("player134" :player{name: "Blake Griffin", age: 30})

("player141" :player{name: "Ray Allen", age: 43})

("player144" :player{name: "Shaquille O'Neal", age: 47})

("player149" :player{name: "Ben Simmons", age: 22})

("player100" :player{name: "Tim Duncan", age: 42})

("player101" :player{name: "Tony Parker", age: 36})

("player110" :player{name: "Cory Joseph", age: 27})

("player126" :player{name: "Kyrie Irving", age: 26})

("player131" :player{name: "Paul George", age: 28})

("player133" :player{name: "Yao Ming", age: 38})

("player140" :player{name: "Grant Hill", age: 46})

("player105" :player{name: "Danny Green", age: 31})

("player109" :player{name: "Tiago Splitter", age: 34})

("player111" :player{name: "David West", age: 38})

...
总结
- NebulaGraph 查询接口的负载均衡可以借助 K8s Service来做;
- NebulaGraph 底层存储接口的暴露在 K8s 中可以利用 APISIX Stream Proxy 和 SNI 来优雅实现;
- 利用 API 网关对出口传输层的加密是一个很好的选择,相较于用 NebulaGraph 原生的 TLS 的方式。
一些坑
fbthrift Python 并不支持发送 extend host name(SNI):https://github.com/vesoft-inc/nebula-python/pull/238,写了 PR 去做支持。这时候 APISIX 中的报错是 failed to find SNI:
2022/11/15 10:18:26 [error] 78#78: *1744270 stream [lua] init.lua:842: stream_ssl_phase(): failed to fetch ssl config: failed to find SNI:

please check if the client requests via IP or uses an outdated protocol. If you need to report an issue, provide a packet capture file of the TLS handshake., context:

ssl_certificate_by_lua*, client: 172.17.0.1, server: 0.0.0.0:9779
参考延伸阅读的 3-6。
此外,我还发现 APISIX stream 里边不解析上游 node 域名,我查了所有 DNS 都没有问题,去提了 issue 才知道是已知问题:https://github.com/apache/apisix/issues/8334,只好先手配 IP:Port 作罢。
2022/11/15 12:26:59 [error] 44#44: *9538531 stream [lua] resolver.lua:47: parse_domain(): failed to parse domain: nebula-storaged-0.nebula-storaged-headless.default.svc.cluster.local, error: failed to query the DNS server: dns client error: 101 empty record received while prereading client data, client: 172.17.0.1, server: 0.0.0.0:9779

2022/11/15 12:26:59 [error] 44#44: *9538531 stream [lua] upstream.lua:79: parse_domain_for_nodes(): dns resolver domain: nebula-storaged-0.nebula-storaged-headless.default.svc.cluster.local error: failed to query the DNS server: dns client error: 101 empty record received while prereading client data, client: 172.17.0.1, server: 0.0.0.0:9779

2022/11/15 12:26:59 [error] 44#44: *9538531 stream [lua] init.lua:965: stream_preread_phase(): failed to set upstream: no valid upstream node while prereading client data, client: 172.17.0.1, server: 0.0.0.0:9779
延伸阅读
- https://gist.github.com/wey-gu/950e4f4c673badae375e59007d80d372
- https://gist.github.com/wey-gu/699b9a2ef5dff5f0fb5f288d692ddfd5
- https://docs.python.org/3/library/ssl.html#ssl.SSLContext.sslsocket_class
- https://github.com/apache/thrift/commit/937228e030569bf25ceb379c9491426709792701
- https://github.com/apache/thrift/pull/894
- https://github.com/apache/thrift/blob/e8353cb46e9f5e71f9b76f55d6bf59530b7f98ef/lib/py/src/transport/TSSLSocket.py#L184
谢谢你读完本文 (///▽///)
要来近距离体验一把图数据库吗?现在可以用用 NebulaGraph Cloud 来搭建自己的图数据系统哟,快来节省大量的部署安装时间来搞定业务吧~ NebulaGraph 阿里云计算巢现 30 天免费使用中,点击链接来用用图数据库吧~
想看源码的小伙伴可以前往 GitHub 阅读、使用、(з)-☆ star 它 -> GitHub;和其他的 NebulaGraph 用户一起交流图数据库技术和应用技能,留下「你的名片」一起玩耍呢~
当云原生网关遇上图数据库,NebulaGraph 的 APISIX 最佳实践的更多相关文章
- Atitit 拦截数据库异常的处理最佳实践
Atitit 拦截数据库异常的处理最佳实践 需要特殊处理的ex 在Dao层异常转换并抛出1 Server层转换为业务异常1 需要特殊处理的ex 在Dao层异常转换并抛出 } catch (SQLExc ...
- MySQL面试必考知识点:揭秘亿级高并发数据库调优与最佳实践法则
做业务,要懂基本的SQL语句: 做性能优化,要懂索引,懂引擎: 做分库分表,要懂主从,懂读写分离... 数据库的使用,是开发人员的基本功,对它掌握越清晰越深入,你能做的事情就越多. 今天我们用10分钟 ...
- [转]10分钟梳理MySQL知识点:揭秘亿级高并发数据库调优与最佳实践法则
转:https://mp.weixin.qq.com/s/RYIiHAHHStIMftQT6lQSgA 做业务,要懂基本的SQL语句: 做性能优化,要懂索引,懂引擎: 做分库分表,要懂主从,懂读写分离 ...
- 7.云原生之Docker容器Dockerfile镜像构建浅析与实践
转载自:https://www.bilibili.com/read/cv15220707/?from=readlist Dockerfile 镜像构建浅析与实践 描述:Dockerfile是一个文本格 ...
- Oracle数据库测试和优化最佳实践: OTest介绍 (转)
当前Oracle数据库最佳测试工具OTest * Otest是用于Oracle数据库测试.优化.监控软件. * Otest是免费提供给Oracle客户和广大DBA工程师使用的软件.由原厂技术专家王 ...
- Java电商支付系统手把手实现(二) - 数据库表设计的最佳实践
1 数据库设计 1.1 表关系梳理 仔细思考业务关系,得到如下表关系图 1.2 用户表结构 1.3 分类表结构 id=0为根节点,分类其实是树状结构 1.4 商品表结构 注意价格字段的类型为 deci ...
- 灵雀云CTO陈恺:从“鸿沟理论”看云原生,哪些技术能够跨越鸿沟?
灵雀云CTO陈恺:从“鸿沟理论”看云原生,哪些技术能够跨越鸿沟? 历史进入2019年,放眼望去,今天的整个技术大环境和生态都发生了很大的变化.在己亥猪年春节刚刚过去的早春时节,我们来梳理和展望一下整个 ...
- 如何将云原生工作负载映射到 Kubernetes 中的控制器
作者:Janakiram MSV 译者:殷龙飞 原文地址:https://thenewstack.io/how-to-map-cloud-native-workloads-to-kubernetes- ...
- DTCC 2020 | 阿里云李飞飞:云原生分布式数据库与数据仓库系统点亮数据上云之路
简介: 数据库将面临怎样的变革?云原生数据库与数据仓库有哪些独特优势?在日前的 DTCC 2020大会上,阿里巴巴集团副总裁.阿里云数据库产品事业部总裁.ACM杰出科学家李飞飞就<云原生分布式数 ...
- 云原生2.0网关API标准发展趋势
摘要:Gateway API希望取代Ingress API. 本文分享自华为云社区<云原生2.0网关API标准发展趋势>,作者:华为云云原生团队 . 云原生网关API标准背景及发展现状 G ...
随机推荐
- 【K哥爬虫普法】12亿公民信息泄露,仅判3年,个人信息是否为爬虫“禁区”?
我国目前并未出台专门针对网络爬虫技术的法律规范,但在司法实践中,相关判决已屡见不鲜,K 哥特设了"K哥爬虫普法"专栏,本栏目通过对真实案例的分析,旨在提高广大爬虫工程师的法律意识, ...
- 【python】SSTI模版注入
0x00 Python Vene环境及介绍 venv虚拟环境:创建和管理虚拟环境的模块 首先apt update更新一下包管理 安装你当前版本的python-venv 选择一个目录,安装venv虚拟 ...
- go 1.21:cmp
标准库 cmp 原文在这里 go 1.21 新增 cmp 包提供了与有序变脸比较相关的类型和函数. Ordered 定义如下: type Ordered interface { ~int | ~int ...
- 强化学习从基础到进阶-案例与实践[4.2]:深度Q网络DQN-Cart pole游戏展示
强化学习从基础到进阶-案例与实践[4.2]:深度Q网络DQN-Cart pole游戏展示 强化学习(Reinforcement learning,简称RL)是机器学习中的一个领域,区别与监督学习和无监 ...
- 深度学习应用篇-计算机视觉-视频分类[8]:时间偏移模块(TSM)、TimeSformer无卷积视频分类方法、注意力机制
深度学习应用篇-计算机视觉-视频分类[8]:时间偏移模块(TSM).TimeSformer无卷积视频分类方法.注意力机制 1.时间偏移模块(TSM) 视频流的爆炸性增长为以高精度和低成本执行视频理解任 ...
- 3.2 Windows驱动开发:内核CR3切换读写内存
CR3是一种控制寄存器,它是CPU中的一个专用寄存器,用于存储当前进程的页目录表的物理地址.在x86体系结构中,虚拟地址的翻译过程需要借助页表来完成.页表是由页目录表和页表组成的,页目录表存储了页表的 ...
- 一篇带你掌握cmake入门|了解cmake|掌握cmake基本操作
一篇带你掌握cmake入门 内容出处: 作者: 苏丙榅 链接: https://subingwen.cn/cmake/CMake-primer/ 来源: 爱编程的大丙 著作权归作者所有.商业转载请联系 ...
- CF678F Lena and Queries题解
题目链接:CF 或者 洛谷 可以看到查询和插入就是李超线段树的基本操作,但在原有基础上多了一个删除操作,李超线段树不支持删除操作,但支持可撤销和可持久化,所以我们容易想到外层再套一个线段树分治即可.本 ...
- 使用KVM克隆用于Oracle DB的主机
首先,通过现有的vm1「在上篇文章 使用KVM创建OEL虚拟机 已创建」克隆出一个vm,名字叫做db1,然后修改一些配置,使其更适用于Oracle DB的主机. 1.通过克隆vm1生成db1 2.解决 ...
- delphi 里 多用TArray 而不是 array of
今天写代码发现个bug,是delphi 编译器 核心层面的: unit ddx.att; interface uses System.Generics.Collections, System.Rtti ...