【extjs6学习笔记】1.7 初始:加载第三方库
https://www.sencha.com/blog/integrating-ext-js-with-3rd-party-libraries-2/
Introduction
Ext JS provides a lot of built-in components right out of the box that are highly customizable. If it's not in the framework, you can easily extend the classes or even browse Sencha Market for anything you might need. That works great most of the time, but sometimes you might want to use a 3rd party library that is not built using the Ext JS component system. There are a number of ways you can address this situation, but the easiest one is to create a custom wrapper component to handle your library, which can be reused across any of your apps.
Implementation Overview
The goal of your wrapper component is to encapsulate the logic required by the 3rd party library to set itself up and interact with the Ext JS framework. You have the freedom over how much of that 3rd party API is available to use in your application. There are a few options for how you handle this. If the library is relatively simple and you want to control access to the API, you could wrap each of the API methods with a corresponding method in your wrapper. This allows you to hide methods you don't want exposed or intercept method calls where you want to introduce additional custom logic. Another option would be to expose some of the root objects in the API, so other controls are free to call any of the API methods directly on the object. In most cases, this would probably be the approach you'd end up with, but all projects are different.
To demonstrate this idea, we'll create a wrapper component around Leaflet, an open source mapping JavaScript library created by Vladimir Agafonkin. We'll use that wrapper component in an app that shows us a map and provides a button to move the map to a specified location.
Leaflet can integrate with mapping tiles from many different mapping services which gives you great flexibility in how your maps look. In this example, we'll use some map tiles provided by CloudMade. You can register for a free account there, where you'll get an API key to use in your requests (we'll use it later in this example). For more information about map tiles, visit the Leaflet site.
Add Library References
The first thing you'll need to do in your app is add the library references to your HTML file, so the library will be available for you to use. In our example, we'll add two lines to the head per the Leaflet docs. You can get more details on the Leaflet setup in the Leaflet Quick Start Guide.
<link rel="stylesheet" href="http://cdn.leafletjs.com/leaflet-0.5/leaflet.css" />
<script src="http://cdn.leafletjs.com/leaflet-0.5/leaflet.js"></script>
Build the Custom Component
The next thing we'll want to do is extend Ext.Component to create the wrapper component for Leaflet. Ext.Component will give us a bare bones control with an empty UI, but it has all the framework methods needed for it to play nice in any of the layouts.
When integrating with a third party library, we typically need to configure and initialize it to match our needs. For our example, we're going to handle our Leaflet initialization in an override of the 'afterRender' method. This method runs when our custom component has been rendered to the DOM and is ready for us to interact with. We'll also add a class alias and a config variable for our map reference.
Ext.define('Ext.ux.LeafletMapView', {
extend: 'Ext.Component',
alias: 'widget.leafletmapview',
config:{
map: null
},
afterRender: function(t, eOpts){
this.callParent(arguments);
var leafletRef = window.L;
if (leafletRef == null){
this.update('No leaflet library loaded');
} else {
var map = L.map(this.getId());
map.setView([42.3583, -71.0603], 13);
this.setMap(map);
L.tileLayer('http://{s}.tile.cloudmade.com/{key}/{styleId}/256/{z}/{x}/{y}.png', {
key: 'YOUR_API_KEY',
styleId: 997,
maxZoom: 18
}).addTo(map);
}
}
});
Stepping through the 'afterRender' code:
var leafletRef = window.L;
if (leafletRef == null){
this.update('No leaflet library loaded');
} else {
....
}
We try to get access to the Leaflet library which is loaded in the window.L namespace. If we can't get a reference to the library, we'll update the component html with a message stating there was an error loading the library.
var map = L.map(this.getId());
Here we create a Leaflet map object passing in the ID of the Ext JS component. By default, the HTML tag created by Ext.Component will be a div, which is what Leaflet requires to initialize the map control. Rather than hard code an ID to reference the div, we'll use the ID generated by the Ext framework when it renders the control. This will allow us to have multiple instances of the control in our application.
map.setView([42.3583, -71.0603], 13);
This will set the map to the latitude/longitude of the Boston, MA area using a zoom level of 13. There are many online tools for looking up lat/lon's for different locations.
this.setMap(map);
Sets the map reference to our map variable so we can access it later.
L.tileLayer('http://{s}.tile.cloudmade.com/{key}/{styleId}/256/{z}/{x}/{y}.png', {
key: 'YOUR_API_KEY',
styleId: 997,
maxZoom: 18
}).addTo(map);
This will configure Leaflet to use CloudMade's map tiles. Assuming you created an account with them and registered your application, you'll get an API key that you will provide in place of 'YOUR_API_KEY'. Don't worry about the confusing URL, that is how Leaflet will dynamically load your tiles when you move around the map. For additional info, I'd recommend reviewing the Leaflet API docs.
At this point, you'll have a basic mapping control you can use in your applications. However, we're not quite done. If you use it as-is, you might not see what you expect. The sizing will not fit your layout. Leaflet requires us to call a method named 'invalidateSize()' any time the map size changes, and it then renders to that size. This is an easy problem to solve in our wrapper component. We can override the 'onResize' method, which gets called anytime the size is changed in the layout, and call the 'invalidateSize' method on the map.
We'll add this to our control:
onResize: function(w, h, oW, oH){
this.callParent(arguments);
var map = this.getMap();
if (map){
map.invalidateSize();
}
}
This will get called anytime the layout changes, and we'll see if we have a valid map reference. If we do, then we'll tell Leaflet to 'invalidateSize'.
Now we can use the component in our layout, and you can see that it'll respect the layout dimensions we're providing for it. If the layout changes due to a browser re-size or a slider, you'll see the new size get applied. With just a couple lines of code in our custom wrapper component, we've made the third party Leaflet control play nice with the Ext JS layout system.
Sample Usage
Let's build a simple Ext JS app that uses this new wrapper component.
Ext.Loader.setConfig({
enabled: true,
paths:{
'Ext.ux':'ux'
}
});
Ext.require(['Ext.ux.LeafletMapView']);
Ext.onReady(function() {
Ext.create('Ext.container.Viewport', {
layout: 'vbox',
items: [
{
xtype: 'leafletmapview',
flex: 1,
width: '100%'
}
]
})
});
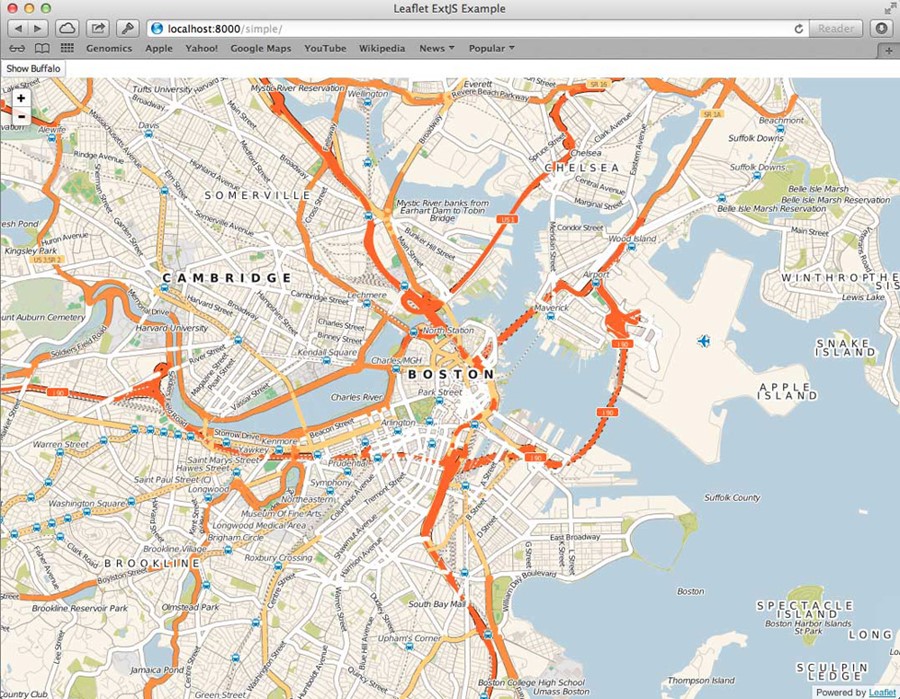
This will create a viewport to use the browser's full size and render out our map to use the whole view. You should see a large map of the Boston area with some simple zoom controls.
The next thing we'll want to do is handle interacting with the map from some outside controls. Let's add a button and have it zoom to a location on the map when clicked. According to the Leaflet docs, all you need to do is call 'setView' on the map object, passing in a coordinate array of the latitude/longitude and a zoom level. So all we have to do is have our wrapper component expose the map object we created in 'afterRender', and then we can have the button access that object and call that method on it.
Place this control above our map control in the viewport items array:
{
xtype: 'button',
text: 'Show Buffalo',
listeners:{
click: function(){
var map = Ext.ComponentQuery.query("viewport leafletmapview")[0];
map.getMap().setView([42.8864, -78.8786], 13);
}
}
}
The above code will display a button where when it's clicked will try to get a reference to the map object and update it's view to a new location. There are many ways to reference a component in an Ext JS application, including Controller refs, Ext.ComponentQuery(), etc. For convenience in this example, we'll use a component query to find our map component in this viewport. Once we have the reference, we can call 'getMap' to get the Leaflet map instance and call any Leaflet API methods directly on it.
From here, you can be as fancy as you'd like your component to get. You can add config properties for all the required setup parameters so you could customize each instance of the component using Ext JS configuration parameters instead of the third party library's conventions. You could also add new properties to toggle library features. For example, you could add a property to enable Leaflet's 'locate' ability, which will attempt to use your browser's Geolocation API to find your location. You can see a more complete example in my GitHub repository.
Conclusion
All libraries are different, and may present additional challenges, but this concept will help you get your Ext JS or Sencha Touch apps integrated with them. There are a number of wrapper components available in the Sencha Market and GitHub already, so you may not need to create your own. But if one doesn't exist for a library you need, now you know how to create your own and share it with the rest of the Sencha developer community.
Written by Kevin Kazmierczak
来自 <https://www.sencha.com/blog/integrating-ext-js-with-3rd-party-libraries-2/>
翻译:
http://blog.csdn.net/tianxiaode/article/details/9178861
说明:
官网论坛上描述如下
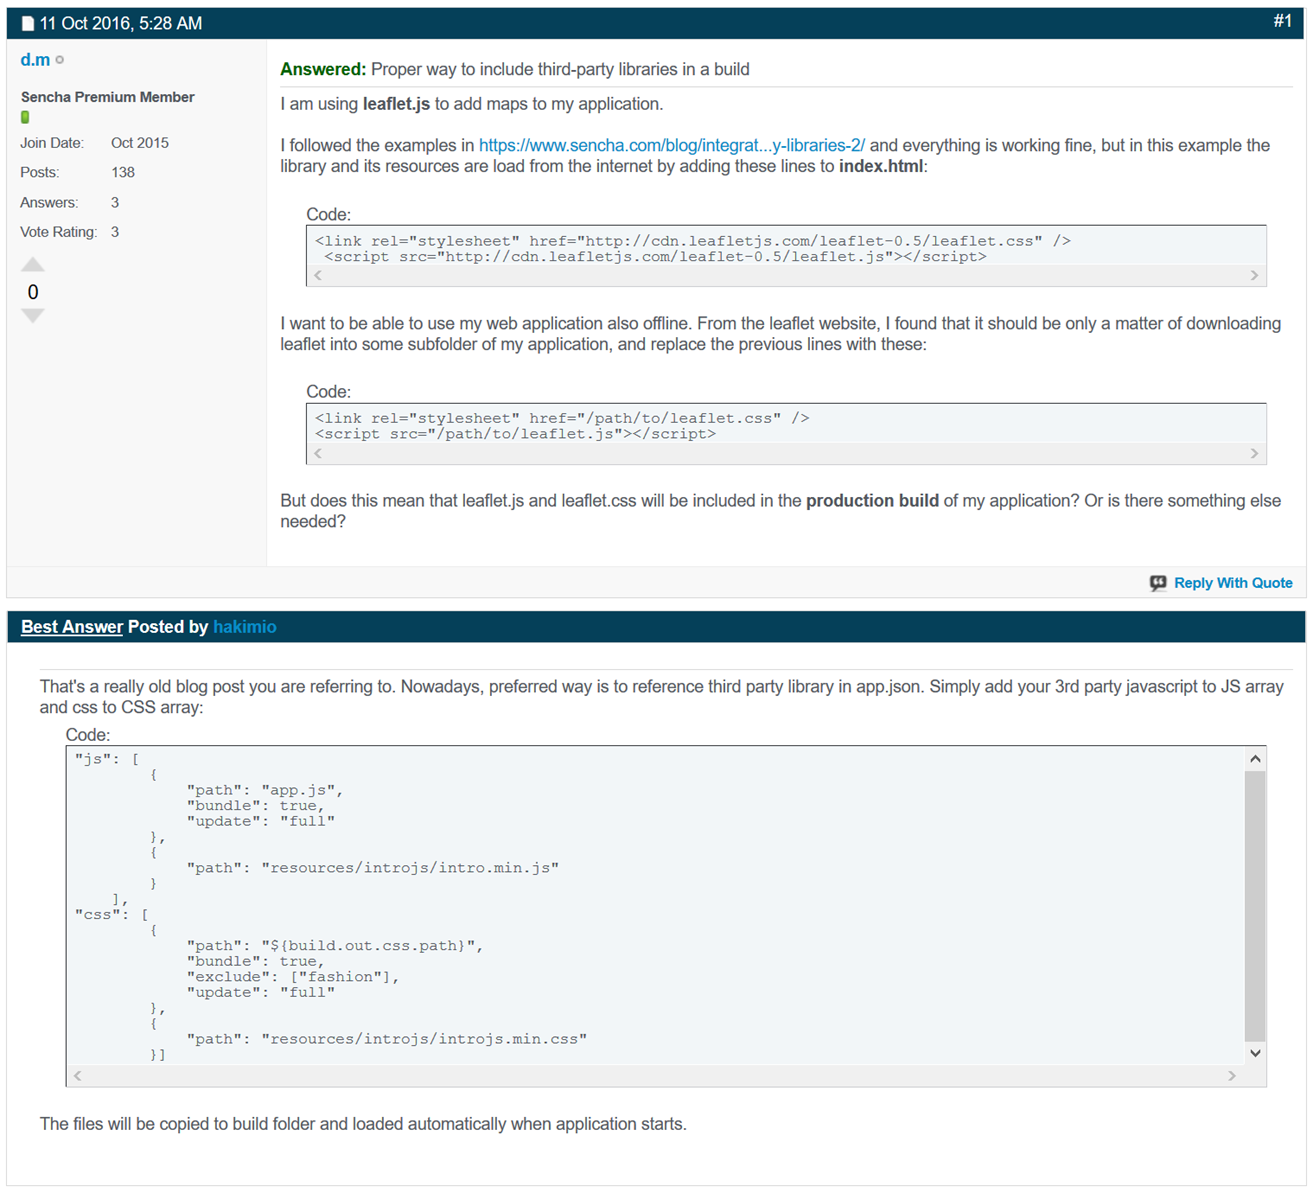
That's a really old blog post you are referring to. Nowadays, preferred way is to reference third party library in app.json. Simply add your 3rd party javascript to JS array and css to CSS array:
Code:
"js": [
{
"path": "app.js",
"bundle": true,
"update": "full"
},
{
"path": "resources/introjs/intro.min.js"
}
],
"css": [
{
"path": "${build.out.css.path}",
"bundle": true,
"exclude": ["fashion"],
"update": "full"
},
{
"path": "resources/introjs/introjs.min.css"
}]
The files will be copied to build folder and loaded automatically when application starts.
来自 <https://www.sencha.com/forum/showthread.php?330047>
【extjs6学习笔记】1.7 初始:加载第三方库的更多相关文章
- [置顶] iOS学习笔记47——图片异步加载之EGOImageLoading
上次在<iOS学习笔记46——图片异步加载之SDWebImage>中介绍过一个开源的图片异步加载库,今天来介绍另外一个功能类似的EGOImageLoading,看名字知道,之前的一篇学习笔 ...
- Flutter学习笔记(19)--加载本地图片
如需转载,请注明出处:Flutter学习笔记(19)--加载本地图片 上一篇博客正好用到了本地的图片,记录一下用法: 首先新建一个文件夹,这个文件夹要跟目录下 然后在pubspec.yaml里面声明出 ...
- XV6学习笔记(1) : 启动与加载
XV6学习笔记(1) 1. 启动与加载 首先我们先来分析pc的启动.其实这个都是老生常谈了,但是还是很重要的(也不知道面试官考不考这玩意), 1. 启动的第一件事-bios 首先启动的第一件事就是运行 ...
- [OpenCV学习笔记3][图像的加载+修改+显示+保存]
正式进入OpenCV学习了,前面开始的都是一些环境搭建和准备工作,对一些数据结构的认识主要是Mat类的认识: [1.学习目标] 图像的加载:imread() 图像的修改:cvtColor() 图像的显 ...
- Quartz.net 2.x 学习笔记03-使用反射加载定时任务
将定时任务信息存储在XML文件中,使用反射加载定时任务 首先新建一个MVC的空站点,使用NuGet添加对Quartz.net和Common.Logging.Log4Net1213的引用,同时使用NuG ...
- 【OpenCV学习笔记之一】图像加载,修改及保存
加载图像(用cv::imread)imread功能是加载图像文件成为一个Mat对象 其中第一个参数表示图像文件名称第二个参数 表示加载的图像是什么类型 支持常见的三个参数值IMREAD_UNCHANG ...
- WMS学习笔记:1.尝试加载WMS
1.首先找一个可用的WMS栅格地图服务:http://demo.cubewerx.com/demo/cubeserv/cubeserv.cgi 获取GetCapabilities: http://de ...
- Android学习笔记_51_转android 加载大图片防止内存溢出
首先来还原一下堆内存溢出的错误.首先在SD卡上放一张照片,分辨率为(3776 X 2520),大小为3.88MB,是我自己用相机拍的一张照片.应用的布局很简单,一个Button一个ImageView, ...
- Android学习笔记_36_ListView数据异步加载与AsyncTask
一.界面布局文件: 1.加入sdcard写入和网络权限: <!-- 访问internet权限 --> <uses-permission android:name="andr ...
- Laravel 学习笔记之 Composer 自动加载
说明:本文主要以Laravel的容器类Container为例做简单说明Composer的自动加载机制. Composer的自动加载机制 1.初始化一个composer项目 在一个空目录下compose ...
随机推荐
- DS:template
ylbtech-DS: 1.返回顶部 2.返回顶部 3.返回顶部 4.返回顶部 5.返回顶部 6.返回顶部 作者:ylbtech出处:http://ylbtech.cnbl ...
- 6 git 生成SSH公钥/私钥 查看公钥
如果没有公钥的话就生成公钥私钥: $ ssh-keygen 然后连续回车(一次是位置,两次密码)
- ReportEvent的正确使用方式
向操作系统的事件管理器报告重大信息是一种非常有用的方式,特别是对于没有界面的后台服务而言.如果你对Windows编程有一定了解,应该很快就能想到使用ReportEvent这个API,然后快速写出下面的 ...
- <正则吃饺子> :关于微信支付的简单总结说明(二)
关于微信退款 一.官方文档 申请退款:https://pay.weixin.qq.com/wiki/doc/api/app/app.php?chapter=9_4&index=6 二.退款流程 ...
- JavaScript高级程序设计学习笔记第三章--基本概念
一.标识符: 1.区分大小写 2.命名规则: 第一个字符必须是一个字母.下划线(_)或一个美元符号($) 其他字符可以是字母.下划线.美元符号或数字 标识符中的字母也可以包含扩展的 ASCII 或 U ...
- windows下搭建nginx服务器及实现nginx支持https配置流程
最近刚接触到了tomcat结合nginx做网站的负载均衡.之前对tomcat搭配nginx实现负载均衡也写过,在上一篇的博客中,最近遇到的问题是要在http的基础上支持https.也就是支持加密的请求 ...
- bootstrap的popover()的使用
有一些选项是通过 Bootstrap 数据 API(Bootstrap Data API)添加或通过 JavaScript 调用的.下表列出了这些选项: 选项名称 类型/默认值 Data 属性名称 描 ...
- Javascript实现页面左边的菜单选中项高亮显示
在项目开发过程中,遇到一个问题 在一个模板页面中,Layout.cshtml,页面左边放了一个菜单项menu,每一项都是一个链接到一个新的页面.但所有页面都是用这个模板Layout.cshtml.需要 ...
- GridView ,后台修改 跟新完毕,前端 未跟新处理
//Response.Redirect(Request.Url.ToString());//重新定位 GridView_dept.DataBind(); //重新绑定都可以
- cordova之旅之初识
emmmm, 一直徘徊在移动端采用什么技术比较好,一直也没有找到,让我为了一个移动端而去学习一波react全家桶是不现实的操作,反观自己的技术栈,通过长时间的对比和剖析找到了入口点,不管了先会写再说吧 ...