HTML+CSS小实战案例
HTML+CSS小实战案例
登录界面的美化,综合最近所学进行练习
网页设计先布局,搭建好大框架,然后进行填充,完成页面布局
<html>
<head>
<meta http-equiv="Content-Type" content="text/html; charset=utf-8"/>
<title>实验</title>
<style type="text/css">
*{margin:0;padding:0;}/*去掉页面样式*/
body{color:white;}
.content{
background-color:pink;
position:absolute;/*绝对定位*/
top:50%;
left:0;
width:100%;
height:400px;
margin-top:-200px;
overflow:hidden;/*隐藏滚动条*/
}
.main{
text-align:center;/*文本居中*/
max-width:600px;
height:400px;
padding:100px 0px;/*上下80px,左右为0*/
/*background:yellow;*//*验证div的位置*/
margin:0 auto;/*设置上右下左,居中显示*/
}
.main h1{
font-family:"楷体";/*设置字体*/
font-size:70px;/*设置字体大小*/
font-weight:2px;/*调整字体粗细*/
}
form{
padding:20px 0;
}
form input{
border:1px solid white;
display:block;
margin:0px auto 10px auto;/*上 右 下 左*/
padding:10px;
width:220px;
border-radius:30px;/*H5设置圆角边框*/
font-size:18px;
font-weight:300;
text-align:center;
}
form input:hover{
background-color:pink;
}
form button{
background-color:yellow;
border-radius:10px;
border:0;
height:30px;
width:50px;
padding:5px 10px;
}
form button:hover{
background-color:red;
}
</style>
</head>
<body>
<div class="content">
<div class="main">
<h1>Welcome</h1>
<form>
<input type="text" name="useid" placeholder="请输入账号"/>
<input type="password" name="pw" placeholder="请输入密码">
<button type="submit">登 录</button>
</form>
</div>
</div> </body>
</html>
登录界面实战运行结果如下

自己动手丰衣足食
 <html>

 <head>

 <meta http-equiv="Content-Type" content="text/html; charset=utf-8"/>

 <!--link href="*.css" rel="stylesheet" type="text/css">-->

     <title>柠檬学院</title>

     <style type="text/css">

         *{margin:0;padding:0;}

         .content{

             background-color:yellow;/*设置背景颜色*/

             position:absolute;/*设置绝对定位*/

             width:100%;/*设置div的宽度*/

             height:400px;/*设置div的高度*/

             top:50%;/*距离上面的距离是一半*/

             margin-top:-200px;/*向上距顶端的距离减200像素*/

             overflow:hidden;/*隐藏滚动条*/

         }

         .container{

             /*background-color:pink;*//*背景颜色*/

             text-align:center;/*文字居中*/

             padding:80px 0px;/*设置上下和左右*/

             max-width:600px;/*设置最大宽度*/

             height:400px;/*设置div的高度*/

             margin:-10 auto 0 auto;/*上  右 下  左*/

         }

         .container h1{

             background-color:pink;

             font-size:80px;

             border-radius:30px;

             color:blue;

             height:80px;

             width:600px;

             text-align:center;

             font-family:"楷体";

         }

         form input{

             font-size:30px;

             display:block;

             border-radius:30px;

             padding:10px 5px;/*上下  左右*/

             text-align:center;

             margin:25 auto 15 auto;/*上  右 下  左*/

             font-weight:300px;

         }

         form input:hover{

             background-color:gold;

         }

         form button{

             background-color:grad;

             height:50px;

             width:100px;

             border-radius:20px;

             font-family:"楷体";

             font-size:30px;

         }

         form button:hover{

             background-color:pink;

         }

     </style>

 </head>

 <body>

     <div class="content">

         <div class="container">

             <h1>柠檬学院</h1>

             <form>

                 <input type="text" name="useid" placeholder="请输入账号"/>

                 <input type="password" name="pw" placeholder="请输入密码"/>

                 <button type="submit">登录</button>

                 <button type="submit">注册</button>

             </form>

         </div>

     </div>

 </body>

 </html>
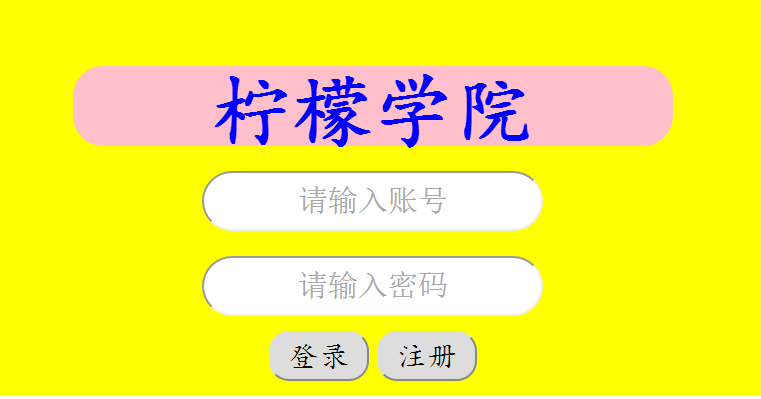
先布局,后填充,网页设计的规范格式
 <html>

 <head>

 <meta http-equiv="Content-Type" content="text/html; charset=utf-8"/>

 <!--link href="*.css" rel="stylesheet" type="text/css">-->

     <title>柠檬学院</title>

     <style type="text/css">

         *{

             margin:0px;

             padding:0px;/*设置距顶点的距离设置为0*/

         }

         .header{

             background-color:pink;

             color:blue;

             height:80px;

             width:100%;

             text-align:center;

             font-size:60px;

         }

         .main{

             margin:0 auto 0 auto;

             background-color:yellow;

             text-align:center;

             font-size:60px;

             width:80%;

             height:600px;

         }

         .foot{

             background-color:gray;

             width:80%;

             margin:0 auto 0 auto;

             height:200px;

             text-align:center;

             font-size:60px;

         }

     </style>

 </head>

 <body>

     <div class="header">

         页面头部信息

     </div>

     <div class="main">

         页面的主要内容

     </div>

     <div class="foot">

         页面的版权信息

     </div>

 </body>

 </html>

 <html>

 <head>

 <meta http-equiv="Content-Type" content="text/html; charset=utf-8"/>

 <!--link href="*.css" rel="stylesheet" type="text/css">-->

     <title>柠檬学院</title>

     <style type="text/css">

         *{

             margin:0px;

             padding:0px;/*设置距顶点的距离设置为0*/

             text-align:center;

         }

         .header{

             background-color:yellow;

             height:100px;

             width:100%;

             font-size:80px;

             font-family:"楷体";

         }

         .main{

             width:80%;

             margin:0 auto 0 auto;

         }

         .left{

             background-color:brown;

             float:left;/*改变位置*/

             height:200px;

             width:20%;

             font-size:60px;

             color:yellow;

         }

         .right{

             background-color:peachpuff;

             height:200px;

             width:80%;

             float:right;

             font-size:60px;

             color:blue;

         }

         .main1{

             margin:0 auto 0 auto;

             background-color:yellow;

             text-align:center;

             font-size:60px;

             width:80%;

             height:600px;

         }

        .foot{

             background-color:gray;

             width:80%;

             margin:0 auto 0 auto;

             height:200px;

             text-align:center;

             font-size:60px;

          }

     </style>

 </head>

 <body>

     <div>

         <div class="header">

             页面头部信息

         </div>

         <div class="main">

             <div class="left">

                 LOGO

             </div>

             <div class="right">

                 页面导航

             </div>

         </div>

          <div class="main1">

             页面的主要内容

         </div>

         <div class="foot">

              页面的版权信息

         </div>

     </div>

 </body>

 </html>

 <html>

 <head>

 <meta http-equiv="Content-Type" content="text/html; charset=utf-8"/>

 <!--link href="*.css" rel="stylesheet" type="text/css">-->

     <title>柠檬学院</title>

     <style type="text/css">

         *{

             margin:0px;

             padding:0px;/*设置距顶点的距离设置为0*/

             text-align:center;

         }

         .header{

             background-color:yellow;

             height:100px;

             width:100%;

             font-size:80px;

             font-family:"楷体";

         }

         .main{

             width:80%;

             margin:0 auto 0 auto;

             height:200px;

         }

         .left{

             background-color:brown;

             float:left;/*改变位置*/

             height:200px;

             width:20%;

             font-size:60px;

             color:yellow;

         }

         .right{

             background-color:peachpuff;

             height:200px;

             width:80%;

             float:right;

             font-size:60px;

             color:blue;

         }

         ad{

             height:480px;

             width:100%;

             margin:auto 0 0 auto;

         }

         .ad1{

             width:10%;

             height:550px;

             margin:0 auto auto auto;

             background-color:blue;

             float:left;

             font-size:60px;

         }

         .main1{

             margin:0 auto 0 auto;

             background-color:yellow;

             text-align:center;

             font-size:60px;

             width:80%;

             height:480px;

             float:left;

         }

         .ad2{

             width:10%;

             height:550px;

             margin:0 auto auto auto;

             background-color:blue;

             float:right;

             font-size:60px;

         }

        .foot{

             background-color:gray;

             width:80%;

             margin:0 auto 0 auto;

             height:200px;

             text-align:center;

             font-size:60px;

          }

     </style>

 </head>

 <body>

     <div>

         <div class="header">

             页面头部信息

         </div>

         <div class="main">

             <div class="left">

                 LOGO

             </div>

             <div class="right">

                 页面导航

             </div>

         </div>

         <div class="ad">

             <div class="ad1">

                 广告投放

             </div>

             <div class="main1">

                 页面的主要内容

             </div>

             <div class="ad2">

                 广告投放

             </div>

         </div>

         <div class="foot">

             页面的版权信息

         </div>

     </div>

 </body>

 </html>

HTML+CSS小实战案例的更多相关文章
- CSS基础 实战案例 模拟小米官方导航栏
效果图 html结构 <ul> <li><a href="#">Xiaomi手机</a></li> <li> ...
- CSS3基础——笔记+实战案例(CSS基本用法、CSS层叠性、CSS继承性)
CSS3基础——笔记 CSS是Cascading Style Sheet的缩写,翻译为"层叠样式表" 或 "级联样式表".CSS定义如何显示HTML的标签央视, ...
- HTML+CSS提升小实战
1 <html> 2 <head> 3 <meta http-equiv="Content-Type" content="text/html ...
- 第二百五十四节,Bootstrap项目实战--案例
Bootstrap项目实战--案例 html <!DOCTYPE html> <html lang="zh-cn"> <head> <me ...
- Salesforce学习之路-developer篇(五)一文读懂Aura原理及实战案例分析
1. 什么是Lightning Component框架? Lightning Component框架是一个UI框架,用于为移动和台式设备开发Web应用程序.这是一个单页面Web应用框架,用于为Ligh ...
- Vue2.0史上最全入坑教程(下)—— 实战案例
书接上文 前言:经过前两节的学习,我们已经可以创建一个vue工程了.下面我们将一起来学习制作一个简单的实战案例. 说明:默认我们已经用vue-cli(vue脚手架或称前端自动化构建工具)创建好项目了 ...
- python实战案例--银行系统
stay hungry, stay foolish.求知若饥,虚心若愚. 今天和大家分享一个python的实战案例,很多人在学习过程中都希望通过一些案例来试一下,也给自己一点动力.那么下面介绍一下这次 ...
- 基于SpringCloud的Microservices架构实战案例-架构拆解
自第一篇< 基于SpringCloud的Microservices架构实战案例-序篇>发表出来后,差不多有半年时间了,一直也没有接着拆分完,有如读本书一样,也是需要契机的,还是要把未完成的 ...
- 暗黑战神! Unity3D网游ARPG实战案例
前面开发了几个单机小游戏,该是时候挑战一下网络游戏方面的开发了! 3D网游ARPG实战案例(第二季),使用Unity2017.3版本制作 内容包括 服务端部分 1.网络通信编码,协议及传输 2.数据驱 ...
随机推荐
- Jquery 生成时钟
$(function(){ showTime(); }): function showTime () { var curtime=new Date(); $(".getDateTime&qu ...
- AVL树模板
///AVL树模板 typedef struct Node ///树的节点 { int val,data; int h; ///以当前结点为根结点的数的高度 int bf; ///平衡因子(左子树高度 ...
- python py生成为pyc文件
生成单个pyc文件 python就是个好东西,它提供了内置的类库来实现把py文件编译为pyc文件,这个模块就是 py_compile 模块. 使用方法非常简单,如下所示,直接在idle中,就可以把一个 ...
- 解析Tomcat内部结构和请求过程
Tomcat Tomcat的组织结构 由Server.xml的结构看Tomcat的体系结构 Tomca的两大组件:Connecter和Container Connecter组件 Container组件 ...
- 设置EditText光标位置
editext.setSelection(int index);
- su - root 报su: incorrect password的错误
检查/bin/下面的文件的组属 和 sh 文件 的权限 是否有问题 例如:-rwxr-xr-x. 1 weblogic dba 34904 Jul 15 2011 /bin/su1 修改这个文件 ...
- Windows 2008安装SQL 2008图解
SQL Server 2008是一个重大的产品版本,它推出了许多新的特性和关键的改进,使得它成为至今为止的最强大和最全面的SQL Server版本. 在现今数据的世界里,公司要获得成功和不断发展,他们 ...
- C#读写xml文件的常用方法
已知有一个XML文件(bookshop.xml)如下: <?xml version="1.0" encoding="gb2312" ?> <b ...
- c#winform如何通过控件名查找控件
//根据控件名称查找控件 //作用根据控件的配置项目, Control[] myfindcs = this.Controls.Find("button4", true); if ( ...
- php实现验证码
验证码在表单实现越来越多了,但是用js的写的验证码,总觉得不方便,所以学习了下php实现的验证码.好吧,其实是没有事情干,但是又不想浪费时间,所以学习了下php实现验证码.正所谓,技多不压身.而且 ...