Nginx服务编译安装、日志功能、状态模块及访问认证模式实操
系统环境
  [root@web ~]# cat /etc/redhat-release

  CentOS release 6.9 (Final)

  [root@web ~]# uname -a

  Linux db02 2.6.-.el6.x86_64 # SMP Tue Mar  :: UTC  x86_64 x86_64 x86_64 GNU/Linux
Nginx介绍
Nginx是一个开源的,支持高性能、高并发的WWW服务器和代理服务软件
nginx软件常见的使用方式或架构为:LNMP(linux nginx mysql php)
Nginx的特点或优势
- 支持高并发:能支持几万并发连接(特别是静态小文件业务环境)
- 资源消耗少:在3万并发连接下,开启10个Nginx线程消耗的内存不到200MB
- 可以做HTTP反向代理及加速缓存、即负载均衡功能,内置对RS节点服务器健康检查功能,这相当于专业的Haproxy软件或LVS的功能。
- 具备Squid等专业缓存软件等的缓存功能。
- 支持异步网络I/O事件模型epoll(Linux 2.6+)(绘图说明同步和异步)
大并发写操作;先写内存,再将内存数据存储到硬盘中---保证访问效率
大并发读操作;先写磁盘,再将磁盘数据存储到内存中---保证数据安全
总结:高并发-->资源消耗少-->功能多样(web服务/负载均衡/支持缓存)-->通讯模型先进(epoll)
Nginx编译安装步骤
一、解决nginx依赖包
需要的依赖:
pcre:兼容perl语言正则表达式,perl compatible regular expressions rewirte模块 参数信息(perl方式定义正则表达式)
openssl:https
注意:所有安装依赖软件,后面都要加上-devel
[root@web ~]# yum install -y pcre-devel openssl-devel

下载nginx

[root@web tools]# wget http://nginx.org/download/nginx-1.10.2.tar.gz

[root@web tools]# ll

total

-rw-r--r--  root root  Oct  : nginx-1.10..tar.gz
解决依赖,下载nginx
二、解压nginx、创建管理用户、配置nginx
[root@web tools]# tar xf nginx-1.10..tar.gz

[root@web tools]# ll

total

drwxr-xr-x       Oct    nginx-1.10.

-rw-r--r--  root root  Oct  : nginx-1.10..tar.gz

[root@web tools]# cd nginx-1.10.

[root@web nginx-1.10.]# useradd -s /sbin/nologin www -M

[root@web nginx-1.10.]# id www

uid=(www) gid=(www) groups=(www)

[root@web01 nginx-1.10.]# ./configure --prefix=/application/nginx-1.10. --user=www --group=www --with-http_stub_status_module  --with-http_ssl_module

--prefix:表示指定软件安装到哪个目录中,指定目录不存在会自动创建

--user/--group:nginx工作进程由哪个用户运行管理

--with-http_stub_status_module:表示启动nginx状态模块功能(用户访问nginx的网络信息)

--with-http_ssl_module:启动https功能模块
解压nginx、创建用户、配置nginx
三、编译&&编译安装
make && make install
给软件创建软连接文件,方便以后管理使用
[root@web application]# ln -s /application/nginx-1.10./ /application/nginx

[root@web application]# ll

total

lrwxrwxrwx  root root    Oct  : nginx -> /application/nginx-1.10./

drwxr-xr-x  root root  Oct  : nginx-1.10.
创建软连接
四、启动nginx服务
[root@web application]# /application/nginx/sbin/nginx

[root@web application]# ps -ef |grep nginx

root           : ?   :: nginx: master process /application/nginx/sbinnginx

www        : ?  :: nginx: worker process

root       : pts/    :: grep --color=auto nginx
启动nginx
软件安装完目录信息
conf --- 软件配置文件保存目录
html --- 网站站点目录*
logs --- 日志文件保存目录
sbin --- nginx命令保存目录
conf目录中内容
nginx.conf --- nginx程序的主配置文件
nginx.conf.default --- nginx配置备份文件
因为初始化的nginx配置文件内有较多注释,影响对配置文件的修改,所以进行精简化配置文件
[root@web conf]# egrep -v "#|^$" nginx.conf.default >nginx.conf
nginx软件启动重启方法
启动方法(全路径)

/applocation/nginx/sbin/nginx

停止方法(全路径+   -s 参数 接指令)

/applocation/nginx/sbin/nginx -s stop

平滑重启方法(全路径+   -s 参数 接指令)

/applocation/nginx/sbin/nginx -s reload

检查配置文件语法(全路径+  -t 参数)

/applocation/nginx/sbin/nginx -t

查看怎么部署的(全路径+   -V 参数)

/applocation/nginx/sbin/nginx -V
nginx重启方式
Nginx配置文件配置详解
在server模块下指定主页文件,可以指定自己写的主页,这里需要注意的是,主页文件要放到站点目录下
[root@web nginx]# cat conf/nginx.conf

worker_processes  ;                        ##worker进程数量

events {

    worker_connections  ;               ##每个worker进程支持的最大连接数

}

http {

    include       mime.types;               ##Nginx支持的媒体类型库文件

    default_type  application/octet-stream; ##默认的媒体类型

    sendfile        on;                     ##开启高效传输模式

    keepalive_timeout  ;                  ##连接超时

    server {

        listen       ;                    ##提供服务的端口,默认是80

        server_name  www.zxpo.top;          ##提供服务的域名主机名

        location / {

            root   html/www;                ##站点的根目录,相当于Nginx的安装目录

            index  index.html index.htm;   ##默认的首页文件,多个用空格分开

        }

        error_page        /50x.html;    ##出现对应的状态码,使50x.html

        location = /50x.html {

            root   html;                    ##指定对应的站点目录为html

        }

    }

}
配置文件详解
多个server模块堆在一个配置文件中比较乱,难以修改,可以将配置文件分为多个,一个nginx.conf为主,例如
创建一个exyra目录为存放不同站点的配置文件目录,将不同网页的server模块写成不同的配置文件,然后引用
http {

    include       mime.types;

    default_type  application/octet-stream;

    sendfile        on;

    keepalive_timeout  ;

    include     extra/www.conf;

    include     extra/blog.conf;

    include     extra/bbs.conf;

}
Nginx使用
基于域名访问
在server模块中设置,server模块可以有多个,server_name,可以修改成不同的域名,如果是本地测试的话,记得host文件解析
 server {

        listen       ;

        server_name  www.zxpo.top;          <- 修改虚拟主机域名名称

        location / {

            root   html/www;                <- 修改虚拟主机站点目录

            index  index.html index.htm;

        }
基于端口访问
server {

        listen       ;      <- 将端口换成81,进行测试

        server_name  bbs.zxpo.top;

        location / {

            root   html/bbs;

            index  index.html index.htm;

        }
检查
[root@web nginx]# netstat -lntup|grep nginx

tcp               0.0.0.0:       0.0.0.0:*         LISTEN      /nginx

tcp               0.0.0.0:       0.0.0.0:*         LISTEN      /nginx
基于IP访问
注意:采用基于IP配置虚拟主机,修改完配置文件后,需要重启配置文件,不能够采用平滑重启。
只要配置文件中,有关IP地址相关的改动,都需要进行重启nginx服务,不能够采用平滑重启。
改配置文件
server {

        listen       10.0.0.8:;   <-改成某个ip还有指定的端口

        server_name  www.zxpo.top;

        location / {

            root   html/www;

            index  index.html index.htm;

        }
然后重启
curl访问网站流程
[root@web ~]# curl -v www.zxpo.top         <- 利用curl命令-v参数获取访问网站流程

a. 访问网站时首先需要根据域名解析获取到网站的ip地址,找寻网站的ip地址对应的服务器

b. 访问网站时其次需要根据请求建立连接的目标端口信息,找寻网站的相应服务端口是否存在

c. 访问网站时再次需要根据请求域名信息获悉相应的站点,找寻网站的相应站点目录下的资源信息

d. 访问网站时最后如果ip地址加端口信息都已找到,但没有找到对应的域名信息,会按照默认原则使用第一个虚拟主机作为默认访问的虚拟站点目录
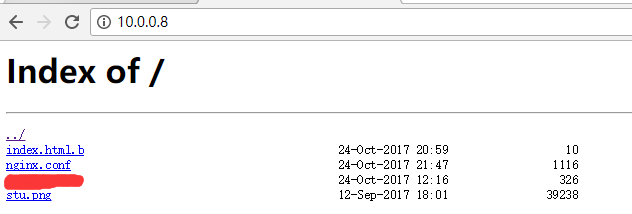
Nginx共享文件web页面
当配置autoindex on参数以后,会显示站点目录文件列表信息:
1. 对于nginx服务可以识别解析资源,进行点击,会显示相应内容
2. 对于nginx服务不可以识别解析资源,进行点击,会直接下载
server {

        listen       ;

        server_name  www.zxpo.com;

        location / {

            root   html/www;           <-或者在设置一级专门做共享的目录

          index  index.html index.htm; <-这里要在站点目录中把主页文件删除,否则会直接显示主页

            autoindex on;

        }
查看Nginx状态信息配置
stub_status模块主要用于查看Nginx的一些状态信息
在主配置文件配置 log_format main……
http {

    include       mime.types;

    default_type  application/octet-stream;

    sendfile        on;

    keepalive_timeout  ;
 log_format  main  '$remote_addr - $remote_user [$time_local] "$request"'

                   '$status $body_bytes_sent "$http_referer" '

                   '"$http_user_agent" "$http_x_forwarded_for"';
省略……
访问状态信息:

Active connections 客户端连接数
accepts 接收数值
handled 处理数值(通常跟接收值是一样的,但是限制值达到上限就例外了)
requests 客户端请求值
Reading 请求报文的连接数
Writing 响应
Waiting 等待请求的数量
说明:一般以上页面内容信息主要会被zabbix监控服务调取,形成图像信息;根据图像信息,从而判断nginx网站服务用户访问量情况
Nginx日志功能
|
Nginx日志变量 |
说明 |
|
$remote_addr |
记录访问网站的客户端地址;即源 ip地址 |
|
$http_x_forwarded_for |
当前端有代理服务器时,设置web节点记录客户端地址的配置,此参数生效的前提是代理服务器上也进行了相关的 x_forwarded_for设置可以记录用户真实的 IP地址信息 |
|
$remote_user |
远程客户端用户名称 |
|
$time_local |
记录访问时间与时区 |
|
$request |
用户的 http请求起始行信息 |
|
$status |
http状态码,记录请求返回的状态,例如:200,404,301等 |
|
$body_bytes_sents |
服务器发送给客户端的响应body字节数 |
|
$http_referer |
记录此次请求是从哪个链接访问过来的,可以根据referer进行防盗链设置即表示是哪个网站介绍过来的 |
|
$http_user_agent |
记录客户端访问信息,例如:浏览器、手机客户端等 |
|
在没有特殊要求的情况下,采用默认的配置即可,更多可以设置的记录日志信息的变量见: http://nginx.org/en/docs/http/ngx_httpJog_module.html |
|
错误日志信息
记录nginx服务运行异常情况信息
error_log的默认值为:

error_log logs/error.log error;
可以放置的标签段为(可以设置的区块):

main,http,server,location
参考资料:http://nginx.org/en/docs/ngx_core_module.html#error_log 。
说明:nginx官方文档查询信息如何使用,如何根据配置信息获取所在模块目录
配置文件中设置错误日志
error_log logs/error.log error;
访问日志信息
Nginx日志格式中默认的参数配置如下:

log_format  main  '$remote_addr - $remote_user [$time_local] "$request" '

                  '$status $body_bytes_sent "$http_referer" '

                  '"$http_user_agent" "$http_x_forwarded_for"';
Nginx记录日志的默认参数配置如下:

access_log  logs/access.log  main;
配置文件中设置访问日志
http {

    include       mime.types;

    default_type  application/octet-stream;

    sendfile        on;

    keepalive_timeout  ;

 log_format  main  '$remote_addr - $remote_user [$time_local] "$request"'

                   '$status $body_bytes_sent "$http_referer" '

                   '"$http_user_agent" "$http_x_forwarded_for"';

access_log  logs/access.log  main;
……
日志信息说明
这是一条日志文件中的日志信息:
10.0.0.253 - - [/Oct/::: +] "GET /favicon.ico HTTP/1.1"   "http://www.zxpo.top/" "Mozilla/5.0 (Windows NT 10.0; WOW64) AppleWebKit/537.36 (KHTML, like Gecko) Chrome/60.0.3112.90 Safari/537.36"

$remote_addr    10.0.0.253       客户端IP地址信息

$remote_user    -                远程认证用户信息

[$time_local]     [/Oct/::: +]       显示访问事件信息

$request        GET / HTTP/1.1   表示显示请求行内容

$status                       显示状态码信息(若日志中,状态码为304,表示用户端有缓存信息)

$body_bytes_sent               响应保存主体内容大小

$http_user_agent                 定义客户端以什么软件进行访问web服务器
Nginx日志切割方式
利用脚本切割
#!/bin/bash

/application/nginx/sbin/nginx -s reload    #先重启一次生成日志

mv /application/nginx/logs/access_www.log /application/nginx/logs/access_www_$(date +%F).log    #然后改名

/application/nginx/sbin/nginx -s reload    #再次重启重新生成新的
具体切割日志脚本
[root@www logs]# cat /server/script/cut_nginx_log.sh

#!/bin/sh

Dateformat=`date +%Y%m%d`

Basedir= "/application/nginx"

Nginxlogdir="$Basedir/logs"

Logname="access_www"

[-d $Nginxlogdir ] && cd $Nginxlogdir || exit

[-f ${Logname}.log ] || exit

/bin/mv ${Logname}.log ${Dateformat}_${Logname}.log

$Basedir/sbin/nginx -s reload
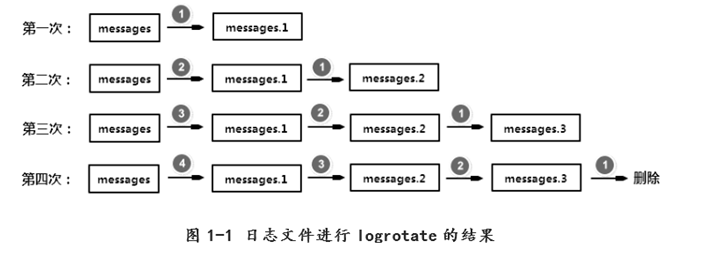
logrotate方式切割
logrotate配置文件详解
/var/log/nginx/*.log { #/var/log/nginx/日志的存储目录,可以根据实际情况进行修改

daily                ##日志文件将按天轮循

weekly               ##日志文件将按周轮循

monthly              ##日志文件将按月轮循

missingok            ##在日志轮循期间,任何错误将被忽略,例如“文件无法找到”之类的错误

rotate 7             #一次存储7个日志文件。对于第8个日志文件,时间最久的那个日志文件将被删除

dateext              #定义日志文件后缀是日期格式,也就是切割后文件是:xxx.log-20160402.gz这样的格式。如果该参数被注释掉,切割出来是按数字递增,即前面说的 xxx.log-1这种格式

# compress           ##在轮循任务完成后,已轮循的归档将使用gzip进行压缩

delaycompress        ##总是与compress选项一起用,delaycompress选项指示logrotate不要将最近的归档压缩,压缩将在下一次轮循周期进行。这在你或任何软件仍然需要读取最新归档时很有用

notifempty           ##如果是空文件的话,不进行转储

create 640 nginx adm ##以指定的权限和用书属性,创建全新的日志文件,同logrotate也会重命名原始日志文件

sharedscripts        ##表示postrotate脚本在压缩了日志之后只执行一次

postrotate

[ -f /var/run/nginx.pid ] && kill -USR1 `cat /var/run/nginx.pid`

endscript

}

## postrotate/endscript:在所有其它指令完成后,postrotate和endscript里面指定的命令将被执行。在这种情况下,rsyslogd进程将立即再次读取其配置并继续运行。注意:这两个关键字必须单独成行
Nginx的location作用
进行策略控制
location = / {

        [ configuration A ]

    }

    location / {

        [ configuration B ]

    }

    location /documents/ {

        [ configuration C ]

    }

    location ^~ /images/ {

        [ configuration D ]

    }

    location ~* \.(gif|jpg|jpeg)$ {

        [ configuration E ]

    }
官方location说明
location表示位置的概念,类似于if,即满足什么条件,就做什么
控制访问网段,设置访问网段白名单和黑名单
[root@web01 www]# cat /application/nginx/conf/extra/www.conf

    server {

        listen       ;

        server_name  www.etiantian.org t.org;

        location / {

            root   html/www;

            index  index.html index.htm;

        }

        location /AV/ {

            root   html/www;

            index  index.html index.htm;

            allow  172.16.1.0/;   ##允许内网网段访问

            deny   all;             ##其余网段拒绝

        }

   }
location匹配说明
|
不用URI及特殊字符组合匹配 |
匹配说明 |
|
location = / { |
精确匹配 / |
|
location ^~ /images { |
匹配常规字符串,不做正则匹配检查(优先) |
|
location ~* \. ( gif|jpg|jpeg ) $ { |
正常匹配,匹配后缀为gif|jpg|jpeg的 |
|
location /documents/ { |
匹配常规字符串,如果有正则,优先匹配正则 |
|
location / { |
所有location都不能匹配后的默认匹配 |
|
~ : 匹配内容区分大小写 ~* :匹配内容不区分大小写 ! :表示取反匹配 ^~ :表示当多个匹配同时存在,优先匹配^~内容 |
|
Nginx 的访问认证
修改nginx的相关配置文件
    server {

        listen      ;

        server_name  www.zxpo.top;

        location / {

            root   html/www;

            index  index.html index.htm;

            auth_basic       "erlianzhang training";

            auth_basic_user_file    /application/nginx/conf/htpasswd;

       }
创建密码认证文件并进行授权
首先要下载httpd-tools软件
yum install httpd-tools -y
htpasswd的参数
[root@web application]# htpasswd -hlep

Usage:

    htpasswd [-cmdpsD] passwordfile username

    htpasswd -b[cmdpsD] passwordfile username password

    htpasswd -n[mdps] username

    htpasswd -nb[mdps] username password

 -c      Create a new file.

        创建一个新的密码文件

 -n      Don't update file; display results on stdout.

        不更新文件,显示输出结果

 -m      Force MD5 encryption of the password.

        强制采用MD5加密密码

 -d      Force CRYPT encryption of the password (default).

        强制采用CRYPT加密密码(默认)

 -p      Do not encrypt the password (plaintext).

        不加密密码(明文)

 -s      Force SHA encryption of the password.

        强制采用SHA加密密码

 -b      Use the password from the command line rather than prompting for it.

        使用密码来自命令行,相当于免交互方式

 -D      Delete the specified user.

        删除指定用户

On Windows, NetWare and TPF systems the '-m' flag is used by default.

On all other systems, the '-p' flag will probably not work.
htpasswd参数详解
创建认证文件
[root@web www]# htpasswd -bc /application/nginx/conf/htpasswd lyq

Adding password for user oldboy

[root@web01 www]# cat /application/nginx/conf/htpasswd

lyq:DVu6f44f2I81w    <- 加密的认证文件自动设置密文
认证文件生成
给密码文件授权,重启Nginx
[root@web www]# chown -R www.www /application/nginx/conf/htpasswd

[root@web www]# chmod  /application/nginx/conf/htpasswd

[root@web www]# /application/nginx/sbin/nginx -t

nginx: the configuration file /application/nginx-1.10./conf/nginx.conf syntax is ok

nginx: configuration file /application/nginx-1.10./conf/nginx.conf test is successful

[root@web www]# /application/nginx/sbin/nginx -s reload
授权密码文件,重启nginx
登陆测试

Nginx服务编译安装、日志功能、状态模块及访问认证模式实操的更多相关文章
- 【01】Nginx:编译安装/动态添加模块
写在前面的话 说起 Nginx,别说运维,就是很多开发人员也很熟悉,毕竟如今已经 2019 年了,Apache 更多的要么成为了历史,要么成为了历史残留. 我们在提及 Nginx 的时候,一直在强调他 ...
- 初识Nginx及编译安装Nginx
初识Nginx及编译安装Nginx 环境说明: 系统版本 CentOS 6.9 x86_64 软件版本 nginx-1.12.2 1.什么是Nginx? 如果你听说或使用过Apache软件 ...
- Nginx 的编译安装和URL地址重写
本文转自:http://www.178linux.com/14119#rd?sukey=ecafc0a7cc4a741b573a095a3eb78af6b4c9116b74d0bbc9844d8fc5 ...
- nginx的编译安装以及启动脚本编写
Nginx的编译安装和启动脚本的编写 Nginxd的功能强大,可以实现代理.负载均衡等企业常用的功能.下面介绍一下nginx的编译安装方法: 1. 下载 官方下载地址:http://nginx.org ...
- nginx应用编译安装
nginx应用编译安装: 安装编译所需依赖包: # apt-get install make gcc g++ libcurl3-openssl-dev libfreetype6-dev libmcry ...
- nginx编译安装和功能介绍
nginx介绍 nginx: engine X,是由1994年毕业于俄罗斯国立莫斯科鲍曼科技大学的同学为俄罗斯rambler.ru公司开发的,开发工作最早从2002年开始,第一次公开发布时间是2004 ...
- 全志a20安卓电视盒子安装可道云kodexplorer服务-编译安装php7.3+nginx
可道云真的很强大,安装包很小,功能却很齐全,还可以自定义轻应用如果有手机客户端就更好了 研究了一下,可道云根目录放到外置存储设备(移动硬盘)会更合适,改路径的方法下面有提到上传文件时一个文件会在用户目 ...
- Nginx的编译安装及服务启动脚本
1.解决依赖关系 编译安装nginx需要事先需要安装开发包组"Development Tools"和 "Development Libraries".同时,还需 ...
- nginx重新编译安装upload模块
由于php处理上传会出现超时,并且显示上传进度官方php不支持nginx+php,所以决定让nginx自己处理上传,我本地环境是mac上已经安装过nginx1.8.0,安装方式为brew,所以需要重新 ...
随机推荐
- 【开源】canvas图像裁剪、压缩、旋转
前言 前段时间遇到了一个移动端对图像进行裁剪.压缩.旋转的需求. 考虑到已有各轮子的契合度都不高,于是自己重新造了一个轮子. 关于图像裁剪.压缩 在HTML5时代,canvas的功能已经非常强大了,可 ...
- [认证授权] 5.OIDC(OpenId Connect)身份认证授权(扩展部分)
在上一篇[认证授权] 4.OIDC(OpenId Connect)身份认证授权(核心部分)中解释了OIDC的核心部分的功能,即OIDC如何提供id token来用于认证.由于OIDC是一个协议族,如果 ...
- pattern
A compiled representation of a regular expression. A regular expression, specified as a string, must ...
- 常用FastJSON的SerializerFeature特性及日期转换格式
SerializerFeature.PrettyFormat:格式化输出 SerializerFeature.WriteMapNullValue:是否输出值为null的字段,默认为false Seri ...
- keras 修仙笔记一
对于牛逼的程序员,人家都喜欢叫他大神:因为大神很牛逼,人家需要一个小时完成的技术问题,他就20分钟就搞定.Keras框架是一个高度集成的框架,学好它,就犹如掌握一个法宝,可以呼风唤雨.所以学keras ...
- 1.Servlet介绍 和 HTTP协议简述
1. Servlet是什么? sun公司制订的一种用来扩展web服务器功能的组件规范. (1)扩展web服务器功能 注: 早期的web服务器只能处理静态资源的请求,即需要事先将 html文件准备好,并 ...
- Python [习题] 字典排序
[习题] 对此字典分别按照value 和key 如何排序? dic1 = {'and':40, 'a':54, 'is':60, 'path':139, 'the':124, 'os':49} In ...
- 《java.util.concurrent 包源码阅读》27 Phaser 第一部分
Phaser是JDK7新添加的线程同步辅助类,作用同CyclicBarrier,CountDownLatch类似,但是使用起来更加灵活: 1. Parties是动态的. 2. Phaser支持树状结构 ...
- 安装apache
1.安装依赖软件 pcre gcc expat apr(Apache portable Run-time libraries,Apache可移植运行库) apr-util [root@localhos ...
- 题目1083:特殊乘法-九度oj
题目描述: 写个算法,对2个小于1000000000的输入,求结果. 特殊乘法举例:123 * 45 = 1*4 +1*5 +2*4 +2*5 +3*4+3*5 输入: 两个小于1000000000的 ...