WPF 验证没有通过无法保存数据(非常好)+ 虚似数据库
Introduction
Implementing multiple validation rules on a single control is bit difficult but not impossible. Every form has one or more controls which required to be validation on different set of logic. Since this is a very basic dependency of code that every developer has to do, this tip is dedicated only to this.
It would be an easy task if we have set of multiple validation like required, numeric, minimum character length, folder exists, numeric range rule and we just apply one or more than one rule just by putting comma or | between the rules in our XAML file. To elaborate more, the issue lets see a situation.
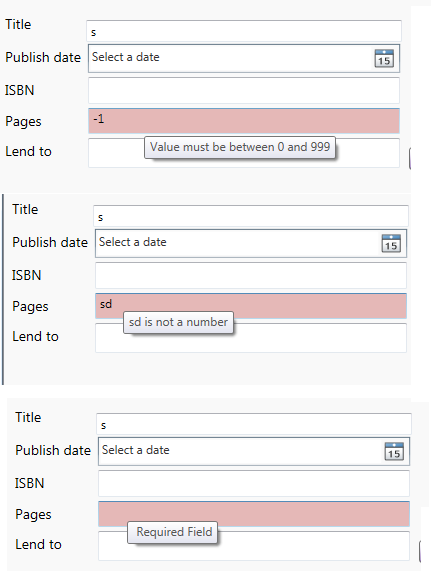
Assume one textbox control value needs to be validated with the below conditions:
- It has to be a required field.
- It has to be a numeric field.
- It should be between ranges of 1 to 100.
Or:
- It has to be a required Field
- Input value should have minimum 3 characters.
Or:
- It has to be a required field.
- Input value should be a valid directory.
Now one way is to create a class and club all rules into one and then use that one rule, but isn't it is a time consuming job and difficult to manage at the later stage of project? Imagine how many combination of rules we will have to make and if there is any logic change, we need to go back and manage each rule with the new changes.
Background
Continue to my validation segment, previously I wrote a tip where I highlighted how to implement maximum length validation on controls, now I moved to other validation but with addition of how to implement multiple validation on the same control.
Using the Code
Would it be nice to have our XAML allow assigning these rules with some kind of separator and then XAML parser would handle this list of rules on the control.
Well yes, this is possible and I will show you in the below steps how we can achieve this.
Single Validation
 Collapse | Copy Code
 <TextBox x:Name="titleBox" MaxLength="100" Grid.Column="1" Margin="0,11,0,0" HorizontalAlignment="Stretch">

            <Binding

                Path="Book.Title"

                    ValidatesOnDataErrors="True"

                     UpdateSourceTrigger="PropertyChanged">

                <Binding.ValidationRules>

                    <rules:RequiredRule />

                </Binding.ValidationRules>

            </Binding>

        </TextBox>
Multiple Validation
Collapse | Copy Code<TextBox Text="{binding:RuleBinding Path=Book.Pages,
ValidationList=RequiredRule|NumericRule|RangeRule, MinValueRange=0, MaxValueRange=999, UpdateSourceTrigger=PropertyChanged, ValidatesOnDataErrors=True , Mode=TwoWay}"
Grid.Column="1" Grid.Row="6" HorizontalAlignment="Stretch"/>
First, we will introduce our two generic classes which would allow us to bind these multiple rules and then these rules would be set at run time.
Collapse | Copy Code[MarkupExtensionReturnType(typeof(object))]
public abstract class BindingDecoratorBase : MarkupExtension
{
/// <summary>
/// The decorated binding class.
///
private Binding binding = new Binding(); public override object ProvideValue(IServiceProvider provider)
{
//create a binding and associate it with the target
return binding.ProvideValue(provider);
} protected virtual bool TryGetTargetItems(IServiceProvider provider, out DependencyObject target, out DependencyProperty dp)
{
}
}
Now our second class would be RuleBinding Class which will be inherited from our 1st class BindingDecoratorBase class. This class has an override of ProvideValue() method. In this method, we call the below RegisterRule() method:
Collapse | Copy Codepublic override object ProvideValue(IServiceProvider provider)
{ //In case multiple rules are bound then it would come like "Required|Numeric
var validationRules = ValidationList.Split(new string[] { "|", }, StringSplitOptions.RemoveEmptyEntries); foreach (var rule in validationRules)
{
RegisterRule(rule);
} //delegate binding creation etc. to the base class
object val = base.ProvideValue(provider);
return val;
} .... private void RegisterRule(string ruleName)
{
ValidationRule rule;
switch (ruleName)
{
case "RequiredRule":
{
rule = new RequiredRule();
Binding.ValidationRules.Add(rule);
break;
}
case "RangeRule":
{
rule = new MinNumericRule()
{ MinValue = MinValueRange, MaxValue = MaxValueRange};
Binding.ValidationRules.Add(rule);
break;
}
case "NumericRule":
{
rule = new NumericRule();
Binding.ValidationRules.Add(rule);
break;
}
case "NumericNotEmpty":
{
rule = new NumericNotEmptyRule();
Binding.ValidationRules.Add(rule);
break;
}
case "FolderExistRule":
{
rule = new FolderExistRule();
Binding.ValidationRules.Add(rule);
break;
}
case "MinLengthRule":
{
rule = new MinLengthRule();
Binding.ValidationRules.Add(rule);
break;
}
}
}
That's it, very simple implementation but very helpful and effective, when you would run this project you would find that tooltips are changing based on error for the same control.
Points of Interest
Working on WPF is fun and doing things in a simple way in WPF is like cherry on the cake. It is always important that we write code in a simple way so that it can be managed by other people in your absence.
Validation plays a very important role and eliminates possibilities of all those silly errors which are enough to annoy an end user. Every minute spent to create basic structure of validation is worth it and this leads a project to an exception free successful project and saves lots of productivity.
Hope you enjoyed reading this tip.
License
This article, along with any associated source code and files, is licensed under The Code Project Open License (CPOL)
WPF 验证没有通过无法保存数据(非常好)+ 虚似数据库的更多相关文章
- WPF MVVM(Caliburn.Micro) 数据验证
书接前文 前文中仅是WPF验证中的一种,我们暂且称之为View端的验证(因为其验证规是写在Xaml文件中的). 还有一种我们称之为Model端验证,Model通过继承IDataErrorInfo接口来 ...
- WPF中退出时显示是否保存数据提示
一.通过窗体中的按钮实现退出时数据保存提示 Xaml: <Grid> <TextBlock HorizontalAlignment="Left" Margin=& ...
- WPF XML序列化保存数据 支持Datagrid 显示/编辑/添加/删除数据
XML序列化保存数据 using System; using System.Collections.Generic; using System.Linq; using System.Text; usi ...
- 理解和使用WPF 验证机制
博客 学院 下载 更多 写博客 发布Chat 登录注册 理解和使用WPF 验证机制 原创 2013年06月20日 11:15:37 7404 首先建立一个demo用以学习和实验WPF Data Val ...
- Docker最全教程——数据库容器化之持久保存数据(十一)
上一节我们讲述了SQL Server容器化实践(注意,SQL Server现在也支持跨平台),本节将讲述如何持久保存数据,并且接下来将逐步讲解其他数据库(MySql.Redis.Mongodb等等)的 ...
- hibernate4无法保存数据
hibernate4无法保存数据 author: hiu 以后都发文章我都备注一下作者了,hiu就是我了 红色字体更新日期:2014-07-08 初次使用hibernate4,使用getCurrent ...
- WPF获得PNG图片外观Path数据
原文:WPF获得PNG图片外观Path数据 WPF开发界面的时候,用的最多的就是自定义控件模板,开发人员需要根据UI的设计,做出符合要求的自定义控件.但是在一些特殊情况下,UI的设计可能 ...
- 02-EF Core笔记之保存数据
EF Core通过ChangeTracker跟踪需要写入数据库的更改,当需要保存数据时,调用DbContext的SaveChanges方法完成保存. 基本的添加.更新.删除操作示例如下: using ...
- EasyUI使用JSON保存数据
目前来说,使用JSON保存数据比较方便,前台可以不用Test.aspx 页面,可以直接用Html页面,使用.aspx页面的弊端就不在这里熬述. 具体步骤如下: 1.新建一个Html页面,命名为Test ...
随机推荐
- 【Socket编程】Java通信是这样炼成的
简介 网络无处不在,移动互联时代也早已到来,单机版程序慢慢的已没有生命力,所有的程序都要能够访问网络,比如 QQ 网络聊天程序.迅雷下载程序等,这些程序都要同网络打交道,本次将与各位小伙伴们分享的就是 ...
- 【Alpha】第一次Daily Scrum Meeting
一.今日站立式会议照片 二.会议内容 1.调研市场现有礼物挑选软件,分析优势,亮点,劣势 2.确立开发环境和安装调试 三.燃尽图 四.遇到的困难 在准备开发环境和安装调试时遇到系统和开发环境不要兼容, ...
- 【Alpha】第三次Daily Scrum Meeting
GIT 一.今日站立式会议照片 二.会议内容 1.确定开发人员负责开发模块 开发人员 开发模块 杨嘉成 注册登陆模块 吴文庆 服务模块 程志铭 个人中心 2.测试人员在开发人员完成该模块后紧跟测试 三 ...
- 201521123022 《Java程序设计》 第四周学习总结
1. 本章学习总结 1.1 尝试使用思维导图总结有关继承的知识点. 1.2. 使用常规方法总结其他上课内容. ①instenceof运算符:可通过它判断父类引用对象实例的实际类型,且在父类转化成子类时 ...
- 201521123017 《Java程序设计》第3周学习总结
1. 本周学习总结 2. 书面作业 Q1.代码阅读 public class Test1 { private int i = 1;//这行不能修改 private static int j = 2; ...
- Linux如何设置dns
首先打开dns设置文档 空的dns文档如图所示 键入图片中的文本保存即可设置了自己的dns 保存后推出即可.
- Java课程设计 - 学生基本信息管理
团队名称.团队成员介绍(需要有照片) 团队名称:此艺兴非彼艺兴 团队成员: 王兴:女,积极上进 曾艺佳:女,积极上进 项目git地址 StudentManage项目 项目git提交记录截图(要体现出每 ...
- 201521123022 《Java程序设计》 第十四周学习总结
1. 本章学习总结 2. 书面作业 Q1. MySQL数据库基本操作 建立数据库,将自己的姓名.学号作为一条记录插入.(截图,需出现自己的学号.姓名),在自己建立的数据库上执行常见SQL语句(截图) ...
- 201521123121 《Java程序设计》第9周学习总结
1. 本周学习总结 1.1 以你喜欢的方式(思维导图或其他)归纳总结异常相关内容. 2. 书面作业 本次PTA作业题集异常 常用异常 题目5-1 1.1 截图你的提交结果(出现学号) 1.2 自己以前 ...
- Java:接口继承接口 (多继承机制)
在看API文档时,突然发现一个接口可以是其他接口的子接口,这说明接口之间会存在继承的关系.查找了相关的资料,做一个总结. 是继承还是实现 首先要搞清楚接口之间的关系使用的关键字是extends还是im ...