【Netty】第一个Netty应用
一、前言
前面已经学习完了Java NIO的内容,接着来学习Netty,本篇将通过一个简单的应用来了解Netty的使用。
二、Netty应用
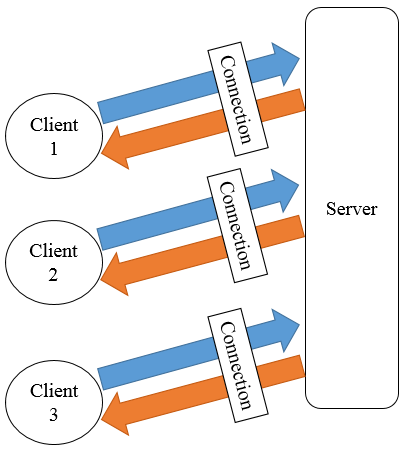
2.1 服务端客户端框架图
下图展示了Netty中服务端与客户端在之间的关系,客户端连接至服务器,然后两者之间互相通信,服务器可连接多个客户端。
2.2 服务端
服务端主要包含两部分内容,分为引导和实现服务器处理器。引导用于设置端口号等信息,处理器主要是用于处理用户自定义逻辑。
1. 引导服务端
引导服务端类名为EchoServer,其代码如下
import io.netty.bootstrap.ServerBootstrap;

import io.netty.channel.ChannelFuture;

import io.netty.channel.ChannelInitializer;

import io.netty.channel.EventLoopGroup;

import io.netty.channel.nio.NioEventLoopGroup;

import io.netty.channel.socket.SocketChannel;

import io.netty.channel.socket.nio.NioServerSocketChannel;

import java.net.InetSocketAddress;

public class EchoServer {

    private int port;

    public EchoServer(int port) {

        this.port = port;

    }

    public void start() throws Exception {

        EventLoopGroup group = new NioEventLoopGroup();

        try {

            ServerBootstrap b = new ServerBootstrap();

            b.group(group)

                    .channel(NioServerSocketChannel.class)

                    .localAddress(new InetSocketAddress(port))

                    .childHandler(new ChannelInitializer<SocketChannel>() {

                        @Override

                        public void initChannel(SocketChannel ch) throws Exception {

                            ch.pipeline().addLast(new EchoServerHandler());

                        }

                    });

            // 绑定端口,开始接收连接

            ChannelFuture f = b.bind().sync();

            System.out.println("Server start listen at " + port);

            // 等待服务器socket关闭

            f.channel().closeFuture().sync();

        } finally {

            group.shutdownGracefully();

        }

    }

    public static void main(String[] args) throws Exception {

        int port;

        if (args.length > 0) {

            port = Integer.parseInt(args[0]);

        } else {

            port = 8080;

        }

        new EchoServer(port).start();

    }

}
说明:其流程大致如下
① 创建NioEventLoopGroup实例来处理事件,如接受连接,读写数据等。
② 创建ServerBootstrap实例。
③ 指定服务端绑定的端口。
④ 设置childHandler来处理每一次连接。
⑤ 使用ServerBootstrap的bind方法进行绑定并同步直至其完成绑定。
2. 实现服务端逻辑
从代码来看引导服务器只是完成了服务端的创建,如指定端口和处理器等,并未涉及到服务端的具体逻辑,其具体业务逻辑可以在处理器中完成,处理器需要继承ChannelInboundHandlerAdapter,本实例中处理器为EchoServerHandler,其代码如下
package com.hust.grid.leesf.chapter2;

import io.netty.buffer.ByteBuf;

import io.netty.buffer.ByteBufUtil;

import io.netty.buffer.Unpooled;

import io.netty.channel.ChannelFutureListener;

import io.netty.channel.ChannelHandlerContext;

import io.netty.channel.ChannelInboundHandlerAdapter;

public class EchoServerHandler extends ChannelInboundHandlerAdapter {

    @Override

    public void channelRead(ChannelHandlerContext ctx, Object msg) {

        ByteBuf bb = (ByteBuf) msg;

        bb.markReaderIndex();

        System.out.println("Server received: " + ByteBufUtil

                .hexDump(bb.readBytes(bb.readableBytes())));

        bb.resetReaderIndex();

        ctx.write(msg);

    }

    @Override

    public void channelReadComplete(ChannelHandlerContext ctx) {

        ctx.writeAndFlush(Unpooled.EMPTY_BUFFER)

                .addListener(ChannelFutureListener.CLOSE);

    }

    @Override

    public void exceptionCaught(ChannelHandlerContext ctx, Throwable cause) {

        cause.printStackTrace();

        ctx.close();

    }

}
说明:当服务器接受到消息后,channelRead方法会被调用,具体消息为msg,用户可以对该消息进行处理,本例中首先将接收的消息进行转化后打印,然后将消息写入ctx中,其中值得注意的是需要标记读索引,然后恢复,否则写入的数据为空。channelReadComplete将之前写入客户端的消息刷新,待操作完成后关闭。exceptionCaught方法则会捕捉处理中的异常。
2.3 客户端
客户端部分的逻辑同服务器类似,也包含引导客户端和实现客户端处理器两部分,客户端连接服务端,并且接收服务端的消息,关闭连接等。
1. 引导客户端
引导客户端类名为EchoClient,其代码如下
package com.hust.grid.leesf.chapter2;

import io.netty.bootstrap.Bootstrap;

import io.netty.channel.*;

import io.netty.channel.nio.NioEventLoopGroup;

import io.netty.channel.socket.SocketChannel;

import io.netty.channel.socket.nio.NioSocketChannel;

import java.net.InetSocketAddress;

public final class EchoClient {

    private String host;

    private int port;

    public EchoClient(String host, int port) {

        this.host = host;

        this.port = port;

    }

    public void start() throws Exception {

        EventLoopGroup group = new NioEventLoopGroup();

        try {

            Bootstrap b = new Bootstrap();

            b.group(group)

                    .channel(NioSocketChannel.class)

                    .remoteAddress(new InetSocketAddress(host, port))

                    .handler(new ChannelInitializer<SocketChannel>() {

                        @Override

                        public void initChannel(SocketChannel ch) throws Exception {

                            ch.pipeline().addLast(new EchoClientHandler());

                        }

                    });

            // 启动客户端

            ChannelFuture f = b.connect().sync();

            // 直到连接关闭

            f.channel().closeFuture().sync();

        } finally {

            group.shutdownGracefully();

        }

    }

    public static void main(String[] args) throws Exception {

        String host = "127.0.0.1";

        int port = 8080;

        if (args.length == 2) {

            host = args[0];

            port = Integer.parseInt(args[1]);

        }

        new EchoClient(host, port).start();

    }

}
说明:其引导部分与服务端非常类似,流程非常类似,其给出了服务端的地址和端口号,Bootstrap的connect函数将会根据指定的地址和端口号连接服务器。
2. 实现客户端逻辑
本部分完成用户实际的业务逻辑,本例中的EchoClientHandler继承SimpleChannelInboundHandler,需要重写如下三个函数
· channelActive函数,在建立了与服务端的连接后该函数被调用。
· channelRead0函数,当接收到服务端发送来的消息后被调用。
· exceptionCaught函数,当处理发生异常时被调用。
EchoClientHandler的代码如下
package com.hust.grid.leesf.chapter2;

import io.netty.buffer.ByteBuf;

import io.netty.buffer.ByteBufUtil;

import io.netty.buffer.Unpooled;

import io.netty.channel.ChannelHandlerContext;

import io.netty.channel.SimpleChannelInboundHandler;

import io.netty.util.CharsetUtil;

public class EchoClientHandler extends SimpleChannelInboundHandler<ByteBuf> {

    @Override

    public void channelActive(ChannelHandlerContext ctx) {

        ctx.writeAndFlush(Unpooled.copiedBuffer("Netty rocks!", CharsetUtil.UTF_8));

    }

    @Override

    public void channelRead0(ChannelHandlerContext ctx, ByteBuf in) {

        System.out.println("Client received: " + ByteBufUtil

                .hexDump(in.readBytes(in.readableBytes())));

    }

    @Override

    public void exceptionCaught(ChannelHandlerContext ctx, Throwable cause) {

        cause.printStackTrace();

        ctx.close();

    }

}
说明:当同服务器的连接建立后,客户端会发送消息至服务端,然后当接收到服务端发送来的消息时,打印该消息。
2.4 运行
1. pom.xml文件
由于本应用依赖的jar文件使用maven构建,其pom.xml文件如下。
<?xml version="1.0" encoding="UTF-8"?>

<project xmlns="http://maven.apache.org/POM/4.0.0"

         xmlns:xsi="http://www.w3.org/2001/XMLSchema-instance"

         xsi:schemaLocation="http://maven.apache.org/POM/4.0.0 http://maven.apache.org/xsd/maven-4.0.0.xsd">

    <modelVersion>4.0.0</modelVersion>

    <groupId>NettyInAction</groupId>

    <artifactId>com.hust.grid.leesf</artifactId>

    <version>1.0-SNAPSHOT</version>

    <properties>

        <project.build.sourceEncoding>UTF-8</project.build.sourceEncoding>

        <version.jackson.core>2.6.3</version.jackson.core>

    </properties>

    <build>

        <plugins>

            <plugin>

                <groupId>org.apache.maven.plugins</groupId>

                <artifactId>maven-compiler-plugin</artifactId>

                <version>3.2</version>

                <configuration>

                    <optimize>true</optimize>

                    <source>1.7</source>

                    <target>1.7</target>

                </configuration>

            </plugin>

        </plugins>

    </build>

    <dependencies>

        <dependency>

            <groupId>junit</groupId>

            <artifactId>junit</artifactId>

            <version>4.12</version>

            <scope>test</scope>

        </dependency>

        <dependency>

            <groupId>io.netty</groupId>

            <artifactId>netty-all</artifactId>

            <version>4.0.32.Final</version>

        </dependency>

        <dependency>

            <groupId>com.fasterxml.jackson.core</groupId>

            <artifactId>jackson-core</artifactId>

            <version>${version.jackson.core}</version>

        </dependency>

        <dependency>

            <groupId>com.fasterxml.jackson.core</groupId>

            <artifactId>jackson-databind</artifactId>

            <version>${version.jackson.core}</version>

        </dependency>

    </dependencies>

</project>
2. 运行服务端
启动EchoServer,等待客户端连接。
3. 运行客户端
启动EchoClient,连接服务端并发送消息。
其中服务端的运行结果如下。
Server start listen at 8080

Server received: 4e6574747920726f636b7321
客户端的运行结果如下。
Client received: 4e6574747920726f636b7321
三、总结
本篇博文讲解了Netty的简单应用,通过简单应用对Netty有所了解,具体的细节将会在之后的博文中进行讲解,本文的代码已经上传至github,也谢谢各位园友的观看~
【Netty】第一个Netty应用的更多相关文章
- Netty4具体解释二:开发第一个Netty应用程序
既然是入门,那我们就在这里写一个简单的Demo,client发送一个字符串到server端,server端接收字符串后再发送回client. 2.1.配置开发环境 1.安装JDK 2.去官网下 ...
- 使用netty构建一个socks proxy
使用netty构建一个socks proxy 最近在做的项目,需要自己搭建一个socks代理.netty4.0附带了一个socks代理的样例,但是3.x就没有这个东西了,碰巧使用的又是3.7,就只 ...
- 如何用Netty实现一个轻量级的HTTP代理服务器
为什么会想通过Netty构建一个HTTP代理服务器?这也是笔者发表这篇文章的目的所在. 其主要还是源于解决在日常开发测试过程中,一直困扰测试同学很久的一个问题,现在我就来具体阐述一下这个问题. 在日常 ...
- 自己用 Netty 实现一个简单的 RPC
目录: 需求 设计 实现 创建 maven 项目,导入 Netty 4.1.16. 项目目录结构 设计接口 提供者相关实现 消费者相关实现 测试结果 总结 源码地址:github 地址 前言 众所周知 ...
- 第二章:第一个Netty程序
第一步:设置开发环境 • 安装JDK,下载地址http://www.oracle.com/technetwork/java/javase/archive-139210.html • 下载netty ...
- Netty实现一个简单聊天系统(点对点及服务端推送)
Netty是一个基于NIO,异步的,事件驱动的网络通信框架.由于使用Java提供 的NIO包中的API开发网络服务器代码量大,复杂,难保证稳定性.netty这类的网络框架应运而生.通过使用netty框 ...
- 第一个Netty程序
netty就是一个高性能的NIO框架,用于java网络编程.下面说说思路: 服务端: 开启通道.设置网络通信方式.设置端口.设置接收请求的handler.绑定通道.最后关闭 客户端: 开启通道.设置网 ...
- Netty(1):第一个netty程序
为什么选择Netty netty是业界最流行的NIO框架之一,它的健壮型,功能,性能,可定制性和可扩展性都是首屈一指的,Hadoop的RPC框架Avro就使用了netty作为底层的通信框架,此外net ...
- Netty入门二:开发第一个Netty应用程序
Netty入门二:开发第一个Netty应用程序 时间 2014-05-07 18:25:43 CSDN博客 原文 http://blog.csdn.net/suifeng3051/article/ ...
- 教你用 Netty 实现一个简单的 RPC!
众所周知,dubbo 底层使用了 Netty 作为网络通讯框架,而 Netty 的高性能我们之前也分析过源码,对他也算还是比较了解了. 今天我们就自己用 Netty 实现一个简单的 RPC 框架. 1 ...
随机推荐
- 我的java学习笔记
最近一直在自学C#和js,想着想把以前学的java学习笔记整理下发上来.
- 用SSE指令计算点乘和累加
void sse_mul_float:两段内存float数据点乘,结果覆盖第一组内存. float sse_acc_float:一组内存float值累加. 注: 1. 没有考虑中间的精确问题,结果会有 ...
- javascript 数组的部分常用属性用法
数组 检测数组(返回布尔类型 a. instanceof(); 检测是否是数组对象 console.log(arr instanceof Array) ; b. Array.isArray() ,H5 ...
- 分解机(Factorization Machines)推荐算法原理
对于分解机(Factorization Machines,FM)推荐算法原理,本来想自己单独写一篇的.但是看到peghoty写的FM不光简单易懂,而且排版也非常好,因此转载过来,自己就不再单独写FM了 ...
- poptest分享计划以及提供的服务
poptest分享计划以及提供的服务 POPTEST致力于测试开发工程师的培养,能让学员经过系统培训后从事自动化测试工作,包括功能自动化.性能自动化.接口自动化以及移动端系统的自动化测试等,由于移动端 ...
- Hexo + Github Pages 搭建个人博客
之前一直想搭建自己的博客,由于自己的懒惰拖到现在.好了,废话不多说!直接上干货! 安装Node.js 安装Git Github Pages配置 安装Hexo及主题设置 进阶篇-高级定制 其它实用功能 ...
- ajax大洋第一步
Ajax工具包 Ajax并不是一项新技术,它实际上是几种技术,每种技术各尽其职,以一种全新的方式聚合在一起. 服务器端语言:服务器需要具备向浏览器发送特定信息的能力.Ajax与服务器端语言无关. XM ...
- IDEA 根据数据库表 生成 Model实体
首先在 Idea中 配置数据源,测试ok(过程略) idea窗口中左下角是否 有显示Persistence 窗口 如果没有显示就要如下方法 添加显示: File - > Project Str ...
- Robotframe work之环境搭建(一)
准备安装如下:Python2.7.10.robot framework3.0.2.wxPython 2.8.12.1.robot framework-ride 1. 官网下载安装python,目前wx ...
- Weex的环境搭建以及集成到Android项目
最近由于公司的需要,初步研究了Weex,Weex是阿里开发的一个web的框架,官方的介绍如下: Weex 是一套简单易用的跨平台开发方案,能以 web 的开发体验构建高性能.可扩展的 native 应 ...