vim 配置一:
Ubuntu 版本为 20.04
一、安装 space-vim
下载 vim:sudo apt-get install vim
下载 space-vim:
cd
git clone https://github.com/liuchengxu/space-vim.git
cd .space-vim
./install.py --vim
等待自动安装完成,不需要做任何操作
二、YouCompleteMe 自动补全安装
space-vim 安装 YouCompleteMe 不是很好,所以首先要提前安装好相应的环境,再去设置 space-vim。
2.1 环境安装
2.1.1 基本环境安装
安装环境:
sudo apt-get install build-essential cmake
sudo apt-get install python-dev python3-dev
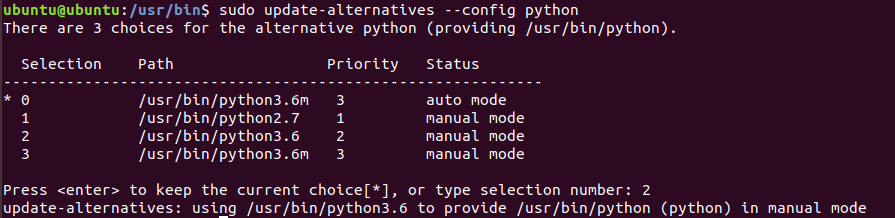
虽然安装了 python2.7,但是当前版本建议用 python3,可以切换版本:
当前系统中安装了3个版本的 python(绿色的,蓝色的软链接),使用 update-alternatives 命令安装版本:
update-alternatives --install /usr/bin/python python /usr/bin/python2.

update-alternatives --install /usr/bin/python python /usr/bin/python3.

update-alternatives --install /usr/bin/python python /usr/bin/python3.6m 3
添加之后,切换版本:
update-alternatives --config python
2.1.2 llvm 安装
llvm 官方 apt 网站:https://apt.llvm.org/
先执行以下命令:
wget -O - https://apt.llvm.org/llvm-snapshot.gpg.key|sudo apt-key add -
修改 sources.list:
sudo vim /etc/apt/sources.list
 1 Focal (20.04) - Last update : Sun, 24 May 2020 18:52:03 UTC / Revision: 20200524052636+1e7865d9464

 2 # i386 not available

 3 deb http://apt.llvm.org/focal/ llvm-toolchain-focal main

 4 deb-src http://apt.llvm.org/focal/ llvm-toolchain-focal main

 5 # 9

 6 deb http://apt.llvm.org/focal/ llvm-toolchain-focal-9 main

 7 deb-src http://apt.llvm.org/focal/ llvm-toolchain-focal-9 main

 8 # 10

 9 deb http://apt.llvm.org/focal/ llvm-toolchain-focal-10 main

10 deb-src http://apt.llvm.org/focal/ llvm-toolchain-focal-10 main

执行 sudo apt-get update,然后执行安装:
sudo apt-get install clang-format clang-tidy clang-tools clang clangd libc++-dev libc++1 libc++abi-dev libc++abi1 libclang-dev libclang1 liblldb-11-dev libllvm-ocaml-dev libomp-dev libomp5 lld lldb llvm-dev llvm-runtime llvm python-clang
2.1.3 安装 Momo(不需要可以不安装)
安装步骤参照:https://www.mono-project.com/download/stable/#download-lin
sudo apt install gnupg ca-certificates

sudo apt-key adv --keyserver hkp://keyserver.ubuntu.com:80 --recv-keys 3FA7E0328081BFF6A14DA29AA6A19B38D3D831EF

echo "deb https://download.mono-project.com/repo/ubuntu stable-focal main" | sudo tee /etc/apt/sources.list.d/mono-official-stable.list

sudo apt update

sudo apt install mono-devel
2.1.4 安装 go(不需要可不安装)
下载地址:https://golang.google.cn/dl/
下载版本:go1.14.3.linux-amd64.tar.gz
安装参考:https://golang.google.cn/doc/install?download=go1.14.3.linux-amd64.tar.gz
我下载的地方在 ~/Download 中,cd ~/Download
执行安装命令:
sudo tar -C /usr/local -xzf go1.14.3.linux-amd64.tar.gz
添加环境变量,vim .~/.profile:
export PATH=$PATH:/usr/local/go/bin

执行命令:
source $HOME/.profile
测试一下,写下代码如下,hello.go:
package main

import "fmt"

func main() {

    fmt.Printf("hello, world\n")

}
编译:
go build hello.go

设置 GOPROXY 的环境变量,不然 go 补全安装的时候,会去被墙的网站下载,我们使用国内站点进行下载:
$ echo "export GO111MODULE=on" >> ~/.profile

$ echo "export GOPROXY=https://goproxy.cn" >> ~/.profile

$ source ~/.profile
2.1.5 安装 Node(不需要可不安装)
下载地址:https://nodejs.org/dist/v12.16.3/
wget https://nodejs.org/dist/v12.16.3/node-v12.16.3-linux-x64.tar.gz
安装指导:https://github.com/nodejs/help/wiki/Installation
sudo mkdir -p /usr/local/lib/nodejs

sudo tar -zxvf node-v12.16.3-linux-x64.tar.gz -C /usr/local/lib/nodejs
修改环境变量: vim ~/.profile
#nodejs

VERSION=v12.16.3

DISTRO=linux-x64

export PATH=/usr/local/lib/nodejs/node-$VERSION-$DISTRO/bin:$PATH

刷新环境变量:
. ~/.profile
测试:

将 node、npm 和 npx 软链接到 /usr/bin:
sudo ln -s /usr/local/lib/nodejs/node-$VERSION-$DISTRO/bin/node /usr/bin/node

sudo ln -s /usr/local/lib/nodejs/node-$VERSION-$DISTRO/bin/npm /usr/bin/npm

sudo ln -s /usr/local/lib/nodejs/node-$VERSION-$DISTRO/bin/npx /usr/bin/npx

npm 更新:sudo npm install npm@latest -g
2.1.6 安装 TypeScript
sudo npm install -g typescript
2.2 安装 YouCompleteMe
2.2.1 下载插件
进入 plug 目录:cd ~/.vim/plugged
git clone https://github.com/ycm-core/YouCompleteMe.git
git clone 此插件,然后在此插件的根目录下运行如下命令:git submodule update --init --recursive
2.2.2 执行安装
进入 YouCompleteMe 的目录,执行安装:
cd ~/.vim/plugged/YouCompleteMe

./install.py --all
2.2.3
执行命令 echo | clang -v -E -x c++ - 可以查看到自己需要添加的库:
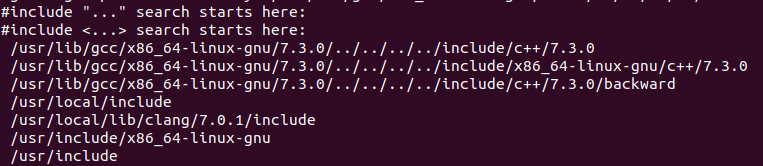
将目录添加进 flags 数组的末尾,按照里面的 -isystem + 头文件目录格式填写即可。同事要注释掉下面的内容:

三、添加插件
3.1 space-vim 中已经包含的插件
space-vim 里面 layers 包含了很多插件,我们只需要在 ~/.spacevim 中添加相应的 layers 即可将插件包含进来,并进行安装。
可配置的插件:https://github.com/liuchengxu/space-vim/blob/master/layers/LAYERS.md
vim ~/.spacevim
 " Comment the following line if you don't want Vim and NeoVim to share the

 " same plugin download directory.

 let g:spacevim_plug_home = '~/.vim/plugged'

 " Uncomment the following line to override the leader key. The default value is space key "<\Space>".

 " let g:spacevim_leader = "<\Space>"

 " Uncomment the following line to override the local leader key. The default value is comma ','.

 " let g:spacevim_localleader = ','

 " Enable the existing layers in space-vim.

 " Refer to https://github.com/liuchengxu/space-vim/blob/master/layers/LAYERS.md for all available layers.

 let g:spacevim_layers = [

       \ 'syntax-checking',

       \ 'better-defaults', 'spacevim',

       \ 'emoji', 'games', 'goyo',

       \ 'c-c++', 'haskell', 'html', 'java', 'javascript',

       \ 'markdown', 'python', 'rust', 'scala', 'typescript',

       \ 'chinese',

       \ 'code-snippets', 'editing', 'formatting', 'programming',

       \ 'airline',

       \ 'cscope', 'ctags', 'docker', 'file-manager', 'fzf', 'lsp', 'tmux', 'ycmd',

       \ 'git', 'github',

       \ 'better-motion', 'ctrlp', 'text-align', 'which-key',

       \ ]

 " Uncomment the following line if your terminal(-emulator) supports true colors.

 let g:spacevim_enable_true_color =

 " Uncomment the following if you have some nerd font installed.

 let g:spacevim_nerd_fonts =

 " If you want to have more control over the layer, try using Layer command.

 if g:spacevim.gui

   Layer 'airline'

 endif

 " Manage your own plugins.

 " Refer to https://github.com/junegunn/vim-plug for more detials.

 function! UserInit()

   " Add your own plugin via Plug command.

   Plug 'junegunn/seoul256.vim'

 endfunction

 " Override the default settings from space-vim as well as adding extras

 function! UserConfig()

   " Override the default settings.

   " Uncomment the following line to disable relative number.

   " set norelativenumber

   " Adding extras.

   " Uncomment the following line If you have installed the powerline fonts.

   " It is good for airline layer.

   let g:airline_powerline_fonts =

   let g:spacevim_lsp_engine = 'vim_lsp'

 endfunction
修改完成后,随便用 vim 打开一个文件,会弹出一个对话框,选择 Y ,就开始自动进行下载安装。
安装完成后,还需要安装一个字体库:sudo apt-get install powerline
这个字体库是提供给 airline 使用。
3.2 添加非包含插件
四、vim 自带的插件
4.1 terminal 插件
terminal 插件是用于在 vim 中开一个 terminal 窗口,供操作 bash 命令。可以在 vim 中使用 :terminal 命令打开此窗口。
不过有开源的辅助插件可以使用。
在.vimrc 中的 vundle 结构中添加:
 Plugin 'PangPangPangPangPang/vim-terminal'

 map <silent> <F12> :VSTerminalToggle<cr>

 if has('nvim')

     tnoremap <F12> <C-\><C-n> :VSTerminalToggle<cr>

     tnoremap <C-w> <C-\><C-n><C-w>

 else

     tmap <silent> <F12> <c-w>:VSTerminalToggle<cr>

 endif

 let g:vs_terminal_custom_height =

 let g:vs_terminal_custom_pos = 'bottom'
运行 PluginInstall 安装插件。
效果:
要退出终端,选择终端,在终端执行 exit,然后 :q 即可
4.2 termdebug 插件
termdebug 是 vim 8.0 以后提供的自带的新插件,可以在 vim 窗口实现以前 vimgdb 的调试功能,相比较 vimgdb ,感觉功能更强大。
此插件必须要安装 terminal,在 vim 窗口运行:echo has('terminal') ,如果返回值是 1 ,则当前系统中有 terminal。
termdebug 插件全称即是 terminal debug Plugin,用于用 gdb 调试一个程序并且可在 vim 窗口中观察。
4.2.1 termdebug 插件启动
要想启动此插件,首先在 vim 中运行命令:packadd termdebug
对自己编译出来的二进制文件,注意 vim 打开的程序的源码目录必须是根目录,如果二进制文件为 hello ,运行:Termdebug hello
此时会打开另外两个窗口:
- gdb 窗口:gdb 窗口提供 gdb 的原生操作
- 程序窗口:程序窗口供被调试的程序使用
- 源码窗口:提供源码交互
4.2.2 调试程序
我们既可以在 GDB 窗口中调试,也可以在源码窗口中调试。
- GDB 窗口调试常用指令:
- file bin 加载名为 bin 的二进制文件
- CTRL-C 中断程序
- run/r 运行
- next/n 执行当前行,停在下一行 (step over)
- step/s 执行当前行,进入下一层函数 (step in)
- finish 执行直至离开当前函数
- where 显示栈
- continue/c 继续执行
- break/b N 在第 N 行加断点
- break/b f 在函数 f 处加断点
- delete 删除所有断点
更多的命令就需要查阅官方文档了
- 在程序窗口调试:
- :Run [args] 运行程序,可带参数 [args],或沿用上一次运行的参数
- :Arguments {args} 设置下一次运行所用参数
- :Break 在当前行加断点
- :Clear 删除当前行的一个断点
- :Step = gdb "step"
- :Over = gdb "next"
- :Finish = gdb "finish"
- :Continue = gdb "continue"
- :Stop 中断程序
vim 配置一:的更多相关文章
- acm的ubuntu (ubuntu16.04 安装指南,chrome安装,vim配置,git设置和github,装QQ)
日常手贱把ubuntu14.04更新到了16.04,然后就game over了.mdzz,不然泥萌也看不到这篇博客了=.= 然后花了些时间重装了一个16.04版的,原来那个14.04的用可以用,就是动 ...
- 简单快捷好用的vim配置和终端配置推荐
vim 配置实用spf13-vim,安装方便简单快捷,极力推荐. 另外oh-my-zsh 终端配置很好,与之搭配使用效果更佳. 安装都很简单,一个脚本搞定, 都是在gitHub上开源的,自行搜索,这里 ...
- 快速学习C语言三: 开发环境, VIM配置, TCP基础,Linux开发基础,Socket开发基础
上次学了一些C开发相关的工具,这次再配置一下VIM,让开发过程更爽一些. 另外再学一些linux下网络开发的基础,好多人学C也是为了做网络开发. 开发环境 首先得有个Linux环境,有时候家里机器是W ...
- centos vim配置高亮语法和格式化粘贴
centos vim配置高亮语法和格式化粘贴 设置vim别名和高亮grep词语 echo -e "\nalias vi=vim\nalias grep='grep --color'\n&qu ...
- vim配置方法
/etc/vimrc (公共的) ~/.vimrc (私人的) rpm -qa|grep vim 这个命令,如何vim已经正确安装,则会显示上面三个包的名称 全部安装 yum -y install v ...
- VIM配置相关记录
把一直使用中的vim配置做个GIT入库管理,也把之前积累在机器上的文档,做个汇总. https://github.com/wujuguang/kyvim 1. 安装完整版vim vi和vim的区别?在 ...
- Vim配置及说明——IDE编程环境
Vim配置及说明——IDE编程环境 Vim配置及说明——IDE编程环境 1.基本及字体 2.插件管理 3.主题风格 4.窗口设置 5.目录树导航 6.标签导航 7.taglist 8.多文档编辑 9. ...
- Env:VIM配置
注:文章来自于http://www.cnblogs.com/ma6174/archive/2011/12/10/2283393.html 花了很长时间整理的,感觉用起来很方便,共享一下. 我的vim配 ...
- vim配置python开发环境
vim配置python开发环境 一.安装vim sudo apt-get install vim 二.vim基础配置 #Centos6.5 /usr/share/vim/vim72 vi /etc/v ...
- Vim配置IDE开发环境
我的vim IDE界面: 1.安装Vim和Vim基本插件首先安装好Vim和Vim的基本插件.这些使用apt-get安装即可:lingd@ubuntu:~/arm$sudo apt-get instal ...
随机推荐
- proxy.conf编写
#这里的test.com要与proxy_pass http://test.com 一至!upstream test.com { ip_hash; server 172.16.0.20:80; serv ...
- Docker的脚本安装
官方镜像支持 curl -sSL https://get.docker.com/ | sh 国内镜像站 curl -sSL https://get.daocloud.io/docker | sh cu ...
- yd的汇总
因为是我这只蒟蒻个人的汇总嘛,可能有些奇♂怪的东西或者不规范的语言出现啦,见谅见谅 搬了一些到知识汇总里,删了一些过时和无用的,少了好多=.= 1.STL_queue 经实践验证,!qs.empty( ...
- 简单ATM系统
模拟实现一个ATM + 购物商城程序1.额度 15000或自定义2.实现购物商城,买东西加入 购物车,调用信用卡接口结账3.可以提现,手续费5%4.每月22号出账单,每月10号为还款日,过期未还,按欠 ...
- Can not issue data manipulation statements with executeQuery()错误解决
转: Can not issue data manipulation statements with executeQuery()错误解决 2012年03月27日 15:47:52 katalya 阅 ...
- AndroidStudio快速入门四:打造你的开发工具,settings必备
http://blog.csdn.net/jf_1994/article/details/50085825 前言:这里是使用AS的基本设置,适合新入手的朋友阅读,将这里介绍的设置完基本使用无忧啦. 1 ...
- try语句的使用
C语言里try是一个语句或函数.其作用是是抛出错误用. 将有可能产生错误的语句括在一起,放入try语句块.如果在try语句块中发生异常,FlashPlayer会创建一个错误对象,并将该Error对象派 ...
- HTTP请求头和响应头的格式
请求头: 请求头肯定带着客户端信息,比如host主机名,User-Agent用户代理信息,Cookie等等 响应头: 响应头带有服务端信息:Server服务器信息,Last-Modified最后修改 ...
- day-03(js)
回顾: css: 层叠样式表 作用: 渲染页面 提供工作效率,将html和样式分离 和html的整合 方式1:内联样式表 通过标签的style属性 <xxx style="...&qu ...
- o(1), o(n), o(logn), o(nlogn)
转自:https://blog.csdn.net/Mars93/article/details/75194138 在描述算法复杂度时,经常用到o(1), o(n), o(logn), o(nlogn) ...