centos7+cobbler+kickstart
一、cobbler简介
cobbler 是一个系统启动服务boot server,可以通过pxe得方式用来快速安装,重装系统,支持安装不同linux发行版和windows。这个工具是用python开发,方便小巧,15k行代码,使用简单得命令完成pxe网络安装环境配置,还可以管理dhcp,dns,yum包镜像。
cobbler可以命令行,也可以web(cobbler-web),还提供api接口,可以方便二次开发使用
其实就是多安装树得pxe环境,是pxe得高级应用
二、cobbler可以提供得功能
1、pxe支持
2、dhcp管理
3、dns服务管理(bind,dnsmasq)
4、电源管理
5、kickstart支持
6、yum仓库管理
7、tftp(pxe启动时需要)
8、apache,提供ks得安装源,并提供定制化得ks配置,同时,它和apache做了深度整合,通过cobbler,可以师兄redhat/centos/fedora系统得快速部署,同时也支持suse、debian(ubuntu)系统,通过配置开可以支持windows
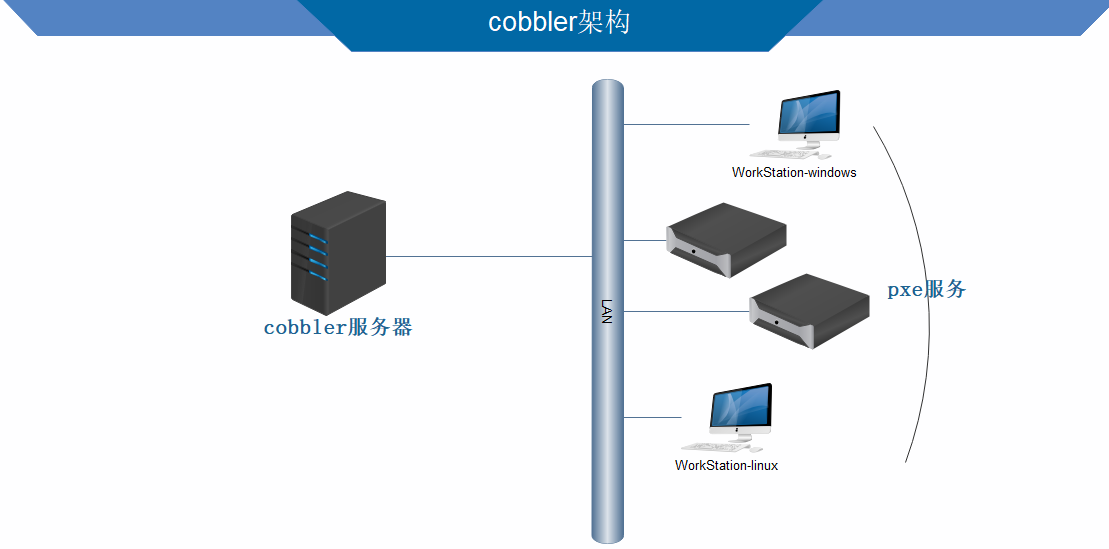
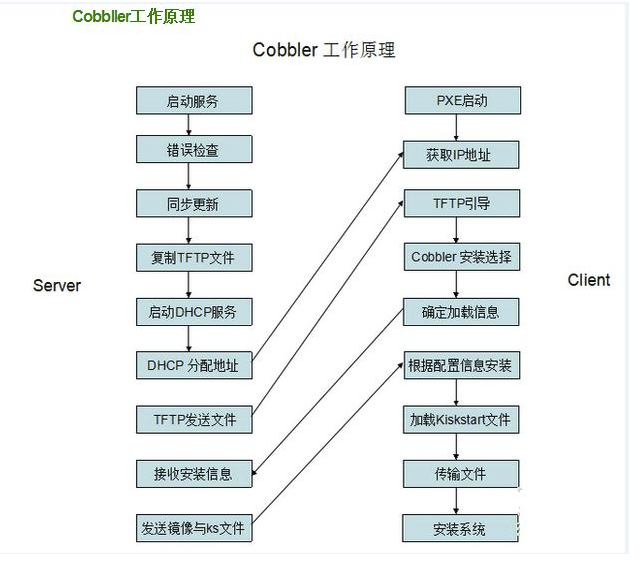
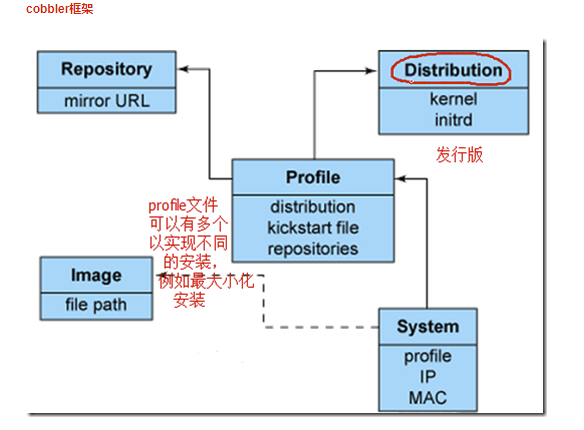
三、cobbler架构及工作原理、核心框架(自己画了一张,又找了几张图,可以很清晰架构了)


介绍一下profile,核心,由三个组件组成
repositories (安装树或安装源)
mirror 镜像,光盘或者网络中得安装源
import 导入
distribution(vmlinuz-内核,initrd.img-引导映像文件)
cobbler 自动从reporitories抽取出来生成
kickstart file 组成得完完整整得系统发行版
cobbler就是较早pxe得升级版,优点容易配置,还自带web界面比较易于管理,但是中文资料少,(有人测试:cobbler不会应为在局域网中启动了dhcp而导致有些机器因为默认从pxe启动在重启服务器后加载tftp内容导致启动终止,这部分没有验证)
可以通过cobbler自动部署dhcp,tftp,http,在安装过程中加载ks无人值守安装应答文件实现无人值守,从客户端使用pxe引导启动安装
四、开始安装
1、安装cobbler依赖的服务及相关目录
cobbler的运行依赖于dhcp、tftp、rsync、dns、http、xinetd服务
yum -y install cobbler cobbler cobbler-web pykickstart debmirror httpd dhcp xinetd
cobbler #cobbler程序包
cobbler-web #cobbler的web服务包
pykickstart #cobbler检查kickstart语法错误
httpd #Apache web服务
dhcp #Dhcp服务
tftp #tftp服务
xinetd #诸多服务的超级守护进程,
###扩展部分可以忽略:很多人不知道这是干啥的,xinetd,可以把一些小服务放在xinetd里进行托管,托管后的好处就是可以使用xinetd强大的参数来控制这些服务,并增强安全性,但也又一些缺点,它最大的缺点就是RPC支持的不够稳定,但也可以启动protmap,使它与xinetd共存来解决。###
###系统默认支持xinetd服务可以分为
1)标准internet服务:telnet,ftp
2)信息服务:finger、netstat、systat
3)邮件服务:imap、imaps、pop2、pop3、pops
4)RPC服务:rquotad、rstatd、rusersd、sprayd、walld
5)BSD服务:comsta、exec、login、ntalk、shell、talk
6)内部服务:chargen、daytime、echo、servers、services、time
7)安全服务:irc
8)其他服务:name,tftp,uucp
###
配置文件目录:/etc/cobbler
/etc/cobbler #配置文件目录
/etc/cobbler/settings #cobbler主配置文件
/etc/cobbler/dhcp.template #DHCP服务的配置模板
/etc/cobbler/tftpd.template #tftp服务的配置模板
/etc/cobbler/rsync.template #rsync服务的配置模板
/etc/cobbler/iso #iso模板配置文件目录
/etc/cobbler/pxe #pxe模板文件目录
/etc/cobbler/power #电源的配置文件目录
/etc/cobbler/users.conf #web服务授权配置文件
/etc/cobbler/users.digest #web访问的用户名密码配置文件
/etc/cobbler/dnsmasq.template #DNS服务的配置模板
/etc/cobbler/modules.conf #Cobbler模块配置文件
Cobbler数据目录
/var/lib/cobbler
/var/lib/cobbler/config #配置文件
/var/lib/cobbler/kickstarts #默认存放kickstart文件
/var/lib/cobbler/loaders #存放的各种引导程序
/var/www/cobbler #系统安装镜像目录
/var/www/cobbler/ks_mirror #导入的系统镜像列表,cobbler distro文件目录
/var/www/cobbler/images #导入的系统镜像启动文件
/var/www/cobbler/repo_mirror #yum源存储目录
日志目录
/var/log/cobbler
/var/log/cobbler/install.log #客户端系统安装日志
/var/log/cobbler/cobbler.log #cobbler日志
2、安装使用cobbler
1)先添加epel源
wget https://mirrors.aliyun.com/epel/epel-release-latest-7.noarch.rpm
rpm -ivh epel-release-latest-7.noarch.rpm
yum clean all
yum makecache all
2)开启http,cobbler
先启动httpd,在启动cobblerd
systemctl start httpd.service
systemctl start cobblerd.service
systemctl enable httpd
systemctl enabled cobblerd
netstart -tnlp
14091端口
先看一下面两条命令
cobbler help
cobbler check
      cobbler check

  			The following are potential configuration items that you may want to fix:

  			1 : The 'server' field in /etc/cobbler/settings must be set to something other than localhost, or kickstarting features will not work.  This should be a resolvable hostname or IP for the boot server as reachable by all machines that will use it.

  			2 : For PXE to be functional, the 'next_server' field in /etc/cobbler/settings must be set to something other than 127.0.0.1, and should match the IP of the boot server on the PXE network.

  			3 : SELinux is enabled. Please review the following wiki page for details on ensuring cobbler works correctly in your SELinux environment:

  			    https://github.com/cobbler/cobbler/wiki/Selinux

  			4 : some network boot-loaders are missing from /var/lib/cobbler/loaders, you may run 'cobbler get-loaders' to download them, or, if you only want to handle x86/x86_64 netbooting, you may ensure that you have installed a *recent* version of the syslinux package installed and can ignore this message entirely.  Files in this directory, should you want to support all architectures, should include pxelinux.0, menu.c32, elilo.efi, and yaboot. The 'cobbler get-loaders' command is the easiest way to resolve these requirements.

  			5 : change 'disable' to 'no' in /etc/xinetd.d/rsync

  			6 : since iptables may be running, ensure 69, 80/443, and 25151 are unblocked

  			7 : comment out 'dists' on /etc/debmirror.conf for proper debian support

  			8 : comment out 'arches' on /etc/debmirror.conf for proper debian support

  			9 : The default password used by the sample templates for newly installed machines (default_password_crypted in /etc/cobbler/settings) is still set to 'cobbler' and should be changed, try: "openssl passwd -1 -salt 'random-phrase-here' 'your-password-here'" to generate new one

  			Restart cobblerd and then run 'cobbler sync' to apply changes.
3、配置cobbler主配置文件及处理check问题
1)server和next_server
vim /etc/cobbler/setting
server 192.168.216.149 #server用于cobbler服务器指定ip地址
next-server 192.168.216.149 #next-server DHCP/PXE网络引导文件被下载的tftp服务器ip,可以和server是同一台也可以是其他主机
用sed免去vim编辑
sed -i 's/server:127.0.0.1/server: 192.168.216.149/g' /etc/cobbler/settings
sed -i 's/next-server:127.0.0.1/next-server: 192.168.216.149/g' /etc/cobbler/settings
2)生成cobbler安装系统root初始密码(上面出现第9项)
  	[root@node3 ~]# openssl passwd -1 -salt $(openssl rand -hex 4)

        Password:

        $1$5b5e6a7a$ZdD7Yn4i5ExKKcqxtFZth1

        vim /etc/cobbler/setting

        default_password_crypted: "$1$5b5e6a7a$ZdD7Yn4i5ExKKcqxtFZth1"
3)cobbler管理rsync
默认时0,不对rsync进行管理,可以修改为1进行管理
###cobbler 支持/etc/cobbler/rsync.template #rsync服务的配置模板###
用sed解决
sed -i 's/manage_dhcp:0/manage_dhcp: 1/g' /etc/cobbler/settings
grep '^manage_dhcp' /etc/cobbler/settings
4)cobbler管理dhcp
pxe启动需要dhcp服务器地址,并直接引导系统,它就可以从网络中下载引导文件到tftp的服务器,cobbler可以通manage_dhcp的设置来进行管理
配置dhcp服务
修改cobbler配置让cobbler来管理dhcp服务,在做自定义配置时,需要修改dhcp相关配置,以配合pxe
同上也是改为1
manage_dhcp: 1
sed -i 's/manage_dhcp:0/manage_dhcp: 1/g' /etc/cobbler/settings
grep '^manage_dhcp' /etc/cobbler/settings
注意还需要修改cobbler管理dhcp的模板
###/etc/cobbler/dhcp.template,此文件是cobbler管理dhcp的模板,确保dhcp分配的地址和cobbler在一个网段###
vim /etc/cobbler/dhcp.template
subnet 192.168.216.0 netmask 255.255.255.0{
option routers 192.168.216.2;
#option domain-name-servers x.x.x.x;
#option subnet-mask x.x.x.x;
range dynamic-bootp 192.168.216.200 192.168.216.210;
default-lease-time 21600;
max-lease-time 43200;
next-server $next_server;
}
#
5)配置debmirror
注释掉@dists和@arches的行
sed -i -e 's|@dists=.*|#@dists=|' /etc/debmirror.conf
sed -i -e 's|@arches=.*|#@arches=|' /etc/debmirror.conf
6)配置tftp
###cobbler也可以管理tftpd /etc/cobbler/tftpd.tmplate #tftp服务的配置模板###
我这里没有用cobbler管理
vim /etc/xinetd.d/tftp
disabled =no
chkconfig tftp on 开机自启
systemctl enable tftp.service
systemctl restart tftp.servcie
systemctl enabled xinetd.service
systemctl start xinetd.servcie
检查xinetd进行
ps -ef |grep xinetd
检查tftp监听端口69
ss -untlp
7)配置启动rsync
vim /etc/xinetd.d/rysnc
disabled =no
systemctl start ryncd
rsync和tftpd都起来后启动xinetd
service xinetd restart
8)关闭selinux
setenforce 0
getenforce
permissive
9)可以下载或复制本机的bootload
ls /var/lib/cobbler/loaders
cobbler get-loaders
复制本机的
cp /usr/share/syslinux/menu.c32 /var/lib/cobbler/loaders
cp /usr/share/syslinux/pexlinux.o /var/lib/cobbler/loaders
10)如果不用cobbler管理dhcp,则配置dhcp配置文件
cp /usr/share/doc/dhcp-4.2.5/dhcpd.conf.example /dhcpd.conf
vim /etc/dhcp/dhcpd.conf
option domain-name "zhangxingeng.com";
option domain-name-servers 192.168.216.149;
subnet 192.168.216.0 netmask 255.255.255.0 {
range 192.168.216.200 192.168.216.220
option routers 192.168.216.149;
}
4、启动各项服务
systemctl start dhcpd
systemctl start ryncd
systemctl start tftpd
systemctl start httpd
systemctl start xinted
cobbler sync 同步
cobbler sync 命令用于将tftpboot目录和/var/www/cobbler(系统江西目录)保持最新,当/var/lib/cobbler或者ks发生变化,应该执行一次cobbler sync或重启cobbler服务
五、cobbler 子命令介绍及启动cobbler
1、cobbler 子命令
cobbler [command] --help
cobbler report #查看cobbler报告
cobbler list #查看操作
cobbler profile #查看配置文件信息
cobbler distro #查看cobbler导入系统发行版系统信息
cobbler system #查看system信息
cobbler repo #查看repo信息
cobbler sync #同步cobbler配置,更改配置最好都要执行下
cobbler reposync #同步yum仓库
注:profile与distro是多对一的关系,profile 是对distro进行定制后的描述
 [root@node3 ~]# cobbler --help

 usage

 =====

 cobbler <distro|profile|system|repo|image|mgmtclass|package|file> ...

         [add|edit|copy|getks*|list|remove|rename|report] [options|--help]

 cobbler <aclsetup|buildiso|import|list|replicate|report|reposync|sync|validateks|version|signature|get-loaders|hardlink> [options|--help]

 [root@node3 ~]#
 [root@node3 ~]# cobbler distro list

    centos7-x86_64

 [root@node3 ~]# cobbler profile list

    centos7-x86_64

 [root@node3 ~]# cobbler distro --help

 usage

 =====

 cobbler distro add

 cobbler distro copy

 cobbler distro edit

 cobbler distro find

 cobbler distro list

 cobbler distro remove

 cobbler distro rename

 cobbler distro report
六、开始生成distro,ks,及profile文件
1、挂载光盘并生成distro
 [root@node3 kickstarts]# mount /dev/cdrom /media/cdrom/

 mount: /dev/sr0 is write-protected, mounting read-only

 [root@node3 kickstarts]# cobbler import --name=centos7-x86_64 --path=/media/cdrom

 task started: --30_174436_import

 task started (id=Media import, time=Sat Jun  :: )
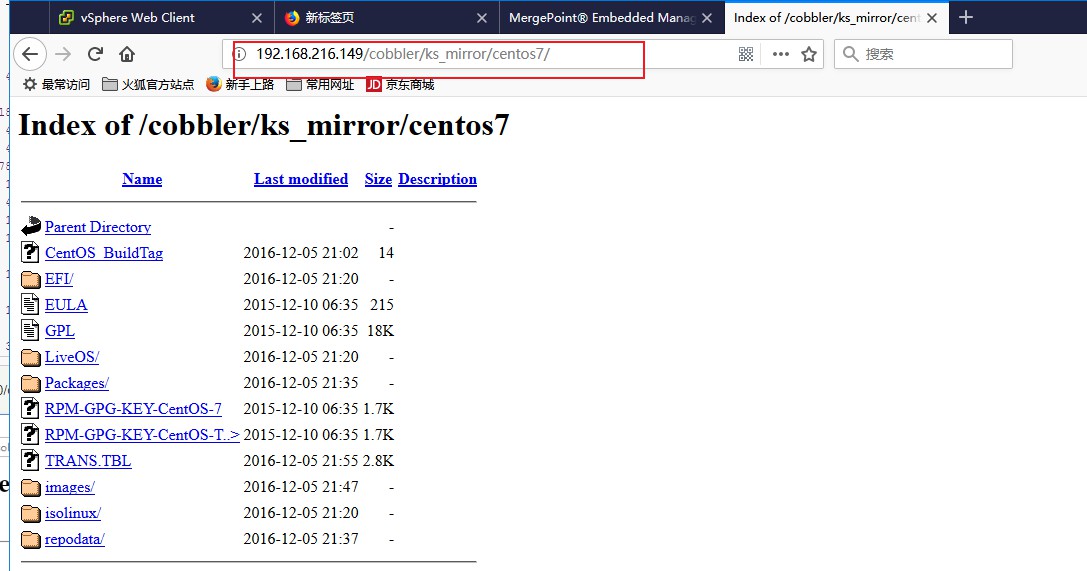
等待导入完成,distro就生成完成了,从本地导入默认就是把镜像中的文件复制到/var/www/cobbler/
 [root@node3 kickstarts]# ll /var/www/cobbler/images/centos7-

 centos7-Everything-x86_64/ centos7-x86_64/

 [root@node3 kickstarts]# ll /var/www/cobbler/images/centos7-x86_64/

 total

 -rw-r--r--.  root root  Dec     initrd.img

 -rwxr-xr-x.  root root   Nov    vmlinuz

 [root@node3 kickstarts]#
 [root@node3 kickstarts]# ll /var/www/cobbler/ks_mirror/centos7

 total

 -rw-r--r--.  root root      Dec     CentOS_BuildTag

 drwxr-xr-x.  root root      Dec     EFI

 -rw-r--r--.  root root     Dec    EULA

 -rw-r--r--.  root root   Dec    GPL

 drwxr-xr-x.  root root      Dec     images

 drwxr-xr-x.  root root     Dec     isolinux

 drwxr-xr-x.  root root      Dec     LiveOS

 drwxrwxr-x.  root root  Dec     Packages

 drwxrwxr-x.  root root    Dec     repodata

 -rw-r--r--.  root root    Dec    RPM-GPG-KEY-CentOS-

 -rw-r--r--.  root root    Dec    RPM-GPG-KEY-CentOS-Testing-

 -r--r--r--.  root root    Dec     TRANS.TBL

2、提供ks文件
centos6的话只需要修改keyboard改为keyboard us,及%post脚本内容即可。
centos7修改如下:
 [root@node3 kickstarts]# pwd

 /var/lib/cobbler/kickstarts

 [root@node3 kickstarts]# vim centos7.ks

 #version=DEVEL

 # System authorization information

 auth --enableshadow --passalgo=sha512

 # Install OS instead of upgrade

 install

 # Use network installation

 url --url=$tree

 #也可以写成 url="http://192.168.216.149/cobbler/ks_mirror/centos7/"

 # Use text mode install

 text

 # Firewall configuration

 firewall --disabled

 firstboot --disable

 # ignoredisk --only-use=sda   #centos7默认的项,但是cobbler便宜ks文件不支持此语法,所以将此项注释

 #Keyboard layouts

 # old format: keyboard us

 # new format:

 keyboard --vckeymap=us --xlayouts='us'

 # System language

 lang en_US.UTF-

 # Network information

 network  --onboot=yes --bootproto=dhcp --device=eth0 --noipv6

 network  --hostname=node4.zhangxingeng.com

 # Reboot after installation

 reboot

 # Root password

 rootpw --iscrypted $$5b5e6a7a$ZdD7Yn4i5ExKKcqxtFZth1

 # SELinux configuration

 selinux --disabled

 # Do not configure the X Window System

 skipx

 # System timezone

 timezone Asia/Shanghai

 # System bootloader configuration

 bootloader --append="quiet crashkernel=auto" --location=mbr --boot-drive=sda

 # Clear the Master Boot Record

 zerombr

 # Partition clearing information

 clearpart --all --initlabel

 # Disk partitioning information

 part /boot --asprimary --fstype="xfs" --size=

 part swap --fstype="swap" --size=

 part / --asprimary --fstype="xfs" --grow --size=

 #LVM分区才亏考虑一下的分区

 # part /boot --fstype ext4 --size=

 # part swap --fstype=swap --size=

 # part pv26 --size= --grow

 # volgroup VG00 --pesize= pv26

 # logvol / --fstype ext4 --name=LVroot --vgname=VG00 --size=

 # logvol /data --fstype ext4 --name=LVdata --vgname=VG00 --size= --grow

 %post

 rm -f /etc/yum.repos.d/*

 cat >>/etc/yum.repos.d/my.repo<<eof

 [base]

 name=sohu

 baseurl=http://mirrors.sohu.com/centos/7/os/x86_64/

 gpgcheck=0

 enable=1

 [epel]

 name=epel

 baseurl=http://mirrors.aliyun.com/epel/7Server/x86_64/

 enable=1

 gpgcheck=0

 eof

 sed -i "s/rhgb //" /boot/grub2/grub.cfg

 sed -i "/UUID/d" /etc/sysconfig/network-scripts/ifcfg-eth0

 echo "DNS1=114.114.114.114" >> /etc/sysconfig/network-scripts/ifcfg-eth0

 echo "UseDNS no" >> /etc/ssh/sshd_config

 sed -i "s/GSSAPIAuthentication yes/GSSAPIAuthentication no/" /etc/ssh/ssh_config

 sed -i "s/^SELINUX=.*$/SELINUX=disabled/" /etc/sysconfig/selinux

 systemctl disable firewalld

 %end

 %packages

 @base

 @core

 @development

 @platform-devel

 kexec-tools

 lftp

 tree

 lrzsz

 %end

 %addon com_redhat_kdump --enable --reserve-mb='auto'

 %end
3、提供profile
导入镜像生成的distro过程会自动生成一个profile
 [root@node3 kickstarts]# cobbler profile list

    centos7-Everything-x86_64

    centos7-x86_64
profile默认使用的ks是/var/lib/cobbler/kickstarts/sample_end.ks,所以需要修改此项
 [root@node3 kickstarts]# cobbler profile list

    centos7-Everything-x86_64

    centos7-x86_64

 [root@node3 kickstarts]# cobbler profile report --name=centos7-x86_64

 Name                           : centos7-x86_64

 TFTP Boot Files                : {}

 Comment                        :

 DHCP Tag                       : default

 Distribution                   : centos7-x86_64

 Enable gPXE?                   :

 Enable PXE Menu?               :

 Fetchable Files                : {}

 Kernel Options                 : {}

 Kernel Options (Post Install)  : {}

15 Kickstart                      : /var/lib/cobbler/kickstarts/sample_end.ks

 Kickstart Metadata             : {}

 Management Classes             : []

 Management Parameters          : <<inherit>>

 Name Servers                   : []

 Name Servers Search Path       : []

 Owners                         : ['admin']

 Parent Profile                 :

 Internal proxy                 :

 Red Hat Management Key         : <<inherit>>

 Red Hat Management Server      : <<inherit>>

 Repos                          : []

 Server Override                : <<inherit>>

 Template Files                 : {}

 Virt Auto Boot                 :

 Virt Bridge                    : xenbr0

 Virt CPUs                      :

 Virt Disk Driver Type          : raw

 Virt File Size(GB)             :

 Virt Path                      :

 Virt RAM (MB)                  :

 Virt Type                      : kvm
[root@node3 kickstarts]# cobbler profile edit --name=centos7-x86_64 --kickstart=/var/lib/cobbler/kickstarts/centos7.ks
 [root@node3 kickstarts]# cobbler profile report --name=centos7-x86_64 |grep -i kickstart

 Kickstart                      : /var/lib/cobbler/kickstarts/centos7.ks

 Kickstart Metadata             : {}
centos7应该加上内核启动参数netifnames和biosdevname使得网卡名使用ethN而不使用enoXXX这样的随机名称
 [root@node3 kickstarts]# cobbler profile report --name=centos7-x86_64 |grep -Ei 'kernel|kickstart'

 Kernel Options                 : {'biosdevname': '', 'net.ifnames': ''}

 Kernel Options (Post Install)  : {}

 Kickstart                      : /var/lib/cobbler/kickstarts/centos7.ks

 Kickstart Metadata             : {}

 [root@node3 kickstarts]#
如果不是生成profile也可以添加一个,比如cobbler profile add --name=centos7-x86_64 --distro=centos7-x86_64 -- kickstart=/var/lib/cobbler/kicstarts/centos7.ks
每添加一个profile都是在项/var/lib/tftpboot/pxelinux.cfg/default中添加一个label
 [root@node3 kickstarts]# cat /var/lib/tftpboot/pxelinux.cfg/default

 DEFAULT menu

 PROMPT

 MENU TITLE Cobbler | http://cobbler.github.io/

 TIMEOUT

 TOTALTIMEOUT

 ONTIMEOUT local

 LABEL local

         MENU LABEL (local)

         MENU DEFAULT

         LOCALBOOT -

 LABEL centos7-Everything-x86_64

         kernel /images/centos7-Everything-x86_64/vmlinuz

         MENU LABEL centos7-Everything-x86_64

         append initrd=/images/centos7-Everything-x86_64/initrd.img ksdevice=bootif lang=  kssendmac text  ks=http://192.168.216.149/cblr/svc/op/ks/profile/centos7-Everything-x86_64

         ipappend

 LABEL centos7-x86_64

         kernel /images/centos7-x86_64/vmlinuz

         MENU LABEL centos7-x86_64

         append initrd=/images/centos7-x86_64/initrd.img ksdevice=bootif lang=  text net.ifnames= biosdevname= kssendmac  ks=http://192.168.216.149/cblr/svc/op/ks/profile/centos7-x86_64

         ipappend

 MENU end

 [root@node3 kickstarts]#
其实也可以自己修改编辑,我们把默认的menu.c32改为vesamenu.c32更喜欢这个界面,把默认菜单等待时间改为2s,也可以设置成更短,并进入菜单默认停留在local(从本地启动系统)
 [root@node3 kickstarts]# cat /var/lib/tftpboot/pxelinux.cfg/default

 2 DEFAULT vesamenu.c32

 PROMPT

 MENU TITLE Cobbler | http://cobbler.github.io/

 5 TIMEOUT 20

 TOTALTIMEOUT

 7 ONTIMEOUT centos7-x86_64

 LABEL local

         MENU LABEL (local)

         MENU DEFAULT

         LOCALBOOT -

 LABEL centos7-Everything-x86_64

         kernel /images/centos7-Everything-x86_64/vmlinuz

         MENU LABEL centos7-Everything-x86_64

         append initrd=/images/centos7-Everything-x86_64/initrd.img ksdevice=bootif lang=  kssendmac text  ks=http://192.168.216.149/cblr/svc/op/ks/profile/centos7-Everything-x86_64

         ipappend

20 LABEL centos7-x86_64

21         kernel /images/centos7-x86_64/vmlinuz

22         MENU LABEL centos7-x86_64

23         append initrd=/images/centos7-x86_64/initrd.img ksdevice=bootif lang=  text net.ifnames=0 biosdevname=0 kssendmac  ks=http://192.168.216.149/cblr/svc/op/ks/profile/centos7-x86_64

24         ipappend 2

 MENU end

 [root@node3 kickstarts]#
注意,需要确保ks路径是有效并正确,我们可以在浏览器访问
http://192.168.216.149/cblr/svc/op/ks/profile/centos7-x86_64
如出现下面情况就是出错了
# This kickstart had errors that prevented it from being rendered correctly.

# The cobbler.log should have information relating to this failure.
如果排错完成需要重新编辑profile加载新的kickstart文件
cobbler profile edit --name=xxxxx --kickstart=xxxxx重新编译xxxxx的profile文件或者支持cobbler sync命令,知道浏览器能获取到kickstart的内容时才算成功或者使用cobbler profile getks --name=xxxxx命令获取名为xxxxx的profile的ks内容
4、定制化的安装
kickstart 实现某台服务器使用给指定ks文件可能有些复杂,但是cobbler就很简单,物理mac地址的唯一性,来进行ks文件的选择定制

在做个镜像,我们指定这个节点使用centos7-Everything.ks
 [root@node3 xinetd.d]# cobbler import --name=centos7-Everything --path=/media/cdrom

 task started: --30_220847_import

 task started (id=Media import, time=Sat Jun  :: )

 Found a candidate signature: breed=redhat, version=rhel6

 Found a candidate signature: breed=redhat, version=rhel7

 Found a matching signature: breed=redhat, version=rhel7

 Adding distros from path /var/www/cobbler/ks_mirror/centos7-Everything:

 creating new distro: centos7-Everything-x86_64

 creating new profile: centos7-Everything-x86_64

 associating repos

 checking for rsync repo(s)

 checking for rhn repo(s)

 checking for yum repo(s)

 starting descent into /var/www/cobbler/ks_mirror/centos7-Everything for centos7-Everything-x86_64

 processing repo at : /var/www/cobbler/ks_mirror/centos7-Everything

 need to process repo/comps: /var/www/cobbler/ks_mirror/centos7-Everything

 looking for /var/www/cobbler/ks_mirror/centos7-Everything/repodata/*comps*.xml

 Keeping repodata as-is :/var/www/cobbler/ks_mirror/centos7-Everything/repodata

 *** TASK COMPLETE ***
 [root@node3 kickstarts]# cobbler profile report --name=centos7-Everything-x86_64

 Name                           : centos7-Everything-x86_64

 TFTP Boot Files                : {}

 Comment                        :

 DHCP Tag                       : default

 Distribution                   : centos7-Everything-x86_64

 Enable gPXE?                   :

 Enable PXE Menu?               :

 Fetchable Files                : {}

 Kernel Options                 : {}

 Kernel Options (Post Install)  : {}

 Kickstart                      : /var/lib/cobbler/kickstarts/sample_end.ks

 Kickstart Metadata             : {}

 Management Classes             : []

 Management Parameters          : <<inherit>>

 Name Servers                   : []

 Name Servers Search Path       : []

 Owners                         : ['admin']

 Parent Profile                 :

 Internal proxy                 :

 Red Hat Management Key         : <<inherit>>

 Red Hat Management Server      : <<inherit>>

 Repos                          : []

 Server Override                : <<inherit>>

 Template Files                 : {}

 Virt Auto Boot                 :

 Virt Bridge                    : xenbr0

 Virt CPUs                      :

 Virt Disk Driver Type          : raw

 Virt File Size(GB)             :

 Virt Path                      :

 Virt RAM (MB)                  :

 Virt Type                      : kvm

 [root@node3 kickstarts]# cobbler profile edit --name=centos7-Everything-x86_64 --kickstart=/var/lib/cobbler/kickstarts/centos7-Everything.ks
 [root@node3 kickstarts]# cobbler system add --name=test --mac=::::: --profile=centos7-Everything-x86_64 --ip-address=192.168.216.222 subnet=255.255.255.0 --gateway=192.168.216.2 --interface=eth0 --static= --hostname=node5

 [root@node3 kickstarts]# cobbler system list

    test

 [root@node3 kickstarts]# cobbler sync

 task started: --30_224520_sync

 task started (id=Sync, time=Sat Jun  :: )

 running pre-sync triggers

 cleaning trees

 removing: /var/www/cobbler/images/centos7-x86_64

 removing: /var/www/cobbler/images/centos7-Everything-x86_64

 removing: /var/lib/tftpboot/pxelinux.cfg/default

 removing: /var/lib/tftpboot/pxelinux.cfg/------

 removing: /var/lib/tftpboot/grub/images

 removing: /var/lib/tftpboot/grub/grub-x86.efi

 removing: /var/lib/tftpboot/grub/grub-x86_64.efi

 removing: /var/lib/tftpboot/grub/efidefault

 removing: /var/lib/tftpboot/grub/------

 removing: /var/lib/tftpboot/images/centos7-x86_64

 removing: /var/lib/tftpboot/images/centos7-Everything-x86_64

 removing: /var/lib/tftpboot/s390x/profile_list

 copying bootloaders

 trying hardlink /var/lib/cobbler/loaders/pxelinux. -> /var/lib/tftpboot/pxelinux.

 copying: /var/lib/cobbler/loaders/pxelinux. -> /var/lib/tftpboot/pxelinux.

 trying hardlink /var/lib/cobbler/loaders/menu.c32 -> /var/lib/tftpboot/menu.c32

 copying: /var/lib/cobbler/loaders/menu.c32 -> /var/lib/tftpboot/menu.c32

 trying hardlink /var/lib/cobbler/loaders/yaboot -> /var/lib/tftpboot/yaboot

 copying: /var/lib/cobbler/loaders/yaboot -> /var/lib/tftpboot/yaboot

 trying hardlink /usr/share/syslinux/memdisk -> /var/lib/tftpboot/memdisk

 copying: /usr/share/syslinux/memdisk -> /var/lib/tftpboot/memdisk

 trying hardlink /var/lib/cobbler/loaders/grub-x86.efi -> /var/lib/tftpboot/grub/grub-x86.efi

 trying hardlink /var/lib/cobbler/loaders/grub-x86_64.efi -> /var/lib/tftpboot/grub/grub-x86_64.efi

 copying distros to tftpboot

 copying files for distro: centos7-x86_64

 trying hardlink /var/www/cobbler/ks_mirror/centos7/images/pxeboot/vmlinuz -> /var/lib/tftpboot/images/centos7-x86_64/vmlinuz

 trying hardlink /var/www/cobbler/ks_mirror/centos7/images/pxeboot/initrd.img -> /var/lib/tftpboot/images/centos7-x86_64/initrd.img

 copying files for distro: centos7-Everything-x86_64

 trying hardlink /var/www/cobbler/ks_mirror/centos7-Everything/images/pxeboot/vmlinuz -> /var/lib/tftpboot/images/centos7-Everything-x86_64/vmlinuz

 trying hardlink /var/www/cobbler/ks_mirror/centos7-Everything/images/pxeboot/initrd.img -> /var/lib/tftpboot/images/centos7-Everything-x86_64/initrd.img

 copying images

 generating PXE configuration files

 generating: /var/lib/tftpboot/pxelinux.cfg/------

 generating: /var/lib/tftpboot/grub/------

 generating PXE menu structure

 copying files for distro: centos7-x86_64

 trying hardlink /var/www/cobbler/ks_mirror/centos7/images/pxeboot/vmlinuz -> /var/www/cobbler/images/centos7-x86_64/vmlinuz

 trying hardlink /var/www/cobbler/ks_mirror/centos7/images/pxeboot/initrd.img -> /var/www/cobbler/images/centos7-x86_64/initrd.img

 Writing template files for centos7-x86_64

 copying files for distro: centos7-Everything-x86_64

 trying hardlink /var/www/cobbler/ks_mirror/centos7-Everything/images/pxeboot/vmlinuz -> /var/www/cobbler/images/centos7-Everything-x86_64/vmlinuz

 trying hardlink /var/www/cobbler/ks_mirror/centos7-Everything/images/pxeboot/initrd.img -> /var/www/cobbler/images/centos7-Everything-x86_64/initrd.img

 Writing template files for centos7-Everything-x86_64

 rendering TFTPD files

 generating /etc/xinetd.d/tftp

 processing boot_files for distro: centos7-x86_64

 processing boot_files for distro: centos7-Everything-x86_64

 cleaning link caches

 running: find /var/lib/tftpboot/images/.link_cache -maxdepth  -type f -links  -exec rm -f '{}' ';'

 received on stdout:

 received on stderr:

 running post-sync triggers

 running python triggers from /var/lib/cobbler/triggers/sync/post/*

 running python trigger cobbler.modules.sync_post_restart_services

 running shell triggers from /var/lib/cobbler/triggers/sync/post/*

 running python triggers from /var/lib/cobbler/triggers/change/*

 running python trigger cobbler.modules.scm_track

 running shell triggers from /var/lib/cobbler/triggers/change/*

 *** TASK COMPLETE ***
看一下自动生成了一个以mac地址的文件,里面的label的ks地址指向刚刚创建的test,http://192.168.216.149/cblr/svc/op/ks/system/test
 [root@node3 pxelinux.cfg]# cat ------

 default linux

 prompt

 timeout

 label linux

         kernel /images/centos7-Everything-x86_64/vmlinuz

         ipappend

         append initrd=/images/centos7-Everything-x86_64/initrd.img ksdevice=bootif lang=  kssendmac text  ks=http://192.168.216.149/cblr/svc/op/ks/system/test

 [root@node3 pxelinux.cfg]#

附录扩展
1、搭建yum源
添加repos源
cobbler repo add --name=centos7-x86_64-epel --mirror=http://mirrors.aliyun.com/epel/7/x86_64 --arch=x86_64 --breed=yum
cobbler reposync
添加repo到对应的profile
cobbler profile edit --name=centos7-x86_64 --repos="centos7-x86_64-epel "
修改ks文件添加%post %end中间
systemctl disable postfix.service
%yum_config_stanza
2、koan (kickstart-over-a-network)实现客户机自动重新安装
1)客户端安装koan
yum install -y koan
2)执行安装命令
koan --server=192.168.216.149 --list=profiles
- looking for cobbler at http://192.168.216.149:80/cobbler_api
centos7-x86_64
3)在指定要重装的系统上执行要重装的哪个系统
koan --replace-self --server=192.168.216.149 --profile=centos7-x86_64
4)重启就会自动安装新系统了
转载请注明出处:https://www.cnblogs.com/zhangxingeng/p/9702625.html
centos7+cobbler+kickstart的更多相关文章
- centos7系列Cobbler+kickstart全自动装机实战
配置yum源,以及epel源 [root@crobbler-90111 ~]# cat /etc/yum.repos.d/aliyun.repo [epel] name=ailiyun baseurl ...
- 自动化安装操作系统(Centos7+PXE+Cobbler+kickstart)
一.简介 PXE称作是一种引导方式而不是安装方式似乎更加准确,PXE(Pre-boot Execution Environment)是由Intel设计的协议,它可以使计算机通过网络启动,但是有一个前提 ...
- centos7+cobbler安装
cobbler工作流程 1.安装软件包: yum -y install httpd dhcp tftp python-ctypes cobbler xinetd cobbler-web pykicks ...
- cobbler+kickstart安装笔记
cobbler+kickstart安装笔记 本文参考老男孩配置:https://blog.oldboyedu.com/autoinstall-cobbler/ centos7:开机如果不启动网卡,需要 ...
- 批量Linux 网络安装环境建立工具cobbler/kickstart
批量Linux 网络安装环境建立工具网络安装服务器套件: Cobbler(Red Hat 2008年发布的项目) Kickstart(Red Hat08年前项目,相关脚本令人望而却步,现 ...
- Centos7验证Kickstart文件是否完整方法
1.1 功能简介 CentOS 7 包含 ksvalidator 命令行程序,可使用该程序进行确认Kickstart文件.这个工具是 pykickstart 软件包的一部分.要安装pykicks ...
- pxe+kickstart cobbler无人值守装机
环境准备: 一台服务器 [root@admin tftpboot]# cat /etc/redhat-release CentOS Linux release 7.2.1511 (Core) [roo ...
- PXE+kickstart网络安装CentOS7.4系统及过程中各种报错
环境:关闭防火墙.selinux 注意:虚拟机进行网络安装的话,7.3以后的系统是需要2G以上的内存 [root@kickstart ~]# cat /etc/redhat-release CentO ...
- 进阶!基于CentOS7系统使用cobbler实现单台服务器批量自动化安装不同版本系统(week3_day5_part2)-技术流ken
前言 在上一篇博文<cobbler批量安装系统使用详解-技术流ken>中已经详细讲解了cobbler的使用以及安装,本篇博文将会使用单台cobbler实现自动化批量安装不同版本的操作系统. ...
随机推荐
- Filter的使用(web作业)
一:什么是过滤器 Filter:Servlet过滤器Fileter是一个小型的web组件,它们通过拦截请求和响应,以便查看.提取或以某种方式操作客户端和服务器之间交换的数据,实现“过滤”的功能.Fil ...
- openXML设置Excel行组合
重要代码: row = new DOS.Row() { RowIndex = new DOX.UInt32Value(rowIndex), Spans = new DOX.ListValue<D ...
- <<君主论>>读后感
“<君主论>与<圣经>齐名,被称为邪恶的圣经,这本书的立论基础是人性本恶论,他所描述的人性之恶,主要是以西欧资本原始积累背景下的现实社会中人的各种丑恶现象为蓝本的.” 要是高中 ...
- enumerate的用法
names = ["tony","huluwa","tom","jerry","lala"]for ...
- Memcached未授权访问
概念 memcached是一个内存中的键值存储区,用于存储来自数据库调用.API调用或页面呈现结果的任意小数据块(字符串.对象).memcached简单但功能强大.其简单的设计促进了快速部署.易于开发 ...
- (一)Javascript 面向对象编程:封装
Javascript 面向对象编程:封装 作者:阮一峰 Javascript是一种基于对象(object-based)的语言,你遇到的所有东西几乎都是对象.但是,它又不是一种真正的面向对象编程(OOP ...
- 利用 awk 统计nginx 中某一个用户的访问次数
线上总是会遇到攻击,所以就需要分析 access.log 看看那些用户的访问次数不正常,针对这些不正常的用户,要做处理,以 access.log为例说明下怎么统计. 通过 access.log 日志来 ...
- 30.Iterator
迭代对于我们搞Java的来说绝对不陌生.我们常常使用JDK提供的迭代接口进行Java集合的迭代. Iterator iterator = list.iterator(); while(iterator ...
- 自定义Token的CAS登录
工作中实际遇到的需求,我们有一个旧系统,用了CAS的单点登录,现在有一个外部系统,准备从它那里单点进来,这个外部系统提供了一个token参数来标记这是哪一个用户,我们用他们提供的方式解析出对应的用户, ...
- 深入-FastReport TfrxReport组件使用
[翻译] FastReport TfrxReport组件使用 一:加载和保存报表 报表默认保存在项目窗体文件中,大多数情况下,没有更多的操作要深圳市, 因此,你不需要采取特别措施来载入报告.如果你 ...
