
Mac OS X 10.11.1下搭建Python3.4 + PyQt5.5.1 +Eric6.1.1开发平台
由于Python易学、开源、面向对象、可移植性高、库丰富的特点,近期开始学习Python。百度了解了各款Python IDE后,还是认为Eric比较适合我,所以踏上了安装Eric坎坷之路,从选定工具到安装成功一共花费了8天时间,从Windows到Linux再到Mac,挨个折腾了一遍,Windows的搭建比较简单,下载好相应版本直接运行exe就行了,Linux和Mac下我都是用源码包安装的,所以遇到了不少问题最后,终于在Mac上研究明白了。把搭建的整个过程写下来,和与我一样的小白分享。
PS:Mac与Linux的搭建没什么区别,Linux下的也可参考本文,由于我安装过xcode所以gcc我没有再单独去安装,没有的请根据提示自行安装。
一、准备文件
- Python3.4
- Qt5.5.1
- SIP4.17
- QScintilla2.9.1
- PyQt5.5.1
二、安装过程
1.安装Python3.4
从官网(https://www.python.org/download)下载相应平台的版本安装即可
注意!!
- 如果您是iOS开发者,请不要删除python2.7,因为Xcode使用的2.7的脚本,不支持3以上版本!!!
2.安装Qt5.5.1
从官网(http://qt-project.org/downloads)下载相应平台的版本安装即可,路径设成默认(/Users/*/Qt5.5.1)即可
安装完成需要将Qt5添加到环境变量~/.bash_profile
vim ~/.bash_profile
将下面两行添加进去
 PATH="/Users/*/Qt5.5.1/5.5/clang_64/bin:${PATH}"

 export PATH
3.安装SIP4.14
下载地址:http://www.riverbankcomputing.com/software/sip/download
 tar -zxvf sip-4.17.tar.gz

 cd sip-4.17

 python3 configure.py

 make  && date # 加&&date是个人习惯,make成功会显示时间

 sudo make install  && date # 一定要加sudo
4.安装QScintilla/Qt4Qt5
下载地址:http://www.riverbankcomputing.com/software/qscintilla/download
QScintilla2 文件中有3个文件夹的内容要分别安装:Qt4Qt5,designer-Qt4Qt5和Python。
Qt4Qt5文件夹要在PyQt之前安装,designer-Qt4Qt5和Python要在PyQt之后安装,顺序一定要注意!!
 cd ./QScintilla-gpl-2.9./Qt4Qt5

 qmake qscintilla.pro

 make && date

 sudo make install && date
5.安装PyQt5.5.1
下载地址:https://www.riverbankcomputing.com/software/pyqt/download5
由于是安装在Python的site-packages里,所以要首先确定包的位置
 python3

 Python3.4.4(v3.4.4:737efcadf5a6,Dec192015,::)

 [GCC 4.2.(AppleInc. build )(dot )] on darwin

 Type"help","copyright","credits" or "license"for more information.

 >>> import site

 >>> site.getsitepackages()

 ['/Library/Frameworks/Python.framework/Versions/3.4/lib/python3.4/site-packages','/Library/Frameworks/Python.framework/Versions/3.4/lib/site-python','/Library/Python/3.4/site-packages']
知道了位置开始编译
 cd PyQt-gpl-5.5.

 $python3 configure.py -q /Users/**/Qt5.5.1/5.5/clang_64/bin/qmake -d /Library/Python/3.4/site-packages/ #-q 后面的是qmake的位置,-d 后面是Python包的位置

 make && date
注意!!
我在执行make的时候出了一个这样的错误
 /Users/Kallan/Documents/Python开发/PyQt-gpl-5.5./sip/QtPositioning/qgeolocation.sip::: fatal error:

          'qgeolocation.h' file not found

     #include <qgeolocation.h>

             ^

      error generated.

 make[]:***[sipQtPositioningcmodule.o]Error1

 make:***[sub-QtPositioning-make_first-ordered]Error2
解决方法:
在/PyQt-gpl-5.5.1/QtPositioning文件夹下创建一个头文件qgeolocation.h,把下面的内容复制进去
     /****************************************************************************

     **

     **Copyright(C)2015TheQtCompanyLtd.

     **Contact: http://www.qt.io/licensing/

     **

     **This file is part of the QtPositioning module of the QtToolkit.

     **

     ** $QT_BEGIN_LICENSE:LGPL21$

     **CommercialLicenseUsage

     **Licensees holding valid commercial Qt licenses may use this file in

     ** accordance with the commercial license agreement provided with the

     **Softwareor, alternatively,in accordance with the terms contained in

     ** a written agreement between you andTheQtCompany.For licensing terms

     **and conditions see http://www.qt.io/terms-conditions.For further

     ** information use the contact form at http://www.qt.io/contact-us.

     **

     ** GNU LesserGeneralPublicLicenseUsage

     **Alternatively, this file may be used under the terms of the GNU Lesser

     **GeneralPublicLicense version 2.1or version 3as published by the Free

     **SoftwareFoundationand appearing in the file LICENSE.LGPLv21and

     ** LICENSE.LGPLv3 included in the packaging of this file.Please review the

     ** following information to ensure the GNU LesserGeneralPublicLicense

     ** requirements will be met: https://www.gnu.org/licenses/lgpl.html and

     ** http://www.gnu.org/licenses/old-licenses/lgpl-2.1.html.

     **

     **As a special exception,TheQtCompany gives you certain additional

     ** rights.These rights are described inTheQtCompany LGPL Exception

     ** version 1.1, included in the file LGPL_EXCEPTION.txt in this package.

     **

     ** $QT_END_LICENSE$

     **

     ****************************************************************************/

     #ifndef QGEOLOCATION_H

     #define QGEOLOCATION_H

     #include <QtCore/QSharedDataPointer>

     #include <QtCore/QMetaType>

     #include <QtPositioning/qpositioningglobal.h>

     QT_BEGIN_NAMESPACE

     classQGeoAddress;

     classQGeoCoordinate;

     classQGeoRectangle;

     classQGeoLocationPrivate;

     class Q_POSITIONING_EXPORT QGeoLocation

     {

     public:

        QGeoLocation();

        QGeoLocation(const QGeoLocation&other);

        ~QGeoLocation();

        QGeoLocation&operator=(const QGeoLocation&other);

        bool operator==(const QGeoLocation&other) const;

        bool operator!=(const QGeoLocation&other) const {

            return!(other ==*this);

        }

        QGeoAddress address() const;

        void setAddress(const QGeoAddress&address);

        QGeoCoordinate coordinate() const;

        void setCoordinate(const QGeoCoordinate&position);

        QGeoRectangle boundingBox() const;

        void setBoundingBox(const QGeoRectangle&box);

        bool isEmpty() const;

     private:

        QSharedDataPointer<QGeoLocationPrivate> d;

     };

     Q_DECLARE_TYPEINFO(QGeoLocation, Q_MOVABLE_TYPE);

     QT_END_NAMESPACE

     Q_DECLARE_METATYPE(QGeoLocation)

     #endif
继续!
 make && date

 sudo make install && date
6.安装QScintilla/Python
 cd /QScintilla-gpl-2.9./Python

 python3 configure.py --pyqt=PyQt5-d /Library/Frameworks/Python.framework/Versions/3.4/lib/python3./site-packages/PyQt5--pyqt-sipdir=/Library/Frameworks/Python.framework/Versions/3.4/share/sip/PyQt5-v /Library/Frameworks/Python.framework/Versions/3.4/share/sip/PyQt5

 make && date

 sudo make install && date
如果在Python里import不会报错,即代表安装成功,可继续往下进行
 python3

 Python3.4.4(v3.4.4:737efcadf5a6,Dec192015,::)

 [GCC 4.2.(AppleInc. build )(dot )] on darwin

 Type"help","copyright","credits" or "license"for more information.

 >>> import PyQt5.Qsci

 >>> exit()
7.安装QScintilla/designer-Qt4Qt5
 cd /QScintilla-gpl-2.9./designer-Qt4Qt5

 qmake designer.pro

 make && date

 sudo make install && date
8.安装Eric6
下载地址:http://sourceforge.net/projects/eric-ide/files/eric6/stable/
下载其中的eric6-6.1.1.tar主文件和eric6-i18n-zh_CN.GB2312-6.1.1.tar中文语言包。
将两个文件提取出来,将中文语音包的eric复制到主文件内合并
 cd eric6-6.1.

 sudo python3 install.py

配置Eric6
1、选择Eric6-> preference -> Editor -> Autocompation。勾选所有选框;

2.Editor -> QScintilla 。勾上左右的两个选框,然后在下面source中,选择from Document and API files;

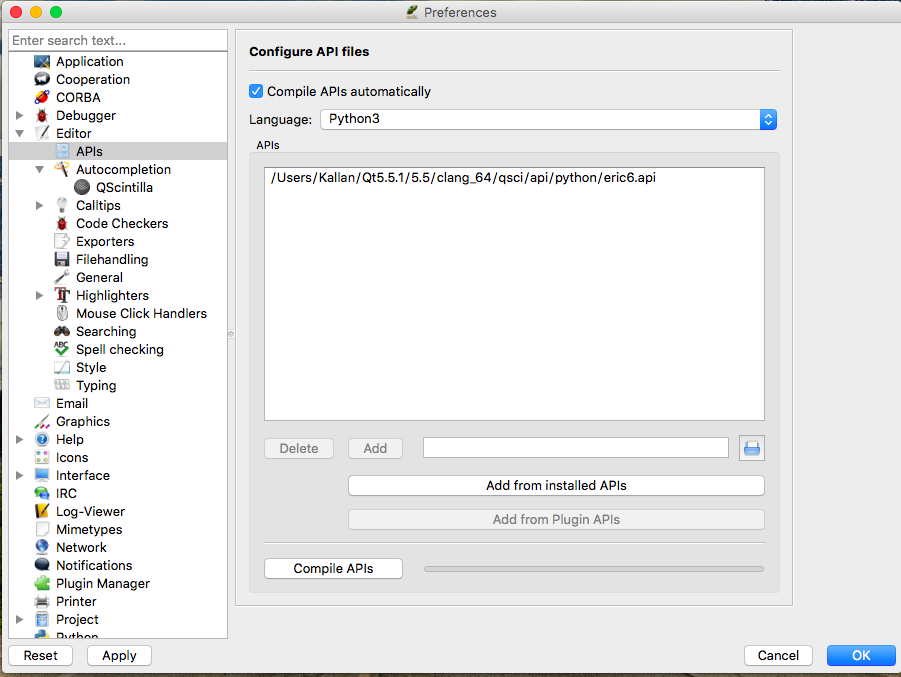
3.Editor -> APIs。勾选Complie APIs Autocompation,在Language中,选择python3。点面下面的Add from installed APIs按钮,选择住需要的.api文件。最后点击Compile APIs;
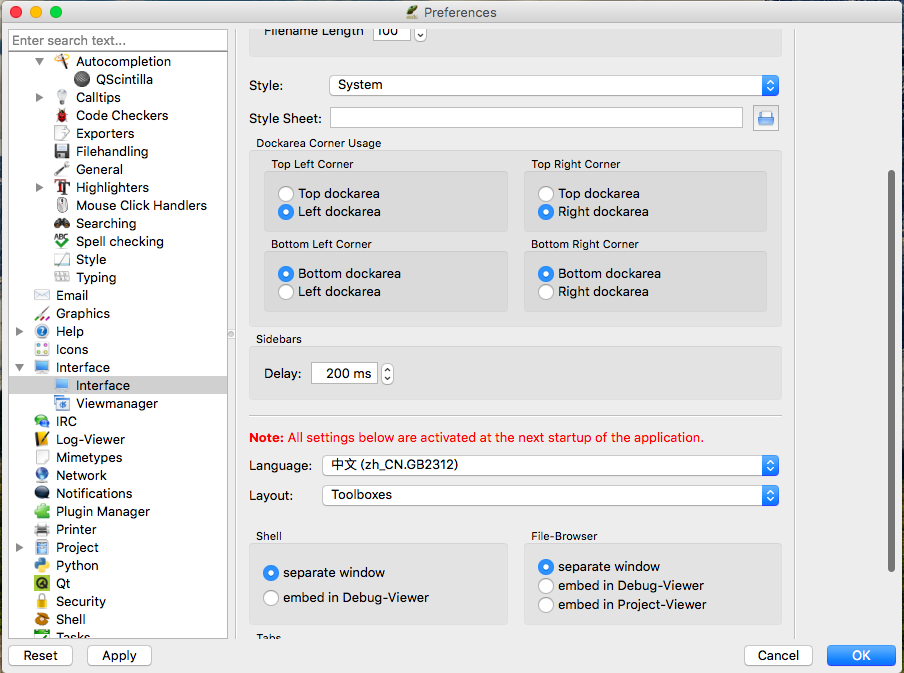
4、Interface -> Interface。Language选择中文,重启生效。
大功告成!
三、曾经遇到的问题
1.安装QScintilla designer-Qt4Qt5时报错!
root@kallan:/media/kallan/D盘/编程学习/python/QScintilla-gpl-2.9./designer-Qt4Qt5# qmake -qt5 designer.pro Project ERROR: Unknown module(s) in QT: designer
原因: Qt没有安装好
2.安装QScintilla Python时报错!
 python3 configure.py --pyqt=PyQt5-d /Library/Frameworks/Python.framework/Versions/3.4/lib/python3./site-packages/PyQt5--pyqt-sipdir=/Library/Frameworks/Python.framework/Versions/3.4/share/sip/PyQt5--qsci-sipdir=/Library/Frameworks/Python.framework/Versions/3.4/share/sip/PyQt5

 Error:Make sure you have a working sip on your PATH or use the --sip argument

 to explicitly specify a working sip.
原因:没有安装SIP
3.安装QScintilla Python时报错!
 python3 configure.py --pyqt=PyQt5

 ConfiguringQScintilla2.9.1...

 QScintilla2.9.1 is being used.

 TheQScintilla.sip files will be installed in/usr/share/sip/PyQt5.

 TheQScintilla module will be installed in

 /usr/lib/python3/dist-packages/PyQt5.

 PyQt5.3.1 is being used.

 Qt5.3.1 is being used.

 sip 4.16. is being used.

 The sip executable is /usr/bin/sip.

 TheQScintilla module is being built with 'protected' redefined as 'public'.

 TheQScintilla API file will be installed in/usr/share/qt5/qsci/api/python.

 Generating the C++ source for the Qsci module...

 Error:Unable to create the C++ code.
原因:安装顺序错误——先安装的PyQt5,而后安装的QScintilla Qt4Qt5
4.QScintilla的Python安装完成但是在Python中import时报错!
 >>> import PyQt5.Qsci

 Traceback(most recent call last):

 File"<stdin>", line ,in<module>

 ImportError: dlopen(/Library/Frameworks/Python.framework/Versions/3.4/lib/python3./site-packages/PyQt5/Qsci.so,):Library not loaded:@rpath/QtPrintSupport.framework/Versions//QtPrintSupport

 Referenced from:/Library/Frameworks/Python.framework/Versions/3.4/lib/python3./site-packages/PyQt5/Qsci.so

 Reason: image not found
5.安装Eric报错!
 python3 install.py

 Checking dependencies

 PythonVersion:3.4.

 FoundPyQt5

 Sorry, please install QScintilla2 and

 its PyQt5/PyQt4 wrapper.

 Error: dlopen(/Library/Frameworks/Python.framework/Versions/3.4/lib/python3./site-packages/PyQt5/Qsci.so,):Library not loaded:@rpath/QtPrintSupport.framework/Versions//QtPrintSupport

 Referenced from:/Library/Frameworks/Python.framework/Versions/3.4/lib/python3./site-packages/PyQt5/Qsci.so

 Reason: image not found
4和5问题的原因是一样的,QScintilla的Python没有安装成功
本文版权归作者和博客园共有,欢迎转载,但未经作者同意必须保留此段声明,且在文章页面明显位置给出原文连接,否则保留追究法律责任的权利。
Mac OS X 10.11.1下搭建Python3.4 + PyQt5.5.1 +Eric6.1.1开发平台的更多相关文章
- Ubuntu 14.04下搭建Python3.4 + PyQt5.3.2 + Eric6.0开发平台
引言 找了很多Python GUI工具集,还是觉得PyQt比较理想,功能强大跨平台,还支持界面设计器.花一天时间折腾了Ubuntu14.04(32位)+ Python3.4 + Qt5.3.2 + P ...
- Windows下虚拟机安装Mac OS X —– VM12安装Mac OS X 10.11
____________________________________________________________________________________________________ ...
- Windows下虚拟机安装Mac OS X ----- VM12安装Mac OS X 10.11
Windows下虚拟机安装Mac OS X -– VM12安装Mac OS X 10.11 随着Iphone在国内大行其道,越来越多的开发者涌入iOS开发大军 中,但都苦于没有苹果机,本文即将介绍WI ...
- Caffe on Mac OS X 10.11
在Mac环境安装Caffe环境(CPU_ONLY) http://blog.csdn.net/xidiancoder/article/details/52081519 有问题 http://blo ...
- VMware 10安装Mac OS X 10.11和XCode7
上周把我的计算机当试验品,安装mac虚拟机.由于文件下载复制解压的时间花了很长,历时两天,记录下来(和我一样的新手不妨参考一下): 我机硬件:win7 64位 8G内存 没有8G以上就不要考虑了.我安 ...
- VMware 12安装Mac OS X 10.11
去年写了一篇安装Mac OS X 10.10的文章,看到大家都想体验OS X,大多数都能成功,但也在其中发现了一些问题,所以更新一下,希望对大家有所帮助. 1048VMware 11安装Mac O ...
- VMware 12安装Mac OS X 10.11&解决上网的问题
近日想在Win10上安装Mac OS 玩玩,于是上网搜了相关资源,查看了相关经验分享,开始着手安装.系统很快成功安装,但最大问题是虚拟机中的Mac OS无法上网.费了很长时间,最终看到Ping通结果, ...
- VMware Workstation 12 安装mac os x 10.11
本人近期在学习iOS开发,由于初学,购买设备有点太昂贵了点.和我有意向想法的朋友能够看看在这篇文章.在虚拟机里装MAC os系统. 第一步:准备 VMware Workstation 12版本号 ma ...
- Windows下虚拟机安装Mac OS X —– VMware Workstation12安装Mac OS X 10.11
1下载 镜像:Instal OS X Yosemite 10.10.3(14D131).cdr 密码:qhhm 2 unlocker208文件(链接:https://pan.baidu ...
随机推荐
- centos7.4 防火墙设置
1.关闭默认的firewall防火墙 systemctl stop firewalld.service #停止firewall systemctl disable firewalld.service ...
- Yii2 使用 bootboxJS美化confirm窗口
有些关键操作比如删除,我们在执行前一般先弹出来个confirm确认窗口. 在Yii2中为一个操作添加confirm确认很容易.只需在链接出添加一个‘data-confirm' => '确实要添加 ...
- ps 图层解锁后变成全格子(全透明)的解决方法
其实是因为同时打开了好几个ps文件正在编辑中,所以解决方法就是重启ps,然后单独编辑一个文件,解锁后就不会再出现这种情况能,就能正常编辑了
- idea 新建 maven项目遇到的一些问题
idea创建好了maven项目之后,需要先在项目中添加 Web,这里创建Web时就会要求fix一个Artifacts,新建即可,然后面板设置默认即可(shift+ctrl+alt+s 打开面板): 然 ...
- hive 日志
hive中日志分为两种: 1 系统日志,记录hive运行情况,错误状态 2 job日志 , 记录hive中 job执行的历史过程 系统日志存储位置: 配置在 hive/conf/hive-log4j. ...
- 第六篇 native 版本的Postman如何通过代理服务器录制Web及手机APP请求
第四篇主要介绍了chrome app版本的postman如何安装及如何录制Web脚本,比较简单. 但是chrome app 版本和native 版本相比,对应chrome app 版本官方已经放弃支持 ...
- Ubuntu 安装python后,安装python-dev
1.通常情况下: sudo apt install python-dev 或者 在 sudo apt install python 命令下安装应该也附带了 python-dev 上述 pyhthon ...
- Siki_Unity_3-16_3D数学基础
Unity 3-16 3D数学基础 任务0-1:课程介绍 课程大纲: 1. 3D数学介绍 2. Unity中的几种坐标系: 全局坐标系.屏幕坐标系等 坐标系间的坐标转换:比如屏幕坐标转换到世界坐标 3 ...
- TW实习日记:第九天
这两天有点忙,要改前端网页和加需求上去.所以昨天说的Vue缓存机制也没看,所以打算现在列个挖了的坑的清单: Vue缓存机制.生命周期和钩子函数 使用项目组自用组件来重写静态页面 SSM框架搭建.整合流 ...
- HDU-1053:Advanced Fruits(LCS+路径保存)
链接:HDU-1053:Advanced Fruits 题意:将两个字符串合成一个串,不改变原串的相对顺序,可将相同字母合成一个,求合成后最短的字符串. 题解:LCS有三种状态转移方式,将每个点的状态 ...