
Shrio04 自定义Realm

1 说明
1.1 Realm的作用
Realm和认证和授权时的数据交互有关,相当于DAO层。
1.2 AuthorizingRealm
》层次关系图
》作用
继承AuthorizingRealm类后重写doGetAuthorizationInfo和doGetAuthenticationInfo就可以实现授权和认证逻辑。
2 代码实现
2.1 创建一个maven项目并引入shiro、junit依赖
2.2 创建一个类继承AuthorizingRealm
2.3 重写doGetAuthorizationInfo和doGetAuthenticationInfo
2.4 完整代码
package com.xunyji.demo04.realm;

import com.xunyji.demo0.StringUtilsXyj;

import org.apache.shiro.authc.AuthenticationException;

import org.apache.shiro.authc.AuthenticationInfo;

import org.apache.shiro.authc.AuthenticationToken;

import org.apache.shiro.authc.SimpleAuthenticationInfo;

import org.apache.shiro.authz.AuthorizationInfo;

import org.apache.shiro.authz.SimpleAuthorizationInfo;

import org.apache.shiro.crypto.hash.Md5Hash;

import org.apache.shiro.realm.AuthorizingRealm;

import org.apache.shiro.subject.PrincipalCollection;

import org.apache.shiro.util.ByteSource;

import org.slf4j.Logger;

import org.slf4j.LoggerFactory;

import java.util.HashMap;

import java.util.HashSet;

import java.util.Map;

import java.util.Set;

/**

 * @author AltEnter

 * @create 2019-01-23 20:32

 * @desc 自定义Realm,md

 **/

public class CustomRealm extends AuthorizingRealm {

    private Logger log = LoggerFactory.getLogger(this.getClass());

    private Map<String, String> userMap = new HashMap<String, String>();

    {

        getName();

//        userMap.put("fury", "111111");

//        userMap.put("fury", "96e79218965eb72c92a549dd5a330112");

        userMap.put("fury", "66b747dd6c7c7c8ca4227a67fff8ea6e");

    }

    /**

     * 授权逻辑

     * @param principals

     * @return

     */

    @Override

    protected AuthorizationInfo doGetAuthorizationInfo(PrincipalCollection principals) {

        // 01 获取用户名

        String username = (String) principals.getPrimaryPrincipal();

        // 02 获取权限集合

        Set<String> permissionSet = getPermissionSetByUsername(username);

        // 03 获取角色集合

        Set<String> roleSet = getRoleSetByUsername(username);

        // 04 封装SimpleAuthorizationInfo对象

        SimpleAuthorizationInfo simpleAuthorizationInfo = new SimpleAuthorizationInfo();

        simpleAuthorizationInfo.setRoles(roleSet);

        simpleAuthorizationInfo.setStringPermissions(permissionSet);

        return simpleAuthorizationInfo;

    }

    /**

     * 根据用户名获取权限集合

     * @param username

     * @return

     */

    private Set<String> getPermissionSetByUsername(String username) {

        HashSet<String> permissionSet = new HashSet<>();

        permissionSet.add("user:create");

        permissionSet.add("user:delete");

        permissionSet.add("user:update");

        return permissionSet;

    }

    /**

     * 根据用户名获取角色集合

     * @param username

     * @return

     */

    private Set<String> getRoleSetByUsername(String username) {

        HashSet<String> roleSet = new HashSet<>();

        roleSet.add("admin");

        roleSet.add("user");

        return roleSet;

    }

    /**

     * 认证逻辑

     * @param token

     * @return

     * @throws AuthenticationException

     */

    @Override

    protected AuthenticationInfo doGetAuthenticationInfo(AuthenticationToken token) throws AuthenticationException {

        // 01 获取前端用户名和密码

        String username = (String) token.getPrincipal();

        String passoword = new String((char[]) token.getCredentials());

        if (StringUtilsXyj.isEmpty(passoword) || StringUtilsXyj.isEmpty(username)) {

            String msg = "doGetAuthenticationInfo - 用户名和密码不能为空";

            log.info(msg);

            throw new RuntimeException(msg);

        }

        log.info(String.format("doGetAuthenticationInfo - 前端传过来的用户信息为 - 用户名为:%s ,用户密码为:%s", username, passoword));

        System.out.println(String.format("doGetAuthenticationInfo - 前端传过来的用户信息为 - 用户名为:%s ,用户密码为:%s", username, passoword));

        // 02 根据用户名获取用户密码

        String pwd = getPasswordByUsername(username);

        // 03 前端密码加密加盐处理

        passoword = string2Md5Hash(passoword, "AltEnter");

        System.out.println("加盐加密后的密码为:" + pwd);

        // 04 密码比对

        if (passoword.equals(pwd)) {

            // 封装SimpleAuthenticationInfo对象

            SimpleAuthenticationInfo simpleAuthenticationInfo = new SimpleAuthenticationInfo(username, passoword, getName());

            // 加盐处理

            simpleAuthenticationInfo.setCredentialsSalt(ByteSource.Util.bytes("AltEnter"));

            return simpleAuthenticationInfo;

        } else {

            String msg = "doGetAuthenticationInfo - 用户名或者密码错误";

            log.info(msg);

            System.out.println(msg);

            throw new RuntimeException(msg);

        }

    }

    /**

     * 密码加密加盐处理

     * @param password 待加密密码

     * @param salt 盐

     * @return 经过加密和加盐处理后的密码

     */

    private String string2Md5Hash(String password, String salt) {

        return new Md5Hash(password, salt).toString();

    }

    /**

     * 根据用户名获取密码

     * @param username

     * @return

     */

    private String getPasswordByUsername(String username) {

        String pwd = userMap.get(username);

        return pwd;

    }

    public static void main(String[] args) {

//        Md5Hash md5Hash = new Md5Hash("111111");

//        System.out.println("111111加密后的结果为:" + md5Hash.toString());

//        96e79218965eb72c92a549dd5a330112

        Md5Hash md5Hash = new Md5Hash("111111", "AltEnter");

        System.out.println("111111经过MD5加密和AltEnter加盐后的结果为:" + md5Hash.toString());

//        66b747dd6c7c7c8ca4227a67fff8ea6e

    }

}
3 测试类
package com.xunyji.demo04.realm;

import org.apache.shiro.SecurityUtils;

import org.apache.shiro.authc.UsernamePasswordToken;

import org.apache.shiro.authc.credential.HashedCredentialsMatcher;

import org.apache.shiro.authc.pam.FirstSuccessfulStrategy;

import org.apache.shiro.authc.pam.ModularRealmAuthenticator;

import org.apache.shiro.mgt.DefaultSecurityManager;

import org.apache.shiro.subject.Subject;

import org.junit.Test;

import static org.junit.Assert.*;

public class CustomRealmTest {

    @Test

    public void test01() {

        CustomRealm customRealm = new CustomRealm();

        // shiro加密 start

        HashedCredentialsMatcher matcher = new HashedCredentialsMatcher();

        //选择加密方式

        matcher.setHashAlgorithmName("md5");

        //加密次数

        matcher.setHashIterations(1);

        // 给自定义Realm设置加密规则

        customRealm.setCredentialsMatcher(matcher);

//        shiro加密 end

        // 更改认证策略 start

        DefaultSecurityManager defaultSecurityManager = new DefaultSecurityManager();

        FirstSuccessfulStrategy firstSuccessfulStrategy = new FirstSuccessfulStrategy();

        ModularRealmAuthenticator modularRealmAuthenticator = new ModularRealmAuthenticator();

        modularRealmAuthenticator.setAuthenticationStrategy(firstSuccessfulStrategy);

        defaultSecurityManager.setAuthenticator(modularRealmAuthenticator);

        // 更改认证策略 end

        defaultSecurityManager.setRealm(customRealm);

        SecurityUtils.setSecurityManager(defaultSecurityManager);

        Subject subject = SecurityUtils.getSubject();

        UsernamePasswordToken token = new UsernamePasswordToken("fury", "111111");

        subject.login(token);

        System.out.println(String.format("认证信息为:%s", subject.isAuthenticated()));

        System.out.println(String.format("拥有admin角色吗? - %s", subject.hasRole("admin")));

        System.out.println(String.format("拥有user:create权限吗? - %s", subject.isPermitted("user:create")));

        subject.logout();

        System.out.println(String.format("认证信息为:%s", subject.isAuthenticated()));

    }

}
4 注意
4.1 可以给SecurityManager设置认证策略

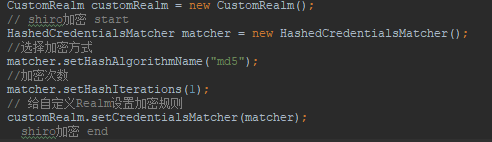
4.2 可以给Realm设置MD5加密
4.3 SecurityManager必须先设置认证策略再设置Realm

Shrio04 自定义Realm的更多相关文章
- 权限框架 - shiro 自定义realm
上篇文章中是使用的默认realm来实现的简单登录,这仅仅只是个demo,真正项目中使用肯定是需要连接数据库的 首先创建自定义realm文件,如下: 在shiro中注入自定义realm的完全限定类名: ...
- Shrio认证详解+自定义Realm
Authentication(身份认证)是Shiro权限控制的第一步,用来告诉系统你就是你. 在提交认证的时候,我们需要给系统提交两个信息: Principals:是一个表示用户的唯一属性,可以是用户 ...
- Shiro第二篇【介绍Shiro、认证流程、自定义realm、自定义realm支持md5】
什么是Shiro shiro是apache的一个开源框架,是一个权限管理的框架,实现 用户认证.用户授权. spring中有spring security (原名Acegi),是一个权限框架,它和sp ...
- shiro(二)自定义realm,模拟数据库查询验证
自定义一个realm类,实现realm接口 package com; import org.apache.shiro.authc.*; import org.apache.shiro.realm.Re ...
- shiro自定义Realm
1.1 自定义Realm 上边的程序使用的是shiro自带的IniRealm,IniRealm从ini配置文件中读取用户的信息,大部分情况下需要从系统的数据库中读取用户信息,所以需要自定义realm. ...
- Shiro入门 - 通过自定义Realm连数数据库进行授权
shiro-realm.ini [main] #自定义Realm myRealm=test.shiro.MyRealm #将myRealm设置到securityManager,相当于Spring中的注 ...
- Shiro入门 - 通过自定义Realm连数数据库进行认证(md5+salt形式)
shiro-realm-md5.ini [main] #定义凭证匹配器 credentialsMatcher=org.apache.shiro.authc.credential.HashedCrede ...
- Shiro入门 - 通过自定义Realm连数数据库进行认证
添加shiro-realm.ini文件 [main] #自定义Realm myRealm=test.shiro.MyRealm #将myRealm设置到securityManager,相当于Sprin ...
- shiro教程2(自定义Realm)
通过shiro教程1我们发现仅仅将数据源信息定义在ini文件中与我们实际开发环境有很大不兼容,所以我们希望能够自定义Realm. 自定义Realm的实现 创建自定义Realmjava类 创建一个jav ...
随机推荐
- 关于yo3 所遇到的问题
关于去哪儿开发的yo3 库,实在不敢恭维 ,没有最坑,只有更坑. 官方文档写的实在是 ,有element,iview,ant-design等等一半也可以 ,个人观点. 在使用Scroller中, 自动 ...
- npm 与 package.json 快速入门
npm 是前端开发广泛使用的包管理工具,之前使用 Weex 时看了阮一峰前辈的文章了解了一些,这次结合官方文章总结一下,加深下理解吧! 读完本文你将了解: 什么是 npm 安装 npm 更新 npm ...
- MFGTool2批量操作
/********************************************************************************* * MFGTool2批量操作 * ...
- Git 将代码恢复到一个历史的版本
Git 将代码恢复到一个历史的版本 要把代码回到某个历史版本 比如 test有两种方法 暴力的方式 如果你的仓库是自己在用(不影响别人),那么你可以使用 git reset --hard <ta ...
- Visual Studio环境变量、工作目录、vc++目录、 命令等 的配置和作用
在调试 Visual Studio 2008 程序时,经常有一些动态链接库(即 dll 文件)需要加载到工程里,这样才能依赖第三方库进行程序调试. 这些动态链接库,往往都是测试版本或是开发中的版本,或 ...
- 黄聪:“不允许对64位应用程序进行修改”的解决方法 --“Changes to 64-bit applications are not allowed.”
在64位系统中使用VS对程序(32位的)进行调试,出现“不允许对64位应用程序进行修改”的提示,如下图所示: 解决方法:在VS主菜单上选择“生成” or "Build"——“配置管 ...
- android单元测试 activity跳转 以及 input 输入后 测试
Android junit实现多个Activity跳转测试 分类: Android Junit测试2011-11-14 16:49 1601人阅读 评论(2) 收藏 举报 androidjunitla ...
- APR介绍
http://blog.csdn.net/jmshl/article/details/6773731 APR分析-整体篇 由于部门所使用的底层库与Apache Server有着“一定的渊源”,所以总有 ...
- 【Codeforces】Codeforces Round #491 (Div. 2) (Contest 991)
题目 传送门:QWQ A:A - If at first you don't succeed... 分析: 按照题意模拟 代码: #include <bits/stdc++.h> usin ...
- 认识Linux操作系统
Linux系统是一个类似UNIX的操作系统 认识Linux的来世与今生 1.Linux系统的历史 Linux系统是一个类似UNIX的操作系统,Linux系统是UNIX在微机上的完整实现,它的标志是一个 ...