tornado框架之路二
二、路由系统
路由系统其实就是 url 和 类 的对应关系,这里不同于其他框架,其他很多框架均是 url 对应 函数,Tornado中每个url对应的是一个类。
#!/usr/bin/env python

# -*- coding:utf-8 -*-

import tornado.ioloop

import tornado.web

class MainHandler(tornado.web.RequestHandler):

    def get(self):

        self.write("Hello, world")

class WorkHanlder(tornado.web.RequestHandler):

    def get(self,page):

     self.write(page)

class StoryHandler(tornado.web.RequestHandler):

    def get(self, story_id):

        self.write("You requested the story " + story_id)

class BuyHandler(tornado.web.RequestHandler):

    def get(self):

        self.write("buy.wupeiqi.com/index")

application = tornado.web.Application([

    (r"/index", MainHandler),

    (r"/story/([0-9]+)", StoryHandler),

   (r"/work/(?P<page>\d*)",WorkHanlder),

])

application.add_handlers('buy.wupeiqi.com$', [

    (r'/index',BuyHandler),

])

if __name__ == "__main__":

    application.listen(80)

    tornado.ioloop.IOLoop.instance().start()
分页(一页显示五条内容,每页显示11个页码)
#!/usr/bin/env python

# -*- coding:utf-8 -*-

import tornado.web

import tornado.ioloop

from work.controller import work

settings={

    "template_path":"tpl",

}

application = tornado.web.Application([

    (r"/work/(?P<page>\d*)",work.WorkHanlder),

],**settings)

if __name__ == "__main__":

    application.listen(8888)

    tornado.ioloop.IOLoop.instance().start()
start.py
#!/usr/bin/env python

# -*- coding:utf-8 -*-

import tornado.web

list_all = ["ssdfsdgsdsgfdf",]

for i in range(100):

    list_all.append("123士大夫是的覅是公司的")

class WorkHanlder(tornado.web.RequestHandler):

    def get(self,page):   #page指的是当前页

        list_asd = []

        try:

            page = int(page)  #如果在浏览器上输入的值为整型则正常转

        except:

            page = 1          #如果输入的值不是int型的,则默认为第一页

        start = (page - 1)*5   #内容的开始取值范围

        end = page*5           #内容的结束取值范围

        list = list_all[start:end] #根据当前页的页码,获取相应页码的内容

        all_page ,c = divmod(len(list_all),5) #每页的内容设置为5,超出时下一页显示

        if c>0:

            all_page+= 1        # 如果余数大于0,说明还需要另一页来显示

        if all_page < 11:       #设置一页显示11个页码  如果总页数为小于11的话,无论点那一页默认显示全部

            s = 1               #页码开始为1

            t = all_page        #页码结束为总页码

        else:                #我们设置格式为显示前5后5

            if page < 6:        #当页码大于11的时候,又分当前页码如果小于6时,显示1-12的页码

                s = 1

                t = 12

            else:              #页码大于11且当前页码大于6时又分下面俩种

                if all_page > page +5 :    #

                    s = page - 5

                    t = page + 5 + 1

                else:

                    s = all_page - 11

                    t = all_page + 1

        for p in range(s,t):

            if p == page:

                temp = "<a href='/work/%s' style='color:red'>%s</a>"%(p,p)

            else:

                temp = "<a href='/work/%s'>%s</a>"%(p,p)

            list_asd.append(temp)

        st = "".join(list_asd)

        self.render("work.html",list_show = list ,list_page =st,)

    def post(self, *args, **kwargs):

        pass
work.py
<!DOCTYPE html>

<html lang="en">

<head>

    <meta charset="UTF-8">

    <title>Title</title>

</head>

<body>

{% for item in list_show %}

<h3>{{ item }}</h3>

{% end %}

{% raw list_page %}

</body>

</html>
work.html
css文件和js文件的引入方式
<link rel="stylesheet" href="{{static_url('chouti.css')}}">

<script src="{{static_url('jquery-1.9.1.min.js')}}"></script>
Tornado中原生支持二级域名的路由,如:
三、模板引擎
Tornao中的模板语言和django中类似,模板引擎将模板文件载入内存,然后将数据嵌入其中,最终获取到一个完整的字符串,再将字符串返回给请求者。
Tornado 的模板支持“控制语句”和“表达语句”,控制语句是使用 {% 和 %} 包起来的 例如 {% if len(items) > 2 %}。表达语句是使用 {{ 和 }} 包起来的
,例如 {{ items[0] }}。
控制语句和对应的 Python 语句的格式基本完全相同。我们支持 if、for、while 和 try,这些语句逻辑结束的位置需要用 {% end %} 做标记。还通过 extends 和 block 语句实现了模板继承。这些在 template 模块 的代码文档中有着详细的描述。
注:在使用模板前需要在setting中设置模板路径:"template_path" : "tpl"
1、基本使用
#!/usr/bin/env python

# -*- coding:utf-8 -*-

import tornado.ioloop

import tornado.web

class MainHandler(tornado.web.RequestHandler):

    def get(self):

        self.render("index.html", list_info = [11,22,33])

application = tornado.web.Application([

    (r"/index", MainHandler),

])

if __name__ == "__main__":

    application.listen(8888)

    tornado.ioloop.IOLoop.instance().start()
index
<!DOCTYPE html>

<html>

<head>

    <meta http-equiv="Content-Type" content="text/html; charset=UTF-8"/>

    <title>老男孩</title>

    <link href="{{static_url("css/common.css")}}" rel="stylesheet" />

</head>

<body>

    <div>

        <ul>

            {% for item in list_info %}

                <li>{{item}}</li>

            {% end %}

        </ul>

    </div>

    <script src="{{static_url("js/jquery-1.8.2.min.js")}}"></script>

</body>

</html>
index.html
在模板中默认提供了一些函数、字段、类以供模板使用:

escape: tornado.escape.xhtml_escape 的別名

xhtml_escape: tornado.escape.xhtml_escape 的別名

url_escape: tornado.escape.url_escape 的別名

json_encode: tornado.escape.json_encode 的別名

squeeze: tornado.escape.squeeze 的別名

linkify: tornado.escape.linkify 的別名

datetime: Python 的 datetime 模组

handler: 当前的 RequestHandler 对象

request: handler.request 的別名

current_user: handler.current_user 的別名

locale: handler.locale 的別名

_: handler.locale.translate 的別名

static_url: for handler.static_url 的別名

xsrf_form_html: handler.xsrf_form_html 的別名
2、母版
内容的引入:
在母版的body块中写--------------->{% block body %}{% end %}
在子版中写------------------------{% extends 'layout.html'%} ---------->导入母版
-----------------------------------{% block body %}---------------------->格式
-----------------------------------<h1>work</h1>------------------------>内容
-----------------------------------{% end %}------------------------------>格式
<!DOCTYPE html>

<html lang="en">

<head>

    <meta charset="UTF-8">

    <title>Title</title>

    <style>

        .c1{

            height: 40px;

            background-color: #2459a2;

        }

        .c2{

            height: 40px;

            background-color: black;

        }

    </style>

</head>

<body>

<div class="c1"></div>

{% block body %}{% end %}

<div class="c2"></div>

</body>

</html>
layout.html
{% extends 'layout.html'%}

{% block body %}

<h1>index</h1>

{% end %}
index.html
{% extends 'layout.html'%}

{% block body %}

<h1>work</h1>

{% end %}
work.html
#!/usr/bin/env python

# -*- coding:utf-8 -*-

import tornado.web

class IndexHanlder(tornado.web.RequestHandler):

    def get(self):

        self.render("index.html")

    def post(self, *args, **kwargs):

        pass

class WorkHanlder(tornado.web.RequestHandler):

    def get(self):

        self.render("work.html")

    def post(self, *args, **kwargs):

        pas
extend
#!/usr/bin/env python

# -*- coding:utf-8 -*-

import tornado.web

import tornado.ioloop

from work.controller import work

from work.controller import extend

settings={

    "template_path":"tpl",

}

application = tornado.web.Application([

    (r"/work",extend.WorkHanlder),

    (r"/index", extend.IndexHanlder),

],**settings)

if __name__ == "__main__":

    application.listen(8888)

    tornado.ioloop.IOLoop.instance().start()
start.py
css的引入1:
在母版的head块中写--------------->{% block css %}{% end %}
在子版中写--------------------------{% block css %}------------------------------------------------------------------>格式
------------------------------------<link href="{{static_url('s1.css')}}" rel="stylesheet" />----------------------->内容
------------------------------------{% end %}------------------------------------------------------------------------->格式
css的引入2:
在母版的head块中写--------------->{% block css %}{% end %}
在子版中写--------------------------{% block css %}------------------------------------------------------------------>格式
------------------------------------<style>-----------------------------------------------------------------------------------
---------------------------------- .s1{ width: 30px; height: 30px; color: #2459a2; background-color: greenyellow; }
----------------------------------- </style>----------------------------------------------------------------------------------
------------------------------------{% end %}------------------------------------------------------------------------->格式
整体body块、css块、js块母版汇总:
<!DOCTYPE html>

<html lang="en">

<head>

    <meta charset="UTF-8">

    <title>Title</title>

    <link href="{{static_url('s1.css')}}" rel="stylesheet" />

    {% block css %}{% end %}         <!-- 这里的css和下面的JavaScript大小写都行,只要母版和子版中的一样就行---->

</head>

<body>

<div class="c1">11111111</div>

{% block body %}{% end %}

<div class="c2">3333333333</div>

<script src="{{static_url('js/jquery-1.8.2.min.js')}}"></script>

{% block javascript %}{% end %}

</body>

</html>
母版
{% extends 'layout.html'%}

{% block css %}

<style>

    .s1{

        width: 30px;

        height: 30px;

        color: #2459a2;

        background-color: greenyellow;

    }

</style>

{% end %}

{% block body %}

<div class="s1">123123</div>

<h1>work</h1>

{% end %}

<ul>

{%  for item in li %}

    <li>{{item}}</li>

{% end %}

</ul>

{% block javascript %}

<script>

    alert("12121212121")

</script>

{% end %}
子版
3、导入
<form action="">

    <input type="text">

    <input type="text">

</form>
form.html
<!DOCTYPE html>

<html lang="en">

<head>

    <meta charset="UTF-8">

    <title>Title</title>

</head>

<body>

{% include "form.html" %}

</body>

</html>
index.html
四、cookie
1、基本操作
Cookie是由服务器端生成,发送给User-Agent(一般是浏览器),浏览器会将Cookie的key/value保存到某个目录下的文本文件内,下次请求同一网站时就发送该Cookie给服务器(前提是浏览器设置为启用cookie)
在后台设置cookie:
class IndexHanlder(tornado.web.RequestHandler):

    def get(self):

        print(self.cookies) #获取http请求中携带的浏览器中的所有cookie

        print(self.get_cookie("k1"))  # 获取浏览器中的cooki

        self.set_cookie("k1","v1")  #为浏览器设置cookie
在前端(浏览器上使用JavaScript):
    document.cookie               #获取浏览器中所有的cookie

    document.cookie.split(";")   #获取浏览器中具体某一个cookie,需要先分割,再操作

    document.cookie = "k1=999"   #设置cookie
由于Cookie保存在浏览器端,所以在浏览器端也可以使用JavaScript来操作Cookie:
<!DOCTYPE html>

<html lang="en">

<head>

    <meta charset="UTF-8">

    <title>Title</title>

</head>

<body>

<h1>123</h1>

</body>

<script>

/*设置cookie,指定秒数过期*/

function setCookieBySeconds(name,value,expires){

    var current_date = new Date();  //获取当前时间

    current_date.setSeconds(current_date.getSeconds() + expires);

    document.cookie = name + "= "+ value +";expires=" + current_date.toUTCString();

}

/*设置cookie,指定天数过期*/

function setCookieByDays(name,value,expires){

    var current_date = new Date();  //获取当前时间

    current_date.setDate(current_date.getDate() + expires);

    document.cookie = name + "= "+ value +";expires=" + current_date.toUTCString();

}

</script>

</html>
JavaScript操作Cookie

2、加密cookie(签名)
Cookie 很容易被恶意的客户端伪造。加入你想在 cookie 中保存当前登陆用户的 id 之类的信息,你需要对 cookie 作签名以防止伪造。Tornado 通过 set_secure_cookie 和 get_secure_cookie 方法直接支持了这种功能。 要使用这些方法,你需要在创建应用时提供一个密钥,名字为 cookie_secret。 你可以把它作为一个关键词参数传入应用的设置中:
def _create_signature_v1(secret, *parts):

    hash = hmac.new(utf8(secret), digestmod=hashlib.sha1)

    for part in parts:

        hash.update(utf8(part))

    return utf8(hash.hexdigest())

# 加密

def _create_signature_v2(secret, s):

    hash = hmac.new(utf8(secret), digestmod=hashlib.sha256)

    hash.update(utf8(s))

    return utf8(hash.hexdigest())

def create_signed_value(secret, name, value, version=None, clock=None,

                        key_version=None):

    if version is None:

        version = DEFAULT_SIGNED_VALUE_VERSION

    if clock is None:

        clock = time.time

    timestamp = utf8(str(int(clock())))

    value = base64.b64encode(utf8(value))

    if version == 1:

        signature = _create_signature_v1(secret, name, value, timestamp)

        value = b"|".join([value, timestamp, signature])

        return value

    elif version == 2:

        # The v2 format consists of a version number and a series of

        # length-prefixed fields "%d:%s", the last of which is a

        # signature, all separated by pipes.  All numbers are in

        # decimal format with no leading zeros.  The signature is an

        # HMAC-SHA256 of the whole string up to that point, including

        # the final pipe.

        #

        # The fields are:

        # - format version (i.e. 2; no length prefix)

        # - key version (integer, default is 0)

        # - timestamp (integer seconds since epoch)

        # - name (not encoded; assumed to be ~alphanumeric)

        # - value (base64-encoded)

        # - signature (hex-encoded; no length prefix)

        def format_field(s):

            return utf8("%d:" % len(s)) + utf8(s)

        to_sign = b"|".join([

            b"",

            format_field(str(key_version or 0)),

            format_field(timestamp),

            format_field(name),

            format_field(value),

            b''])

        if isinstance(secret, dict):

            assert key_version is not None, 'Key version must be set when sign key dict is used'

            assert version >= 2, 'Version must be at least 2 for key version support'

            secret = secret[key_version]

        signature = _create_signature_v2(secret, to_sign)

        return to_sign + signature

    else:

        raise ValueError("Unsupported version %d" % version)

# 解密

def _decode_signed_value_v1(secret, name, value, max_age_days, clock):

    parts = utf8(value).split(b"|")

    if len(parts) != 3:

        return None

    signature = _create_signature_v1(secret, name, parts[0], parts[1])

    if not _time_independent_equals(parts[2], signature):

        gen_log.warning("Invalid cookie signature %r", value)

        return None

    timestamp = int(parts[1])

    if timestamp < clock() - max_age_days * 86400:

        gen_log.warning("Expired cookie %r", value)

        return None

    if timestamp > clock() + 31 * 86400:

        # _cookie_signature does not hash a delimiter between the

        # parts of the cookie, so an attacker could transfer trailing

        # digits from the payload to the timestamp without altering the

        # signature.  For backwards compatibility, sanity-check timestamp

        # here instead of modifying _cookie_signature.

        gen_log.warning("Cookie timestamp in future; possible tampering %r",

                        value)

        return None

    if parts[1].startswith(b""):

        gen_log.warning("Tampered cookie %r", value)

        return None

    try:

        return base64.b64decode(parts[0])

    except Exception:

        return None

def _decode_fields_v2(value):

    def _consume_field(s):

        length, _, rest = s.partition(b':')

        n = int(length)

        field_value = rest[:n]

        # In python 3, indexing bytes returns small integers; we must

        # use a slice to get a byte string as in python 2.

        if rest[n:n + 1] != b'|':

            raise ValueError("malformed v2 signed value field")

        rest = rest[n + 1:]

        return field_value, rest

    rest = value[2:]  # remove version number

    key_version, rest = _consume_field(rest)

    timestamp, rest = _consume_field(rest)

    name_field, rest = _consume_field(rest)

    value_field, passed_sig = _consume_field(rest)

    return int(key_version), timestamp, name_field, value_field, passed_sig

def _decode_signed_value_v2(secret, name, value, max_age_days, clock):

    try:

        key_version, timestamp, name_field, value_field, passed_sig = _decode_fields_v2(value)

    except ValueError:

        return None

    signed_string = value[:-len(passed_sig)]

    if isinstance(secret, dict):

        try:

            secret = secret[key_version]

        except KeyError:

            return None

    expected_sig = _create_signature_v2(secret, signed_string)

    if not _time_independent_equals(passed_sig, expected_sig):

        return None

    if name_field != utf8(name):

        return None

    timestamp = int(timestamp)

    if timestamp < clock() - max_age_days * 86400:

        # The signature has expired.

        return None

    try:

        return base64.b64decode(value_field)

    except Exception:

        return None

def get_signature_key_version(value):

    value = utf8(value)

    version = _get_version(value)

    if version < 2:

        return None

    try:

        key_version, _, _, _, _ = _decode_fields_v2(value)

    except ValueError:

        return None

    return key_version
内部算法
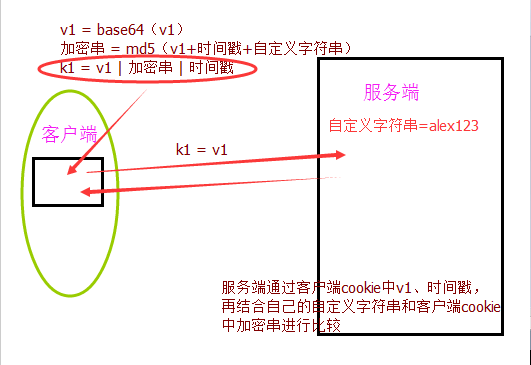
签名Cookie的本质是:
写cookie过程:
- 将值进行base64加密
- 对除值以外的内容进行签名,哈希算法(无法逆向解析)
- 拼接 签名 + 加密值
v1 = base64(v1)
k1 = v1 | 加密串(md5(v1+时间戳+自定义字符串)) | 时间戳
读cookie过程:
- 读取 签名 + 加密值
- 对签名进行验证
- base64解密,获取值内容
五、Session(依赖于cookie)
由于cookie中需要保存客户的很多信息,而且如果信息很多的话,服务端与客户端交互的时候也浪费流量,所以我们需要用很少的一段字符串来保存很多的信息,这就是我们所要引进的session。
cookie 和session 的区别:
1、cookie数据存放在客户的浏览器上,session数据放在服务器上。
2、cookie不是很安全,别人可以分析存放在本地的COOKIE并进行COOKIE欺骗 考虑到安全应当使用session。
3、session会在一定时间内保存在服务器上。当访问增多,会比较占用你服务器的性能 考虑到减轻服务器性能方面,应当使用COOKIE。
4、单个cookie保存的数据不能超过4K,很多浏览器都限制一个站点最多保存20个cookie。
5、所以个人建议: 将登陆信息等重要信息存放为SESSION 其他信息如果需要保留,可以放在COOKIE中

#!/usr/bin/env python

# -*- coding:utf-8 -*-

import tornado.web

import tornado.ioloop

import hashlib

import time

li = {}

class IndexHanlder(tornado.web.RequestHandler):

    def get(self):

        obj = hashlib.md5()

        obj.update(bytes(str(time.time()),encoding="utf-8"))

        random_str = obj.hexdigest()

        li[random_str]={}

        li[random_str]["k1"]=123

        li[random_str]["k2"]=456

        li[random_str]["is_login"]=True

        self.set_cookie("qqqqqq",random_str)

        self.write("成功设置cookie")

    def post(self, *args, **kwargs):

        pass

class ManagerHanlder(tornado.web.RequestHandler):

    def get(self):

        random_str = self.get_cookie("qqqqqq",None)

        current_user_info = li.get(random_str,None)

        if not current_user_info:

            self.redirect("/index")

        else:

            if li[random_str]["is_login"]:

                self.write("欢迎")

            else:

                self.redirect("/index")

        def post(self, *args, **kwargs):

            pass

settings={

    "template_path":"tpl",

     "static_path":"st",

    "cookie_secret":""

}

class IndeHanlder(tornado.web.RequestHandler):

    def get(self):

        self.render("1.html")

application = tornado.web.Application([

    (r"/index", IndexHanlder),

    (r"/manager", ManagerHanlder),

],**settings)

if __name__ == "__main__":

    application.listen(8888)

    tornado.ioloop.IOLoop.instance().start()
利用session做用户验证
#!/usr/bin/env/python

# -*- coding:utf-8 -*-

import tornado.web

container = {}

# container = {

#     # "第一个人的随机字符串":{},

#     # "第一个人的随机字符串":{'k1': 111, 'parents': '你'},

# }

class Session:

    def __init__(self, handler):

        self.handler = handler

        self.random_str = None

    def __genarate_random_str(self):

        import hashlib

        import time

        obj = hashlib.md5()

        obj.update(bytes(str(time.time()), encoding='utf-8'))

        random_str = obj.hexdigest()

        return random_str

    def __setitem__(self, key, value):

        # 在container中加入随机字符串

        # 定义专属于自己的数据

        # 在客户端中写入随机字符串

        # 判断,请求的用户是否已有随机字符串

        if not self.random_str:

            random_str = self.handler.get_cookie('__kakaka__')

            if not random_str:

                random_str = self.__genarate_random_str()

                container[random_str] = {}

            else:

                # 客户端有随机字符串

                if random_str in container.keys():

                    pass

                else:

                    random_str = self.__genarate_random_str()

                    container[random_str] = {}

            self.random_str = random_str

        container[self.random_str][key] = value

        self.handler.set_cookie("__kakaka__", self.random_str)

    def __getitem__(self, key):

        # 获取客户端的随机字符串

        # 从container中获取专属于我的数据

        #  专属信息【key】

        random_str =  self.handler.get_cookie("__kakaka__")

        if not random_str:

            return None

        # 客户端有随机字符串

        user_info_dict = container.get(random_str,None)

        if not user_info_dict:

            return None

        value = user_info_dict.get(key, None)

        return value

class BaseHandler(tornado.web.RequestHandler):

    def initialize(self):

        self.session = Session(self)

class IndexHandler(BaseHandler):

    def get(self):

        if self.get_argument('u',None) in ['alex','eric']:

            self.session['is_login'] = True

            self.session['name'] =self.get_argument('u',None)

            print(container)

        else:

            self.write('请你先登录')

class MangerHandler(BaseHandler):

    def get(self):

        val = self.session['is_login']

        if val:

            self.write(self.session['name'])

        else:

            self.write('登录失败')

class LoginHandler(BaseHandler):

    def get(self,*args,**kwargs):

        self.render('login.html',status="")

    def post(self, *args, **kwargs):

        user = self.get_argument('user',None)

        pwd = self.get_argument('pwd',None)

        code = self.get_argument('code',None)

        check_code = self.session['CheckCode']

        if code.upper() == check_code.upper():

            self.write('验证码正确')

        else:

            self.render('login.html',status ='验证码错误')

class CheckCodeHandler(BaseHandler):

    def get(self,*args,**kwargs):

        import io

        import check_code

        mstream = io.BytesIO()

        img, code = check_code.create_validate_code()

        img.save(mstream,'GIF')

        self.session['CheckCode']=code

        self.write(mstream.getvalue())

class CsrfHandler(BaseHandler):

    def get(self,*args,**kwargs):

        self.render("csrf.html")

    def post(self, *args, **kwargs):

        self.write("hahahahaah")

settings = {

    'template_path':'views',

    'static_path':'static',

    "xsrf_cookies":True

}

application = tornado.web.Application([

    (r'/index',IndexHandler),

    (r'/manger',MangerHandler),

    (r'/login',LoginHandler),

    (r'/check_code',CheckCodeHandler),

    (r'/csrf',CsrfHandler),

],**settings)

if __name__ == "__main__":

    application.listen(8888)

    tornado.ioloop.IOLoop.instance().start()
session用户验证精简版
六、验证码
验证码原理在于后台自动创建一张带有随机内容的图片,然后将内容通过img标签输出到页面
安装图像处理模块:
pip3 install pillow
步骤:1、首先下载安装pillow图像处理模块------->2、把check_code.py文件和Monaco.ttf文件放在目录下
#!/usr/bin/env python

# -*- coding:utf-8 -*-

import tornado.ioloop

import tornado.web

import io

import check_code

li = []

class CheckCodeHandler(tornado.web.RequestHandler):

    def get(self):

        mstream = io.BytesIO()

        img, code = check_code.create_validate_code()

        li.append(code)   #这里可以保存到session中

        img.save(mstream, "GIF")

        self.write(mstream.getvalue())

        print(code)

class LoginHandler(tornado.web.RequestHandler):

    def get(self):

        self.render('login.html',status="")

    def post(self, *args, **kwargs):

        user = self.get_argument("user",None)

        pwd = self.get_argument("pwd",None)

        mima = self.get_argument("mima",None)

        if user == "alex" and pwd == "" and mima.upper() == li[0].upper():  #不区分大小写

            self.write("登录成功")

        else:

            # self.redirect("/login")

            self.render("login.html",status = "验证码错误")

settings = {

    'template_path': 'tpl',

    'static_path': 'static',

    'static_url_prefix': '/static/',

    'cookie_secret': 'aiuasdhflashjdfoiuashdfiuh',

}

application = tornado.web.Application([

    (r"/login", LoginHandler),

    (r"/check_code", CheckCodeHandler),

], **settings)

if __name__ == "__main__":

    application.listen(8888)

    tornado.ioloop.IOLoop.instance().start()
start.py
#!/usr/bin/env python

#coding:utf-8

import random

from PIL import Image, ImageDraw, ImageFont, ImageFilter

_letter_cases = "abcdefghjkmnpqrstuvwxy"  # 小写字母,去除可能干扰的i,l,o,z

_upper_cases = _letter_cases.upper()  # 大写字母

_numbers = ''.join(map(str, range(3, 10)))  # 数字

init_chars = ''.join((_letter_cases, _upper_cases, _numbers))

def create_validate_code(size=(120, 30),

                         chars=init_chars,

                         img_type="GIF",

                         mode="RGB",

                         bg_color=(255, 255, 255),

                         fg_color=(0, 0, 255),

                         font_size=18,

                         font_type="Monaco.ttf",

                         length=4,

                         draw_lines=True,

                         n_line=(1, 2),

                         draw_points=True,

                         point_chance = 2):

    '''

    @todo: 生成验证码图片

    @param size: 图片的大小,格式(宽,高),默认为(120, 30)

    @param chars: 允许的字符集合,格式字符串

    @param img_type: 图片保存的格式,默认为GIF,可选的为GIF,JPEG,TIFF,PNG

    @param mode: 图片模式,默认为RGB

    @param bg_color: 背景颜色,默认为白色

    @param fg_color: 前景色,验证码字符颜色,默认为蓝色#0000FF

    @param font_size: 验证码字体大小

    @param font_type: 验证码字体,默认为 ae_AlArabiya.ttf

    @param length: 验证码字符个数

    @param draw_lines: 是否划干扰线

    @param n_lines: 干扰线的条数范围,格式元组,默认为(1, 2),只有draw_lines为True时有效

    @param draw_points: 是否画干扰点

    @param point_chance: 干扰点出现的概率,大小范围[0, 100]

    @return: [0]: PIL Image实例

    @return: [1]: 验证码图片中的字符串

    '''

    width, height = size # 宽, 高

    img = Image.new(mode, size, bg_color) # 创建图形

    draw = ImageDraw.Draw(img) # 创建画笔

    def get_chars():

        '''生成给定长度的字符串,返回列表格式'''

        return random.sample(chars, length)

    def create_lines():

        '''绘制干扰线'''

        line_num = random.randint(*n_line) # 干扰线条数

        for i in range(line_num):

            # 起始点

            begin = (random.randint(0, size[0]), random.randint(0, size[1]))

            #结束点

            end = (random.randint(0, size[0]), random.randint(0, size[1]))

            draw.line([begin, end], fill=(0, 0, 0))

    def create_points():

        '''绘制干扰点'''

        chance = min(100, max(0, int(point_chance))) # 大小限制在[0, 100]

        for w in range(width):

            for h in range(height):

                tmp = random.randint(0, 100)

                if tmp > 100 - chance:

                    draw.point((w, h), fill=(0, 0, 0))

    def create_strs():

        '''绘制验证码字符'''

        c_chars = get_chars()

        strs = ' %s ' % ' '.join(c_chars) # 每个字符前后以空格隔开

        font = ImageFont.truetype(font_type, font_size)

        font_width, font_height = font.getsize(strs)

        draw.text(((width - font_width) / 3, (height - font_height) / 3),

                    strs, font=font, fill=fg_color)

        return ''.join(c_chars)

    if draw_lines:

        create_lines()

    if draw_points:

        create_points()

    strs = create_strs()

    # 图形扭曲参数

    params = [1 - float(random.randint(1, 2)) / 100,

              0,

              0,

              0,

              1 - float(random.randint(1, 10)) / 100,

              float(random.randint(1, 2)) / 500,

              0.001,

              float(random.randint(1, 2)) / 500

              ]

    img = img.transform(size, Image.PERSPECTIVE, params) # 创建扭曲

    img = img.filter(ImageFilter.EDGE_ENHANCE_MORE) # 滤镜,边界加强(阈值更大)

    return img, strs
check_code.py
<!DOCTYPE html>

<html lang="en">

<head>

    <meta charset="UTF-8">

    <title>Title</title>

</head>

<body>

<form action="/login" method="post">

    <p><input name="user" placeholder="用户名" type="text"></p>

    <p><input name="pwd" placeholder="密码" type="text"></p>

    <p>

      <input name="mima" placeholder="验证码" type="text" >

        <img src="/check_code" onclick='ChangeCode();' id='imgCode'>

    </p>

    <input type="submit" value="提交"><span style="color: red">{{status}}</span>

</form>

<script>

    function ChangeCode() {

        var code = document.getElementById('imgCode');

        code.src += '?';

    }

</script>

</body>

</html>
login.html

tornado框架之路二的更多相关文章
- tornado框架之路三之ajax
一.ajax 1.传统的Web应用 一个简单操作需要重新加载全局数据 2.AJAX AJAX即“Asynchronous Javascript And XML”(异步JavaScript和XML),是 ...
- tornado框架之路一
Web 服务器 每个页面都以 HTML 的形式传送到你的浏览器中,HTML 是一种浏览器用来描述页面内容和结构的语言.那些负责发送 HTML 到浏览器的应用称之为“Web 服务器”,会让你迷惑的是,这 ...
- Tornado框架简介(二)
--------------------Application-------------------- 1.settings 1.debug=True:,设置tornado是否工作在调试模式, ...
- python运维开发(二十二)---JSONP、瀑布流、组合搜索、多级评论、tornado框架简介
内容目录: JSONP应用 瀑布流布局 组合搜索 多级评论 tornado框架简介 JSONP应用 由于浏览器存在同源策略机制,同源策略阻止从一个源加载的文档或脚本获取或设置另一个源加载的文档的属性. ...
- python运维开发(二十三)---tornado框架
内容目录: 路由系统 模板引擎 cookie 加密cookie 自定义api 自定义session 自定义form表单验证 异步非阻塞 web聊天室实例 路由系统 路由系统其实就是 url 和 类 的 ...
- tornado框架&三层架构&MVC&MTV&模板语言&cookie&session
web框架的本质其实就是socket服务端再加上业务逻辑处理, 比如像是Tornado这样的框架. 有一些框架则只包含业务逻辑处理, 例如Django, bottle, flask这些框架, 它们的使 ...
- 用IntelliJ IDEA 开发Spring+SpringMVC+Mybatis框架 分步搭建二:配置MyBatis 并测试(1 构建目录环境和依赖)
引言:在用IntelliJ IDEA 开发Spring+SpringMVC+Mybatis框架 分步搭建一 的基础上 继续进行项目搭建 该部分的主要目的是测通MyBatis 及Spring-dao ...
- 第二百五十九节,Tornado框架-模板语言的三种方式
Tornado框架-模板语言的三种方式 模板语言就是可以在html页面,接收逻辑处理的self.render()方法传输的变量,将数据渲染到对应的地方 一.接收值渲染 {{...}}接收self.re ...
- web框架--tornado框架之模板引擎
使用Tornado实现一个简陋的任务表功能demo来讲解tornado框架模板引擎 一.demo目录结构 二.具体文件内容 2.1.commons.css .body{ margin: 0; back ...
随机推荐
- maven本地仓库的配置以及如何修改默认.m2仓库位置
本地仓库是远程仓库的一个缓冲和子集,当你构建Maven项目的时候,首先会从本地仓库查找资源,如果没有,那么Maven会从远程仓库下载到你本地仓库.这样在你下次使用的时候就不需要从远程下载了.如果你所需 ...
- Ansible常用模块及API
Ansible安装 安装EPEL作为安装Ansible的yum源(CentOS6.4): rpm -Uvh http://ftp.linux.ncsu.edu/pub/epel/6/i386/epel ...
- IIS SMTP status codes
Here are the meaning of SMTP status codes. Status Code Description 211 System status, or system help ...
- android studio提示unable to run mksdcard sdk
如题,android studio提示unable to run mksdcard sdk sudo apt-
- 【freemaker】之自定义变量,特殊变量 globals ,循环对象取值
entity public class Employee { private Integer id; private String name; private Integer age; private ...
- 【log】log4j
常用log4j.properties配置文件 log4j.rootLogger = info,console #指定serviceImpl层 日志输出 log4j.logger.com.sms.ser ...
- C语言每日一题之No.5
总在想,但凡编程基础正常点,都不至于惨败到这个地步.也像大多数人毕业出来,新鲜的第一份工作,如果做得好还可以略有成就感,做得一般还有提升的空间,但至少不至于像我这样基本没基础的被鄙视得一塌糊涂,被外界 ...
- W81安装记录
安装Windows 8.1之前先断网!!! 在x86的WinPE环境中安装Windows 8.1 x64的方法: 1.格式化硬盘的第一主分区C盘,将x64的ISO解压到其他分区里: 2.复制ISO解压 ...
- 黄聪:mysql 存在该记录则更新,不存在则插入记录的sql
一条mysql教程 存在该记录则更新,不存在则插入记录的sql , ‘yourname') ON DUPLICATE KEY UPDATE auto_name='yourname' ON DUPLIC ...
- jQuery Ajax 方法调用 Asp.Net WebService 以及调用aspx.cs中方法的详细例子
一.jQuery Ajax 方法调用 Asp.Net WebService (引自Terry Feng) Html文件 <!DOCTYPE html PUBLIC "-//W3C//D ...