CentOS7.3下关于DHCP中继代理服务器的详细配置
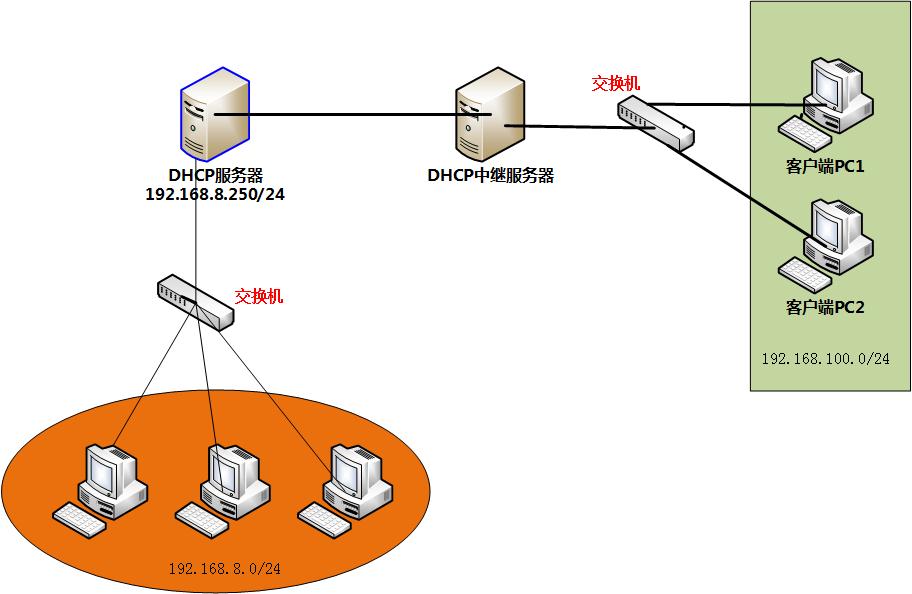
DHCP服务器只作用于局域网同一网段内,客户端是通过广播消息来获得DHCP服务器响应后才能得到IP地址的,但广播消息不能跨越子网,那么如何让客户端获取到DHCP服务器提供的IP地址呢?这就是DHCP中继服务器的功能了。
实验拓扑图:
实验环境:
DHCP服务器:CentOS Linux release 7.3.1611
DHCP中继代理:CentOS Linux release 7.3.1611
客户端:CentOS 6.9
1、DHCP服务器配置
(1)、配置DHCP服务器的网络参数
[root@host02 ~]# vi /etc/sysconfig/network-scripts/ifcfg-ens33

TYPE="Ethernet"

BOOTPROTO="static"

IPADDR=192.168.8.250

NETMASK=255.255.255.0

GATEWAY=192.168.8.254

DEFROUTE="yes"

PEERDNS="yes"

PEERROUTES="yes"

IPV4_FAILURE_FATAL="no"

IPV6INIT="yes"

IPV6_AUTOCONF="yes"

IPV6_DEFROUTE="yes"

IPV6_PEERDNS="yes"

IPV6_PEERROUTES="yes"

IPV6_FAILURE_FATAL="no"

IPV6_ADDR_GEN_MODE="stable-privacy"

NAME="ens33"

UUID="8225206d-ab64-4101-b343-35316fc76a7c"

DEVICE="ens33"

ONBOOT="yes"

~

~

~
(2)、重启网络服务
[root@host02 ~]# systemctl restart network
查看DHCP服务器IP
[root@host02 ~]# ifconfig

ens33: flags=<UP,BROADCAST,RUNNING,MULTICAST>  mtu

        inet 192.168.8.250  netmask 255.255.255.0  broadcast 192.168.8.255

        inet6 fe80::66d2:4ff4:82d6:a6e4  prefixlen   scopeid 0x20<link>

        ether :0c:::7e:d0  txqueuelen   (Ethernet)

        RX packets   bytes  (18.3 MiB)

        RX errors   dropped   overruns   frame

        TX packets   bytes  (5.6 MiB)

        TX errors   dropped  overruns   carrier   collisions

lo: flags=<UP,LOOPBACK,RUNNING>  mtu

        inet 127.0.0.1  netmask 255.0.0.0

        inet6 ::  prefixlen   scopeid 0x10<host>

        loop  txqueuelen   (Local Loopback)

        RX packets   bytes  (30.4 KiB)

        RX errors   dropped   overruns   frame

        TX packets   bytes  (30.4 KiB)

        TX errors   dropped  overruns   carrier   collisions

virbr0: flags=<UP,BROADCAST,MULTICAST>  mtu

        inet 192.168.122.1  netmask 255.255.255.0  broadcast 192.168.122.255

        ether :::f7::1e  txqueuelen   (Ethernet)

        RX packets   bytes  (432.0 B)

        RX errors   dropped   overruns   frame

        TX packets   bytes  (0.0 B)

        TX errors   dropped  overruns   carrier   collisions
(3) 安装DHCP服务
[root@host02 ~]# yum install dhcp

[root@host02 ~]# rpm -qa dhcp

dhcp-4.2.-.el7.centos.x86_64
(4)编辑DHCP服务器的配置文件
[root@host02 ~]# vi dhcpd.conf

#dhcp configuration

#整体环境设置

ddns-update-style  none;

ignore client-updates;

default-lease-time  ;

max-lease-time     ;

option routers  192.168.8.254;

option domain-name    "centos.me";

option  domain-name-servers  202.102.224.68,202.102.227.68;

#二个网段IP分配

subnet  192.168.8.0 netmask 255.255.255.0 {

    range  192.168.8.200 192.168.8.210;

    option subnet-mask  255.255.255.0;

    option routers 192.168.8.1;

    }

subnet 192.168.100.0 netmask 255.255.255.0 {

        range 192.168.100.80  192.168.100.100;

        option subnet-mask 255.255.255.0;

        option routers 192.168.100.1;

}
将编辑好的DHCP配置文件覆盖初装后的空白配置文件;
[root@host02 ~]# cp dhcpd.conf  /etc/dhcp/dhcpd.conf

cp: overwrite ‘/etc/dhcp/dhcpd.conf’? y
(5)启动DHCP服务,并检查状态;
[root@host02 ~]# systemctl start dhcpd

[root@host02 ~]# systemctl status dhcpd

● dhcpd.service - DHCPv4 Server Daemon

   Loaded: loaded (/usr/lib/systemd/system/dhcpd.service; disabled; vendor preset: disabled)

   Active: active (running) since Thu -- :: CST; 6s ago

     Docs: man:dhcpd()

           man:dhcpd.conf()

 Main PID:  (dhcpd)

   Status: "Dispatching packets..."

   CGroup: /system.slice/dhcpd.service

           └─ /usr/sbin/dhcpd -f -cf /etc/dhcp/dhcpd.conf -user dhcpd -group dhcpd --no-pid

Aug  :: host02.linux.com dhcpd[]: No subnet declaration for virbr0 (192.168.122.1).

Aug  :: host02.linux.com dhcpd[]: ** Ignoring requests on virbr0.  If this is not what

Aug  :: host02.linux.com dhcpd[]:    you want, please write a subnet declaration

Aug  :: host02.linux.com dhcpd[]:    in your dhcpd.conf file for the network segment

Aug  :: host02.linux.com dhcpd[]:    to which interface virbr0 is attached. **

Aug  :: host02.linux.com dhcpd[]:

Aug  :: host02.linux.com dhcpd[]: Listening on LPF/ens33/:0c:::7e:d0/192.168.8.0/

Aug  :: host02.linux.com dhcpd[]: Sending on   LPF/ens33/:0c:::7e:d0/192.168.8.0/

Aug  :: host02.linux.com dhcpd[]: Sending on   Socket/fallback/fallback-net

Aug  :: host02.linux.com systemd[]: Started DHCPv4 Server Daemon.

[root@host02 ~]# netstat -tunlp |grep dhcp

udp               0.0.0.0:              0.0.0.0:*                           /dhcpd

udp               0.0.0.0:           0.0.0.0:*                           /dhcpd

udp6              :::                 :::*                                /dhcpd
DHCP服务器一切正常!至此DHCP服务器的配置已经完成;下一步配置DHCP中继代理服务器。
2、配置DHCP中继服务器
(1)、做为中继服务器首先要确保有两张网卡,否则没法中继;
本实验我已经在中继服务器上虚拟出两个网卡;
[root@host-a ~]# lspci |grep ethernet

[root@host-a ~]# lspci |grep Ethernet

:01.0 Ethernet controller: Intel Corporation 82545EM Gigabit Ethernet Controller (Copper) (rev )

:05.0 Ethernet controller: Intel Corporation 82545EM Gigabit Ethernet Controller (Copper) (rev )
(2)查看网卡信息
[root@host-a ~]# ifconfig

ens33: flags=<UP,BROADCAST,RUNNING,MULTICAST>  mtu

        ether :0c::a9::dd  txqueuelen   (Ethernet)

        RX packets   bytes  (561.4 KiB)

        RX errors   dropped   overruns   frame

        TX packets   bytes  (78.5 KiB)

        TX errors   dropped  overruns   carrier   collisions

ens37: flags=<UP,BROADCAST,RUNNING,MULTICAST>  mtu

        ether :0c::a9::e7  txqueuelen   (Ethernet)

        RX packets   bytes  (2.8 KiB)

        RX errors   dropped   overruns   frame

        TX packets   bytes  (68.6 KiB)

        TX errors   dropped  overruns   carrier   collisions

lo: flags=<UP,LOOPBACK,RUNNING>  mtu

        inet 127.0.0.1  netmask 255.0.0.0

        inet6 ::  prefixlen   scopeid 0x10<host>

        loop  txqueuelen   (Local Loopback)

        RX packets   bytes  (12.5 KiB)

        RX errors   dropped   overruns   frame

        TX packets   bytes  (12.5 KiB)

        TX errors   dropped  overruns   carrier   collisions

virbr0: flags=<UP,BROADCAST,MULTICAST>  mtu

        inet 192.168.122.1  netmask 255.255.255.0  broadcast 192.168.122.255

        ether :::7a:2c:f4  txqueuelen   (Ethernet)

        RX packets   bytes  (0.0 B)

        RX errors   dropped   overruns   frame

        TX packets   bytes  (0.0 B)

        TX errors   dropped  overruns   carrier   collisions
(2)接下来分别配置这两个网卡的网络参数
网卡ens33与DHCP服务器相连,属于192.168.8.0/24网段,注意网卡ens33的IP地址是DHCP服务器的网关地址,
配置如下:
[root@host-a ~]# vi /etc/sysconfig/network-scripts/ifcfg-ens33

TYPE="Ethernet"

BOOTPROTO="static"

IPADDR=192.168.8.254

NETMASK=255.255.255.0

DEFROUTE="yes"

PEERDNS="yes"

PEERROUTES="yes"

IPV4_FAILURE_FATAL="no"

IPV6INIT="yes"

IPV6_AUTOCONF="yes"

IPV6_DEFROUTE="yes"

IPV6_PEERDNS="yes"

IPV6_PEERROUTES="yes"

IPV6_FAILURE_FATAL="no"

IPV6_ADDR_GEN_MODE="stable-privacy"

NAME="ens33"

UUID="065ff1ad-9117-4cf4-a716-c61d5fdc0c00"

DEVICE="ens33"

ONBOOT="yes"
网卡ens37与192.168.100.0/24网段相连,注意网卡ens37的IP地址是192.168.100.0/24网段的网关地址,配置如下:
[root@host-a ~]# cat /etc/sysconfig/network-scripts/ifcfg-ens37

TYPE=Ethernet

BOOTPROTO=static

IPADDR=192.168.100.1

PREFIX=

DEFROUTE=yes

IPV4_FAILURE_FATAL=no

IPV6INIT=yes

IPV6_AUTOCONF=yes

IPV6_DEFROUTE=yes

IPV6_PEERDNS=yes

IPV6_PEERROUTES=yes

IPV6_FAILURE_FATAL=no

IPV6_ADDR_GEN_MODE=stable-privacy

NAME="ens37"

UUID=e3854409-f832-4d4c-b7ae-271d0aa5ecc5

ONBOOT=yes
(3)配置好后,重起网络服务使设置生效
[root@host-a ~]# systemctl restart network

[root@host-a ~]# ifconfig

ens33: flags=<UP,BROADCAST,RUNNING,MULTICAST>  mtu

        inet 192.168.8.254  netmask 255.255.255.0  broadcast 192.168.8.255

        inet6 fe80::f31:c380:a398:1df6  prefixlen   scopeid 0x20<link>

        ether :0c::a9::dd  txqueuelen   (Ethernet)

        RX packets   bytes  (562.4 KiB)

        RX errors   dropped   overruns   frame

        TX packets   bytes  (91.6 KiB)

        TX errors   dropped  overruns   carrier   collisions

ens37: flags=<UP,BROADCAST,RUNNING,MULTICAST>  mtu

        inet 192.168.100.1  netmask 255.255.255.0  broadcast 192.168.100.255

        inet6 fe80:::4bde:b57c:957d  prefixlen   scopeid 0x20<link>

        ether :0c::a9::e7  txqueuelen   (Ethernet)

        RX packets   bytes  (2.8 KiB)

        RX errors   dropped   overruns   frame

        TX packets   bytes  (76.6 KiB)

        TX errors   dropped  overruns   carrier   collisions

lo: flags=<UP,LOOPBACK,RUNNING>  mtu

        inet 127.0.0.1  netmask 255.0.0.0

        inet6 ::  prefixlen   scopeid 0x10<host>

        loop  txqueuelen   (Local Loopback)

        RX packets   bytes  (12.5 KiB)

        RX errors   dropped   overruns   frame

        TX packets   bytes  (12.5 KiB)

        TX errors   dropped  overruns   carrier   collisions

virbr0: flags=<UP,BROADCAST,MULTICAST>  mtu

        inet 192.168.122.1  netmask 255.255.255.0  broadcast 192.168.122.255

        ether :::7a:2c:f4  txqueuelen   (Ethernet)

        RX packets   bytes  (0.0 B)

        RX errors   dropped   overruns   frame

        TX packets   bytes  (0.0 B)

        TX errors   dropped  overruns   carrier   collisions
(4)安装DHCP
#安装

[root@host-a network-scripts]# yum install dhcp

#安装成功

[root@host-a network-scripts]# rpm -qa dhcp

dhcp-4.2.-.el7.centos.x86_64

#注意dhcp包含dhcp中继服务

[root@host-a ~]# rpm -ql dhcp |grep dhcrelay

/usr/lib/systemd/system/dhcrelay.service

/usr/sbin/dhcrelay

/usr/share/man/man8/dhcrelay..gz
(5)打开DHCP中继服务器路由转发功能
编辑/etc/sysctl.conf 文件在文件添加一行内容为:
“net.ipv4.ip_forward=1”
开启路由转发功能
[root@host-a ~]# vi /etc/sysctl.conf

# sysctl settings are defined through files in

# /usr/lib/sysctl.d/, /run/sysctl.d/, and /etc/sysctl.d/.

#

# Vendors settings live in /usr/lib/sysctl.d/.

# To override a whole file, create a new file with the same in

# /etc/sysctl.d/ and put new settings there. To override

# only specific settings, add a file with a lexically later

# name in /etc/sysctl.d/ and put new settings there.

#

# For more information, see sysctl.conf() and sysctl.d().

net.ipv4.ip_forward =
使设置立即生效,执行以下命令:
[root@host-a ~]# sysctl -p
net.ipv4.ip_forward = 1
查看内核参数设置,确认生效;
[root@host-a ~]# sysctl -a |grep ip_forward
net.ipv4.ip_forward = 1
net.ipv4.ip_forward_use_pmtu = 0
[root@host-a ~]#
(6)开启DHCP中继服务
[root@host-a ~]# dhcrelay 192.168.8.250

Dropped all unnecessary capabilities.

Internet Systems Consortium DHCP Relay Agent 4.2.

Copyright - Internet Systems Consortium.

All rights reserved.

For info, please visit https://www.isc.org/software/dhcp/

Listening on LPF/virbr0/:::7a:2c:f4

Sending on   LPF/virbr0/:::7a:2c:f4

Listening on LPF/ens37/:0c::a9::e7

Sending on   LPF/ens37/:0c::a9::e7

Listening on LPF/ens33/:0c::a9::dd

Sending on   LPF/ens33/:0c::a9::dd

Sending on   Socket/fallback

[root@host-a ~]#

[root@host-a ~]# netstat -tunlp |grep dhcrelay

udp               0.0.0.0:           0.0.0.0:*                           /dhcrelay

udp               0.0.0.0:              0.0.0.0:*                           /dhcrelay

udp6              :::                :::*                                /dhcrelay
3、客户端测试
(1)配置客户端网络为自动获取IP


(2)重启网络服务

(3)查看IP
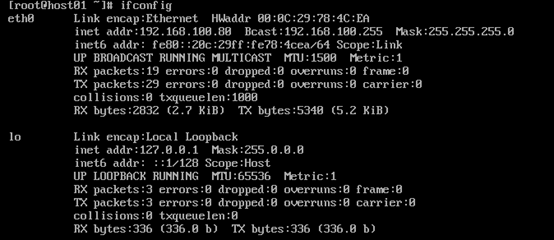
(4)查看客户端在重启网络时都做了什么

(5)查看DHCP服务器日志文件
[root@host02 ~]# tail -n   /var/log/messages

Aug  :: host02 systemd: Stopping user-.slice.

Aug  :: host02 dhcpd: DHCPREQUEST for 192.168.6.6 from :0c:::4c:ea via 192.168.100.1: ignored (not authoritative).

Aug  :: host02 dhcpd: DHCPREQUEST for 192.168.6.6 from :0c:::4c:ea via 192.168.100.1: ignored (not authoritative).

Aug  :: host02 dhcpd: DHCPDISCOVER from :0c:::4c:ea via 192.168.100.1

Aug  :: host02 dhcpd: DHCPOFFER on 192.168.100.80 to :0c:::4c:ea (host01) via 192.168.100.1

Aug  :: host02 dhcpd: DHCPREQUEST for 192.168.100.80 (192.168.8.250) from :0c:::4c:ea (host01) via 192.168.100.1

Aug  :: host02 dhcpd: DHCPACK on 192.168.100.80 to :0c:::4c:ea (host01) via 192.168.100.1

Aug  :: host02 dhcpd: DHCPREQUEST for 192.168.100.80 (192.168.8.250) from :0c:::4c:ea (host01) via 192.168.100.1

Aug  :: host02 dhcpd: DHCPACK on 192.168.100.80 to :0c:::4c:ea (host01) via 192.168.100.1
(6)检查客户端获取的DNS是否正确

DNS与DHCP服务器设置的一致!
可以看到客户端已经可以正常获取DHCP服务器设置的网络参数了!!
CentOS7.3下关于DHCP中继代理服务器的详细配置的更多相关文章
- [moka同学笔记]window下redis的安装以及php-redis详细配置(摘录)
(注意对应的版本)下载地址:https://github.com/phpredis/phpredis/downloads 首先下载redis安装,windows下安装软件都是下一步下一步over,就不 ...
- 7、二种 为二个不同的子网配置DHCP服务器(中继代理服务器)
环境如下: (参考之前,保证二个子网可以互相ping通) 虚拟机vm1 192.168.170.3 VMnet8 (NAT模式) 虚拟 ...
- 启用DHCP中继代理,实现跨子网服务 - Win 2003 Server
伴随着局域网规模的逐步扩大,一个网络常常会被划分成多个不同的子网,以便根据不同子网的工作要求来实现个性化的管理要求.考虑到规模较大的局域网一般会使用DHCP服务器来为各个工作站分配IP地址,不过一旦局 ...
- H3C的DHCP中继配置命令
dhcp enable命令用来使能DHCP服务 dhcp relay information enable 命令用来配置DHCP中继支持Option 82功能 缺省情况下,DHCP中继不支持Optio ...
- DHCP配置实例(含DHCP中继代理)
https://blog.51cto.com/yuanbin/109759. DHCP配置实例(含DHCP中继代理) 某公司局域网有192.168.1.0/24和192.168.2.0/24这两个 ...
- 配置DHCP中继
本实验模拟企业网络场景.某公司分部的网络由交换机S1和网关路由器R1组成,员工终端PC-1和PC-2都连接在S1上.公司要求分部内所有员工主机的IP地址都通过总部的DHCP服务器自动获取.分部网关路由 ...
- 网络拓扑实例之交换机处于同一网络作为DHCP中继与服务器(八)
组网图形 DHCP中继简介 DHCP中继用于在DHCP服务器和客户端之间转发DHCP报文.当DHCP服务器与客户端不在同一个网段时,需要配置DHCP中继.对于DHCP客户端来说,DHCP中继就是DHC ...
- 中兴交换机基础配置(备份、dhcp中继、monitor)
1. 备份配置 格式: copy tftp/sftp/ftp [vrf mng] root: 本地文件 远端文件 1. 通过tftp进行备份,vrf mng表示指定使用管理口链路连接 copy tft ...
- 如何搭建DHCP及DHCP中继服务器
当局域网中有大量的主机时,如果逐台设置ip地址.默认网关.dns服务器地址时等网络参数,显然是一个费力也未必讨好的方法,这时使用DHCP的方式分发ip地址,能够动态配置各客户机的网络地址参数,大大减轻 ...
随机推荐
- LUNA16数据集的百度云链接
可能需要会员链接:https://pan.baidu.com/s/1KTjoGKfLB_1Y-BQzerhGgg 提取码:g901
- CRF++使用步骤
1.将CRF++文件的压缩包解压后添加到java的工程目录下 2.使用前必须生成train.data和test.data 文件并放到crf_learn.exe的同级目录下 3.cmd进入目标位置,其中 ...
- Python迭代器生成器,模块和包
1.迭代器和生成器 2.模块和包 1.迭代器 迭代器对象要求支持迭代器协议的对象,在Python中,支持迭代器协议就是实现对象的__iter__()和__next__()方法. 其中__it ...
- 单片机关键字sfr和sbit的理解
在单片机C语言编程中,扩充了两个关键字sfr和sbit.sfr(Special Function Register特殊功能寄存器的缩写),sbit(特殊功能寄存器位),与定义一般的int.char型变 ...
- JDK Throwable
Throwable 1. 使用大量数组和List常量: private static final StackTraceElement[] UNASSIGNED_STACK = new StackTra ...
- 搭建element-ui Vue结构
1.安装淘宝镜像 npm install cnpm -g --registry=https://registry.npm.taobao.org 2.安装webpack cnpm install web ...
- 删除重复数据,保留一条ID最小的
SELECT * from TBCITY_Temp where code in ( select code from TBCITY_Temp group by code hav ...
- idea导入servlet项目
转载:https://www.cnblogs.com/qiyebao/p/6236012.html
- POI 读大文件日志
POI的三个目录 usermodel 包含很多类,方便用户使用,但是占用内存大 eventusermodel 使用xml的SAX事件解析,XSSFReader创建时必须使用OPCPackage,pkg ...
- java——抽象类、接口、二者区别
抽象类: 抽象方法:不包含方法体的方法为抽象方法,抽象方法必须使用abstract关键字来修饰: abstract void method(); 抽象类:当一个类中包含了抽象方法时,该类必须使用abs ...