IdentityServer4 学习笔记[2]-用户名密码验证
回顾
上一篇介绍了IdentityServer4客户端授权的方式,今天来看看IdentityServer4的基于密码验证的方式,与客户端验证相比,主要是配置文件调整一下,让我们来看一下
配置修改
public static class Config

    {

        public static List<TestUser> GetUsers()

        {

            return new List<TestUser>

            {

                new TestUser

                {

                    SubjectId = "1",

                    Username = "alice",

                    Password = "password"

                },

                new TestUser

                {

                    SubjectId = "2",

                    Username = "bob",

                    Password = "password"

                }

            };

        }

        public static IEnumerable<IdentityResource> GetIdentityResources()

        {

            return new IdentityResource[]

            {

                new IdentityResources.OpenId()

            };

        }

        public static IEnumerable<ApiResource> GetApis()

        {

            return new List<ApiResource>

            {

                new ApiResource("api1", "My API")

            };

        }

        public static IEnumerable<Client> GetClients()

        {

            return new List<Client>

            {

                new Client

                {

                    ClientId = "client",

                    // no interactive user, use the clientid/secret for authentication

                    AllowedGrantTypes = GrantTypes.ClientCredentials,

                    // secret for authentication

                    ClientSecrets =

                    {

                        new Secret("secret".Sha256())

                    },

                    // scopes that client has access to

                    AllowedScopes = { "api1" }

                },

                // resource owner password grant client

                new Client

                {

                    ClientId = "ro.client",

                    AllowedGrantTypes = GrantTypes.ResourceOwnerPassword,

                    ClientSecrets =

                    {

                        new Secret("secret".Sha256())

                    },

                    AllowedScopes = { "api1" }

                }

            };

        }

    }
通过上面的代码,与客户端授权方式相比,多了两个东西,一个是GetClients()方法中增加了一个Client,授权方式为资源拥有者密码的模式,另一个是增加了一个方法GetUsers(),真实场景中TestUser一般使用Asp.NetCore.Identity的用户,这里暂时使用TestUser来测试,IdentityServer4不是用户管理系统,它是授权框架(发放令牌的)
注册用户
在Startup中,把TestUser也添加上
public void ConfigureServices(IServiceCollection services)

{

    services.AddIdentityServer()

       .AddDeveloperSigningCredential()

       .AddInMemoryClients(Config.GetClients())

       .AddInMemoryApiResources(Config.GetApis())

       .AddInMemoryIdentityResources(Config.GetIdentityResources())

       .AddTestUsers(Config.GetUsers());

}
新建测试Api项目

可以选择删除IIS的设置,与前一篇文章的操作一致,并修改端口号为5001(Api资源服务地址)
并新增一个控制器IdentityController,继承自ControllerBase
[Route("identity")]

[Authorize]

public class IdentityController : ControllerBase

{

    public IActionResult Get()

    {

        return new JsonResult(from c in User.Claims select new { c.Type, c.Value });

    }

}
注意到IdentityController控制器类上有个特性[Authorize],这个代表这个控制器需要验证OK后才能访问,如果没有[Authorize]就说明访问不需要授权,在Get方法中这么写是为了获取到用户的身份信息,也就是Bearer Token中所包含的用户信息,当然也可以从Cookie中获取,我们使用Bearer Token的方式,以便照顾有移动客户端的场景
配置Api项目
public class Startup

{

    public void ConfigureServices(IServiceCollection services)

    {

        services.AddMvcCore()

            .AddAuthorization()

            .AddJsonFormatters();

            ///这里使用5000端口的授权服务端来验证

            services.AddAuthentication("Bearer")

            .AddJwtBearer("Bearer", options =>

            {

                options.Authority = "http://localhost:5000";

                options.RequireHttpsMetadata = false;

                options.Audience = "api1";

            });

        }

        public void Configure(IApplicationBuilder app)

        {

            ///这句别忘了,启用验证

            app.UseAuthentication();

            app.UseMvc();

        }

    }
启动
解决方案右键选择属性菜单并打开,设置启动方式,选择多个启动项目,启动,让两个服务都运行起来

验证测试
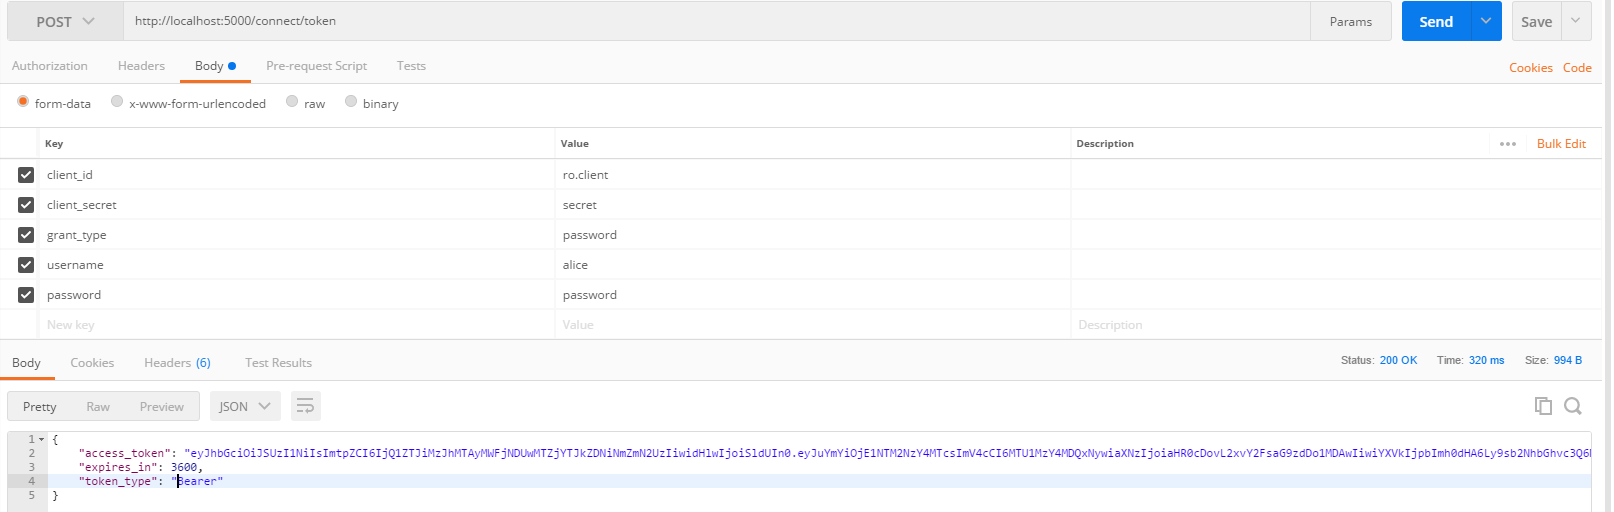
打开Postman,填入参数,提交,获取Token
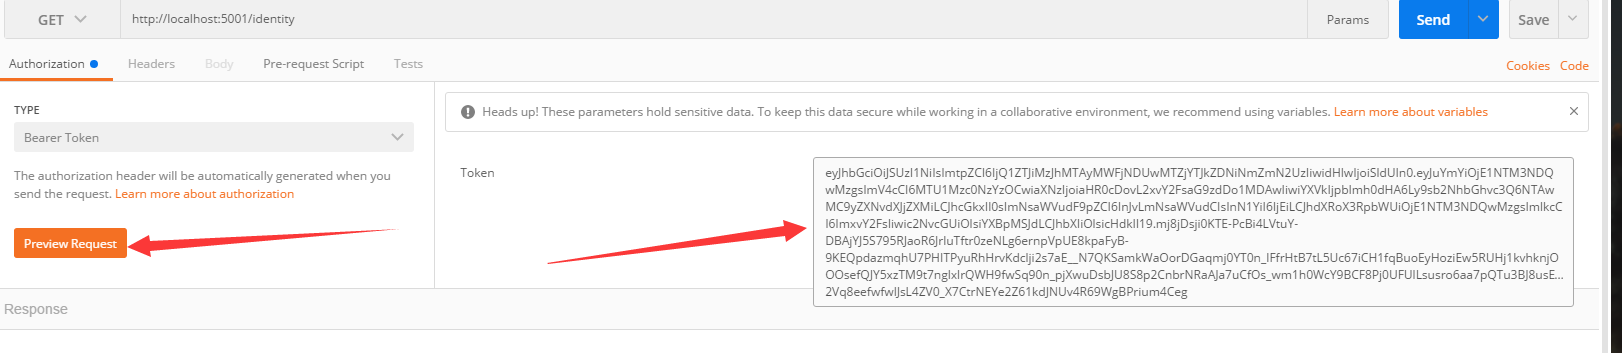
拿到Token后,到5001地址去执行http://localhost:5001/identity,选择Bearer Token,把刚才获取到的Token填入,并点击红色按钮
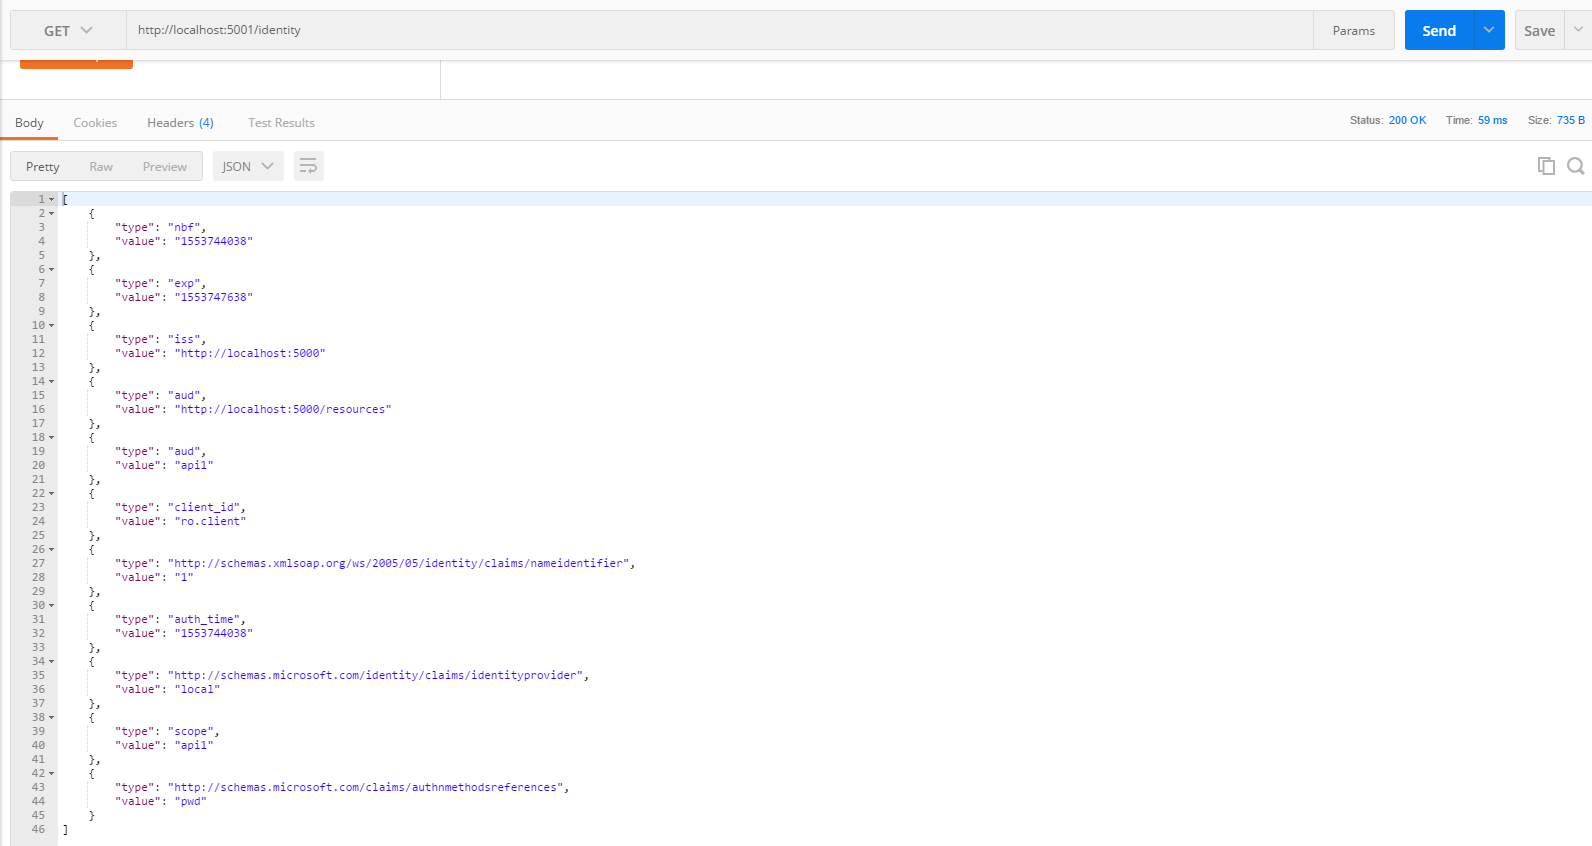
点击Send 按钮后,Api执行成功
如果不填写Token,或者故意将Token填错将返回401,未授权错误

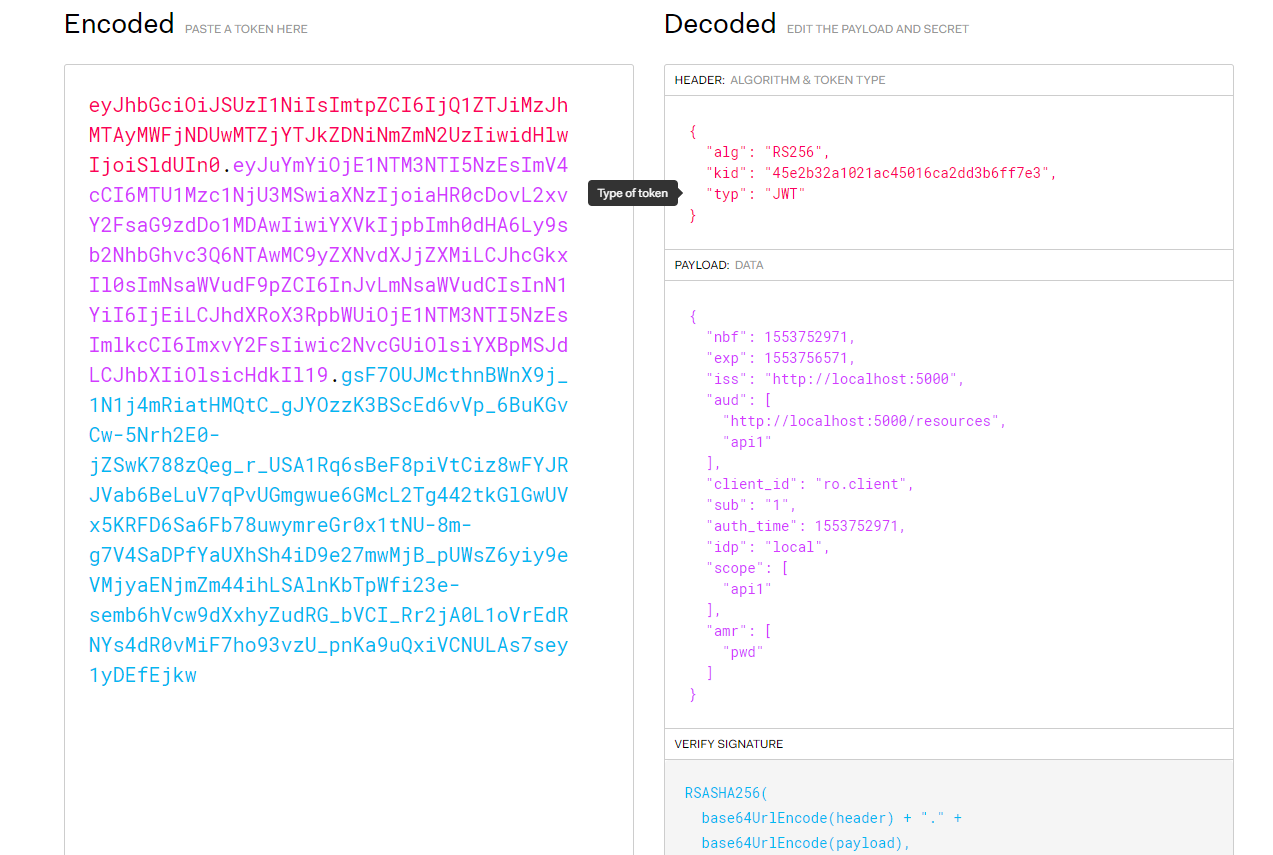
打开网址(https://jwt.io/),把Token复制进去,解析一下看看,与客户端授权方式相比,多了一个Sub
进一步思考
IdentityServer4应该有可以获取到用户信息的端口,我们从之前的发现端点里也能猜到一些,那我们拿着刚刚获取到的Token去这个端点获取下试试看

那我们就用Postman测试下,填写http://localhost:5000/connect/userinfo,使用Get
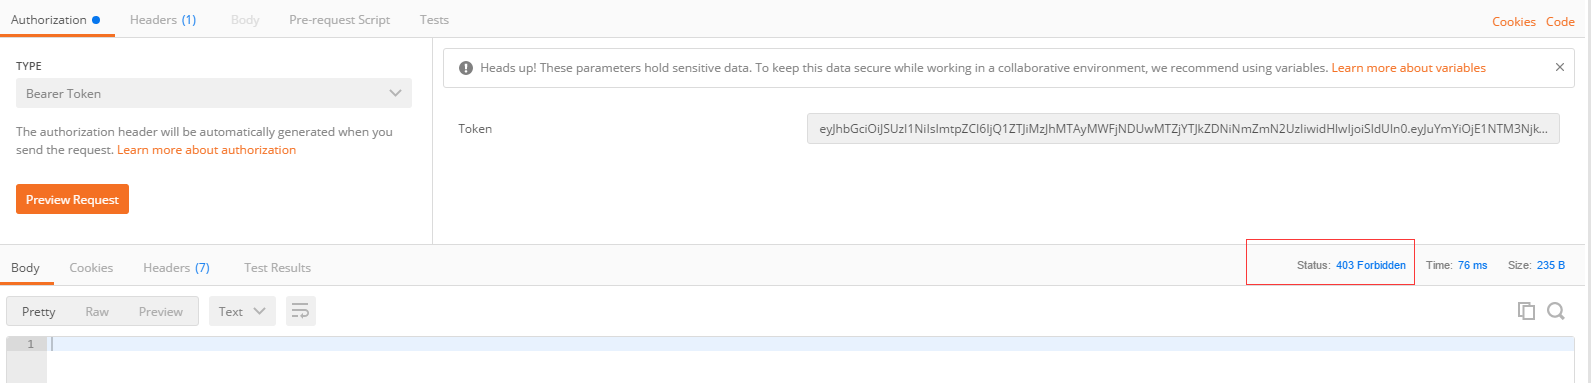
从上图可以看出,报403了,被拒绝访问了,可能哪里出了问题,经过一番搜索,授权服务端Config里GetClients()方法里ro.client这个用户,有个AllowedScopes = { "api1"},这里的权限可能不足
如下所示
 // resource owner password grant client

    new Client

    {

        ClientId = "ro.client",

        AllowedGrantTypes = GrantTypes.ResourceOwnerPassword,

        ClientSecrets =

        {

            new Secret("secret".Sha256())

        },

        AllowedScopes = { "api1"}

    }
调整后,允许的权限如下
AllowedScopes = { "api1",IdentityServerConstants.StandardScopes.OpenId}
...期间重复的步骤省略,再次获取一次看看
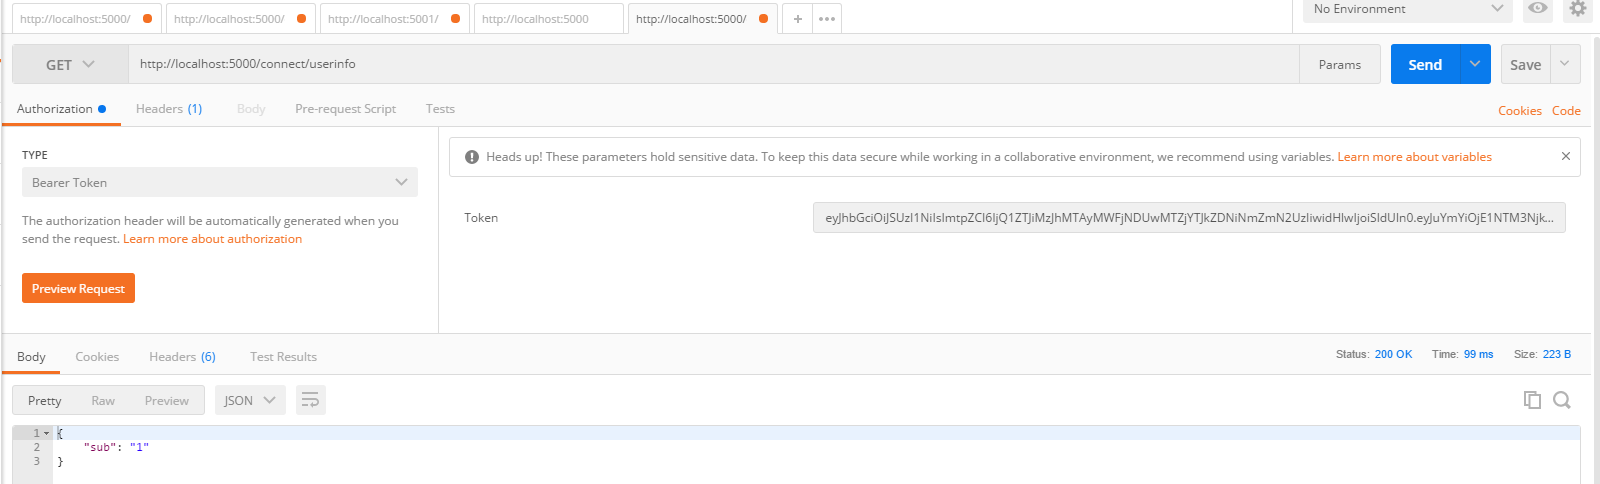
这次OK了,看到一个sub,这个也貌似对应着TestUser里的SubjectId,这个是用户的唯一编号
 new TestUser

                {

                    SubjectId = "1",

                    Username = "alice",

                    Password = "password",

                },
但是如果我想返回更多的用户信息怎么办呢,比如返回用户的电话号码,Email,以及自定义的类似组织等信息,应该如何处理呢,那我们给用户增加些身份(Claim)信息
public static List<TestUser> GetUsers()

{

    return new List<TestUser>

    {

        new TestUser

        {

            SubjectId = "1",

            Username = "alice",

            Password = "password",

            Claims = new Claim[]

            {

                new Claim(JwtClaimTypes.NickName,"Sarco"),

                new Claim(JwtClaimTypes.GivenName,"SarcoTest"),

                new Claim(JwtClaimTypes.PhoneNumber,"186221085730"),

                new Claim("org_code","3210")

            }

        },

        new TestUser

        {

            SubjectId = "2",

            Username = "bob",

            Password = "password"

        }

    };

}
我们增加了四项身份信息,NickName,GivenName,PhoneNumber和OrgCode,其中第四项是自定义的,
同时修改下Client的AllowedScopes
new Client

{

    ClientId = "ro.client",

    AllowedGrantTypes = GrantTypes.ResourceOwnerPassword,

    ClientSecrets =

    {

        new Secret("secret".Sha256())

    },

    AllowedScopes = { "api1",IdentityServerConstants.StandardScopes.OpenId,

    IdentityServerConstants.StandardScopes.Profile},

}
再次获取Token

会发现报错了,上面scope我没有填写,和之前的一样,但是报错了,如果填写上,如api 或者 openid,可以成功,那看看不填有没有办法呢,经过一番研究,Config里GetIdentityResources()方法增加一项new IdentityResources.Profile()就可以了。
public static IEnumerable<IdentityResource> GetIdentityResources()

        {

            return new IdentityResource[]

            {

                new IdentityResources.OpenId(),

                new IdentityResources.Profile()

            };

        }
再次获取下Token,并且根据Token再次获取用户信息
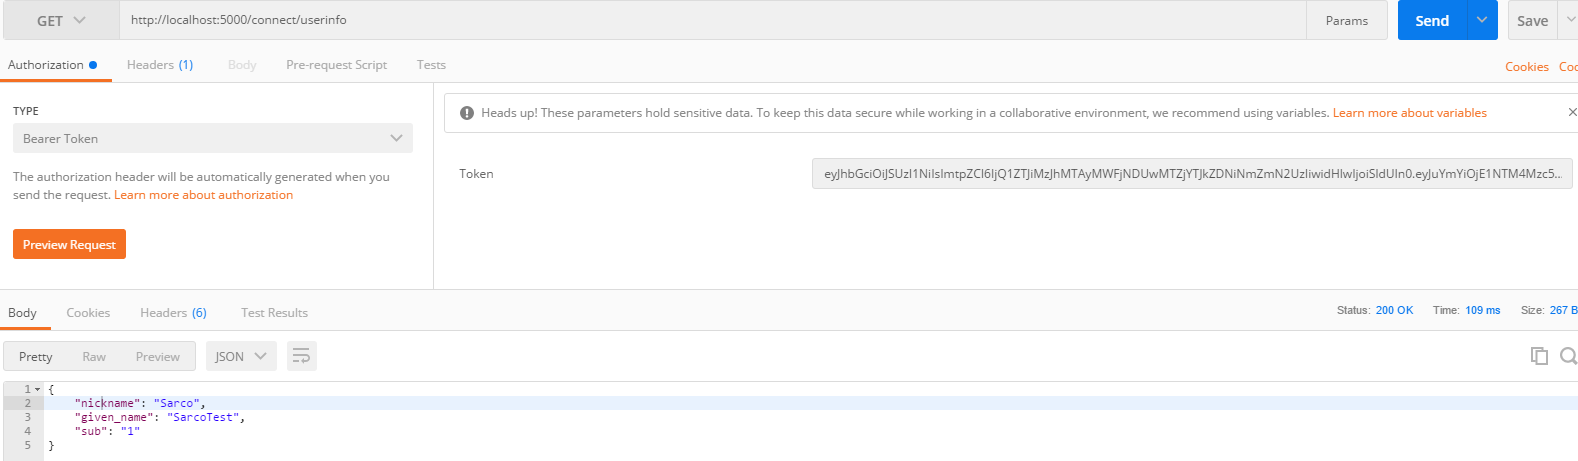
会发现,现在nickname和given_name有了,但是phone_number和org_code还是没有
报错原因:GetIdentityResources()方法添加后,只是说现在授权资源里包含Profile了,但是在GetClients()方法里的AllowedScopes里并不包含,所以报错
那么phone_number和org_code怎么没有出现呢?

我们看下Profile的范围,根据说明,它包含终端用户的默认身份信息有name,family_name,given_name,family_name,middle_name,nick_name,preferred_username,profile,picture,website,gender,birthdate,zoneinfo,locate and updated_at,也就是可以这么说,这么多的身份信息都属于Profile这个组里面,因为之前的用户信息里,我只添加了四项
new Claim(JwtClaimTypes.NickName,"Sarco"),

new Claim(JwtClaimTypes.GivenName,"SarcoTest"),

new Claim(JwtClaimTypes.PhoneNumber,"186221085730"),

new Claim("org_code","3210")
其中NickName和GivenName是属于Profile组的,所以,当客户的AllowedScopes里包含IdentityServerConstants.StandardScopes.Profile时,nick_name和given_name会显示出来,而PhoneNumber不属于Profile里,所以不会返回显示,自定义的组织信息肯定也无法获取到,还记得我前面说的
经过一番研究,Config里GetIdentityResources()方法增加一项new IdentityResources.Profile()就可以了,这是为什么呢?
记得之前获取Token的时候,Scope不填写的时候会报错,而填api或者openid就不会报错,是因为如果不填写,授权服务端就会从CliendId为"ro.client"的客户端拥有的Scope里全找一次,而我们一开始AllowedScopes里面包含了
IdentityServerConstants.StandardScopes.Profile,但是在GetIdentityResources()方法里没有添加new IdentityResources.Profile(),所以执行到获取Scope为IdentityServerConstants.StandardScopes.Profile时,由于找不到这项的IdentityResources,所以失败了,但是获取Token的时候填写api或者openid时,精确查找,由于AllowScopes和GetIdentityResources()都有,所以可以成功,这里可以这么说,AllowedScopes里的项必须在GetIdentityResources()或者GetApis()里里面要有
理解了这一点后,那我们调整下代码让自定义的org_code返回
public static IEnumerable<IdentityResource> GetIdentityResources()

{

    return new IdentityResource[]

    {

        new IdentityResources.OpenId(),

        new IdentityResources.Profile(),

        new IdentityResources.Phone(),

        new IdentityResource("org","组织代码",new string[]{"org_code" })

    };

}

public static IEnumerable<Client> GetClients()

        {

            return new List<Client>

            {

                new Client

                {

                    ClientId = "client",

                    // no interactive user, use the clientid/secret for authentication

                    AllowedGrantTypes = GrantTypes.ClientCredentials,

                    // secret for authentication

                    ClientSecrets =

                    {

                        new Secret("secret".Sha256())

                    },

                    // scopes that client has access to

                    AllowedScopes = { "api1" }

                },

                // resource owner password grant client

                new Client

                {

                    ClientId = "ro.client",

                    AllowedGrantTypes = GrantTypes.ResourceOwnerPassword,

                    ClientSecrets =

                    {

                        new Secret("secret".Sha256())

                    },

                    ///org代表GetIdentityResources()里的自定义new IdentityResource("org","组织代码",new string[]{"org_code" }),而org_code代表用户Claims里的new Claim("org_code","3210")

                    AllowedScopes = { "api1",IdentityServerConstants.StandardScopes.OpenId,

                        IdentityServerConstants.StandardScopes.Profile,"org"},

                }

            };

        }
调整后,再用postman获取Token,然后从http://localhost:5000/connect/userinfo里获取下用户信息
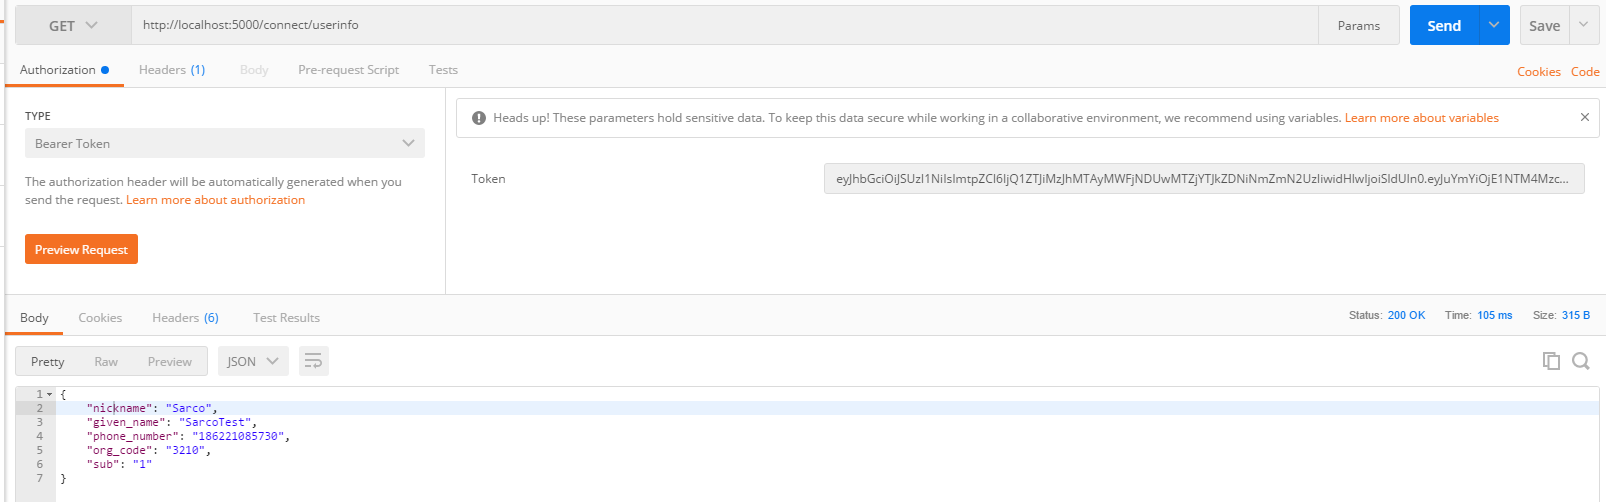
顺利的获取到了phone_number,org_code等信息
总结
IdentityResource与TestUser中的Claims的关系
TestUser中的多项Claim可以成为一个IdentityResource的一个项,也就是可以创建一个IdentityResource,包含User中的一个和多个Claim信息,类似于教师证里面包含工号和职位等多个相关信息
Client的AllowedScopes与IdentityResource以及ApiResource的关系
Client的AllowedScopes中的项必须在IdentityResource或者ApiResource中能找到,否则也会报错,ApiResource代表Api资源,IdentityResource项代表能访问用户身份信息包含哪些信息
IdentityServer4 学习笔记[2]-用户名密码验证的更多相关文章
- SQL反模式学习笔记20 明文密码
目标:恢复或重置密码 反模式:使用明文存储密码 1.存储密码 使用明文存储密码或者在网络上传递密码是不安全的. 如果攻击者截取到你用来插入(或者修改)密码的sql语句,就可以获得密码. 黑客获 ...
- 【WCF】使用“用户名/密码”验证的合理方法
我不敢说俺的方法是最佳方案,反正这世界上很多东西都是变动的,正像老子所说的——“反(返)者,道之动”.以往看到有些文章中说,为每个客户端安装证书嫌麻烦,就直接采用把用户名和密码塞在SOAP头中发送,然 ...
- WCF 安全性之 自定义用户名密码验证
案例下载 http://download.csdn.net/detail/woxpp/4113172 客户端调用代码 通过代理类 代理生成 参见 http://www.cnblogs.com/woxp ...
- OpenVPN使用用户名/密码验证方式
OpenVPN推荐使用证书进行认证,安全性很高,但是配置起来很麻烦.还好它也能像pptp等vpn一样使用用户名/密码进行认证. 不管何种认证方式,服务端的ca.crt, server.crt, ser ...
- 【WCF】Silverlight+wcf+自定义用户名密码验证
本文摘自 http://www.cnblogs.com/virusswb/archive/2010/01/26/1656543.html 在昨天的博文Silverlight3+wcf+在不使用证书的情 ...
- WebService 用户名密码验证
原文:WebService 用户名密码验证 在项目开发的过程中,WebService是经常要用的,当调用WebService方法时,需要经过服务的验证才可以调用,一般就是用户名/密码验证,还有一个就是 ...
- WCF服务安全控制之netTcpBinding的用户名密码验证【转】
选择netTcpBinding WCF的绑定方式比较多,常用的大体有四种: wsHttpBinding basicHttpBinding netTcpBinding wsDualHttpBinding ...
- WCF用户名密码验证方式
WCF使用用户名密码验证 服务契约 namespace WCFUserNameConstract { [ServiceContract] public interface IWcfContract { ...
- 自定义实现wcf的用户名密码验证
目前wcf分为[传输层安全][消息层安全]两种,本身也自带的用户名密码验证的功能,但是ms为了防止用户名密码明文在网络上传输,所以,强制要求一旦使用[用户名密码]校验功能,则必须使用证书,按照常理讲, ...
随机推荐
- C语言在32位和64位机器下数字数据类型的字节数取决于编译器和平台, 主要由编译器决定。
C语言中数字数据类型的字节数 C声明 32位机器 64位机器 char 1 1 short int 2 2 int 4 4 //整型在32位和64位下都是4个字节 long int 4 8 l ...
- CGContextRef详解
/* CoreGraphics - CGContext.h */ /** Graphics state functions. **/ //为了让开发者在进行坐标变换时无须计算多次坐标变换后的累加结果, ...
- paramiko连接方式
链接方法: 方式一: ssh = paramiko.SSHClient() ssh.set_missing_host_key_policy(paramiko.AutoAddPolicy()) ssh. ...
- redis学习一 大体概述
redis 命令查找:http://doc.redisfans.com/ 1,redis 技术简介以及疑问 redis是一个开源的,内存存储的数据结构服务器.可以用做数据库,高速缓存和消息队 ...
- 问题:oracle 不等于;结果:Oracle中的不等于号
Oracle中的不等于号 今天碰到一个Oracle不等于的问题,最后搜索了一下,发现下面资料,拿来跟大家分享一下 关于Oracle中的不等于号: 在Oracle中, <> != ~= ...
- myeclipse实用快捷键
笔者这里总结的是个人在使用myeclipse时常用的快捷操作,总结如下: 1.Ctrl + / :为选中的一段代码加上或去掉注释符 Ctrl + Shift + / :( ...
- ffmpeg/ffplay源码剖析笔记<转>
转载:http://www.cnblogs.com/azraelly/ http://www.cnblogs.com/azraelly/archive/2013/01/18/2865858.html ...
- DAY18-Django之form表单
构建一个表单 假设你想在你的网站上创建一个简单的表单,以获得用户的名字.你需要类似这样的模板: <form action="/your-name/" method=" ...
- Maven构建war项目添加版本号
上午接到一个新的需求,项目的war包打包之后,放在了阿里的OSS上,供其他项目下载更新时使用,但是只有一个项目名,也就是pom的artifactId,预期的结果是要加上一个版本号,能区分出是什么时候打 ...
- contentvalue的探究(结构,用途)
contentvalue类似HASHMAP,但是KEY只能为STRING 该类用于数据库操作时对数据的封装,可以避免使用SQL语句,为后期创建CONTENTPROVIDER提供便利. 如果没有上述需求 ...