
xgboost-Python&R
python机器学习-乳腺癌细胞挖掘(博主亲自录制视频)
https://study.163.com/course/introduction.htm?courseId=1005269003&utm_campaign=commission&utm_source=cp-400000000398149&utm_medium=share

xgboost官网教程
https://xgboost.readthedocs.io/en/latest/python/python_intro.html
下载地址
https://www.lfd.uci.edu/~gohlke/pythonlibs/#xgboost

然后打开cmd,用cd切换路径到下载地址
最后 pip install.....
乳腺癌数据测试代码
# -*- coding: utf-8 -*-

"""

Created on Thu Apr 19 21:04:14 2018

@author: Administrator

"""

from sklearn.cross_validation import train_test_split

from sklearn.datasets import load_breast_cancer

cancer=load_breast_cancer()

train_x, test_x, train_y, test_y=train_test_split(cancer.data,cancer.target,random_state=0)

import xgboost as xgb

dtrain=xgb.DMatrix(train_x,label=train_y)

dtest=xgb.DMatrix(test_x)

params={'booster':'gbtree',

    'objective': 'binary:logistic',

    'eval_metric': 'auc',

    'max_depth':4,

    'lambda':10,

    'subsample':0.75,

    'colsample_bytree':0.75,

    'min_child_weight':2,

    'eta': 0.025,

    'seed':0,

    'nthread':8,

     'silent':1}

watchlist = [(dtrain,'train')]

bst=xgb.train(params,dtrain,num_boost_round=100,evals=watchlist)

ypred=bst.predict(dtest)

# 设置阈值, 输出一些评价指标

y_pred = (ypred >= 0.5)*1

#模型校验

from sklearn import metrics

print ('AUC: %.4f' % metrics.roc_auc_score(test_y,ypred))

print ('ACC: %.4f' % metrics.accuracy_score(test_y,y_pred))

print ('Recall: %.4f' % metrics.recall_score(test_y,y_pred))

print ('F1-score: %.4f' %metrics.f1_score(test_y,y_pred))

print ('Precesion: %.4f' %metrics.precision_score(test_y,y_pred))

metrics.confusion_matrix(test_y,y_pred)

'''

模型区分能力相当好

AUC: 0.9981

ACC: 0.9860

Recall: 0.9889

F1-score: 0.9889

Precesion: 0.9889

'''

print("xgboost:")

#print("accuracy on the training subset:{:.3f}".format(bst.get_score(train_x,train_y)))

#print("accuracy on the test subset:{:.3f}".format(bst.get_score(test_x,test_y)))

print('Feature importances:{}'.format(bst.get_fscore()))

'''

Feature importances:{'f20': 33, 'f27': 50, 'f21': 54, 'f1': 29, 'f7': 33, 'f22': 38,

'f26': 17, 'f13': 46, 'f23': 41, 'f24': 13, 'f15': 2, 'f0': 6, 'f14': 5, 'f25': 7,

'f3': 6, 'f12': 3, 'f9': 3, 'f28': 11, 'f8': 2, 'f10': 9, 'f6': 9, 'f16': 2, 'f29': 1,

'f4': 4, 'f18': 3, 'f19': 2, 'f17': 2, 'f11': 1}

'''

'''

import matplotlib.pylab as plt

import pandas as pd

feat_imp = pd.Series(alg.booster().get_fscore()).sort_values(ascending=False)

feat_imp.plot(kind='bar', title='Feature Importances')

plt.ylabel('Feature Importance Score')

'''

#preds = bst.predict(test_x)
乳腺癌数据测试代码2
# -*- coding: utf-8 -*-

"""

Created on Sun Jun 17 10:10:45 2018

@author: Administrator

"""

import xgboost as xgb

from sklearn.cross_validation import train_test_split

from sklearn.datasets import load_breast_cancer

#gridSearchCv调参

from sklearn.grid_search import GridSearchCV

import pickle

import numpy as np

import graphviz

cancer=load_breast_cancer()

train_x, test_x, train_y, test_y=train_test_split(cancer.data,cancer.target,random_state=0)

x=cancer.data

y=cancer.target

#加载数据

#XGBoost可以加载libsvm格式的文本数据,加载的数据格式可以为Numpy的二维数组和XGBoost的二进制的缓存文件。加载的数据存储在对象DMatrix中

dtrain=xgb.DMatrix(train_x,label=train_y)

dtest=xgb.DMatrix(test_x)

params={'booster':'gbtree',

    'objective': 'binary:logistic',

    #'eval_metric': 'auc',

    'max_depth':4,

    'lambda':10,

    'subsample':0.75,

    'colsample_bytree':0.75,

    'min_child_weight':2,

    'eta': 0.025,

    'seed':0,

    'nthread':8,

     'silent':1}

params['eval_metric'] = ['auc', 'ams@0']

#params['eta']=list(np.arange(0,1,0.1))

#Specify validations set to watch performance

evallist=[(dtrain, 'train')]

'''

eta_range=list(np.arange(0,1,0.1))

#参数格子

param_grid=dict(eta=eta_range)

'''

#num_boost_round这是指提升迭代的个数

#evals 这是一个列表,用于对训练过程中进行评估列表中的元素。形式是evals = [(dtrain,’train’),(dval,’val’)]或者是evals = [(dtrain,’train’)],对于第一种情况,它使得我们可以在训练过程中观察验证集的效果。

bst=xgb.train(params,dtrain,num_boost_round=100,evals=evallist)

ypred=bst.predict(dtest)

# 设置阈值, 输出一些评价指标

y_pred = (ypred >= 0.5)*1

from sklearn import metrics

print ('AUC: %.4f' % metrics.roc_auc_score(test_y,ypred))

print ('ACC: %.4f' % metrics.accuracy_score(test_y,y_pred))

print ('Recall: %.4f' % metrics.recall_score(test_y,y_pred))

print ('F1-score: %.4f' %metrics.f1_score(test_y,y_pred))

print ('Precesion: %.4f' %metrics.precision_score(test_y,y_pred))

metrics.confusion_matrix(test_y,y_pred)

#绘制重要性特征

xgb.plot_importance(bst)

#绘制树

#xgb.plot_tree(bst, num_trees=2)

#保存模型

bst.save_model('xgboost.model')

#The model and its feature map can also be dumped to a text file.

# dump model

bst.dump_model('dump.raw.txt')

# dump model with feature map

bst.dump_model('dump.raw.txt', 'featmap.txt')

#保存分类器

save_classifier = open("xgboost.pickle","wb")

pickle.dump(bst, save_classifier)

save_classifier.close()

'''

#打开分类器文件测试

classifier_f = open("xgboost.pickle", "rb")

classifier = pickle.load(classifier_f)

classifier_f .close()

'''
xgboost-feature importance
# -*- coding: utf-8 -*-

"""

Created on Sun Jun 17 10:34:20 2018

@author: Administrator

"""

import pandas as pd

import xgboost as xgb

import operator

from matplotlib import pylab as plt

def ceate_feature_map(features):

    outfile = open('xgb.fmap', 'w')

    i = 0

    for feat in features:

        outfile.write('{0}\t{1}\tq\n'.format(i, feat))

        i = i + 1

    outfile.close()

def get_data():

    train = pd.read_csv("../input/train.csv")

    features = list(train.columns[2:])

    y_train = train.Hazard

    for feat in train.select_dtypes(include=['object']).columns:

        m = train.groupby([feat])['Hazard'].mean()

        train[feat].replace(m,inplace=True)

    x_train = train[features]

    return features, x_train, y_train

def get_data2():

    from sklearn.datasets import load_iris

    #获取数据

    iris = load_iris()

    x_train=pd.DataFrame(iris.data)

    features=["sepal_length","sepal_width","petal_length","petal_width"]

    x_train.columns=features

    y_train=pd.DataFrame(iris.target)

    return features, x_train, y_train

#features, x_train, y_train = get_data()

features, x_train, y_train = get_data2()

ceate_feature_map(features)

xgb_params = {"objective": "reg:linear", "eta": 0.01, "max_depth": 8, "seed": 42, "silent": 1}

num_rounds = 1000

dtrain = xgb.DMatrix(x_train, label=y_train)

xgb_model = xgb.train(xgb_params, dtrain, num_rounds)

importance = xgb_model.get_fscore(fmap='xgb.fmap')

importance = sorted(importance.items(), key=operator.itemgetter(1))

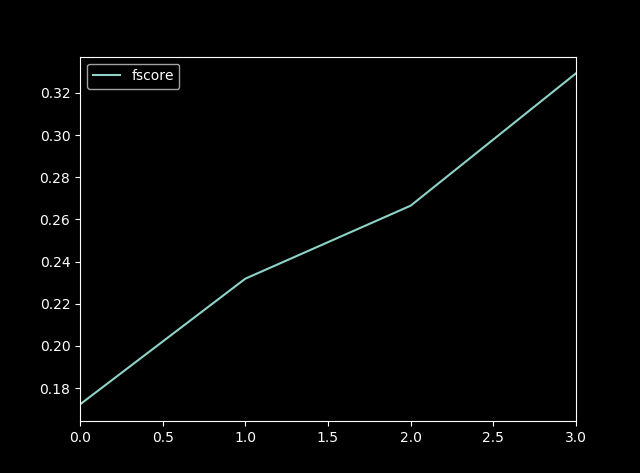
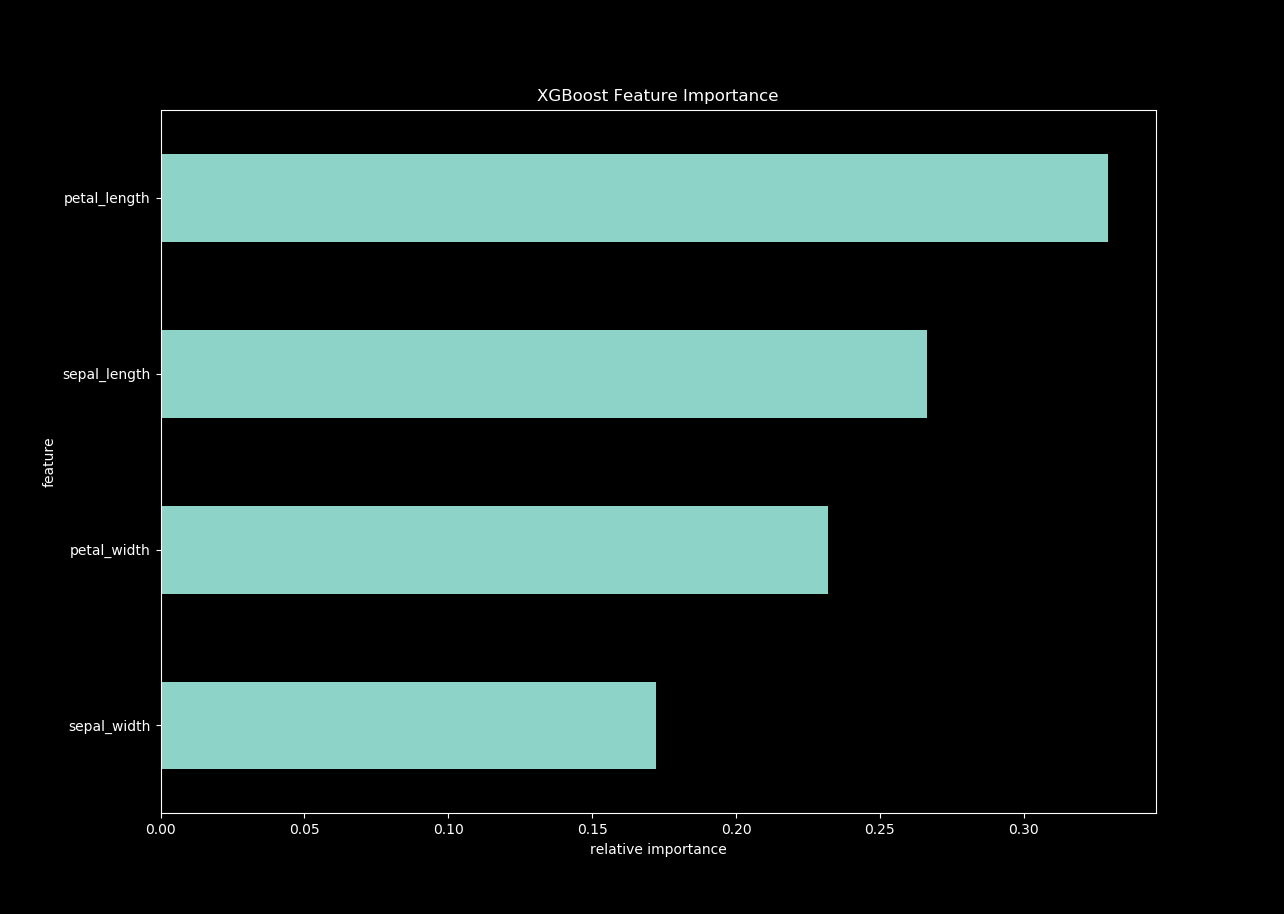
df = pd.DataFrame(importance, columns=['feature', 'fscore'])

df['fscore'] = df['fscore'] / df['fscore'].sum()

plt.figure()

df.plot()

df.plot(kind='barh', x='feature', y='fscore', legend=False, figsize=(16, 10))

plt.title('XGBoost Feature Importance')

plt.xlabel('relative importance')

plt.gcf().savefig('feature_importance_xgb.png')
xgboost R语言函数索引:
agaricus.test Test part from Mushroom Data Set
agaricus.train Training part from Mushroom Data Set
callbacks Callback closures for booster training.
cb.cv.predict Callback closure for returning cross-validation
based predictions.
cb.early.stop Callback closure to activate the early
stopping.
cb.evaluation.log Callback closure for logging the evaluation
history
cb.gblinear.history Callback closure for collecting the model
coefficients history of a gblinear booster
during its training.
cb.print.evaluation Callback closure for printing the result of
evaluation
cb.reset.parameters Callback closure for restetting the booster's
parameters at each iteration.
cb.save.model Callback closure for saving a model file.
dim.xgb.DMatrix Dimensions of xgb.DMatrix
dimnames.xgb.DMatrix Handling of column names of 'xgb.DMatrix'
getinfo Get information of an xgb.DMatrix object
predict.xgb.Booster Predict method for eXtreme Gradient Boosting
model
print.xgb.Booster Print xgb.Booster
print.xgb.DMatrix Print xgb.DMatrix
print.xgb.cv.synchronous
Print xgb.cv result
setinfo Set information of an xgb.DMatrix object
slice Get a new DMatrix containing the specified rows
of orginal xgb.DMatrix object
xgb.Booster.complete Restore missing parts of an incomplete
xgb.Booster object.
xgb.DMatrix Construct xgb.DMatrix object
xgb.DMatrix.save Save xgb.DMatrix object to binary file
xgb.attr Accessors for serializable attributes of a
model.
xgb.create.features Create new features from a previously learned
model
xgb.cv Cross Validation
xgb.dump Dump an xgboost model in text format.
xgb.gblinear.history Extract gblinear coefficients history.
xgb.ggplot.deepness Plot model trees deepness
xgb.ggplot.importance Plot feature importance as a bar graph
xgb.importance Importance of features in a model.
xgb.load Load xgboost model from binary file
xgb.model.dt.tree Parse a boosted tree model text dump
xgb.parameters<- Accessors for model parameters.
xgb.plot.multi.trees Project all trees on one tree and plot it
xgb.plot.shap SHAP contribution dependency plots
xgb.plot.tree Plot a boosted tree model
xgb.save Save xgboost model to binary file
xgb.save.raw Save xgboost model to R's raw vector, user can
call xgb.load to load the model back from raw
vector
xgb.train eXtreme Gradient Boosting Training
xgboost-deprecated Deprecation notices.
可以在目录‘C:/Users/zhi.li04/Documents/R/win-library/3.3/xgboost/doc’中的小文品内找到更多的信息
discoverYourData: Discover your data (source, pdf)
xgboostPresentation: Xgboost presentation (source, pdf)
xgboost: xgboost: eXtreme Gradient Boosting (source, pdf)
xgboost调参
https://blog.csdn.net/wdxin1322/article/details/71698659?utm_source=itdadao&utm_medium=referral
具体参数树状图:
eta:默认值设置为0.3。您需要指定用于更新步长收缩来防止过度拟合。每个提升步骤后,我们可以直接获得新特性的权重。实际上 eta 收缩特征权重的提高过程更为保守。范围是0到1。低η值意味着模型过度拟合更健壮。
gamma:默认值设置为0。您需要指定最小损失减少应进一步划分树的叶节点。更大,更保守的算法。范围是0到∞。γ越大算法越保守。
max_depth:默认值设置为6。您需要指定一个树的最大深度。参数范围是1到∞。
min_child_weight:默认值设置为1。您需要在子树中指定最小的(海塞)实例权重的和,然后这个构建过程将放弃进一步的分割。在线性回归模式中,在每个节点最少所需实例数量将简单的同时部署。更大,更保守的算法。参数范围是0到∞。
max_delta_step:默认值设置为0。max_delta_step 允许我们估计每棵树的权重。如果该值设置为0,这意味着没有约束。如果它被设置为一个正值,它可以帮助更新步骤更为保守。通常不需要此参数,但是在逻辑回归中当分类是极为不均衡时需要用到。将其设置为1 - 10的价值可能有助于控制更新。参数范围是0到∞。
subsample: 默认值设置为1。您需要指定训练实例的子样品比。设置为0.5意味着XGBoost随机收集一半的数据实例来生成树来防止过度拟合。参数范围是0到1。
colsample_bytree : 默认值设置为1。在构建每棵树时,您需要指定列的子样品比。范围是0到1。
colsample_bylevel:默认为1
max_leaf_nodes:叶结点最大数量,默认为2^6
线性上升具体参数
lambda and alpha : L2正则化项,默认为1、L1正则化项,默认为1。这些都是正则化项权重。λ默认值假设是1和α= 0。
lambda_bias : L2正则化项在偏差上的默认值为0。
scale_pos_weight:加快收敛速度,默认为1
任务参数
base_score : 默认值设置为0.5。您需要指定初始预测分数作为全局偏差。
objective : 默认值设置为reg:linear。您需要指定你想要的类型的学习者,包括线性回归、逻辑回归、泊松回归等。
eval_metric : 您需要指定验证数据的评估指标,一个默认的指标分配根据客观(rmse回归,错误分类,意味着平均精度等级
seed : 随机数种子,确保重现数据相同的输出。
调参方式
- 首先调整max_depth ,通常max_depth 这个参数与其他参数关系不大,初始值设置为10,找到一个最好的误差值,然后就可以调整参数与这个误差值进行对比。比如调整到8,如果此时最好的误差变高了,那么下次就调整到12;如果调整到12,误差值比10 的低,那么下次可以尝试调整到15.
- 在找到了最优的max_depth之后,可以开始调整subsample,初始值设置为1,然后调整到0.8 如果误差值变高,下次就调整到0.9,如果还是变高,就保持为1.0
- 接着开始调整min_child_weight , 方法与上面同理
- 再接着调整colsample_bytree
- 经过上面的调整,已经得到了一组参数,这时调整eta 到0.05,然后让程序运行来得到一个最佳的num_round,(在 误差值开始上升趋势的时候为最佳 )
 # General Parameters, see comment for each definition

 2 # choose the booster, can be gbtree or gblinear

 3 booster = gbtree

 4 # choose logistic regression loss function for binary classification

 5 objective = binary:logistic

 6

 7 # Tree Booster Parameters

 8 # step size shrinkage

 9 eta = 1.0

10 # minimum loss reduction required to make a further partition

11 gamma = 1.0

12 # minimum sum of instance weight(hessian) needed in a child

13 min_child_weight = 100

14 # maximum depth of a tree

15 max_depth = 6

16

17 # Task Parameters

18 # the number of round to do boosting

19 num_round = 50

20 # 0 means do not save any model except the final round model

21 save_period = 0

22 # The path of training data

23 data = "a.train"

24 # The path of validation data, used to monitor training process, here [test] sets name of the validation set

25 eval[test] = "a.test"

26 # evaluate on training data as well each round

27 #eval_train = 1

28 # The path of test data

29 eval_metric = "auc"

30 eval_metric = "error"

31 test:data = "a.test"

微信扫二维码,免费学习更多python资源

xgboost-Python&R的更多相关文章
- VS code 配置为 Python R LaTeX IDE
VS code配置为Python R LaTeX IDE VS code的中文断行.编辑功能强大,配置简单. VSC的扩展在应用商店搜索安装,快捷键ctrl+shift+x调出应用商店. 安装扩展后, ...
- 配置 Sublime Text 3 作为Python R LaTeX Markdown IDE
配置 Sublime Text 3 作为Python R LaTeX Markdown IDE 配置 Sublime Text 3 作为Python IDE IDE的基本功能:代码提醒.补全:编译文件 ...
- 机器学习算法 Python&R 速查表
sklearn实战-乳腺癌细胞数据挖掘( 博主亲自录制) https://study.163.com/course/introduction.htm?courseId=1005269003&u ...
- ubuntu 执行Python脚本出现: /usr/bin/env: ‘python\r’: No such file or directory
原因: #!/usr/bin/env python 在ubuntu会变成 #!/usr/bin/env python\r 而\r 会被shell 当成参数 所以出现: /usr/bin/env: ‘ ...
- 建模分析之机器学习算法(附python&R代码)
0序 随着移动互联和大数据的拓展越发觉得算法以及模型在设计和开发中的重要性.不管是现在接触比较多的安全产品还是大互联网公司经常提到的人工智能产品(甚至人类2045的的智能拐点时代).都基于算法及建模来 ...
- python '%r'或者'{!r}'的意思
转载:https://blog.csdn.net/a19990412/article/details/80149112 这两个都是python的转译字符, 类似于%r, %d,%f >>& ...
- Python&R&量化 金融之路
[ 分类 ]- 金融之路 - 闲云孤鹤(人生在世五十年,大千世界一瞬间,浮生若梦,仿佛间,幻境一场,生者无常,终须尽.) - CSDN博客 https://blog.csdn.net/robertso ...
- kNN算法及其python&R实现
iris数据集,这一教科书级别的数据,分类前不需要做任何数据预处理什么的,相当的理想!但请注意你自己的数据99%的可能需要做预处理. 下面分别用R语言和Python来实现iris数据集的分类: R语言 ...
- xgboost python windows编译问题
1.作为kaggle上非常火的机器学习包xgboost,windows python包安装起来真的非常麻烦,安装了一整天才成功. 2.请先下载xgboost-master,csdn上有资源的,能够在这 ...
- 分析脚本搭建docker环境:python, R
1. 搭建Anaconda Python3.6 FROM nvidia/cuda:8.0-cudnn6-devel-ubuntu16.04 MAINTAINER Tyan <tyan.liu.g ...
随机推荐
- gitbook 入门教程之主题插件
主题插件 目前 gitbook 提供三类文档: Book 文档,API 文档和 FAQ 文档. 其中,默认的也是最常使用的就是 Book 文档,如果想要了解其他两种文档模式,需要引入相应的主题插件. ...
- windows linux 子系统折腾记
最近买了部新电脑,海尔n4105的一体机,好像叫s7. 放在房间里面,看看资料.因为性能孱弱,所以不敢安装太强大的软件,然后又有一颗折腾的心.所以尝试了win10自带的linux子系统. 然后在应用商 ...
- 常见的异步方式async 和 await
之前研究过c#的async和await关键字,幕后干了什么,但是不知道为什么找不到相关资料了.现在重新研究一遍,顺便记录下来,方便以后查阅. 基础知识 async 关键字标注一个方法,该方法返回值是一 ...
- Numpy库的学习(三)
今天我们继续学习一下Numpy库的学习 废话不多说 ,开始讲 比如我们现在想创建一个0-14这样一个15位的数组 可以直接写,但是很麻烦,Numpy中就给我们了一个方便创建的方法 numpy中有一个a ...
- Ranger-Kafka插件安装
Ranger-Kafka插件安装, 使用Ranger0.7.0版本,集成Kafka插件到Kafka集群, Kafka Plugin需要安装到所有的Kafka的集群节点上面. 1.登陆Kafka的安装用 ...
- pyhton从开始到光棍的day11
纪念我这个开始学python的光棍天,光棍天依旧是函数,这次的函数有个小高级,比昨天的low函数稍微高级点,就是在使用函数中是可以赋值的,比如索引一个值什么的.函数还可以当做参数进行传递,把这个函数名 ...
- [认证授权] 1.OAuth2授权
1 OAuth2解决什么问题的? 举个栗子先.小明在QQ空间积攒了多年的照片,想挑选一些照片来打印出来.然后小明在找到一家提供在线打印并且包邮的网站(我们叫它PP吧(Print Photo缩写
- 我们为什么要使用RabbitMQ?
一.前言 这篇文章就是讲RabbitMQ的好处,你可能要说RocketMQ很好呀,我们主要看上的就是RabbitMQ支持多语言的客户端,很符合我们公司的现状,不要我们花费功夫去搞一个客 ...
- React生命周期详解
React生命周期图解: 一.旧版图解: 二.新版图解: 从图中,我们可以清楚知道React的生命周期分为三个部分: 实例化.存在期和销毁时. 旧版生命周期如果要开启async rendering, ...
- JavaScript的数据结构和算法
所有JavaScript对象都有hasOwnProperty(value)的方法,用来返回一个表明对象是不是具有这个value Key值属性的布尔值. javaScript的方法 具有delete的方 ...