Windows Apache(ApacheHaus)安装配置教程
1,Apache下载

选择一个版本,点击Download

点击File For Microsoft Windows
由于Apache HTTP Server官方不提供二进制(可执行)的发行版,所以我们选择一些贡献者编译完成的版本,我们选择第一个ApacheHaus
点击ApacheHaus,进入下载页

选择其中一个版本,如果你的Windows还没安装对应的VC环境的话,选择对应的VCRedistribute版本下载安装。我选择Apache 2.4VC9版,因为我的电脑中已经安装了VC9的环境。
点击JumpLinks下第一行的某一个版本,下载对应压缩包。
2,配置Apache之一--httpd.conf
解压后进入里面Apache22(最后两位数字可能不同)文件夹,使用文本编辑器(推荐ultraedit)打开conf文件夹中的httpd.conf配置文件
找到ServerRoot选项,设置Apache目录,大约在35行左右,将其改成你的Apache程序的文件夹,例:
ServerRoot "C:/Users/myPC/Downloads/httpd-2.2.31-x86-r3/Apache22"
找到Listen选项,设置端口,大约46行,一般不修改,使用默认80,在开启服务器前请保证80端口未被占用
找到DocumentRoot选项,修改服务器根目录,例:
DocumentRoot "F:/"
请保证此目录存在,否则服务器无法正常启动
修改Directory,保证其与服务器根目录相同,只修改下面的第一行中引号部分
<Directory "F:/">

    #

    # Possible values for the Options directive are "None", "All",

    # or any combination of:

    #   Indexes Includes FollowSymLinks SymLinksifOwnerMatch ExecCGI MultiViews

    #

    # Note that "MultiViews" must be named *explicitly* --- "Options All"

    # doesn't give it to you.

    #

    # The Options directive is both complicated and important.  Please see

    # http://httpd.apache.org/docs/2.2/mod/core.html#options

    # for more information.

    #

    Options Indexes FollowSymLinks

    #

    # AllowOverride controls what directives may be placed in .htaccess files.

    # It can be "All", "None", or any combination of the keywords:

    #   Options FileInfo AuthConfig Limit

    #

    AllowOverride None

    #

    # Controls who can get stuff from this server.

    #

    Order allow,deny

    Allow from all

</Directory>
找到ScriptAlias选项,设置服务器脚本目录,大约326行,一般将其设置为Apache目录下的cgi-bin文件夹
ScriptAlias /cgi-bin/ "C:/Users/myPC/Downloads/httpd-2.2.31-x86-r3/Apache22/cgi-bin"
找到随后的Directory选项,设置脚本目录,大约342行,需要将其设置为和前面的ScriptAlias目录相同
<Directory "C:/Users/myPC/Downloads/httpd-2.2.31-x86-r3/Apache22/cgi-bin">

    AllowOverride None

    Options None

    Order allow,deny

    Allow from all

</Directory>
3,配置Apache之二--ssl配置
如果你这使启动服务,一般会出现下面的消息对话框:

提示
Windows不能在本地计算机启动Apache2.2。有关更多信息,查阅系统日志文件。如果这是非Microsoft服务,请与厂商联系,并参考特定服务器错误代码1。
确定此问题的原因:
右键 计算机,点击管理->Windows日志->应用程序,显示如下
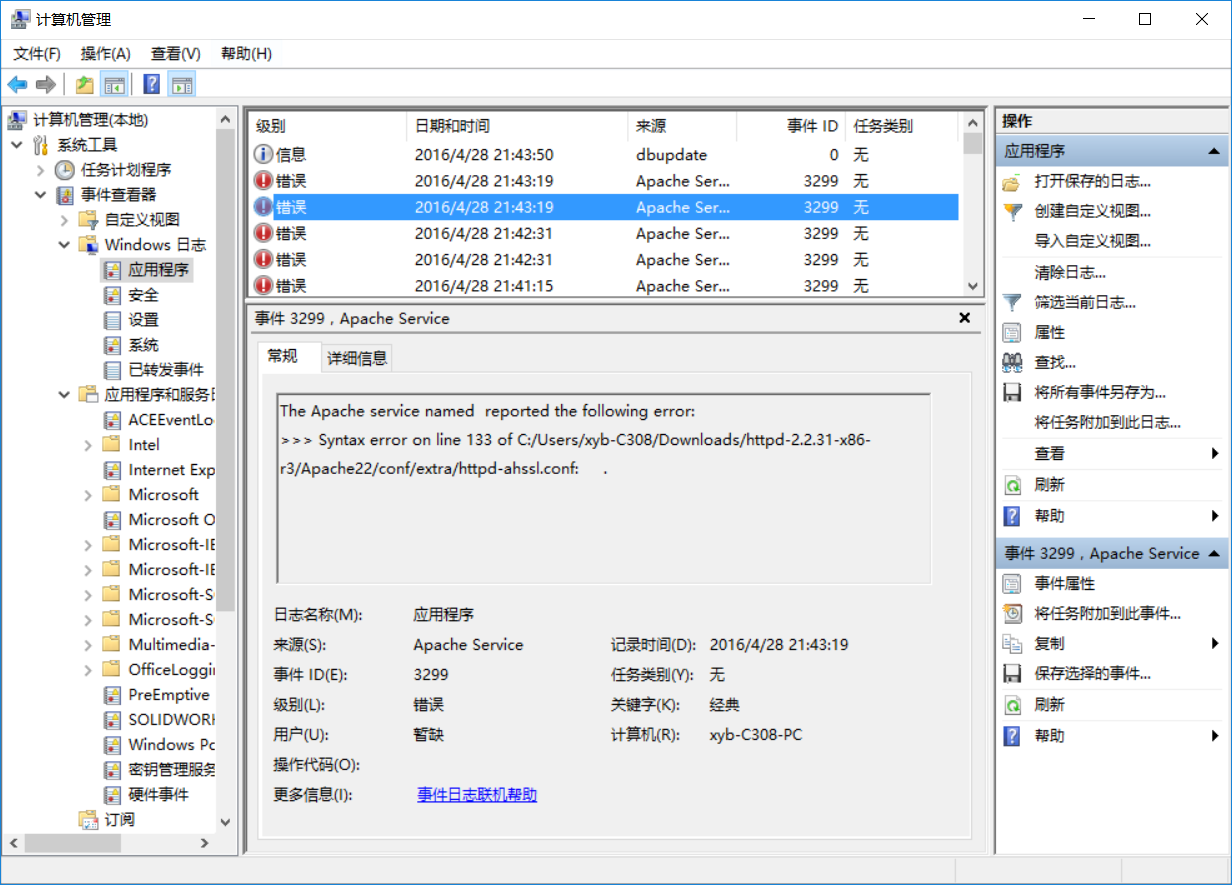
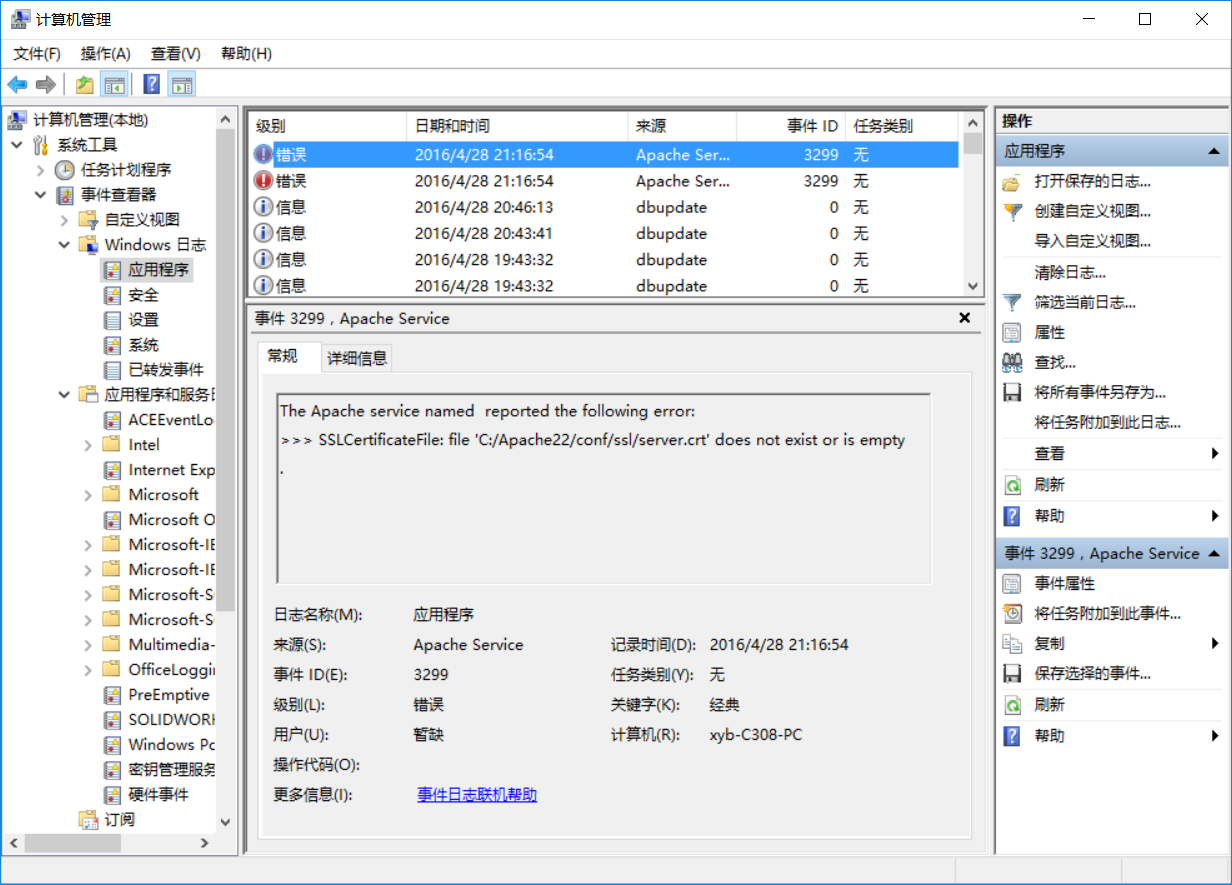
这是由于SSL配置不正确所产生的,下面说一下解决办法。
打开Apache程序目录下的conf/extra/httpd-ahssl.conf文件,配置VirtualHost选项,有三处名为VirtualHost的选项,均需修改。
第一个在107行左右。
在110行左右,将其中的SSLCertificateFile改为:Apache所在目录/conf/ssl/server.crt
在111行左右,将SSLCertificateKeyFile改为:Apache所在目录/conf/ssl/server.key
在112行左右,将DocumentRoot改为你的服务器根目录
在126行左右,将CustomLog改为:Apache所在目录/logs/ssl_request.log,这个不改的话也会错。一般会出现如下错误:

Apache2.2服务由于下列服务特定错误而终止:函数不正确。
改成的效果:
<VirtualHost _default_:443>

  SSLEngine on

  ServerName localhost:443

  SSLCertificateFile C:/Users/myPC/Downloads/httpd-2.2.31-x86-r3/Apache22/conf/ssl/server.crt

  SSLCertificateKeyFile C:/Users/myPC/Downloads/httpd-2.2.31-x86-r3/Apache22/conf/ssl/server.key

  DocumentRoot F:/

# openssl req -new > server.csr

# openssl rsa -in privkey.pem -out server.key

# openssl x509 -in server.csr -out server.crt -req -signkey server.key -days 2048

<FilesMatch "\.(cgi|shtml|phtml|php)$">

    SSLOptions +StdEnvVars

</FilesMatch>

<Directory "/Apache22/cgi-bin">

    SSLOptions +StdEnvVars

</Directory>

BrowserMatch "MSIE [2-5]" \

         nokeepalive ssl-unclean-shutdown \

         downgrade-1.0 force-response-1.0

CustomLog "C:/Users/myPC/Downloads/httpd-2.2.31-x86-r3/Apache22/logs/ssl_request.log" \

          "%t %h %{SSL_PROTOCOL}x %{SSL_CIPHER}x \"%r\" %b"

</virtualhost>
主要改上文四处地方
在130行和152行还有另外两个VirtualHost,均需修改上述的四个选项
例:
130行
<VirtualHost *:443>

  SSLEngine on

  ServerName serverone.tld:443

  SSLCertificateFile C:/Users/myPC/Downloads/httpd-2.2.31-x86-r3/Apache22/conf/ssl/serverone.crt

  SSLCertificateKeyFile C:/Users/myPC/Downloads/httpd-2.2.31-x86-r3/Apache22/conf/ssl/serverone.key

  DocumentRoot F:/

# openssl req -new > serverone.csr

# openssl rsa -in privkey.pem -out serverone.key

# openssl x509 -in serverone.csr -out serverone.crt -req -signkey serverone.key -days 2048

<FilesMatch "\.(cgi|shtml|phtml|php)$">

    SSLOptions +StdEnvVars

</FilesMatch>

<Directory "/Apache22/cgi-bin">

    SSLOptions +StdEnvVars

</Directory>

BrowserMatch "MSIE [2-5]" \

         nokeepalive ssl-unclean-shutdown \

         downgrade-1.0 force-response-1.0

CustomLog "C:/Users/myPC/Downloads/httpd-2.2.31-x86-r3/Apache22/logs/ssl_request.log" \

          "%t %h %{SSL_PROTOCOL}x %{SSL_CIPHER}x \"%r\" %b" env=HTTPS

</virtualhost>
第152行
<VirtualHost *:443>

  SSLEngine on

  ServerName servertwo.tld:443

  SSLCertificateFile C:/Users/myPC/Downloads/httpd-2.2.31-x86-r3/Apache22/conf/ssl/servertwo.crt

  SSLCertificateKeyFile C:/Users/myPC/Downloads/httpd-2.2.31-x86-r3/Apache22/conf/ssl/servertwo.key

  DocumentRoot F:/

# openssl req -new > servertwo.csr

# openssl rsa -in privkey.pem -out servertwo.key

# openssl x509 -in servertwo.csr -out servertwo.crt -req -signkey servertwo.key -days 2048

<FilesMatch "\.(cgi|shtml|phtml|php)$">

    SSLOptions +StdEnvVars

</FilesMatch>

<Directory "/Apache22/cgi-bin">

    SSLOptions +StdEnvVars

</Directory>

BrowserMatch "MSIE [2-5]" \

         nokeepalive ssl-unclean-shutdown \

         downgrade-1.0 force-response-1.0

CustomLog "C:/Users/myPC/Downloads/httpd-2.2.31-x86-r3/Apache22/ssl_request.log" \

          "%t %h %{SSL_PROTOCOL}x %{SSL_CIPHER}x \"%r\" %b"

</virtualhost>
上述的两个VirtualHost均需修改四处
这样,Apache就算配置完了,如果还有问题,可能还需配置./conf/extra/httpd-ssl.conf,配置方法和配置VirtualHost的相似
4,启动Apache HTTP Server
使用Windows命令行以管理员身份进入Apache程序的文件夹下的bin文件夹,输入httpd -k install,完成Apache服务的安装。
然后双击bin目录下的ApacheMonitor.exe,点击右边的start启动服务器,如果正常,如下图:

测试一下:

5,其它
卸载Apache HTTP Server:
管理员身份进入bin目录,使用httpd -k uninstall 移除服务
使用httpd -w -n "Apache2" -k start命令启动服务器 可以显示启动过程中的日志,便于分析错误。
Windows Apache(ApacheHaus)安装配置教程的更多相关文章
- Apache(ApacheHaus)安装配置教程
1,Apache下载 选择一个版本,点击Download 点击File For Microsoft Windows 由于Apache HTTP Server官方不提供二进制(可执行)的发行版,所以我们 ...
- Windows上PostgreSQL安装配置教程
Windows上PostgreSQL安装配置教程 这篇文章主要为大家详细介绍了Windows上PostgreSQL安装配置教程,具有一定的参考价值,感兴趣的小伙伴们可以参考一下 PostgreSQL的 ...
- hadoop集群监控工具Apache Ambari安装配置教程
ambari 1.2.4 下载地址:http://www.apache.org/dist/incubator/ambari/ambari-1.2.4/ambari-1.2.4-incubating.t ...
- Windows 中JDK安装配置教程
1.准备工作 a.因为Java JDK区分32位和64位系统,所以在安装之前必须先要判断以下我们的系统为多少位系统.右键计算机-属性查看,我安装的是64位 b.下载JDK,地址:http://www. ...
- [转载]Apache在windows下的安装配置
Apache在windows下的安装配置 转载自:http://blog.sina.com.cn/s/blog_536f16b00100cfat.html 1 Apache的下载 Apache ...
- Windows基础环境_安装配置教程(Windows7 64、JDK1.8、Android SDK23.0、TortoiseSVN 1.9.5)
Windows基础环境_安装配置教程(Windows7 64.JDK1.8.Android SDK23.0.TortoiseSVN 1.9.5) 安装包版本 1) JDK版本包 地址: htt ...
- PHP调试工具Xdebug安装配置教程
说道PHP代码调试,对于有经验的PHPer,通过echo.print_r.var_dump函数,或PHP开发工具zend studio.editplus可解决大部分问题,但是对于PHP入门学习的童鞋来 ...
- 【Jmeter】Jmeter安装配置教程
jmeter安装配置教程 1.安装jdk,配置环境变量 进入官网,https://www.oracle.com/downloads/index.html#java,选择 Java (JDK) for ...
- windows Apache 环境下配置支持HTTPS的SSL证书
windows Apache 环境下配置支持HTTPS的SSL证书 1.准备工作 1)在设置Apache + SSL之前, 需要做: 安装Apache, 下载安装Apache时请下载带有SSL版本的A ...
随机推荐
- 使用zabbix发送邮件的简易设置流程(存档用)
1.安装邮件软件 (一般默认安装sendmail,这样apache也不用重新设置.) $sudo yum install sendmail 2.在zabbix上设置发送邮件用的本地邮箱 选择管理-&g ...
- 大数据入门第十一天——hive详解(二)基本操作与分区分桶
一.基本操作 1.DDL 官网的DDL语法教程:点击查看 建表语句 CREATE [EXTERNAL] TABLE [IF NOT EXISTS] table_name [(col_name data ...
- 20155327实验一 Java开发环境的熟悉
20155327实验一 Java开发环境的熟悉 实验内容 1.使用JDK编译.运行简单的java程序 2.使用IDEA编辑.编译.运行.调试java程序 实验步骤 1.使用JDK编译.运行简单的jav ...
- 11- IO模型-未完成
1.同步.异步.阻塞.非阻塞 同步(synchronous) IO和异步(asynchronous) IO,阻塞(blocking) IO和非阻塞(non-blocking)IO分别是什么,到底有什么 ...
- 【SoDiaoEditor电子病历编辑器更新啦】--谨以献给那些还在医疗行业奋斗的小伙伴们
为什么推荐的人这么少~~~~ 更新(2017-4-18): 截止目前已知的已有2个三甲医院在使用该编辑器,容我内心澎湃以下,O(∩_∩)O哈哈~ 先放github地址:https://gith ...
- nginx解析漏洞,配置不当,目录遍历漏洞环境搭建、漏洞复现
nginx解析漏洞,配置不当,目录遍历漏洞复现 1.Ubuntu14.04安装nginx-php5-fpm 安装了nginx,需要安装以下依赖 sudo apt-get install libpcre ...
- Jmeter接口测试(八)cookie设置
HTTP Cookie 管理器 如果你有一个 HTTP 请求,其返回结果里包含一个 cookie,那么 使用 JmeterCookie 管理器会自动将该 cookie保存起来,而且以后所有对该网站的请 ...
- 1.VBA 基本概念——《Excel VBA 程序开发自学宝典》
1.1 常见对象及含义 对象名 含义 application 整个Excel应用程序 window 窗口 worksheet 一个工作表 sheets 指定工作簿的所有工作表的合集 shaperan ...
- 如何在多机架(rack)配置环境中部署cassandra节点
cassandra节点上数据的分布和存储是由系统自动完成的.除了我们要设计好partition key之外,在多机架(rack)配置环境中部署cassandra节点,也需要考虑cassandra分布数 ...
- 高可用OpenStack(Queen版)集群-14.Openstack集成Ceph准备
参考文档: Install-guide:https://docs.openstack.org/install-guide/ OpenStack High Availability Guide:http ...