
树莓派与Arduino Leonardo使用NRF24L01无线模块通信之基于RF24库 (二) 发送自定义数据
在我的项目里,树莓派主要作为中心节点,用于接收数据,Arduino作为子节点,用于发送数据,考虑到以后会有很多子节点,但又不至于使得代码过于繁琐,因此所有的传输数据添加一个头部编号用于区分不同节点。
nrf24l01支持的数据最大为4个字节,因此使用最高位的一个字节(8位)作为节点编号,剩余三个字节用于传输数据。以下为具体代码:
Arduino Leonardo程序
主要用于发送数据给树莓派,同时接收树莓派的响应数据。
#include <SPI.h>

#include "RF24.h"

#include <SPI.h>

#include "RF24.h"

#include <printf.h>

/****************** User Config ***************************/

/***      Set this radio as radio number 0 or 1         ***/

bool radioNumber = ;

/* Hardware configuration: Set up nRF24L01 radio on SPI bus plus pins 7 & 8 */

RF24 radio(,);

/**********************************************************/

byte addresses[][] = {"1Node","2Node"};

// Used to control whether this node is sending or receiving

bool role = ;

//这个是我们即将建立的传输渠道编码

//!!要和另一个模块的一致

const uint64_t pipes = 0xE8E8F0F0E1LL;

//这个变量会保持我们接受到的信息

//变量类型一定要和传过来的一样

//要传输的数据

unsigned long sendData = ;

unsigned long head = 0x01000000;//高8位为头标志,根据标志不同区分不同发送源,0x00为中心主节点

unsigned long receData;

void setup() {

  Serial.begin();

  printf_begin();

  Serial.println(F("RF24/examples/GettingStarted"));

  radio.begin();

  radio.setPALevel(RF24_PA_MAX);

  radio.openWritingPipe(pipes);

}

void loop() {

  unsigned long data = sendData+head;

   Serial.print("Sending:");

   Serial.println(data);

   bool ok = radio.write(&data,sizeof(unsigned long));

   if(ok){

      radio.startListening();

      delay(); //延时,用于响应返回时间

      if(radio.available()){

          radio.read(&receData,sizeof(unsigned long));//读取的数据为1时,表示正常

          Serial.print("Response:");

          Serial.println(receData);

        }

      radio.stopListening();

    }

} // Loop
结果如下:
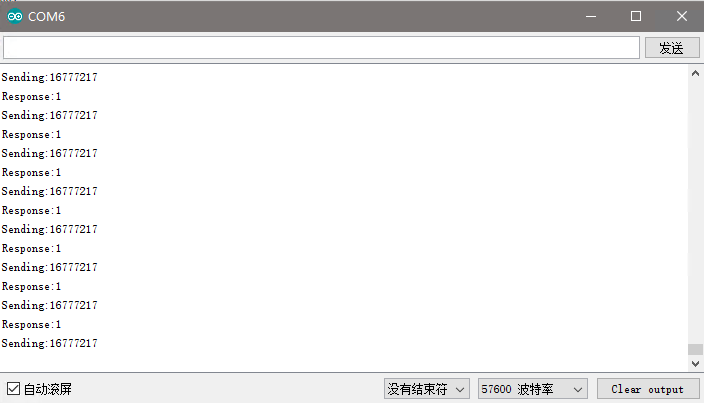
树莓派程序
树莓派主要用于接收数据,同时发出响应。
#include <cstdlib>

#include <iostream>

#include <sstream>

#include <string>

#include <unistd.h>

#include <RF24/RF24.h>

using namespace std;

//

// Hardware configuration

// Configure the appropriate pins for your connections

/****************** Raspberry Pi ***********************/

// Radio CE Pin, CSN Pin, SPI Speed

// Setup for GPIO 22 CE and CE0 CSN with SPI Speed @ 4Mhz

//RF24 radio(RPI_V2_GPIO_P1_22, BCM2835_SPI_CS0, BCM2835_SPI_SPEED_4MHZ);

// NEW: Setup for RPi B+

//RF24 radio(RPI_BPLUS_GPIO_J8_15,RPI_BPLUS_GPIO_J8_24, BCM2835_SPI_SPEED_8MHZ);

// Setup for GPIO 15 CE and CE0 CSN with SPI Speed @ 8Mhz

//RF24 radio(RPI_V2_GPIO_P1_15, RPI_V2_GPIO_P1_24, BCM2835_SPI_SPEED_8MHZ);

// RPi generic:

RF24 radio(,);

/*** RPi Alternate ***/

//Note: Specify SPI BUS 0 or 1 instead of CS pin number.

// See http://tmrh20.github.io/RF24/RPi.html for more information on usage

//RPi Alternate, with MRAA

//RF24 radio(15,0);

//RPi Alternate, with SPIDEV - Note: Edit RF24/arch/BBB/spi.cpp and  set 'this->device = "/dev/spidev0.0";;' or as listed in /dev

//RF24 radio(22,0);

/****************** Linux (BBB,x86,etc) ***********************/

// Setup for ARM(Linux) devices like BBB using spidev (default is "/dev/spidev1.0" )

//RF24 radio(115,0);

//BBB Alternate, with mraa

// CE pin = (Header P9, Pin 13) = 59 = 13 + 46

//Note: Specify SPI BUS 0 or 1 instead of CS pin number.

//RF24 radio(59,0);

/********** User Config *********/

// Assign a unique identifier for this node, 0 or 1

bool radioNumber = ;

/********************************/

// Radio pipe addresses for the 2 nodes to communicate.

const uint64_t pipes = 0xE8E8F0F0E1LL;

unsigned long  receData;

unsigned long  respData=0x01;

unsigned long  head=0x00000000;

int main(int argc, char** argv){

  cout << "RF24/examples/GettingStarted/\n";

  // Setup and configure rf radio

  radio.begin();

  // optionally, increase the delay between retries & # of retries

  radio.setRetries(,);

  // Dump the configuration of the rf unit for debugging

  radio.printDetails();

  radio.openReadingPipe(,pipes);

/***********************************/

  // This simple sketch opens two pipes for these two nodes to communicate

  // back and forth.

  radio.startListening();

  cout << "Listening .... \n";

  // forever loop

  while ()

  {

  // Pong back role.  Receive each packet, dump it out, and send it back

  //

  // if there is data ready

  if ( radio.available() )

  {

    // Fetch the payload, and see if this was the last one.

    while(radio.available()){

        radio.read( &receData, sizeof(unsigned long) );

    }

    radio.stopListening();

    unsigned long data = respData+head;

    radio.write( &data, sizeof(unsigned long) );

    // Now, resume listening so we catch the next packets.

    radio.startListening();

    // Spew it

    printf("Got payload(%d) %lu...\n",sizeof(unsigned long), receData);

    delay(); //Delay after payload responded to, minimize RPi CPU time

    }

  } // forever loop

  return ;

}
结果如下:

上图中数据“16777217”用八进制表示为“0x01000001”,第一个字节的0x01表示从节点head=0x01000000发来的数据,数据为data=0x000001。
树莓派与Arduino Leonardo使用NRF24L01无线模块通信之基于RF24库 (二) 发送自定义数据的更多相关文章
- 树莓派与Arduino Leonardo使用NRF24L01无线模块通信之基于RF24库 (六) 树莓派查询子节点温湿度数据
nrl24l01每次只能发送4个字节,前面说到,第一个字节用于源节点,第二个字节用于目的节点.因此只剩下两个字节用于温度和湿度,一个字节只有八位,需要表示温湿度的正负数,因此每个字节的第一位表示正负符 ...
- 树莓派与Arduino Leonardo使用NRF24L01无线模块通信之基于RF24库 (五) 树莓派单子节点发送数据
本项目中各个节点和树莓派的通信不区分信道,因此如果由树莓派发送给特定节点的数据会被所有节点接收到,因此子节点可以判别该数据是否发给自己的,需要在数据的第二个字节中加入目标节点的编号(第一个字节为源节点 ...
- 树莓派与Arduino Leonardo使用NRF24L01无线模块通信之基于RF24库 (三) 全双工通信
设计思路 Arduino Leonardo初始化为发送模式,发送完成后,立即切换为接收模式,不停的监听,收到数据后立即切换为发送模式,若超过一定时间还为接收到数据,则切换为发送模式. 树莓派初始化为接 ...
- 树莓派与Arduino Leonardo使用NRF24L01无线模块通信之基于RF24库 (四) 树莓派单子节点查询
考虑到项目的实际需要,树莓派作为主机,应该只在需要的时候查询特定节点发送的数据,因此接收到数据后需要根据头部判断是否是自己需要的数据,如果不是继续接收数据,超过一定时间未查询到特定节点的数据,则退出程 ...
- 树莓派与Arduino Leonardo使用NRF24L01无线模块通信之基于RF24库 (一) 配置与测试
引脚连接说明 与树莓派的连线 NRF24L01 => 树莓派 GND => GND VCC => 3.3V CE = ...
- STC8H开发(五): SPI驱动nRF24L01无线模块
目录 STC8H开发(一): 在Keil5中配置和使用FwLib_STC8封装库(图文详解) STC8H开发(二): 在Linux VSCode中配置和使用FwLib_STC8封装库(图文详解) ST ...
- nRF2401A/nRF24L01/nRF24L01+无线模块最常见问题汇集(转)
俗话说:每个人一生下来什么都会的,都是通过自己努力和探索出来的,NRF系列芯片,刚开始都好奇心加兴趣才来捣鼓它的,刚开始做硬件和软件,没有收发数据弄得整个人头都快炸开了,所以在此和大家分享一下前辈的经 ...
- [51单片机] nRF24L01 无线模块 测试 按键-灯-远程控制
哈哈,穷吊死一个,自己做的一个超简单的板还没有电源提供,只得借助我的大开发板啦.其实这2个模块是完全可以分开的,无线嘛,你懂得!进入正题,这个实验的功能就是一个发送模块(大的那个板)连接4个按键,通过 ...
- nRF24L01无线模块笔记
nRF24L01模块 官网链接: https://www.nordicsemi.com/Products/nRF24-series 常见的无线收发模块, 工作在2.4GHz频段, 适合近距离遥控和数据 ...
随机推荐
- 前端- html -总结
html概述 head标签 title 显示网站的标题 meta 提供有关页面的原信息 link 链接css资源文件.网站图标 style 定义内部样式表 script 链接脚本js文件 body标签 ...
- 【bzoj1066】【luogu2472】[SCOI2007]蜥蜴
1066: [SCOI2007]蜥蜴 Time Limit: 1 Sec Memory Limit: 162 MB Description 在一个r行c列的网格地图中有一些高度不同的石柱,一些石柱上 ...
- [CF1027F]Session in BSU[最小基环树森林]
题意 有 \(n\) 门课程,每门课程可以选择在 \(a_i\) 或者 \(b_i\) 天参加考试,每天最多考一门,问最早什么时候考完所有课程. \(n\leq 10^6\). 分析 类似 [BZOJ ...
- java 或者 js 获取项目访问路径(域名)
/** * 获得站点url * @return */ public String getWebUrl(){ String url = getRequest().getScheme() + " ...
- 【日常训练】Help Victoria the Wise(Codeforces 99C)
题意与分析 这题意思是这样的:在正方体的六面镶嵌给定颜色的宝石(相同颜色不区分),然后问最多有几种彼此不等价(即各种旋转过后看起来一致)的方案. 其实可以乱搞,因为范围只有720.求出全排列,然后每个 ...
- 初学者浅度剖析eShopOnContainers 里面用到的MediatR .
一.介绍 简单了解下开源项目 MedatR, eShopOnContainers, MediatR作者Jimmy Bogard : Simple mediator implementation in ...
- loadrunner11和https
最近做了一个接口测试的项目,json格式,https协议,使用postman调试这个接口,在postman中写好三个表头Authorization.sessionIndex.Content-Type和 ...
- jmeter—操作数据库
添加JDBC Request,添加需要执行的sql语句 在这个界面需要配置Variabke Name,内容要与上表中的Name值相同:数据库的用户名.密码.URL.驱动这些基本信息要在这里配置:其他选 ...
- python迭代器的内置函数
1.迭代器: 内置函数: (1)iter() -__iter__() (2)next() -__next__() 2.迭代器的举例; 对于Fibs数列,我们对其进行 限量输出: 实现代码如下: cla ...
- 【Unity Shader】(八) ------ 高级纹理之立方体纹理及光线反射、折射的实现
笔者使用的是 Unity 2018.2.0f2 + VS2017,建议读者使用与 Unity 2018 相近的版本,避免一些因为版本不一致而出现的问题. [Unity Shader](三) -- ...