
CXF WebService整合Spring
转自http://www.cnblogs.com/hoojo/archive/2011/03/30/1999563.html
首先,CXF和spring整合需要准备如下jar包文件:
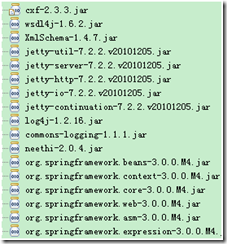
这边我是用Spring的jar包是Spring官方提供的,并没有使用CXF中的Spring的jar文件。
添加这么多文件后,首先在web.xml中添加如下配置:
<!-- 加载Spring容器配置 -->
<listener>
<listener-class>org.springframework.web.context.ContextLoaderListener</listener-class>
</listener>
<!-- 设置Spring容器加载配置文件路径 -->
<context-param>
<param-name>contextConfigLocation</param-name>
<param-value>classpath*:applicationContext-server.xml</param-value>
</context-param>
<listener>
<listener-class>org.springframework.web.util.IntrospectorCleanupListener</listener-class>
</listener>
<servlet>
<servlet-name>CXFService</servlet-name>
<servlet-class>org.apache.cxf.transport.servlet.CXFServlet</servlet-class>
</servlet>
<servlet-mapping>
<servlet-name>CXFService</servlet-name>
<url-pattern>/*</url-pattern>
</servlet-mapping>
然后在src目录中,新建一个applicationContext-server.xml文件,文件内容如下:
<?xml version="1.0" encoding="UTF-8"?>
<beans xmlns="http://www.springframework.org/schema/beans"
xmlns:context="http://www.springframework.org/schema/context"
xmlns:jaxws="http://cxf.apache.org/jaxws"
xmlns:xsi="http://www.w3.org/2001/XMLSchema-instance"
xsi:schemaLocation="http://www.springframework.org/schema/beans >
http://www.springframework.org/schema/beans/spring-beans-3.0.xsd
http://www.springframework.org/schema/context
http://www.springframework.org/schema/context/spring-context-3.0.xsd
http://cxf.apache.org/jaxws
http://cxf.apache.org/schemas/jaxws.xsd"
注意上面的带下划线加粗部分,这个很重要的哦!不能写错或是遗漏了。
添加完这个文件后,还需要在这个文件中导入这么几个文件。文件内容如下:
<import resource="classpath:META-INF/cxf/cxf.xml"/>
<import resource="classpath:META-INF/cxf/cxf-extension-soap.xml"/>
<import resource="classpath:META-INF/cxf/cxf-servlet.xml"/>
下面开始写服务器端代码,首先定制服务器端的接口,代码如下:
package com.hoo.service;
import javax.jws.WebParam;
import javax.jws.WebService;
import javax.jws.soap.SOAPBinding;
import javax.jws.soap.SOAPBinding.Style;
import com.hoo.entity.User;
import com.hoo.entity.Users;
/**
* <b>function:</b>定制客户端请求WebService所需要的接口
* @author hoojo
* @createDate 2011-3-18 上午08:22:55
* @file ComplexUserService.java
* @package com.hoo.service
* @project CXFWebService
* @blog http://blog.csdn.net/IBM_hoojo
* @email hoojo_@126.com
* @version 1.0
*/
@WebService
@SOAPBinding(style = Style.RPC)
public interface IComplexUserService {
public User getUserByName(@WebParam(name = "name") String name);
public void setUser(User user);
}
下面编写WebService的实现类,服务器端实现代码如下:
package com.hoo.service;
import java.util.ArrayList;
import java.util.Date;
import java.util.HashMap;
import java.util.List;
import javax.jws.WebParam;
import javax.jws.WebService;
import javax.jws.soap.SOAPBinding;
import javax.jws.soap.SOAPBinding.Style;
import com.hoo.entity.User;
import com.hoo.entity.Users;
/**
* <b>function:</b> WebService传递复杂对象,如JavaBean、Array、List、Map等
* @author hoojo
* @createDate 2011-3-18 上午08:22:55
* @file ComplexUserService.java
* @package com.hoo.service
* @project CXFWebService
* @blog http://blog.csdn.net/IBM_hoojo
* @email hoojo_@126.com
* @version 1.0
*/
@WebService
@SOAPBinding(style = Style.RPC)
@SuppressWarnings("deprecation")
public class ComplexUserService implements IComplexUserService {
public User getUserByName(@WebParam(name = "name") String name) {
User user = new User();
user.setId(new Date().getSeconds());
user.setName(name);
user.setAddress("china");
user.setEmail(name + "@hoo.com");
return user;
}
public void setUser(User user) {
System.out.println("############Server setUser###########");
System.out.println("setUser:" + user);
}
}
注意的是和Spring集成,这里一定要完成接口实现,如果没有接口的话会有错误的。
下面要在applicationContext-server.xml文件中添加如下配置:
<bean id="userServiceBean" class="com.hoo.service.ComplexUserService"/>
<bean id="inMessageInterceptor" class="com.hoo.interceptor.MessageInterceptor">
<constructor-arg value="receive"/>
</bean>
<bean id="outLoggingInterceptor" class="org.apache.cxf.interceptor.LoggingOutInterceptor"/>
<!-- 注意下面的address,这里的address的名称就是访问的WebService的name -->
<jaxws:server id="userService" serviceClass="com.hoo.service.IComplexUserService" address="/Users">
<jaxws:serviceBean>
<!-- 要暴露的 bean 的引用 -->
<ref bean="userServiceBean"/>
</jaxws:serviceBean>
<jaxws:inInterceptors>
<ref bean="inMessageInterceptor"/>
</jaxws:inInterceptors>
<jaxws:outInterceptors>
<ref bean="outLoggingInterceptor"/>
</jaxws:outInterceptors>
</jaxws:server>
下面启动tomcat服务器后,在WebBrowser中请求:
http://localhost:8080/CXFWebService/Users?wsdl
如果你能看到wsdl的xml文件的内容,就说明你成功了,注意的是上面地址的Users就是上面xml配置中的address的名称,是一一对应的。
下面编写客户端请求的代码,代码如下:
package com.hoo.client;
import org.apache.cxf.jaxws.JaxWsProxyFactoryBean;
import com.hoo.entity.User;
import com.hoo.service.IComplexUserService;
/**
* <b>function:</b>请求Spring整合CXF的WebService客户端
* @author hoojo
* @createDate 2011-3-28 下午03:20:35
* @file SpringUsersWsClient.java
* @package com.hoo.client
* @project CXFWebService
* @blog http://blog.csdn.net/IBM_hoojo
* @email hoojo_@126.com
* @version 1.0
*/
public class SpringUsersWsClient {
public static void main(String[] args) {
//调用WebService
JaxWsProxyFactoryBean factory = new JaxWsProxyFactoryBean();
factory.setServiceClass(IComplexUserService.class);
factory.setAddress("http://localhost:8080/CXFWebService/Users");
IComplexUserService service = (IComplexUserService) factory.create();
System.out.println("#############Client getUserByName##############");
User user = service.getUserByName("hoojo");
System.out.println(user);
user.setAddress("China-Guangzhou");
service.setUser(user);
}
}
运行后,可以在控制台中看到
log4j:WARN No appenders could be found for logger (org.apache.cxf.bus.spring.BusApplicationContext).

log4j:WARN Please initialize the log4j system properly.

log4j:WARN See http://logging.apache.org/log4j/1.2/faq.html#noconfig for more info.

2011-3-28 18:12:26 org.apache.cxf.service.factory.ReflectionServiceFactoryBean buildServiceFromClass

信息: Creating Service {http://service.hoo.com/}IComplexUserServiceService from class com.hoo.service.IComplexUserService

#############Client getUserByName##############

27#hoojo#hoojo@hoo.com#china

Tomcat控制台
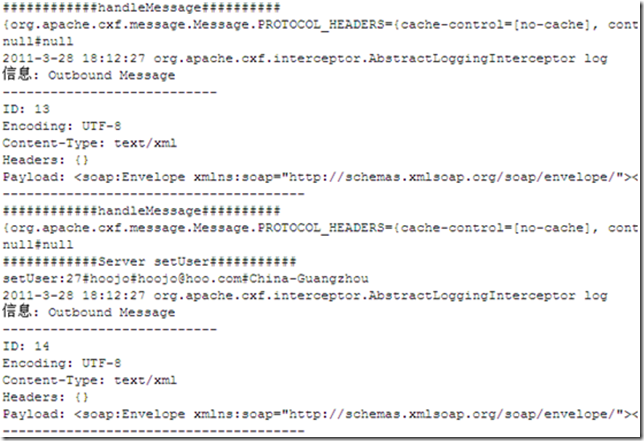
这个server端是通过Spring整合配置的,下面我们将Client端也通过Spring配置完成整合。
首先增加applicationContext-client.xml配置文件,文件内容如下:
<?xml version="1.0" encoding="UTF-8"?>
<beans xmlns="http://www.springframework.org/schema/beans"
xmlns:context="http://www.springframework.org/schema/context"
xmlns:jaxws="http://cxf.apache.org/jaxws"
xmlns:xsi="http://www.w3.org/2001/XMLSchema-instance"
xsi:schemaLocation="http://www.springframework.org/schema/beans >
http://www.springframework.org/schema/beans/spring-beans-3.0.xsd
http://www.springframework.org/schema/context
http://www.springframework.org/schema/context/spring-context-3.0.xsd
http://cxf.apache.org/jaxws
http://cxf.apache.org/schemas/jaxws.xsd"
<import resource="classpath:META-INF/cxf/cxf.xml"/>
<import resource="classpath:META-INF/cxf/cxf-extension-soap.xml"/>
<import resource="classpath:META-INF/cxf/cxf-servlet.xml"/>
<jaxws:client id="userWsClient" serviceClass="com.hoo.service.IComplexUserService"
address="http://localhost:8080/CXFWebService/Users"/>
</beans>
客户端请求代码如下:
package com.hoo.client;
import org.apache.cxf.jaxws.JaxWsProxyFactoryBean;
import org.springframework.context.ApplicationContext;
import org.springframework.context.support.ClassPathXmlApplicationContext;
import com.hoo.entity.User;
import com.hoo.service.IComplexUserService;
/**
* <b>function:</b>请求Spring整合CXF的WebService客户端
* @author hoojo
* @createDate 2011-3-28 下午03:20:35
* @file SpringUsersWsClient.java
* @package com.hoo.client
* @project CXFWebService
* @blog http://blog.csdn.net/IBM_hoojo
* @email hoojo_@126.com
* @version 1.0
*/
public class SpringUsersWsClient {
public static void main(String[] args) {
ApplicationContext ctx = new ClassPathXmlApplicationContext("applicationContext-client.xml");
IComplexUserService service = ctx.getBean("userWsClient", IComplexUserService.class);
System.out.println("#############Client getUserByName##############");
User user = service.getUserByName("hoojo");
System.out.println(user);
user.setAddress("China-Guangzhou");
service.setUser(user);
}
}
运行后结果如下:
#############Client getUserByName##############

45#hoojo#hoojo@hoo.com#china

############Server setUser###########

setUser:45#hoojo#hoojo@hoo.com#China-Guangzhou
CXF WebService整合Spring的更多相关文章
- CXF WebService整合SpringMVC的maven项目
首先推荐博客:http://www.cnblogs.com/xdp-gacl/p/4259481.html http://blog.csdn.net/hu_shengyang/article/de ...
- Spring+SpringMVC+Mybatis+Maven+CXF+WebService整合之服务端
WebService服务端项目结构: <project xmlns="http://maven.apache.org/POM/4.0.0" xmlns:xsi="h ...
- webservice整合spring cxf
下载cxf包,把他里面的包都添加进lib文件夹中. 创建一个接口.添加@WebService注解 @WebService public interface HelloWorld { String sa ...
- webservice整合spring
接口HelloWorld需要添加webservice注解 package com.cs.webservice; import java.util.List; import javax.jws.WebP ...
- webservice 服务端例子+客户端例子+CXF整合spring服务端测试+生成wsdl文件 +cxf客户端代码自动生成
首先到CXF官网及spring官网下载相关jar架包,这个不多说.webservice是干嘛用的也不多说. 入门例子 模拟新增一个用户,并返回新增结果,成功还是失败. 大概的目录如上,很简单. Res ...
- Spring 3 整合Apache CXF WebService[转]
http://www.cnblogs.com/hoojo/archive/2012/07/13/2590593.html 在CXF2版本中,整合Spring3发布CXF WebService就更加简单 ...
- CXF整合Spring开发WebService
刚开始学webservice时就听说了cxf,一直没有尝试过,这两天试了一下,还不错,总结如下: 要使用cxf当然是要先去apache下载cxf,下载完成之后,先要配置环境变量,有以下三步: 1.打开 ...
- Spring整合CXF步骤,Spring实现webService,spring整合WebService
Spring整合CXF步骤 Spring实现webService, spring整合WebService >>>>>>>>>>>> ...
- Spring整合CXF webservice restful 实例
webservice restful接口跟soap协议的接口实现大同小异,只是在提供服务的类/接口的注解上存在差异,具体看下面的代码,然后自己对比下就可以了. 用到的基础类 User.java @Xm ...
随机推荐
- javascript入门学习笔记
<button type="button" onclick="alert('Welcome!')">点击这里</button>alert ...
- Visual Studio 2010 单元测试目录
单元测试的重要性这里我就不多说了,以前大家一直使用NUnit来进行单元测试,其实早在Visual Studio 2005里面,微软就已经集成了一个叫Test的专门测试插件,经过几年的发展,这个工具现在 ...
- uva 11529 Strange Tax Calculation (几何+计数)
题目链接: http://vjudge.net/problem/viewProblem.action?id=18277 这题暴力n^4妥妥的TLE!即使n^3也可能会T 正确的姿势应该是:枚举每个点作 ...
- 用core dump来调试程序段错误
有的程序可以通过编译, 但在运行时会出现Segment fault(段错误). 这通常都是指针错误引起的.但这不像编译错误一样会提示到文件->行, 而是没有任何信息, 使得我们的调试变得困难起来 ...
- iOS开发,新手入门指导
在做了近两年wp,安卓开发之后,某一天突然决定投身iOS的开发之中. 因为一直用的mac,做wp开发的时候都用双系统,vs开久了,就会比较烫,这点让人不爽.后来更多地做安卓,直接mac下开发,很舒适的 ...
- Eclipse代码注释模板修改
/** * @ClassName: ${type_name} * @author: <font color="red"><b>ZF</b>< ...
- java判断网络连接是否正常
/** * 判断本机当前的网络状态是否联通 * 在这里主要用到中国天气信息,所以访问百度地址是否能够访问成功来判断当前的网络状态 */ public static boolean isConnect( ...
- ext之关键字mixins、statics、require
1.mixins 说明:类似于面向对象中的多继承 <script type="text/javascript"> Ext.onReady(function () { / ...
- 如何搭建一个angularJS应用
以写一个hello word为例,首先引入angular.js库文件 <!doctype html> <html ng-app> <head> <titl ...
- LIKE匹配关键字
1.% 匹配任意数目字符(包括零个字符) SELECT * FROM edo_user WHERE true_name LIKE '王%' 应用:关键字查询 WHERE u.true_name lik ...