
Spring Boot入门(六):使用MyBatis访问MySql数据库(注解方式)
本系列博客记录自己学习Spring Boot的历程,如帮助到你,不胜荣幸,如有错误,欢迎指正!
本篇博客我们讲解下在Spring Boot中使用MyBatis访问MySql数据库的简单用法。
1.前期准备
假设你的机器已经安装好了MySql,我们先执行如下语句创建数据库和表:
CREATE DATABASE springbootdemo_db

create table author
(
  author_id   int auto_increment comment '作者id'
    primary key,
  author_name varchar(20) not null comment '姓名',
  pen_name    varchar(20) not null comment '笔名'
)
comment '作者';
2.修改pom文件
pom文件引入mybatis的starter pom和mysql的驱动,因后面要编写控制器,因此也引入下阿里巴巴的fastjson:
<dependency>
    <groupId>org.mybatis.spring.boot</groupId>
    <artifactId>mybatis-spring-boot-starter</artifactId>
    <version>1.1.1</version>
</dependency>

<dependency>
    <groupId>mysql</groupId>
    <artifactId>mysql-connector-java</artifactId>
    <version>5.1.35</version>
</dependency>
<dependency>
    <groupId>com.alibaba</groupId>
    <artifactId>fastjson</artifactId>
    <version>1.2.47</version>
</dependency>
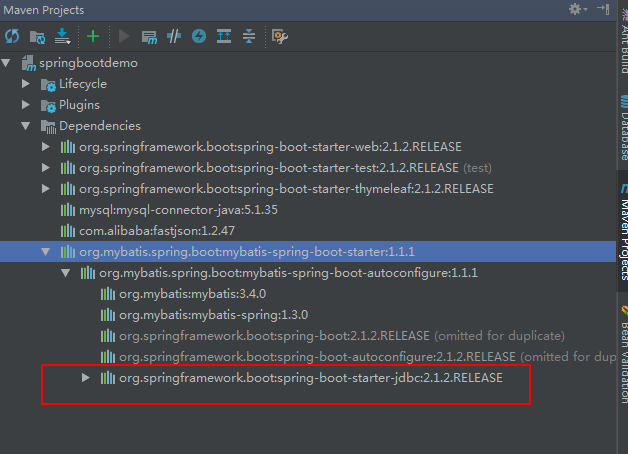
说明:引入了mybatis-spring-boot-starter后,可以不再引用spring-boot-starter-jdbc,因为前者已经依赖于后者。
3.配置数据源
在resources/application.yml中配置数据源:
spring:
  datasource:
    driver-class-name: com.mysql.jdbc.Driver
    url: jdbc:mysql://localhost:3306/springbootdemo_db
    username: root
    password:
4.定义数据库实体
定义数据库实体Author:
package com.zwwhnly.springbootdemo.mybatis.entity;

import com.alibaba.fastjson.annotation.JSONField;

public class Author {
    @JSONField(name = "author_id")
    private Long authorId;
    @JSONField(name = "author_name")
    private String authorName;
    @JSONField(name = "pen_name")
    private String penName;

    public Long getAuthorId() {
        return authorId;
    }

    public void setAuthorId(Long authorId) {
        this.authorId = authorId;
    }

    public String getAuthorName() {
        return authorName;
    }

    public void setAuthorName(String authorName) {
        this.authorName = authorName;
    }

    public String getPenName() {
        return penName;
    }

    public void setPenName(String penName) {
        this.penName = penName;
    }
}
5.编写Dao层代码
定义接口AuthorMapper:
package com.zwwhnly.springbootdemo.mybatis.annotation;

import com.zwwhnly.springbootdemo.mybatis.entity.Author;
import org.apache.ibatis.annotations.*;

import java.util.List;

@Mapper
public interface AuthorMapper {
    @Insert("insert into author(author_name, pen_name) values(#{author_name}, #{pen_name})")
    int add(@Param("author_name") String authorName, @Param("pen_name") String penName);

    @Update("update author set author_name = #{author_name}, pen_name = #{pen_name} where author_id = #{id}")
    int update(@Param("author_name") String authorName, @Param("pen_name") String penName, @Param("id") Integer id);

    @Delete("delete from author where author_id = #{id}")
    int delete(Integer id);

    @Select("select author_id as authorId, author_name as authorName, pen_name as penName from author where author_id = #{id}")
    Author findAuthor(@Param("id") Long id);

    @Select("select author_id as authorId, author_name as authorName, pen_name as penName from author")
    List<Author> findAuthorList();
}
注意:接口要添加@Mapper注解。
6.编写Service层代码
定义类AuthorService:
package com.zwwhnly.springbootdemo.mybatis.annotation;

import com.zwwhnly.springbootdemo.mybatis.entity.Author;
import org.springframework.beans.factory.annotation.Autowired;
import org.springframework.stereotype.Service;

import java.util.List;

@Service
public class AuthorService {
    @Autowired
    private AuthorMapper authorMapper;

    public int add(String authorName, String penName) {
        return this.authorMapper.add(authorName, penName);
    }

    public int update(String authorName, String penName, Integer id) {
        return this.authorMapper.update(authorName, penName, id);
    }

    public int delete(Integer id) {
        return this.authorMapper.delete(id);
    }

    public Author findAuthor(Integer id) {
        return this.authorMapper.findAuthor(id);
    }

    public List<Author> findAuthorList() {
        return this.authorMapper.findAuthorList();
    }
}
注意:类添加@Service注解。
7.编写Controller代码
新建控制器AuthorController:
package com.zwwhnly.springbootdemo.controller;

import com.alibaba.fastjson.JSONObject;
import com.zwwhnly.springbootdemo.mybatis.entity.Author;
import com.zwwhnly.springbootdemo.mybatis.annotation.AuthorService;
import org.springframework.beans.factory.annotation.Autowired;
import org.springframework.web.bind.annotation.*;

import java.util.HashMap;
import java.util.List;
import java.util.Map;

@RestController
@RequestMapping(value = "/mybatis/author")
public class AuthorController {
    @Autowired
    private AuthorService authorService;

    /**
     * 查询作者列表
     */
    @RequestMapping(value = "getAuthorList", method = RequestMethod.GET)
    public Map<String, Object> getAuthorList() {
        List<Author> authorList = this.authorService.findAuthorList();
        Map<String, Object> param = new HashMap<>();
        param.put("total", authorList.size());
        param.put("rows", authorList);
        return param;
    }

    /**
     * 查询单个作者信息
     */
    @RequestMapping(value = "/getAuthor/{authorId:\\d+}", method = RequestMethod.GET)
    public Author getAuthor(@PathVariable Integer authorId) {
        Author author = this.authorService.findAuthor(authorId);
        if (author == null) {
            throw new RuntimeException("查询错误");
        }
        return author;
    }

    /**
     * 新增
     */
    @RequestMapping(value = "add", method = RequestMethod.POST)
    public void add(@RequestBody JSONObject jsonObject) {
        String authorName = jsonObject.getString("authorName");
        String penName = jsonObject.getString("penName");

        try {
            this.authorService.add(authorName, penName);
        } catch (Exception e) {
            e.printStackTrace();
            throw new RuntimeException("新增错误");
        }
    }

    /**
     * 更新
     */
    @RequestMapping(value = "/update/{authorId:\\d+}", method = RequestMethod.PUT)
    public void update(@PathVariable Integer authorId, @RequestBody JSONObject jsonObject) {
        Author author = this.authorService.findAuthor(authorId);
        String authorName = jsonObject.getString("authorName");
        String penName = jsonObject.getString("penName");

        try {
            this.authorService.update(authorName, penName, author.getAuthorId());
        } catch (Exception e) {
            e.printStackTrace();
            throw new RuntimeException("更新错误");
        }
    }

    /**
     * 删除
     */
    @RequestMapping(value = "/delete/{authorId:\\d+}", method = RequestMethod.DELETE)
    public void delete(@PathVariable Integer authorId) {
        try {
            this.authorService.delete(authorId);
        } catch (Exception e) {
            throw new RuntimeException("删除错误");
        }
    }
}
8.使用Postman验证
8.1验证新增
因为新增是Post请求,因此这里我们使用下Postman工具:
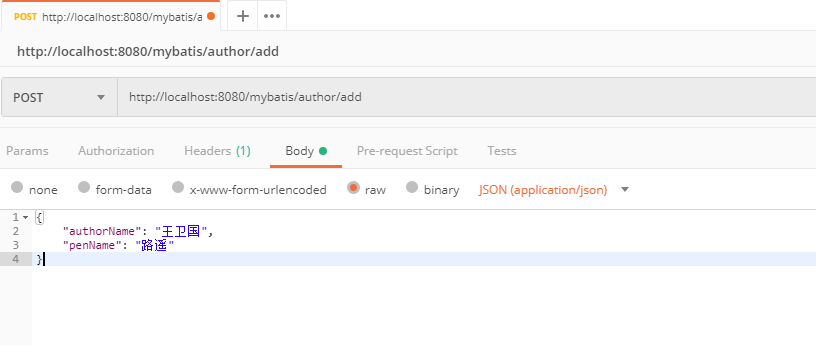
调用完接口,发现数据库新增数据成功。

然后用同样的方法新增下鲁迅的信息。

8.2验证更新
调用更新接口将鲁迅的名字从周作人修改为周树人:
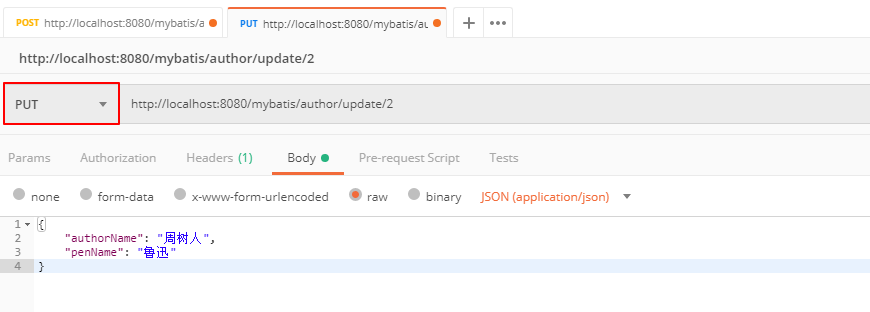
调用完接口,发现数据库更新数据成功。

8.3验证获取列表
在浏览器访问http://localhost:8080/mybatis/author/getAuthorList,返回数据如下:
{
  "total": 2,
  "rows": [
    {
      "authorId": 1,
      "authorName": "王卫国",
      "penName": "路遥"
    },
    {
      "authorId": 2,
      "authorName": "周树人",
      "penName": "鲁迅"
    }
  ]
}
8.4验证获取单个数据
在浏览器访问http://localhost:8080/mybatis/author/getAuthor/1,返回如下数据:
{
  "authorId": 1,
  "authorName": "王卫国",
  "penName": "路遥"
}
8.5验证删除
调用删除接口,将鲁迅的数据删除:
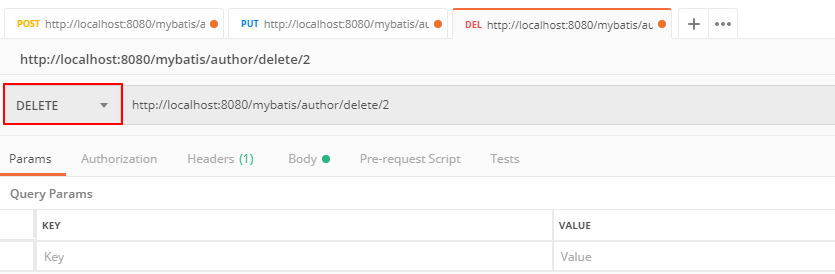
此时访问http://localhost:8080/mybatis/author/getAuthorList,返回数据只有1条了:
{
  "total": 1,
  "rows": [
    {
      "authorId": 1,
      "authorName": "王卫国",
      "penName": "路遥"
    }
  ]
}
9.源码地址
原文地址:Spring Boot入门(六):使用MyBatis访问MySql数据库(注解方式)
源码地址:https://github.com/zwwhnly/springbootdemo.git
欢迎大家下载,有问题可以多多交流。
10.参考链接
Spring Boot 揭秘与实战(二) 数据存储篇 - MyBatis整合
Spring Boot入门(六):使用MyBatis访问MySql数据库(注解方式)的更多相关文章
- Spring Boot入门(2)使用MySQL数据库
介绍 本文将介绍如何在Spring项目中连接.处理MySQL数据库. 该项目使用Spring Data JPA和Hibernate来连接.处理MySQL数据库,当然,这仅仅是其中一种方式,你也 ...
- Spring Boot 框架下使用MyBatis访问数据库之基于XML配置的方式
MyBatis 是一款优秀的持久层框架,它支持定制化 SQL.存储过程以及高级映射.MyBatis 避免了几乎所有的 JDBC 代码和手动设置参数以及获取结果集.MyBatis 可以使用简单的 XML ...
- spring boot使用log4j2将日志写入mysql数据库
log4j2官方例子在spring boot中报错而且还是用的是org.apache.commons.dbcp包 我给改了一下使用org.apache.commons.dbcp2包 1.log4j2. ...
- 出入Spring boot(六)数据访问
Spring Data提供了使用统一的API进行数据访问操作,这是Spring通过提供Spring DataCommons项目来实现的,它是Spring data的依赖Spring Data Comm ...
- Spring Boot项目中使用jdbctemplate 操作MYSQL数据库
不废话,先来代码 pom文件: <project xmlns="http://maven.apache.org/POM/4.0.0" xmlns:xsi="http ...
- Spring Boot 入门 - 目录
pring Boot 入门 - 进阶篇(3)- 定时任务(@Scheduled) 主要用于定时发送邮件.夜间自动维护等. (1)开启定时任务功能 @Configuration @EnableSched ...
- Spring Boot入门教程2-1、使用Spring Boot+MyBatis访问数据库(CURD)注解版
一.前言 什么是MyBatis?MyBatis是目前Java平台最为流行的ORM框架https://baike.baidu.com/item/MyBatis/2824918 本篇开发环境1.操作系统: ...
- Spring boot入门(二):Spring boot集成MySql,Mybatis和PageHelper插件
上一篇文章,写了如何搭建一个简单的Spring boot项目,本篇是接着上一篇文章写得:Spring boot入门:快速搭建Spring boot项目(一),主要是spring boot集成mybat ...
- Spring Boot 2.x基础教程:使用MyBatis访问MySQL
之前我们已经介绍了两种在Spring Boot中访问关系型数据库的方式: 使用spring-boot-starter-jdbc 使用spring-boot-starter-data-jpa 虽然Spr ...
随机推荐
- URL 规范 整理
URL 规范 不用大写:(强制) 用中杠-不用下杠_:(强制) 参数列表要encode,编码使用utf-8:(强制) URI中的名词表示资源集合,使用复数形式.(建议) 增加版本号(建议) URI中统 ...
- mondrian 4.7 源码部署
mondrian是一个开源的数据分析工程, 网上有关mondrian3.X的源码部署比较多, 有关4.X的部署较少. 目前官方推荐使用的时mondrian3.7的修订版, 可以再github上下载到最 ...
- idea快捷
IntelliJ Idea 常用快捷键 列表(实战终极总结!!!!) 1. -----------自动代码-------- 常用的有fori/sout/psvm+Tab即可生成循环.System.ou ...
- Struts2中的值栈
一 什么是值栈 值栈: struts2中提供的一种类似于域对象的工具, 用于struts2中的存值和取值. 每次访问Action的时候, 都会创建一个action对象, 而每个action对象中都存在 ...
- 使用 Java8 Optional 的正确姿势(转)
我们知道 Java 8 增加了一些很有用的 API, 其中一个就是 Optional. 如果对它不稍假探索, 只是轻描淡写的认为它可以优雅的解决 NullPointException 的问题, 于是代 ...
- linux几种时间函数总结
一.linux时间函数总结 最近的工作中用到的时间函数比较频繁,今天抽时间总结一下,在linux下,常用的获取时间的函数有如下几个: asctime, ctime, gmtime, localti ...
- 十九、Hadoop学记笔记————Hbase和MapReduce
概要: hadoop和hbase导入环境变量: 要运行Hbase中自带的MapReduce程序,需要运行如下指令,可在官网中找到: 如果遇到如下问题,则说明Hadoop的MapReduce没有权限访问 ...
- Java公开课-03.内部类
一.内部类的作用 1.实现了类的隐藏 2.实现了多重继承 3.内部类拥有外部类所拥有的属性和方法的访问权限 4.避免修改接口的时候出现同名方法 二.内部类--成员内部类 1.如果我们想访问内部类,我们 ...
- CentOS7快速搭建LNMP环境
名词解释: LNMP:Linux+Nginx+MySql+PHPLAMP:LInux+Apache+MySql+PHPNginx的正确读法应该是Engine X我们使用CentOS自带的YUM来安装 ...
- Linux用户登录日志查询
# 1 utmp.wtmp.btmp文件 Linux用户登录信息放在三个文件中: 1 /var/run/utmp:记录当前正在登录系统的用户信息,默认由who和w记录当前登录用户的信息,uptime记 ...