Spring源码情操陶冶-任务定时器ConcurrentTaskScheduler
承接前文Spring源码情操陶冶#task:scheduled-tasks解析器,本文在前文的基础上讲解单核心线程线程池的工作原理
应用附例
承接前文的例子,如下
<!--define bean for schedule task-->

<bean id="taskBean" class="com.jing.test.spring.task.TaskBean"></bean>

<task:scheduled-tasks>

    <task:scheduled ref="taskBean" method="doInit" cron="0 0 0 ? * *"></task:scheduled>

    <task:scheduled ref="taskBean" method="doClear" cron="0 0 23 ? * *"></task:scheduled>

</task:scheduled-tasks>
即我们不配置task:scheduled-tasks的属性scheduler,则会采取org.springframework.scheduling.concurrent.ConcurrentTaskScheduler任务定时器。
实例化缘由
可以直接去看前文的ContextLifecycleScheduledTaskRegistrar#scheduleTasks()的一个代码片段,如下
protected void scheduleTasks() {

		****

		****

		// 如果不指定scheduler属性,则默认使用单线程池模型

        if (this.taskScheduler == null) {

            this.localExecutor = Executors.newSingleThreadScheduledExecutor();

            this.taskScheduler = new ConcurrentTaskScheduler(this.localExecutor);

        }

        ****

}
我们可以观察下该定时器所包含的线程池对象,调用的是JDK Executors的静态方法newSingleThreadScheduledExecutor()方法
public static ScheduledExecutorService newSingleThreadScheduledExecutor() {

        return new DelegatedScheduledExecutorService

            (new ScheduledThreadPoolExecutor(1));

    }
直接去看ScheduledThreadPoolExecutor构造函数
    public ScheduledThreadPoolExecutor(int corePoolSize) {

	    // 应用ThreadPoolExecutor的构造方法,这里很熟悉了

        super(corePoolSize, Integer.MAX_VALUE, 0, NANOSECONDS,

              new DelayedWorkQueue());

    }
从上面看出,创建的线程池类型为ScheduledThreadPoolExecutor,其内部情况如下
- 核心线程-1个
- 最大可创建线程-Integer.MAX_VALUE
- 空闲线程活动时间-0秒
- 线程队列-DelayedWorkQueue
- 拒绝策略-AbortPolicy(抛异常信息)
定时器执行入口
由前文得知,定时器会根据任务的类型执行TaskScheduler接口的scheduleAtFixedRate()或者scheduleWithFixedDelay()抑或是schedule()方法。为了方便理解,我们就拿schedule()方法入手
ConcurrentTaskScheduler#schedule()
	@Override

	public ScheduledFuture<?> schedule(Runnable task, Trigger trigger) {

		try {

			// jdk1.8不支持,jdk1.7支持

			if (this.enterpriseConcurrentScheduler) {

				return new EnterpriseConcurrentTriggerScheduler().schedule(decorateTask(task, true), trigger);

			}

			else {

				// ErrorHandler一般为LoggingErrorHandler,打印错误日志,也可以直接抛出异常

				ErrorHandler errorHandler = (this.errorHandler != null ? this.errorHandler : TaskUtils.getDefaultErrorHandler(true));

				return new ReschedulingRunnable(task, trigger, this.scheduledExecutor, errorHandler).schedule();

			}

		}

		catch (RejectedExecutionException ex) {

			throw new TaskRejectedException("Executor [" + this.scheduledExecutor + "] did not accept task: " + task, ex);

		}

	}
由上述代码可知,最后包装为ReschedulingRunnable类来调用schedule()方法,OK,在此之前我们必须好好观察下ReschedulingRunnable
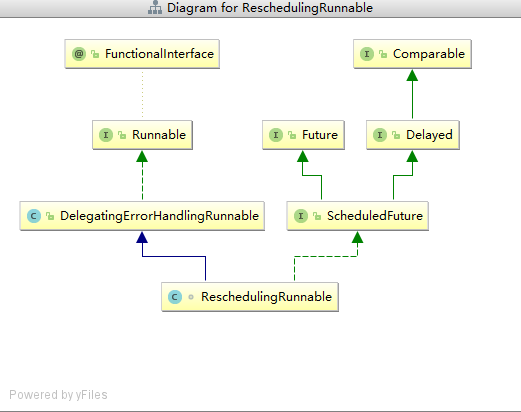
ReschedulingRunnable
首先看下其UML类图
再看下其构造函数
	/**

	*  @param delegate ScheduledMethodRunnable.class Object

	*

	*  @param trigger 一般为CronTrigger

	*

	*  @param executor ScheduledThreadPoolExecutor.class Object

	*

	*  @param errorHandler 一般为LoggingErrorHandler.class Object

	*

	*/

	public ReschedulingRunnable(Runnable delegate, Trigger trigger, ScheduledExecutorService executor, ErrorHandler errorHandler) {

		// 由父类保存真实的Runnable对象

		super(delegate, errorHandler);

		this.trigger = trigger;

		this.executor = executor;

	}
- 然后直接看下
schedule()方法的代码
	public ScheduledFuture<?> schedule() {

		synchronized (this.triggerContextMonitor) {

			// 计算下一次执行的时间

			this.scheduledExecutionTime = this.trigger.nextExecutionTime(this.triggerContext);

			if (this.scheduledExecutionTime == null) {

				return null;

			}

			// 由上述的执行时间计算需要延迟的时间,精确到毫秒

			long initialDelay = this.scheduledExecutionTime.getTime() - System.currentTimeMillis();

			// 由ScheduledThreadPoolExecutor执行定时任务

			this.currentFuture = this.executor.schedule(this, initialDelay, TimeUnit.MILLISECONDS);

			return this;

		}

	}
- 为了理解方便,我们不直接跳至
ScheduledThreadPoolExecutor看源码,我们脑壳想想,肯定会调用其中的run()方法
	@Override

	public void run() {

		Date actualExecutionTime = new Date();

		// 调用委托类DelegatingErrorHandlingRunnable的run方法

		super.run();

		// 更新时间戳并回调shedule()方法使其能周期性执行任务

		Date completionTime = new Date();

		synchronized (this.triggerContextMonitor) {

			this.triggerContext.update(this.scheduledExecutionTime, actualExecutionTime, completionTime);

			if (!this.currentFuture.isCancelled()) {

				schedule();

			}

		}

	}
直接看下父类DelegatingErrorHandlingRunnable#run()方法
	@Override

	public void run() {

		try {

			this.delegate.run();

		}

		catch (UndeclaredThrowableException ex) {

			this.errorHandler.handleError(ex.getUndeclaredThrowable());

		}

		catch (Throwable ex) {

			this.errorHandler.handleError(ex);

		}

	}
上述的代码则会去执行委托类ScheduledMethodRunnable的run()方法,脑壳想想就是通过JDK的method.invoke(Object obj,Object.. args)方法执行我们自定义写的业务。并由errorHandler捕获异常进行善后,默认只是进行error级别的日志输出。
- 对此类作下小结
执行定时器最终调用
ScheduledThreadPoolExecutor#schedule()方法,并返回ScheduledFuture对象其
run()方法最终会调用ScheduledMethodRunnable对象来执行用户自定义的业务其
run()方法也会调用schedule()方法来重复执行第一点的步骤以达到定时执行的效果
ConcurrentTaskScheduler如何保证单线程活跃执行任务
我们从上文得知,其corePoolSize=1,最终原因我们需要从ScheduledThreadPoolExecutor这个继承了ThreadPoolExecutor通用线程池类来了解
ScheduledThreadPoolExecutor#schedule()
直接看下源码
    public ScheduledFuture<?> schedule(Runnable command,

                                       long delay,

                                       TimeUnit unit) {

        if (command == null || unit == null)

            throw new NullPointerException();

        // 直接返回ScheduledFutureTask对象

        RunnableScheduledFuture<?> t = decorateTask(command,

            new ScheduledFutureTask<Void>(command, null,

                                          triggerTime(delay, unit)));

        // 延迟执行策略,继续追踪

        delayedExecute(t);

        return t;

    }
继续追踪delayedExecute()方法
    private void delayedExecute(RunnableScheduledFuture<?> task) {

	    // 如果线程池关闭了则直接拒绝任务

        if (isShutdown())

            reject(task);

        else {

	        // 优先将任务放入DelayQueue队列

            super.getQueue().add(task);

            // 保护策略,避免添加到队列后线程池关闭了,尝试删除任务

            if (isShutdown() &&

                !canRunInCurrentRunState(task.isPeriodic()) &&

                remove(task))

                task.cancel(false);

            else

	            // 确保已有线程在跑

                ensurePrestart();

        }

    }
继续追踪ensurePrestart()方法
    void ensurePrestart() {

        int wc = workerCountOf(ctl.get());

        if (wc < corePoolSize)

            addWorker(null, true);

        else if (wc == 0)

            addWorker(null, false);

    }
由上述的源码我们可以得知
当线程池数小于执行的核心线程数
corePoolSize,则会创建线程,不管核心与否我们都可以得知一旦当前线程数>=核心线程数,则不会进行新线程的创建
ConcurrentTaskScheduler指定的corePoolSize=1,由第一点得知,永远只有一个线程存在于线程池中
ConcurrentTaskScheduler如何保证任务延迟指定时长后被执行
为了避免大片的源码影响我们的阅读以及理解,博主只在此处指出ConcurrentTaskScheduler所拥有DelayQueue队列的take()方法实现了延迟等待的效果
    public E take() throws InterruptedException {

        final ReentrantLock lock = this.lock;

        // 可重入同步锁,确保该方法线程安全

        lock.lockInterruptibly();

        try {

            for (;;) {

                E first = q.peek();

                // 队列无任务,那就处于休眠等待

                if (first == null)

                    available.await();

                else {

	                // 获取还需等待的时间

                    long delay = first.getDelay(NANOSECONDS);

                    if (delay <= 0)

                        return q.poll();

                    first = null; // don't retain ref while waiting

                    if (leader != null)

                        available.await();

                    else {

                        Thread thisThread = Thread.currentThread();

                        leader = thisThread;

                        try {

	                        // 等待相应的时间后才可放行,采取的是Condition的机制

                            available.awaitNanos(delay);

                        } finally {

                            if (leader == thisThread)

                                leader = null;

                        }

                    }

                }

            }

        } finally {

	        // 唤醒等待的线程或者等待的条件

            if (leader == null && q.peek() != null)

                available.signal();

            lock.unlock();

        }

    }
上述代码用到了可重入锁以及锁条件Condition的相关知识,后续会详细分析锁的相关知识。此处作下总结
ReentrantLock锁为可重入锁,即相同的线程可再次获取该锁,不必等待阻塞
ReentrantLock的Condition机制,其类似于Object.wait()机制其调用
available.awaitNanos(delay);方法使当前线程休眠指定的时间后,最终会调用q.poll()方法返回待处理的任务有兴趣的读者可自行阅读
ThreadPoolExecutor的runWorker()方法和getTask()方法,便可以彻底理解ScheduledThreadPoolExecutor的定时机制
小结
CocurrentTaskScheduler指定的单线程模型,会让任务按照FIFO的机制有序的被执行,这个模型不大适合多个任务的同时定时执行,会导致任务执行有一定的延迟性。所以建议与spring结合时配置task:scheduler并配置pool-size属性
Spring源码情操陶冶-任务定时器ConcurrentTaskScheduler的更多相关文章
- Spring源码情操陶冶#task:scheduled-tasks解析器
承接前文Spring源码情操陶冶#task:executor解析器,在前文基础上解析我们常用的spring中的定时任务的节点配置.备注:此文建立在spring的4.2.3.RELEASE版本 附例 S ...
- Spring源码情操陶冶-AbstractApplicationContext#finishBeanFactoryInitialization
承接前文Spring源码情操陶冶-AbstractApplicationContext#registerListeners 约定web.xml配置的contextClass为默认值XmlWebAppl ...
- Spring源码情操陶冶-AbstractApplicationContext#registerListeners
承接前文Spring源码情操陶冶-AbstractApplicationContext#onRefresh 约定web.xml配置的contextClass为默认值XmlWebApplicationC ...
- Spring源码情操陶冶-AbstractApplicationContext#onRefresh
承接前文Spring源码情操陶冶-AbstractApplicationContext#initApplicationEventMulticaster 约定web.xml配置的contextClass ...
- Spring源码情操陶冶-AbstractApplicationContext#initApplicationEventMulticaster
承接前文Spring源码情操陶冶-AbstractApplicationContext#initMessageSource 约定web.xml配置的contextClass为默认值XmlWebAppl ...
- Spring源码情操陶冶-AbstractApplicationContext#initMessageSource
承接前文Spring源码情操陶冶-AbstractApplicationContext#registerBeanPostProcessors 约定web.xml配置的contextClass为默认值X ...
- Spring源码情操陶冶-AbstractApplicationContext#registerBeanPostProcessors
承接前文Spring源码情操陶冶-AbstractApplicationContext#invokeBeanFactoryPostProcessors 瞧瞧官方注释 /** * Instantiate ...
- Spring源码情操陶冶-AbstractApplicationContext#invokeBeanFactoryPostProcessors
阅读源码有利于陶冶情操,承接前文Spring源码情操陶冶-AbstractApplicationContext#postProcessBeanFactory 约定:web.xml中配置的context ...
- Spring源码情操陶冶-AbstractApplicationContext#postProcessBeanFactory
阅读源码有利于陶冶情操,承接前文Spring源码情操陶冶-AbstractApplicationContext#prepareBeanFactory 约定:web.xml中配置的contextClas ...
随机推荐
- 目标检测网络之 YOLOv2
YOLOv1基本思想 YOLO将输入图像分成SxS个格子,若某个物体 Ground truth 的中心位置的坐标落入到某个格子,那么这个格子就负责检测出这个物体. 每个格子预测B个bounding b ...
- python3.X中的循环
获取数字范围: range() 在python3.x中使用range(): >>> list(range(7)) [0, 1, 2, 3, 4, 5, 6] >>> ...
- 总结linux路由技术
Linux系统的route命令用于显示和操作IP路由表,要实现两个不同的网段之间的通信,需要一台连接两个网络的路由器,或者同时连接位于两个网络的网关来实现. 在Linux系统中,设置路由通常是为了解决 ...
- Algorithm --> 最长公共子序列(LCS)
一.什么是最长公共子序列 什么是最长公共子序列呢?举个简单的例子吧,一个数列S,若分别是两个或多个已知序列的子序列,且是所有符合条件序列中最长的,则S称为已知序列的最长公共子序列. 举例如 ...
- Django之ORM模型
ORM介绍 对象关系映射(Object Relational Mapping,简称ORM)模式的作用是在关系型数据库与业务实体对象之间进行映射,这使得我们不需要再去和复杂的SQL语句打交道,只需要简单 ...
- echarts词云引用
最近项目中需要使用echarts的词云图,因为几经波折才引用成功,所以想记下来跟大家分享,(我的随笔不会写那么多让人需要动脑子去理解的东西,就是记录一下步骤,因为经验甚少,底层原理懂得不多,所以就先记 ...
- (译文)学习ES6非常棒的特性——Async / Await函数
try/catch 在使用Async/Await前,我们可能这样写: const main = (paramsA, paramsB, paramsC, done) => { funcA(para ...
- 20162308 实验一《Java开发环境的熟悉》实验报告
a 20162308 实验一<Java开发环境的熟悉>实验报告 实验内容 使用JDK编译.运行简单的Java程序. 使用IDEA 编辑.编译.运行.调试Java程序. 实验要求 没有Lin ...
- 项目Alpha冲刺Day5
一.会议照片 二.项目进展 1.今日安排 熟悉后台框架并尝试编写及继续搭建前台框架模版.完成登录相关的功能实现,添加一些用户相关的单元测试代码,以及相应的测试数据. 2.问题困难 前端不是很熟,页面框 ...
- 使用ArrayList时代码内部发生了什么(jdk1.7)?
前言 ArrayList(这里的ArrayList是基于jdk1.7)是在项目中经常使用的集合类,例如我们从数据库中查询出一组数据.这篇文章不去剖析它的继承和实现,只是让我们知道实例化及增删改查时它的 ...