
Centos7+lnmp+zabbix4+分离mysql实验
一、简介
1、什么是zabbix
zabbix是一个企业级的、开源的、分布式的监控套件。
zabbix可以对网络和服务进行完整性,健康性的监控。zabbix利用灵活的告警机制,可以实验微信,短信和邮件自动报警,zabbix利用存储的监控数据提供监控报告及实现图形化显示。
zabbix支持主动轮询和被动捕获,zabbix所有的报告、统计信息和配置参数都可以通过基于web的前端页面可以确保您从任何方面评估您的网络状态和服务器健康性
重要的是zabbix还是免费的。
2、zabbix特性
zabbix是一个高度集成的网络监控套件,通过一个软件包即可提供如下特性
数据收集
可用性和性能检查
支持SNMP(包括捕获和主动轮训),IPMI,JMX,VMware监控
自定义检查
按照自定义的间隔收集需要的数据
灵活的阈值定义
可以非常灵活的定义问题阈值,称之为触发器,触发器从后端数据库获取参考值
高级告警配置
可以根据升级计划,接收方和媒体类型来定制发送告警通知,使用宏变量可以是告警通知更有意义更高效,自动化动作包含执行远程命令
实时绘图
使用内置图表绘制功能可以将监控项的内容立即绘制成图表
扩展的图形化显示
能够自定义图形,图像中可将多个监控项组合在一个视图展示
网络拓扑图
以仪表盘的样式展现自定义的展现和幻灯片
报告
监控资源高级(业务)视图
历史数据存储
数据存储在数据库中
可配置历史数据
内置数据管理机制
配置简单
将被监控对象添加为主机
主机被创建用于监控,在数据库中是唯一的
应用模板来监控设备
模板使用
在模板中分组检查
模板可以关联其他模板
网络自动发现
自动发现网络设备
监控代理自动注册
发现文件系统,网络接口和snmp oid 值
简介的web界面
web前端基于php
可从任何地方访问
你可以定制自己的操作方式
审核日志
API
提供了对外的可编程接口,用于批量操作,第三方软件集成和其他目的
权限管理系统
安全用户认证
特定用户可以限制访问特定视图
功能强大并易于扩展的监控代理
部署在被监控对象上
可以部署在linux和windows上
二进制代码
为了性能和更少内存的占用,用c语言编写
便于移植
为复杂环境准备
使用zabbix proxy代理服务器,使得远程监控更简单
3、zabbix监控组件及流程
主要由三大部分组成zabbix server,zabbix proxy,agent客户端
zabbix server包括web GUI、database、zabbix server。
监控组件图示如下:

zabbix监控流程如下图:

zabbix监控的完整流程,agent安装在被监控的主机上,agent负责定期收集客户端各项数据,并发送到zabbix server端,zabbix server收到数据,将数据存储到数据库中,用户基于zabbix web 可以看到数据在前端展现的图像。
4、zabbix官方文档
https://www.zabbix.com/documentation/4.0/zh/manual/quickstart/login
二、开始安装并配置
1、架构

2、环境
zabbix server :192.168.216.51
zabbix mysql: 192.168.216.52
zabbix agent: 192.168.216.53
3、web1安装软件,linux+nginx+php
配置好epel源,zabbix源及关闭selinux,firewall
 wget -O /etc/yum.repos.d/CentOS-Base.repo http://mirrors.aliyun.com/repo/Centos-7.repo   #下载最新的base

 yum install epel-release                                         #安装epel

 yum install http://repo.zabbix.com/zabbix/4.0/rhel/7/x86_64/zabbix-release-4.0-1.el7.noarch.rpm #安装zabbix
各软件版本
2.1、安装nginx
51 上部署nginx,zabbx,php-fpm
zabbix-server-mysql #主程序包及数据库文件
zabbix-web-mysql #Zabbix的web端会通过这些数据,来展示绘图
zabbix-get #为了便于agent端发起测试采集数据请求用得
一些依赖的作用
OpenIPMI-libs #即智能平台管理
iksemel #跨平台XML解析器
fping #用于向网络主机发送ICMP回应请求
 yum install nginx -y

 yum install zabbix-server-mysql zabbix-web-mysql zabbix-get

 yum install -y php php-devel php-fpm php-mysql php-common php-devel php-gd libjpeg* php-imap php-
ldap php-odbc php-pear php-xml php-xmlrpc php-mbstring php-mcrypt php-bcmath php-mhash libmcrypt libmcrypt-devel
各软件版本
 [root@web1 yum.repos.d]# rpm -qa |grep zabbix

 zabbix-release-4.0-.el7.noarch

 zabbix-server-mysql-4.0.-.el7.x86_64

 zabbix-web-mysql-4.0.-.el7.noarch

 zabbix-web-4.0.-.el7.noarch

 zabbix-get-4.0.-.el7.x86_64

 [root@web1 yum.repos.d]# rpm -qa |grep zabbix

 zabbix-release-4.0-.el7.noarch

 zabbix-server-mysql-4.0.-.el7.x86_64

 zabbix-web-mysql-4.0.-.el7.noarch

 zabbix-web-4.0.-.el7.noarch

 zabbix-get-4.0.-.el7.x86_64

 [root@web1 yum.repos.d]# rpm -qa |grep php*

 php-process-5.4.-.el7.x86_64

 php-ldap-5.4.-.el7.x86_64

 php-xml-5.4.-.el7.x86_64

 hyphen-2.8.-.el7.x86_64

 php-mysql-5.4.-.el7.x86_64

 php-mcrypt-5.4.-.el7.x86_64

 libmspack-0.5-0.4.alpha.el7.x86_64

 php-gd-5.4.-.el7.x86_64

 php-bcmath-5.4.-.el7.x86_64

 php-pear-1.9.-.el7.noarch

 plymouth-graphics-libs-0.8.-0.26..el7.centos.x86_64

 php-mbstring-5.4.-.el7.x86_64

 php-pdo-5.4.-.el7.x86_64

 php-imap-5.4.-.el7.x86_64

 php-xmlrpc-5.4.-.el7.x86_64

 libreoffice-graphicfilter-5.0.6.2-.el7.x86_64

 gvfs-gphoto2-1.22.-.el7.x86_64

 graphite2-1.3.-.el7_2.x86_64

 php-common-5.4.-.el7.x86_64

 php-odbc-5.4.-.el7.x86_64

 php-fpm-5.4.-.el7.x86_64

 libgphoto2-2.5.-.el7.x86_64

 php-5.4.-.el7.x86_64

 php-devel-5.4.-.el7.x86_64

 php-cli-5.4.-.el7.x86_64

 python2-cryptography-1.3.-.el7.x86_64

 hyphen-en-2.8.-.el7.noarch

 [root@web1 yum.repos.d]#
 Installed:

   zabbix-get.x86_64 :4.0.-.el7  zabbix-server-mysql.x86_64 :4.0.-.el7  zabbix-web-mysql.noarch :4.0.-.el7

 Dependency Installed:

   OpenIPMI-libs.x86_64 :2.0.-.el7     OpenIPMI-modalias.x86_64 :2.0.-.el7     fping.x86_64 :3.10-.el7

   iksemel.x86_64 :1.4-.el7.centos       zabbix-web.noarch :4.0.-.el7

 Complete!
2.2、部署数据库
52 上部署
yum install -y mariadb-embedded mariadb-libs mariadb-bench mariadb mariadb-server
 Installed:

   mariadb.x86_64 :5.5.-.el7_5  mariadb-bench.x86_64 :5.5.-.el7_5  mariadb-embedded.x86_64 :5.5.-.el7_5

 Dependency Installed:

   perl-Compress-Raw-Bzip2.x86_64 :2.061-.el7              perl-Compress-Raw-Zlib.x86_64 :2.061-.el7

   perl-DBI.x86_64 :1.627-.el7                             perl-Data-Dumper.x86_64 :2.145-.el7

   perl-GD.x86_64 :2.49-.el7                               perl-IO-Compress.noarch :2.061-.el7

   perl-Net-Daemon.noarch :0.48-.el7                       perl-PlRPC.noarch :0.2020-.el7

 Updated:

   mariadb-libs.x86_64 :5.5.-.el7_5

 Complete!

 [root@web2 yum.repos.d]# rpm -qa |grep mariadb

 mariadb-libs-5.5.-.el7_5.x86_64

 mariadb-embedded-5.5.-.el7_5.x86_64

 mariadb-bench-5.5.-.el7_5.x86_64

 mariadb-5.5.-.el7_5.x86_64

 [root@web2 yum.repos.d]#
忘记安装了mariadb-server,记得安装啊
 [root@web2 /]# rpm -qa |grep mariadb

 mariadb-embedded-5.5.-.el7_5.x86_64

 mariadb-5.5.-.el7_5.x86_64

 mariadb-server-5.5.-.el7_5.x86_64

 mariadb-bench-5.5.-.el7_5.x86_64

 mariadb-libs-5.5.-.el7_5.x86_64
4、软件配置
1)、配置nginx
cat /etc/nginx/conf.d/default.conf
 [root@web1 yum.repos.d]# cat /etc/nginx/conf.d/default.conf

 server {

         listen ;

         server_name 192.168.216.51;

         index index.html index.htm index.php;

         charset utf-;

         root /usr/share/nginx/html;

         location ~.*\.php$ {

                 fastcgi_pass unix:/dev/shm/php-fpm.sock;

                 fastcgi_index index.php;

                 fastcgi_param   SCRIPT_FILENAME $document_root$fastcgi_script_name;

                 include fastcgi_params;

                 try_files $uri = ;

         }

         location ~.*\.(gif|jpg|jpeg|png|bmp|swf|flv|mp3|wma)$ {

                 expires 30d;

         }

         location ~.*\.(js|css)$ {

                 expires 12h;

         }

 }
2)、配置php-fpm
cat /etc/php-fpm.d/www.conf
修改下面几项
 listen = /dev/shm/php-fpm.sock

 listen.owner = nobody

 listen.group = nobody

 user = nginx

 group = nginx
启动nginx和php-fpm
 [root@web1 yum.repos.d]# systemctl start nginx

 [root@web1 yum.repos.d]# systemctl start php-fpm

 [root@web1 yum.repos.d]# netstat -untlp |grep

 tcp               0.0.0.0:              0.0.0.0:*               LISTEN      /nginx: master

 tcp6              :::                   :::*                    LISTEN      /nginx: master

 [root@web1 yum.repos.d]# netstat -untlp |grep php*

 [root@web1 yum.repos.d]# ps -aux |grep php*

 root        0.0  0.7   ?        Ss   :   : php-fpm: master process (/etc/php-fpm.conf)

 nginx       0.0  0.3    ?        S    :   : php-fpm: pool www

 nginx       0.0  0.3    ?        S    :   : php-fpm: pool www

 nginx       0.0  0.3    ?        S    :   : php-fpm: pool www

 nginx       0.0  0.3    ?        S    :   : php-fpm: pool www

 nginx       0.0  0.3    ?        S    :   : php-fpm: pool www

 root        0.0  0.0     pts/    S+   :   : grep --color=auto php*
最后记得开机自启
systemctl enable nginx
systemctl enable php-fpm
测试一下php,添加index.php,访问一下192.168.216.51
 [root@web1 html]# pwd

 /usr/share/nginx/html

 [root@web1 html]# cat index.php

 <?php

         phpinfo();

 ?>

 [root@web1 html]#

没问题,进入下一步骤
3)、配置数据库
我们在52安装的数据库
3.1、启动一下服务
  Installed:

    mariadb-server.x86_64 :5.5.-.el7_5

  Dependency Installed:

    perl-DBD-MySQL.x86_64 :4.023-.el7

  Complete!

  [root@web2 yum.repos.d]# systemctl start  mariadb

  [root@web2 yum.repos.d]# netstat -untlp |grep

 tcp               0.0.0.0:            0.0.0.0:*               LISTEN      /mysqld

 [root@web2 yum.repos.d]# systemctl enable mariadb
3.2、创建zabbix database,zabbix账户,修改root密码
 [root@web2 yum.repos.d]# mysql                   #进入数据库

 Welcome to the MariaDB monitor.  Commands end with ; or \g.

 Your MariaDB connection id is

 Server version: 5.5.-MariaDB MariaDB Server

 Copyright (c) , , Oracle, MariaDB Corporation Ab and others.

 Type 'help;' or '\h' for help. Type '\c' to clear the current input statement.

 MariaDB [(none)]> CREATE DATABASE zabbix character set utf8 collate utf8_bin; #创建database

 Query OK,  row affected (0.00 sec)

 MariaDB [(none)]> GRANT all privileges ON *.* TO 'zabbix'@'%' IDENTIFIED BY 'admin123'; #建账户授权

 Query OK,  rows affected (0.00 sec)

 MariaDB [(none)]> flush privileges;            #刷新

 Query OK,  rows affected (0.00 sec)

 MariaDB [(none)]> use mysql;

 Reading table information for completion of table and column names

 You can turn off this feature to get a quicker startup with -A

 Database changed

 MariaDB [mysql]> update user set password=password('admin123') where user='root';   #改root密码

 Query OK,  rows affected (0.00 sec)

 Rows matched:   Changed:   Warnings:

 MariaDB [mysql]> flush privileges;

 Query OK,  rows affected (0.00 sec)
3.3、51上测试连接数据
 [root@web1 html]# mv index.php index.php.phpinfo

 [root@web1 html]# vim index.php

 <?php

         $link=mysql_connect('192.168.216.52','zabbix','admin123');

         if($link) echo "<h1>The database connection was successful!</h1>";

         else echo "<h1>The database connection was Fail!!</h1>";

         mysql_close();

 ?>

3.4、导入zabbix database 数据库脚本
51上
 [root@web1 html]# rpm -ql zabbix-server-mysql-4.0.-.el7.x86_64

 /etc/logrotate.d/zabbix-server

 /etc/zabbix/zabbix_server.conf

 /usr/lib/systemd/system/zabbix-server.service

 /usr/lib/tmpfiles.d/zabbix-server.conf

 /usr/lib/zabbix/alertscripts

 /usr/lib/zabbix/externalscripts

 /usr/sbin/zabbix_server_mysql

 /usr/share/doc/zabbix-server-mysql-4.0.

 /usr/share/doc/zabbix-server-mysql-4.0./AUTHORS

 /usr/share/doc/zabbix-server-mysql-4.0./COPYING

 /usr/share/doc/zabbix-server-mysql-4.0./ChangeLog

 /usr/share/doc/zabbix-server-mysql-4.0./NEWS

 /usr/share/doc/zabbix-server-mysql-4.0./README

15 /usr/share/doc/zabbix-server-mysql-4.0.4/create.sql.gz  #就是要找这个数据库脚本

 /usr/share/man/man8/zabbix_server..gz

 /var/log/zabbix

 /var/run/zabbix
 [root@web1 zabbix-server-mysql-4.0.]# gunzip create.sql.gz #解压缩

 [root@web1 zabbix-server-mysql-4.0.]# ll

 total

 -rw-r--r--  root root       Feb   : AUTHORS

 -rw-r--r--  root root   Feb   : ChangeLog

 -rw-r--r--  root root    Feb   : COPYING

 7 -rw-r--r-- 1 root root 5920915 Feb  4 18:02 create.sql

 -rw-r--r--  root root       Feb   : NEWS

 -rw-r--r--  root root     Feb   : README

 [root@web1 zabbix-server-mysql-4.0.]# scp create.sql root@192.168.216.52:/   #发送到52上,数据库服务器
52上,导入zabbix database脚本
 [root@web2 /]# mysql -uroot zabbix < /create.sql  -p

 Enter password:

 [root@web2 /]# mysql -uroot -p

 Enter password:

 Welcome to the MariaDB monitor.  Commands end with ; or \g.

 Your MariaDB connection id is

 Server version: 5.5.-MariaDB MariaDB Server

 Copyright (c) , , Oracle, MariaDB Corporation Ab and others.

 Type 'help;' or '\h' for help. Type '\c' to clear the current input statement.

 MariaDB [(none)]> use zabbix;

 Reading table information for completion of table and column names

 You can turn off this feature to get a quicker startup with -A

 Database changed

 MariaDB [zabbix]> show tables;

 +----------------------------+

 | Tables_in_zabbix           |

 +----------------------------+

 | acknowledges               |

 | actions                    |

 | alerts                     |

 | application_discovery      |

 | application_prototype      |

 | application_template       |

 | applications               |

 | auditlog                   |

 | auditlog_details           |

 | autoreg_host               |

 | conditions                 |

 | config                     |

 | corr_condition             |

 | corr_condition_group       |

 | corr_condition_tag         |

 | corr_condition_tagpair     |

 | corr_condition_tagvalue    |

 | corr_operation             |

 | correlation                |

 | dashboard                  |

 | dashboard_user             |

 | dashboard_usrgrp           |

 | dbversion                  |

 | dchecks                    |

 | dhosts                     |

 | drules                     |

 | dservices                  |

 | escalations                |

 | event_recovery             |

 | event_suppress             |

 | event_tag                  |

 | events                     |

 | expressions                |

 | functions                  |

 | globalmacro                |

 | globalvars                 |

 | graph_discovery            |

 | graph_theme                |

 | graphs                     |

 | graphs_items               |

 | group_discovery            |

 | group_prototype            |

 | history                    |

 | history_log                |

 | history_str                |

 | history_text               |

 | history_uint               |

 | host_discovery             |

 | host_inventory             |

 | hostmacro                  |

 | hosts                      |

 | hosts_groups               |

 | hosts_templates            |

 | housekeeper                |

 | hstgrp                     |

 | httpstep                   |

 | httpstep_field             |

 | httpstepitem               |

 | httptest                   |

 | httptest_field             |

 | httptestitem               |

 | icon_map                   |

 | icon_mapping               |

 | ids                        |

 | images                     |

 | interface                  |

 | interface_discovery        |

 | item_application_prototype |

 | item_condition             |

 | item_discovery             |

 | item_preproc               |

 | items                      |

 | items_applications         |

 | maintenance_tag            |

 | maintenances               |

 | maintenances_groups        |

 | maintenances_hosts         |

 | maintenances_windows       |

 | mappings                   |

 | media                      |

 | media_type                 |

 | opcommand                  |

 | opcommand_grp              |

 | opcommand_hst              |

 | opconditions               |

 | operations                 |

 | opgroup                    |

 | opinventory                |

 | opmessage                  |

 | opmessage_grp              |

 | opmessage_usr              |

 | optemplate                 |

 | problem                    |

 | problem_tag                |

 | profiles                   |

 | proxy_autoreg_host         |

 | proxy_dhistory             |

 | proxy_history              |

 | regexps                    |

 | rights                     |

 | screen_user                |

 | screen_usrgrp              |

 | screens                    |

 | screens_items              |

 | scripts                    |

 | service_alarms             |

 | services                   |

 | services_links             |

 | services_times             |

 | sessions                   |

 | slides                     |

 | slideshow_user             |

 | slideshow_usrgrp           |

 | slideshows                 |

 | sysmap_element_trigger     |

 | sysmap_element_url         |

 | sysmap_shape               |

 | sysmap_url                 |

 | sysmap_user                |

 | sysmap_usrgrp              |

 | sysmaps                    |

 | sysmaps_elements           |

 | sysmaps_link_triggers      |

 | sysmaps_links              |

 | tag_filter                 |

 | task                       |

 | task_acknowledge           |

 | task_check_now             |

 | task_close_problem         |

 | task_remote_command        |

 | task_remote_command_result |

 | timeperiods                |

 | trends                     |

 | trends_uint                |

 | trigger_depends            |

 | trigger_discovery          |

 | trigger_tag                |

 | triggers                   |

 | users                      |

 | users_groups               |

 | usrgrp                     |

 | valuemaps                  |

 | widget                     |

 | widget_field               |

 +----------------------------+

  rows in set (0.00 sec)
ok已经成功导入
4)、修改zabbix配置文件,设置权限
vim /etc/zabbix/zabbix_server.conf
ListenPort=10051
DBHost=192.168.216.52
DBName=zabbix
DBUser=zabbix
DBPassword=admin123
DBPort=3306
修改这几项应该就可以了
 [root@web1 zabbix-server-mysql-4.0.]# systemctl restart zabbix-server

 [root@web1 zabbix-server-mysql-4.0.]# !net

 bash: !net: command not found...

 [root@web1 zabbix-server-mysql-4.0.]# !net

 netstat -untlpo

 Active Internet connections (only servers)

 Proto Recv-Q Send-Q Local Address           Foreign Address         State       PID/Program name     Timer

 tcp               0.0.0.0:             0.0.0.0:*               LISTEN      /systemd            off (0.00//)

 tcp               0.0.0.0:              0.0.0.0:*               LISTEN      /nginx: master  off (0.00//)

 tcp               192.168.122.1:        0.0.0.0:*               LISTEN      /dnsmasq         off (0.00//)

 tcp               0.0.0.0:              0.0.0.0:*               LISTEN      /sshd             off (0.00//)

 tcp               127.0.0.1:           0.0.0.0:*               LISTEN      /cupsd            off (0.00//)

 tcp               127.0.0.1:            0.0.0.0:*               LISTEN      /master          off (0.00//)

 tcp               0.0.0.0:           0.0.0.0:*               LISTEN      /zabbix_server  off (0.00//)

 tcp6              :::                  :::*                    LISTEN      /systemd            off (0.00//)

 tcp6              :::                   :::*                    LISTEN      /nginx: master  off (0.00//)

 tcp6              :::                   :::*                    LISTEN      /sshd             off (0.00//)

 tcp6              :::                 :::*                    LISTEN      /cupsd            off (0.00//)

 tcp6              :::                  :::*                    LISTEN      /master          off (0.00//)

 tcp6              :::                :::*                    LISTEN      /zabbix_server  off (0.00//)

 udp               0.0.0.0:            0.0.0.0:*                           /avahi-daemon: r  off (0.00//)

 udp               0.0.0.0:           0.0.0.0:*                           /avahi-daemon: r  off (0.00//)

 udp               192.168.122.1:        0.0.0.0:*                           /dnsmasq         off (0.00//)

 udp               0.0.0.0:              0.0.0.0:*                           /dnsmasq         off (0.00//)

 udp               0.0.0.0:             0.0.0.0:*                           /lightdm          off (0.00//)

 udp6              :::                  :::*                                /lightdm          off (0.00//)

 [root@web1 zabbix-server-mysql-4.0.]#
最后修改nginx配置文件
51上
cat /etc/nginx/conf.d/default.conf
修改下面一项即可
root /usr/share/zabbix;
systemctl restart nginx
问题1、访问192.168.216.51 出错代码500
cat /var/log/nginx/error.log
tail -5 /var/log/nginx/error.log
PHP Fatal error: require_once(): Failed opening required '/etc/zabbix/web/maintenance.inc.php' (include_path='.:/usr/share/pear:/usr/share/php') in /usr/share/zabbix/include/classes/core/ZBase.php on line " while reading response header from upstream, client: 192.168.216.1, server: 192.168.216.51, request: "GET /index.php HTTP/1.1", upstream: "fastcgi://unix:/dev/shm/php-fpm.sock:", host: "192.168.216.51"
修改权限
  chown -R zabbix:zabbix /etc/zabbix

  chown -R zabbix:zabbix /usr/share/zabbix

  chown -R zabbix:zabbix /usr/lib/zabbix

  chmod -R  /etc/zabbix/web
访问192.168.216.51

三、正式开始web界面配置安装配置zabbix
1、第一步welcome 点击下一步网页还是跳会第一步
问题2、无法进行第2步
有可能是php session没起作用
修改php session 权限
chmod -R 777 /var/lib/php/session/
2、第二步 check of pre-requisites
检查先决条件

问题3、先把fail解决,修改php文件
vim /etc/php.ini
 post_max_size = 32M

 max_execution_time =

 max_input_time =

 date.timezone = PRC
systemctl restart php-fpm
访问一下,好了,进行下一步,点击next step

3、configure DB connection
配置连接的数据库
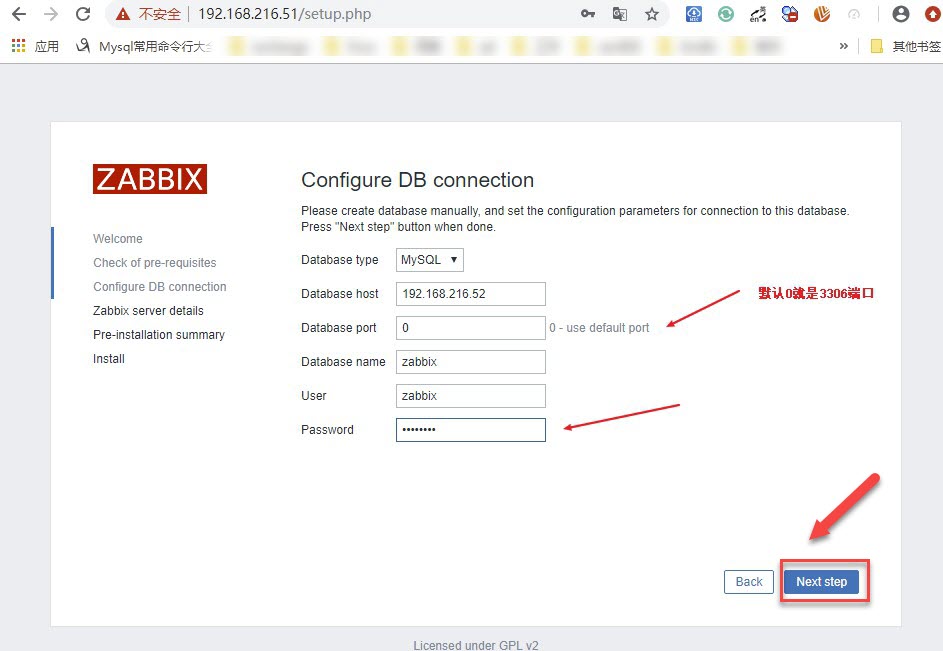
问题4、点击nextstep 出错,上一篇也遇到了这个问题

查看nginx日志发现
 [root@web1 share]# !tail

 tail - /var/log/nginx/error.log

 // :: [error] #: * upstream sent too big header while reading response header from upstream, client: 192.168.216.1, server: 192.168.216.51, request: "GET /setup.php HTTP/1.1", upstream: "fastcgi://127.0.0.1:9000", host: "192.168.216.51"

 // :: [error] #: * upstream sent too big header while reading response header from upstream, client: 192.168.216.1, server: 192.168.216.51, request: "GET /setup.php HTTP/1.1", upstream: "fastcgi://127.0.0.1:9000", host: "192.168.216.51"

 // :: [error] #: * upstream sent too big header while reading response header from upstream, client: 192.168.216.1, server: 192.168.216.51, request: "GET /setup.php HTTP/1.1", upstream: "fastcgi://127.0.0.1:9000", host: "192.168.216.51"

 // :: [error] #: * upstream sent too big header while reading response header from upstream, client: 192.168.216.1, server: 192.168.216.51, request: "GET /setup.php HTTP/1.1", upstream: "fastcgi://127.0.0.1:9000", host: "192.168.216.51"

 // :: [error] #: * upstream sent too big header while reading response header from upstream, client: 192.168.216.1, server: 192.168.216.51, request: "GET /setup.php HTTP/1.1", upstream: "fastcgi://127.0.0.1:9000", host: "192.168.216.51"

 [root@web1 share]# vim /etc/nginx/conf.d/default.conf
    upstream sent too big header while reading response header from upstream
    是这个问题导致,在网站找好多方法,都不行,最后看到是因为fastcgi缓冲区设置过小,其实是header过大
添加缓存区解决,编辑nginx 配置文件,添加两项
fastcgi_buffers 8 16k;
fastcgi_buffer_size 32k;
 [root@web1 share]# vim /etc/nginx/conf.d/default.conf

 server {

         listen ;

         server_name 192.168.216.51;

         index index.html index.htm index.php;

         charset utf-;

         root /usr/share/zabbix;

         location / {

                 #max_fails=;

                 #fail_timeout=;

                 root /usr/share/zabbix;

         }

         location ~.*\.php$ {

                 fastcgi_connect_timeout ;

                 root /usr/share/zabbix;

                 fastcgi_send_timeout ;

                 fastcgi_read_timeout ;

21                 fastcgi_buffers 8 16k;

22                 fastcgi_buffer_size 32k;

                 #fastcgi_pass unix:/dev/shm/php-fpm.sock;

                 fastcgi_pass 127.0.0.1:;

                 fastcgi_index index.php;

                 fastcgi_param   SCRIPT_FILENAME $document_root$fastcgi_script_name;

                 include fastcgi_params;

                 try_files $uri = ;

         }

         location ~.*\.(gif|jpg|jpeg|png|bmp|swf|flv|mp3|wma)$ {

                 expires 30d;

         }

         location ~.*\.(js|css)$ {

                 expires 12h;

         }

 }
4、zabbix server details
这个也可以默认配置,因为进入zabbix主页后是可以修改的

5、pre-installation summary
就是安装配置的一个总结,检查看看有没有出错

6、INSTALL
最后就是报错配置了
问题5、Unable to create the configuration file.
这里没来得及截图提示Unable to create the configuration file.
/etc/zabbix/web没有权限导致,我选择第一项下载zabbix.conf.php 然后上传到相应目录,在点一下,就是如下页面了

奇怪的是我点击login 然后用默认admin 密码zabbix 无法登陆
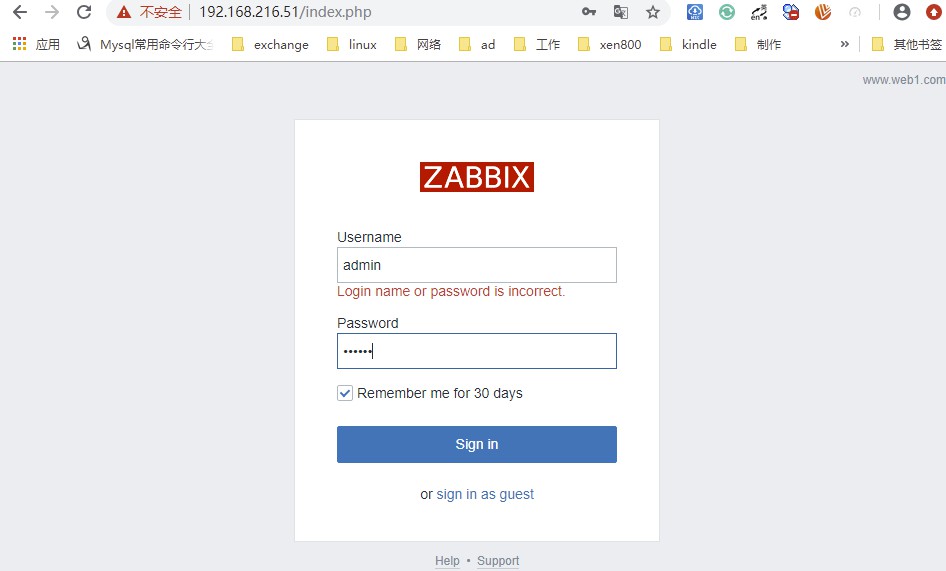
其实zabbix 默认账户为Admin 密码zabbix,zabbix 的简单部署就到这里了,新的zabbix 监控页面如下:

转载请注明出处:https://www.cnblogs.com/zhangxingeng/p/10414070.html
Centos7+lnmp+zabbix4+分离mysql实验的更多相关文章
- Centos7 nginx 虚拟主机、反向代理服务器及负载均衡,多台主机分离php-fpm实验,之强化篇,部署zabbix为例
一.简介 1.由于zabbix是php得,所有lnmp环境这里测试用的上一个实验环境,请查看https://www.cnblogs.com/zhangxingeng/p/10330735.html : ...
- centos7安装Lnmp(Linux+Nginx+MySql+Php+phpMyAdmin+Apache)
centos7安装Lnmp(Linux+Nginx+MySql+Php)及Apache Nginx是俄罗斯人编写的十分轻量级的HTTP服务器,Nginx是一个高性能的HTTP和反向代理服务器,Ng ...
- Centos7安装Zabbix4.0步骤
点击返回:自学Zabbix之路 点击返回:自学Zabbix4.0之路 点击返回:自学zabbix集锦 Centos7安装Zabbix4.0步骤 官方搭建zabbix4.0的环境要求: 1. 环境搭建L ...
- centos7.2环境nginx+mysql+php-fpm+svn配置walle自动化部署系统详解
centos7.2环境nginx+mysql+php-fpm+svn配置walle自动化部署系统详解 操作系统:centos 7.2 x86_64 安装walle系统服务端 1.以下安装,均在宿主机( ...
- 阿里云Linux CentOS8.1 64位服务器安装LNMP(Linux+Nginx+MySQL+PHP)
LNMP环境和软件版本: 名称 版本号 查询命令 Linux系统 CentOS Linux release 8.1.1911 (Core) cat /etc/redhat-release Nginx ...
- LVS+MYCAT+读写分离+MYSQL主备同步部署手册
LVS+MYCAT+读写分离+MYSQL主备同步部署手册 1 配置MYSQL主备同步…. 2 1.1 测试环境… 2 1.2 配置主数据库… 2 1.2.1 ...
- 【转载】LVS+MYCAT+读写分离+MYSQL主备同步部署手册(邢锋)
LVS+MYCAT+读写分离+MYSQL主备同步部署手册 1 配置MYSQL主备同步…. 2 1.1 测试环境… 2 1.2 配置主数据库… 2 1.2.1 ...
- Linux centos7环境下安装MySQL的步骤详解
Linux centos7环境下安装MySQL的步骤详解 安装MySQL mysql 有两个跟windows不同的地方 1).my.ini 保存到/etc/my.ini 2).用户权限,单独用户执行 ...
- MySQL实验准备(二)--Python模拟数据(MySQL数据库)
Python模拟数据(MySQL数据库) 数据模拟 目的:模拟多个表的插入和查询数据的模拟,再通过基准测试脚本测试服务器性能和收集数据,仿真模拟. 备注: 如果需要基础的python环境,可以查看&l ...
随机推荐
- python struct.pack() 二进制文件,文件中打包二进制数据的存储与解析
学习Python的过程中,遇到一个问题,在<Python学习手册>(也就是<learning python>)中,元组.文件及其他章节里,关于处理二进制文件里,有这么一段代码的 ...
- Android 画文字图
画图 private Bitmap getbitmap(String content) { Bitmap bitmap = Bitmap.createBitmap(400, 400, Bitmap.C ...
- python strip()函数和Split函数的用法总结
strip函数原型 声明:s为字符串,rm为要删除的字符序列. 只能删除开头或是结尾的字符或是字符串.不能删除中间的字符或是字符串. s.strip(rm) 删除s字符串中开头.结尾处,位于 rm删除 ...
- python爬虫踩坑教程
我们的目标是爬取下面这个个网址上的2010~2018年的数据 http://stockdata.stock.hexun.com/zrbg/Plate.aspx?date=2015-12-31 获取我们 ...
- Android版数据结构与算法(五):LinkedHashMap核心源码彻底分析
版权声明:本文出自汪磊的博客,未经作者允许禁止转载. 上一篇基于哈希表实现HashMap核心源码彻底分析 分析了HashMap的源码,主要分析了扩容机制,如果感兴趣的可以去看看,扩容机制那几行最难懂的 ...
- JS点击图片更改照片
<img src="../../img/20190224185111.png" alt="" id="zhaopian"/> - ...
- 基础测试jmeter5.0+badboy(从小白到入门)
1]测试工具jmeter环境安装 1.1]安装jdk环境 1:必须安装jdk8.0(我尝试安装最新版本不行,好像当时没有配置好.之后安装8.0遍可以正常运行)下载地址:单击此段 配置jdk环境:鼠标右 ...
- SQL Server内幕之数据页
数据页是包含已添加到数据库表中的用户数据的结构. 如前所述, 数据页有三种, 每个都以不同的格式存储数据. SQL server 有行内数据页.行溢出数据页和 LOB 数据页. 与 SQL serve ...
- SpaceSyntax【空间句法】之DepthMapX学习:唠叨(目录)
最近花大力气学习了空间句法这一理论,以及其相关软件DepthMapX. 我觉得吧,你要是能搜索到这理论,这一软件名,这篇博客,那我甚至都不用介绍这软件是干什么用的——好吧,还是会说一下的. 虽然不知道 ...
- 提升机器学习数学基础,这7本书一定要读-附pdf资源
文章发布于公号[数智物语] (ID:decision_engine),关注公号不错过每一篇干货. 来源 | KDnuggets 作者 | Ajit Jaokar 转自 | 新智元 编辑 | 大明 [编 ...