lvs-dr 模式-piranha
系统: redhat 6.5 mini
|
机器名 |
ip |
vip |
|
lvs01(主lvs) |
192.168.20.10 |
192.168.20.254 |
|
lvs02(备lvs) |
192.168.20.20 |
|
|
rs01 (web) |
192.168.20.100 |
|
|
rs02 (web) |
192.168.20.200 |
1、 在各个机器上配置ip地址,机器名,关闭selinux,同步时间
[root@lvs01 ~]# hostname
lvs01
[root@lvs01 ~]# getenforce
Disabled
[root@lvs02 ~]# hostname
lvs02
[root@lvs02 ~]# getenforce
Disabled
[root@rs01 ~]# hostname
rs01
[root@rs01 ~]# getenforce
Disabled
[root@rs02 ~]# hostname
rs02
[root@rs02 ~]# getenforce
Disabled
[root@lvs01 yum.repos.d]# cat /etc/hosts
192.168.20.10 lvs01
192.168.20.20 lvs02
192.168.20.100 rs01
192.168.20.200 rs02
[root@lvs01 yum.repos.d]# ntpdate 0.rhel.pool.ntp.org
[root@lvs02 yum.repos.d]# ntpdate 0.rhel.pool.ntp.org
[root@rs01 yum.repos.d]# ntpdate 0.rhel.pool.ntp.org
[root@rs02 yum.repos.d]# ntpdate 0.rhel.pool.ntp.org
2、 在各个机器关闭防火墙,配置yum源
[root@lvs01 yum.repos.d]# service iptables stop
[root@lvs01 yum.repos.d]# chkconfig iptables off
[root@lvs02 ~]# service iptables stop
[root@lvs02 ~]# chkconfig iptables off
[root@rs01 ~]# service iptables stop
[root@rs01 ~]# chkconfig iptables off
[root@rs02 ~]# service iptables stop
[root@rs02 ~]# chkconfig iptables off
[root@lvs01 yum.repos.d]# service iptables stop
[root@lvs01 yum.repos.d]# chkconfig iptables off
[root@lvs01 yum.repos.d]# cat rhel-source.repo
[base]
name=base
baseurl=file:///mnt
enabled=1
gpgcheck=0
[LB]
name=LB
baseurl=file:///mnt/LoadBalancer
enabled=1
gpgcheck=0
[HA]
name=HA
baseurl=file:///mnt/HighAvailability
enabled=1
gpgcheck=0
[RS]
name=RS
baseurl=file:///mnt/ResilientStorage
enabled=1
gpgcheck=0
[root@lvs01 yum.repos.d]# scp rhel-source.repo lvs02:/etc/yum.repos.d/rhel-source.repo
3、 在rs01.rs02上部署web服务,设置arptables,添加vip
[root@rs01 ~]#ip addr add 192.168.20.254/24 dev eth0
[root@rs01 ~]# echo "ip addr add 192.168.20.254/24 dev eth0">>/etc/rc.d/rc.local
[root@rs01 ~]# arptables -A IN -d 192.168.20.254 -j DROP
[root@rs01 ~]# arptables -A OUT -s 192.168.20.254 -j mangle --mangle-ip-s 192.168.20.100
[root@rs01 ~]# service arptables_jf save
将当前规则保存到 /etc/sysconfig/arptables: [确定]
[root@rs01 ~]# chkconfig arptables_jf on
[root@rs01 ~]# yum install -y httpd
[root@rs01 ~]# echo "rs01">/var/www/html/index.html
[root@rs01 ~]# service httpd restart
[root@rs01 ~]# chkconfig httpd on
[root@rs02 ~]# arptables -A IN -d 192.168.20.254 -j DROP
[root@rs02 ~]# arptables -A OUT -s 192.168.20.254 -j mangle --mangle-ip-s 192.168.20.100
[root@rs02 ~]# service arptables_jf save
将当前规则保存到 /etc/sysconfig/arptables: [确定]
[root@rs02 ~]# chkconfig arptables_jf on
[root@rs02 ~]#ip addr add 192.168.20.254/24 dev eth0
[root@rs02 ~]# echo "ip addr add 192.168.20.254/24 dev eth0">>/etc/rc.d/rc.local
[root@rs02 ~]# yum install -y httpd
[root@rs02 ~]# echo "rs02">/var/www/html/index.html
[root@rs02 ~]# service httpd restart
[root@rs02 ~]# chkconfig httpd on
4、 在lvs01,lvs02安装LB,在lvs01上配置lvs集群登录用户和密码
[root@lvs01 yum.repos.d]# yum groupinstall "Load Balancer"
[root@lvs02 yum.repos.d]# yum groupinstall "Load Balancer"
[root@lvs01 yum.repos.d]# piranha-passwd
New Password:
Verify:
Adding password for user piranha
[root@lvs01 yum.repos.d]# /etc/init.d/piranha-gui start
[root@lvs01 yum.repos.d]# chkconfig piranha-gui on
5、通过浏览器配置lvs集群
5.1 在浏览器输入http://192.168.20.10:3636 输入用户名和密码

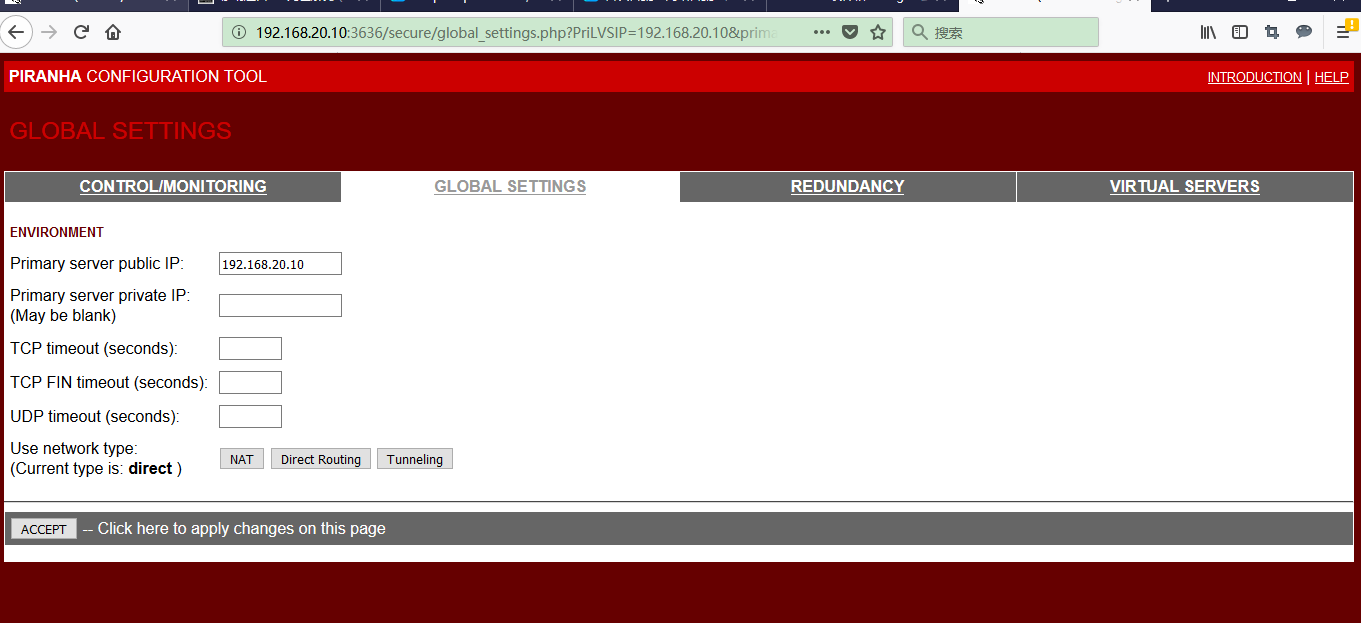
5.2 配置lvs01,ip地址,选direct
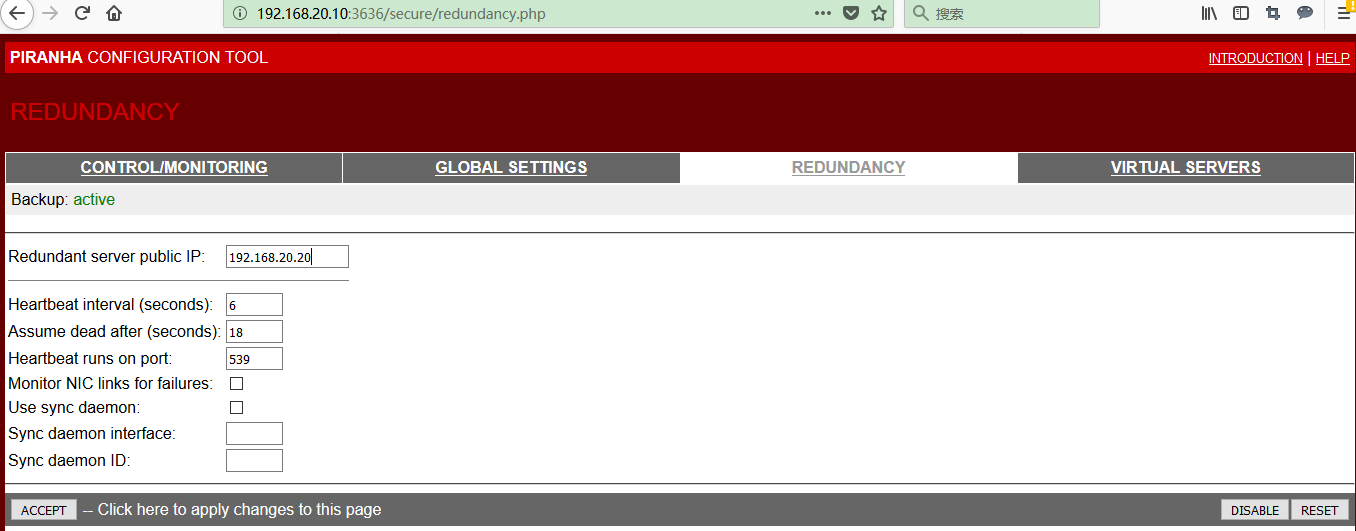
5.3 配置lvs02
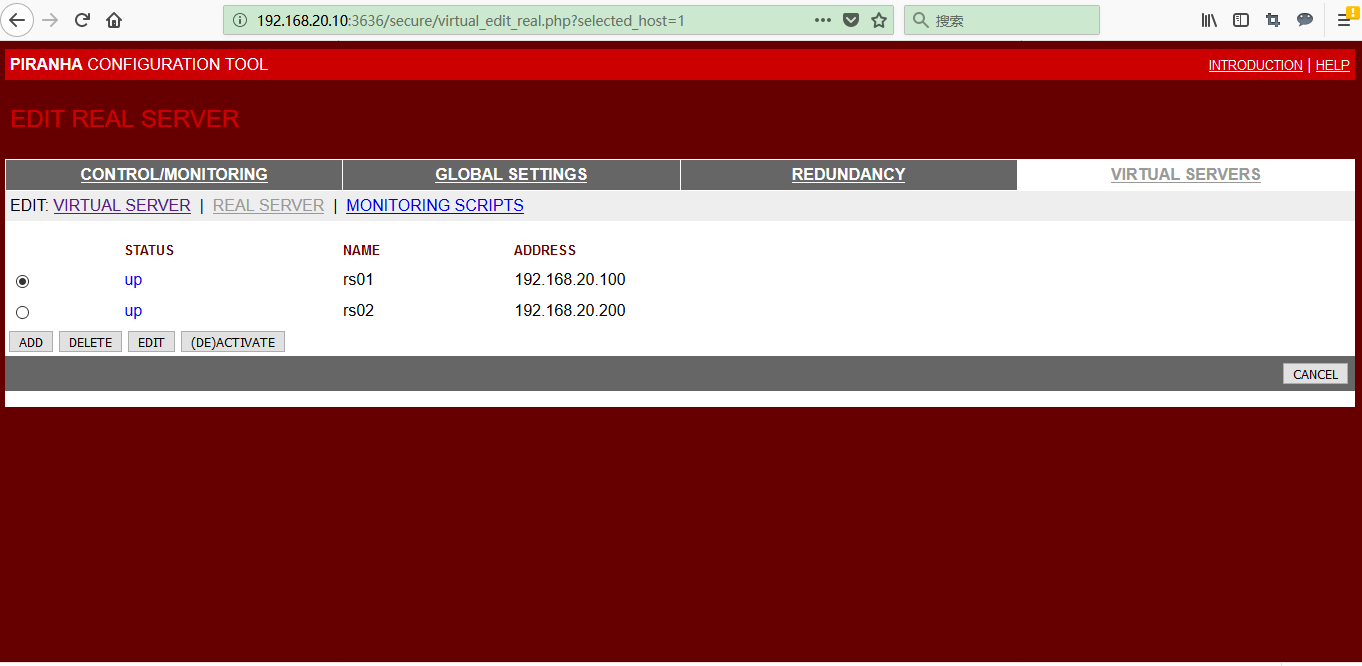
5.4 配置对外服务和真实服务器

5.5 将在lvs01 上的配置文件复制到lvs02 上,在lvs01,lvs02 上启动负载均衡的监控进程
[root@lvs01 ~]# scp /etc/sysconfig/ha/lvs.cf lvs02:/etc/sysconfig/ha/lvs.cf
root@lvs02's password:
lvs.cf 100% 865 0.8KB/s 00:00
[root@lvs01 ~]# /etc/init.d/pulse restart
Shutting down pulse: [失败]
Starting pulse: [确定]
[root@lvs01 ~]# chkconfig pulse on
[root@lvs02 ~]# /etc/init.d/pulse restart
Shutting down pulse: [失败]
Starting pulse: [确定]
[root@lvs02 ~]# chkconfig pulse on
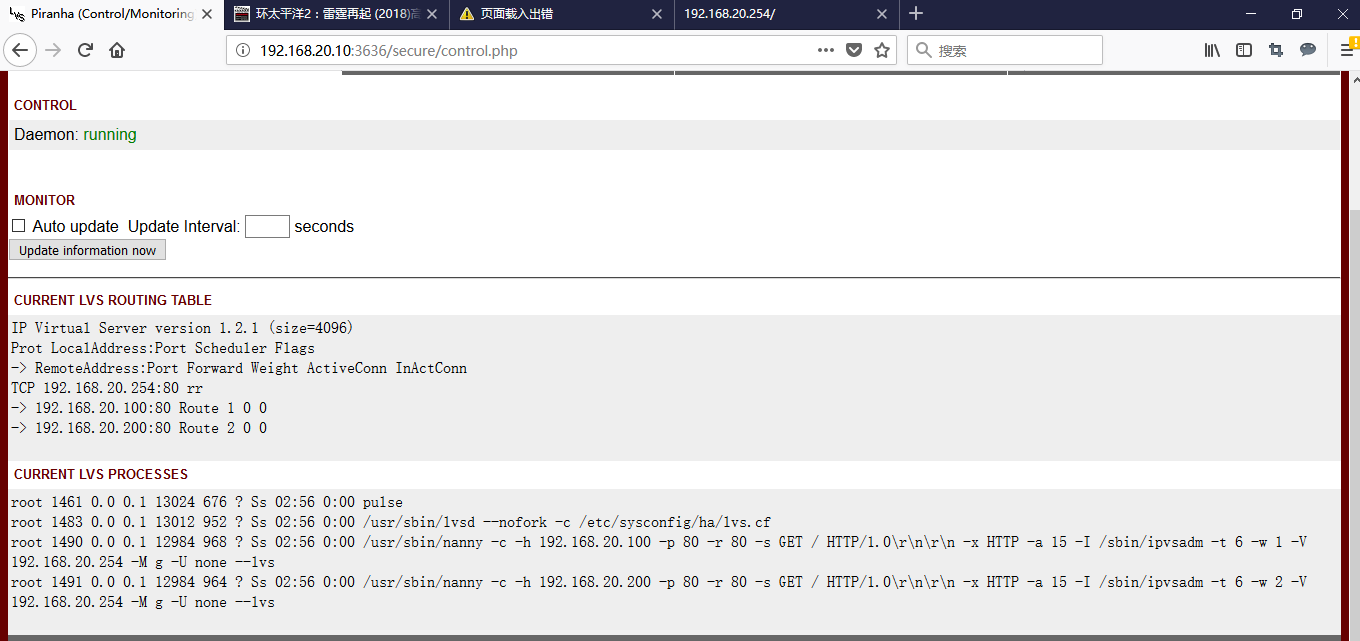
5.6 lvs 正常运行的状态
1、 测试
3.1 正常访问

3.2 lvs01 宕机了,可以正常访问

3.3 rs01 宕机了,也可正常访问

lvs-dr 模式-piranha的更多相关文章
- LVS DR模式 负载均衡服务搭建
LVS 负载均衡 最近在研究服务器负载均衡,阅读了网上的一些资料,发现主要的软件负载均衡方案有nginx(针对HTTP服务的负载均衡),LVS(针对IP层,MAC层的负载均衡).LVS模式工作在网络层 ...
- 一个公网地址部署LVS/DR模式
http://blog.chinaunix.net/uid-7411781-id-3436142.html 一个公网地址部署LVS/DR模式 网上看了很多关于LVS的文章,在选取2种模式LVS/D ...
- LVS DR模式搭建、keepalived+lvs
1.LVS DR模式搭建 条件: 即三台机器,在同一内网. 编辑脚本文件:/usr/local/sbin/lvs_dr.sh #! /bin/bashecho 1 > /proc/sys/net ...
- LVS DR模式搭建 keepalived lvs
LVS DR模式搭建• 三台机器 • 分发器,也叫调度器(简写为dir)172.16.161.130 • rs1 172.16.161.131 • rs2 172.16.161.132 • vip 1 ...
- lvs之 lvs+nginx+tomcat_1、tomcat_2+redis(lvs dr 模式)
前提:已经安装好 lvs+nginx+tomcat_1.tomcat_2+redis环境 ,可参考 (略有改动,比如tomcat_1.tomcat_2安装在两台机器上,而不是单机多实例 ,自行稍稍变动 ...
- CentOS下LVS DR模式负载均衡配置详解
一安装LVS准备: 1.准备4台Centos 6.2 x86_64 注:本实验关闭 SELinux和IPtables防火墙. 管理IP地址 角色 备注 192.168.1.101 LVS主调度器(Ma ...
- Keepalived+LVS DR模式高可用架构实践
Keepalived最初是为LVS设计,专门监控各服务器节点的状态(LVS不带健康检查功能,所以使用keepalived进行健康检查),后来加入了VRRP(虚拟路由热备协议(Virtual Route ...
- Linux centosVMware Linux集群架构LVS DR模式搭建、keepalived + LVS
一.LVS DR模式搭建 三台机器 分发器,也叫调度器(简写为dir) davery :1.101 rs1 davery01:1.106 rs2 davery02:11.107 vip 133.200 ...
- LVS DR模式实验
LVS DR模式实验 三台虚拟机,两个台节点机(Apache),一台DR实验调度机 一:关闭相关安全机制 systemctl stop firewalld iptables -F setenforce ...
- lvs dr 模式请求过程
一. lvs dr 模式请求过程 1.整个请求过程如下: client在发起请求之前,会发一个arp广播的包,在网络中找"谁是vip",由于所有的服务器,lvs和rs都有vip,为 ...
随机推荐
- 计算机基础之Windows10操作系统安装U盘制作
1.第一步,下载Windows10--ISO镜像(Windows7类似),下载站点: https://msdn.itellyou.cn/(百度搜索msdn即可),个人认为这是最干净的操作系统镜像站点, ...
- 看完轻松年薪30w+
弱鸡学git中,百度git追踪方面的博文,突然发现各种git的博文中突然插入了一个这个,不解,本以为又是某个大佬在分享他的心路历程,点进去打算喝鸡汤,666 怪不得标题党标题党这么的叫,可怕可怕,文章 ...
- 使用websocket实现在线聊天功能
很早以前为了快速达到效果,使用轮询实现了在线聊天功能,后来无意接触了socket,关于socket我的理解是进程间通信,首先要有服务器跟客户端,服务的启动监听某ip端口定位该进程,客户端开启socke ...
- 正负样本比率失衡SMOTE
正负样本比率失衡SMOTE [TOC] 背景 这几天测试天池的优惠券预测数据在dnn上面会不会比集成树有较好的效果,但是正负样本差距太大,而处理这种情况的一般有欠抽样和过抽样,这里主要讲过抽样,过抽样 ...
- LeetCode - 185. Department Top Three Salaries
The Employee table holds all employees. Every employee has an Id, and there is also a column for the ...
- WPF ----在UserControl的xaml里绑定依赖属性
场景:在定义wpf 用户控件的时候,希望使用时设置自定义的属性来改变用户控件里的状态或内容等. 下面直接上实例代码: 用户控件的后台代码,定义依赖属性 public partial class MyU ...
- Centos 6.7 KVM下安装windows 7系统
装windows 虚拟机之前你需要做以下准备工作:A.下载windows 镜像文件和 windows 的驱动iso 文件到本地,然后上传至服务器的某个目录(当然你也可以直接在服务器上下载):B.你本地 ...
- Linux(ubuntu)安装redis集群,redis集群搭建
今天学习一下redis集群的搭建.redis在现在是很常用的数据库,在nosql数据库中也是非常好用的,接下来我们搭建一下redis的集群. 一.准备 首先我们要安装c语言的编译环境,我们要安装red ...
- HDU1560 DNA sequence IDA* + 强力剪枝 [kuangbin带你飞]专题二
题意:给定一些DNA序列,求一个最短序列能够包含所有序列. 思路:记录第i个序列已经被匹配的长度p[i],以及第i序列的原始长度len[i].则有两个剪枝: 剪枝1:直接取最长待匹配长度.1900ms ...
- mysql的常用引擎
在MySQL数据库中,常用的引擎主要就是2个:Innodb和MyIASM. 首先: 1.简单介绍这两种引擎,以及该如何去选择.2.这两种引擎所使用的数据结构是什么. 1. a.Innodb引擎,Inn ...