lvs-dr 模式-piranha
系统: redhat 6.5 mini
|
机器名 |
ip |
vip |
|
lvs01(主lvs) |
192.168.20.10 |
192.168.20.254 |
|
lvs02(备lvs) |
192.168.20.20 |
|
|
rs01 (web) |
192.168.20.100 |
|
|
rs02 (web) |
192.168.20.200 |
1、 在各个机器上配置ip地址,机器名,关闭selinux,同步时间
[root@lvs01 ~]# hostname
lvs01
[root@lvs01 ~]# getenforce
Disabled
[root@lvs02 ~]# hostname
lvs02
[root@lvs02 ~]# getenforce
Disabled
[root@rs01 ~]# hostname
rs01
[root@rs01 ~]# getenforce
Disabled
[root@rs02 ~]# hostname
rs02
[root@rs02 ~]# getenforce
Disabled
[root@lvs01 yum.repos.d]# cat /etc/hosts
192.168.20.10 lvs01
192.168.20.20 lvs02
192.168.20.100 rs01
192.168.20.200 rs02
[root@lvs01 yum.repos.d]# ntpdate 0.rhel.pool.ntp.org
[root@lvs02 yum.repos.d]# ntpdate 0.rhel.pool.ntp.org
[root@rs01 yum.repos.d]# ntpdate 0.rhel.pool.ntp.org
[root@rs02 yum.repos.d]# ntpdate 0.rhel.pool.ntp.org
2、 在各个机器关闭防火墙,配置yum源
[root@lvs01 yum.repos.d]# service iptables stop
[root@lvs01 yum.repos.d]# chkconfig iptables off
[root@lvs02 ~]# service iptables stop
[root@lvs02 ~]# chkconfig iptables off
[root@rs01 ~]# service iptables stop
[root@rs01 ~]# chkconfig iptables off
[root@rs02 ~]# service iptables stop
[root@rs02 ~]# chkconfig iptables off
[root@lvs01 yum.repos.d]# service iptables stop
[root@lvs01 yum.repos.d]# chkconfig iptables off
[root@lvs01 yum.repos.d]# cat rhel-source.repo
[base]
name=base
baseurl=file:///mnt
enabled=1
gpgcheck=0
[LB]
name=LB
baseurl=file:///mnt/LoadBalancer
enabled=1
gpgcheck=0
[HA]
name=HA
baseurl=file:///mnt/HighAvailability
enabled=1
gpgcheck=0
[RS]
name=RS
baseurl=file:///mnt/ResilientStorage
enabled=1
gpgcheck=0
[root@lvs01 yum.repos.d]# scp rhel-source.repo lvs02:/etc/yum.repos.d/rhel-source.repo
3、 在rs01.rs02上部署web服务,设置arptables,添加vip
[root@rs01 ~]#ip addr add 192.168.20.254/24 dev eth0
[root@rs01 ~]# echo "ip addr add 192.168.20.254/24 dev eth0">>/etc/rc.d/rc.local
[root@rs01 ~]# arptables -A IN -d 192.168.20.254 -j DROP
[root@rs01 ~]# arptables -A OUT -s 192.168.20.254 -j mangle --mangle-ip-s 192.168.20.100
[root@rs01 ~]# service arptables_jf save
将当前规则保存到 /etc/sysconfig/arptables: [确定]
[root@rs01 ~]# chkconfig arptables_jf on
[root@rs01 ~]# yum install -y httpd
[root@rs01 ~]# echo "rs01">/var/www/html/index.html
[root@rs01 ~]# service httpd restart
[root@rs01 ~]# chkconfig httpd on
[root@rs02 ~]# arptables -A IN -d 192.168.20.254 -j DROP
[root@rs02 ~]# arptables -A OUT -s 192.168.20.254 -j mangle --mangle-ip-s 192.168.20.100
[root@rs02 ~]# service arptables_jf save
将当前规则保存到 /etc/sysconfig/arptables: [确定]
[root@rs02 ~]# chkconfig arptables_jf on
[root@rs02 ~]#ip addr add 192.168.20.254/24 dev eth0
[root@rs02 ~]# echo "ip addr add 192.168.20.254/24 dev eth0">>/etc/rc.d/rc.local
[root@rs02 ~]# yum install -y httpd
[root@rs02 ~]# echo "rs02">/var/www/html/index.html
[root@rs02 ~]# service httpd restart
[root@rs02 ~]# chkconfig httpd on
4、 在lvs01,lvs02安装LB,在lvs01上配置lvs集群登录用户和密码
[root@lvs01 yum.repos.d]# yum groupinstall "Load Balancer"
[root@lvs02 yum.repos.d]# yum groupinstall "Load Balancer"
[root@lvs01 yum.repos.d]# piranha-passwd
New Password:
Verify:
Adding password for user piranha
[root@lvs01 yum.repos.d]# /etc/init.d/piranha-gui start
[root@lvs01 yum.repos.d]# chkconfig piranha-gui on
5、通过浏览器配置lvs集群
5.1 在浏览器输入http://192.168.20.10:3636 输入用户名和密码

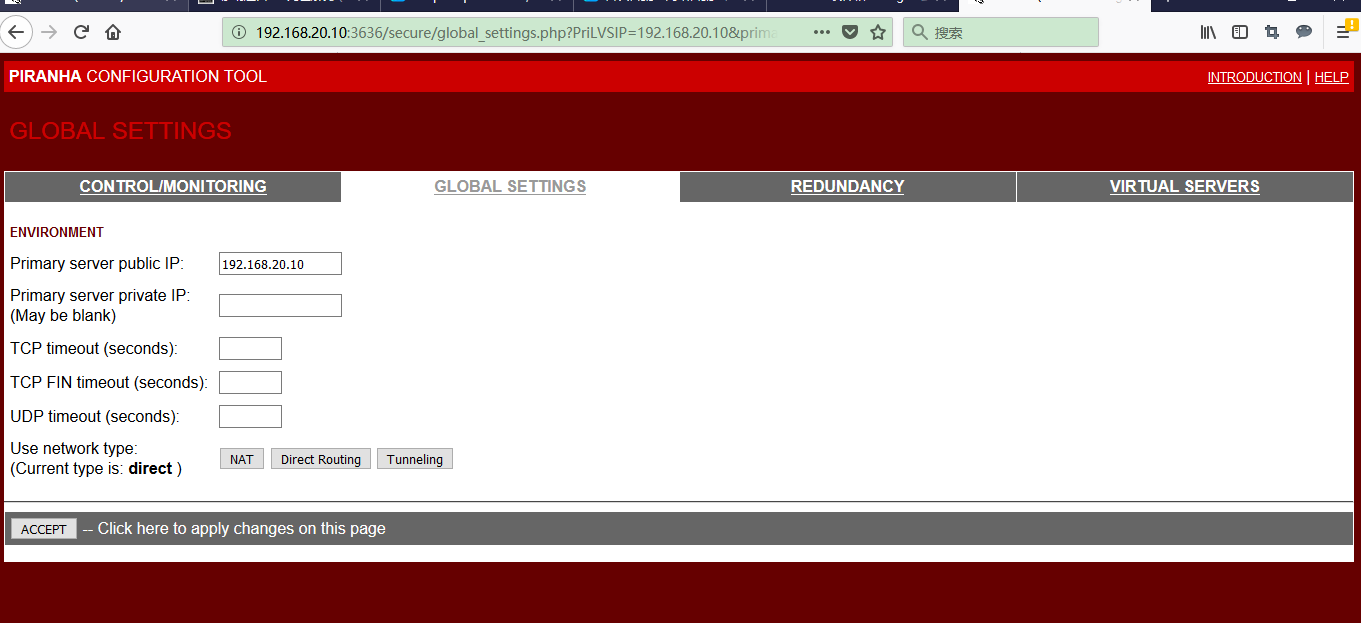
5.2 配置lvs01,ip地址,选direct
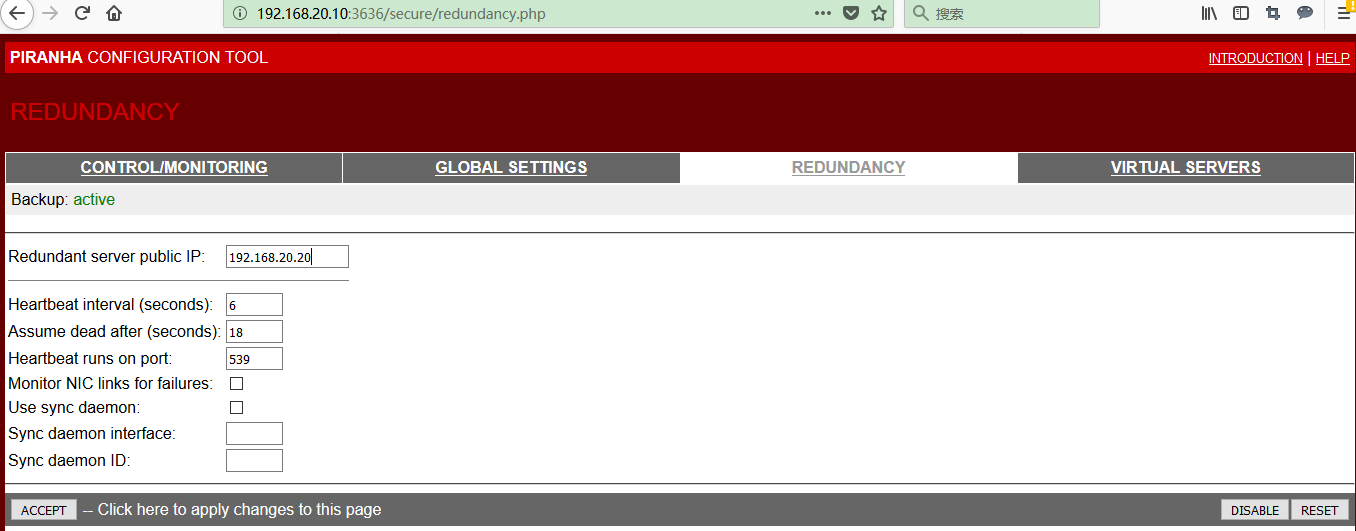
5.3 配置lvs02
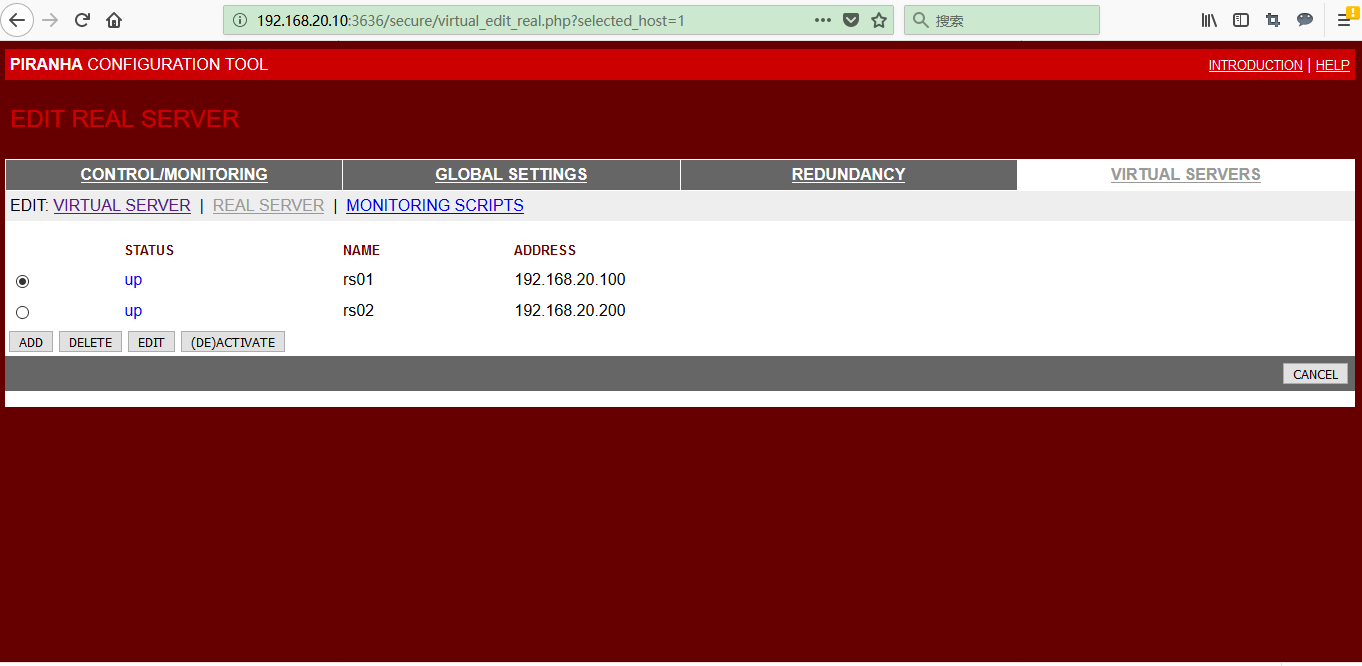
5.4 配置对外服务和真实服务器

5.5 将在lvs01 上的配置文件复制到lvs02 上,在lvs01,lvs02 上启动负载均衡的监控进程
[root@lvs01 ~]# scp /etc/sysconfig/ha/lvs.cf lvs02:/etc/sysconfig/ha/lvs.cf
root@lvs02's password:
lvs.cf 100% 865 0.8KB/s 00:00
[root@lvs01 ~]# /etc/init.d/pulse restart
Shutting down pulse: [失败]
Starting pulse: [确定]
[root@lvs01 ~]# chkconfig pulse on
[root@lvs02 ~]# /etc/init.d/pulse restart
Shutting down pulse: [失败]
Starting pulse: [确定]
[root@lvs02 ~]# chkconfig pulse on
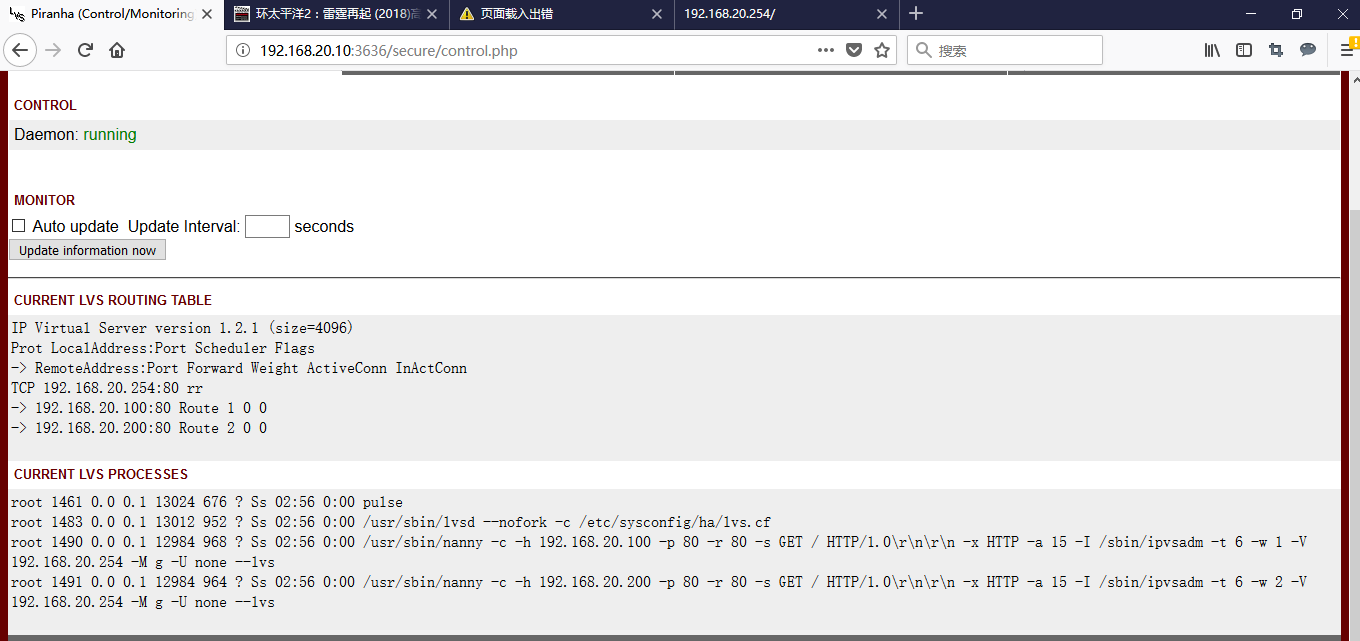
5.6 lvs 正常运行的状态
1、 测试
3.1 正常访问
3.2 lvs01 宕机了,可以正常访问

3.3 rs01 宕机了,也可正常访问

lvs-dr 模式-piranha的更多相关文章
- LVS DR模式 负载均衡服务搭建
LVS 负载均衡 最近在研究服务器负载均衡,阅读了网上的一些资料,发现主要的软件负载均衡方案有nginx(针对HTTP服务的负载均衡),LVS(针对IP层,MAC层的负载均衡).LVS模式工作在网络层 ...
- 一个公网地址部署LVS/DR模式
http://blog.chinaunix.net/uid-7411781-id-3436142.html 一个公网地址部署LVS/DR模式 网上看了很多关于LVS的文章,在选取2种模式LVS/D ...
- LVS DR模式搭建、keepalived+lvs
1.LVS DR模式搭建 条件: 即三台机器,在同一内网. 编辑脚本文件:/usr/local/sbin/lvs_dr.sh #! /bin/bashecho 1 > /proc/sys/net ...
- LVS DR模式搭建 keepalived lvs
LVS DR模式搭建• 三台机器 • 分发器,也叫调度器(简写为dir)172.16.161.130 • rs1 172.16.161.131 • rs2 172.16.161.132 • vip 1 ...
- lvs之 lvs+nginx+tomcat_1、tomcat_2+redis(lvs dr 模式)
前提:已经安装好 lvs+nginx+tomcat_1.tomcat_2+redis环境 ,可参考 (略有改动,比如tomcat_1.tomcat_2安装在两台机器上,而不是单机多实例 ,自行稍稍变动 ...
- CentOS下LVS DR模式负载均衡配置详解
一安装LVS准备: 1.准备4台Centos 6.2 x86_64 注:本实验关闭 SELinux和IPtables防火墙. 管理IP地址 角色 备注 192.168.1.101 LVS主调度器(Ma ...
- Keepalived+LVS DR模式高可用架构实践
Keepalived最初是为LVS设计,专门监控各服务器节点的状态(LVS不带健康检查功能,所以使用keepalived进行健康检查),后来加入了VRRP(虚拟路由热备协议(Virtual Route ...
- Linux centosVMware Linux集群架构LVS DR模式搭建、keepalived + LVS
一.LVS DR模式搭建 三台机器 分发器,也叫调度器(简写为dir) davery :1.101 rs1 davery01:1.106 rs2 davery02:11.107 vip 133.200 ...
- LVS DR模式实验
LVS DR模式实验 三台虚拟机,两个台节点机(Apache),一台DR实验调度机 一:关闭相关安全机制 systemctl stop firewalld iptables -F setenforce ...
- lvs dr 模式请求过程
一. lvs dr 模式请求过程 1.整个请求过程如下: client在发起请求之前,会发一个arp广播的包,在网络中找"谁是vip",由于所有的服务器,lvs和rs都有vip,为 ...
随机推荐
- 读书共享 Primer Plus C-part 5
第五章 运算符.表达式和语句 关于+- 的一元运算符和二元运算符的区别 a++:a先创建自身的一个副本,然后a自增1,最后返回副本的值 a+=1: 事实上相当于++a a=a+1: 虽然有点雷同于a+ ...
- 用tig来查看git log
sudo apt-get install tig安装软件 在项目目录下:tig查看git 的 log 常用指令:上下箭头选择log的版本enter进入具体版本查看详细k和j是上下滚动查看详细信息的内容 ...
- 使用mybatis插入自增主键ID的数据后返回自增的ID
在开发中碰到用户注册的功能需要用到用户ID,但是用户ID是数据库自增生成的,这种情况上网查询后使用下面的方式配置mybatis的insert语句可以解决: <insert id="in ...
- 💈 A Cross-Thread Call Helper Class
Conmajia © 2012, 2018 Introduction When you are working on background threads and call frontend GUI ...
- Java经典编程题50道之二十七
求100之内的素数. public class Example27 { public static void main(String[] args) { prime(); } ...
- solr6.6教程-基础环境搭建(二)
在上一篇文章中已经简单介绍了solr在windows的部署,今天我们来下如何新建一个自己core. 1,core理解 如果把solr理解为个数据库的话,那么core可以理解为数据库中的一张表,其实就是 ...
- node.js简单搭建服务,访问本地站点文件
1.安装nodejs服务(从官网下载安装),node相当于apache服务器 2.在自己定义的目录下新建服务器文件如 server.js 例如,我在D:\nodeJs下创建了server.js文件 v ...
- typeof操作符 返回值
Type操作符 返回值 : 1undefined 这个未定义 2.boolean 这个为boolean类型 3.string 这个是字符串 4.number 这个就是数值 5 ...
- 在Mac下配置Maven环境
下载Maven安装文件,(http://maven.apache.org/download.html)如:apache-maven-3.5.0-bin.zip,然后解压到本地目录. 打开 .bash_ ...
- LOJ116 - 有源汇有上下界最大流
原题链接 Description 模板题啦~ Code //有源汇有上下界最大流 #include <cstdio> #include <cstring> #include & ...