
tensorflow(六)
一、TensorBoard可视化工具
TensorBoard实现形式为web应用程序,这为提供分布式、跨系统的图形界面服务带来了便利。
1.使用流程
SummaryOps->Session--(input)-->FileWriter---(add)--->Event file---(load)-->TensorBoard
import tensorflow as tf

with tf.name_scope('graph') as scope:

     matrix1 = tf.constant([[3., 3.]],name ='matrix1')  #1 row by 2 column

     matrix2 = tf.constant([[2.],[2.]],name ='matrix2') # 2 row by 1 column

     product = tf.matmul(matrix1, matrix2,name='product')

sess = tf.Session()

writer = tf.summary.FileWriter("/data/logs/", sess.graph) #第一个参数指定生成文件的目录。

init = tf.global_variables_initializer()

sess.run(init)
命令行执行 tensorboard --logdir=/data/logs
打开localhost:6006
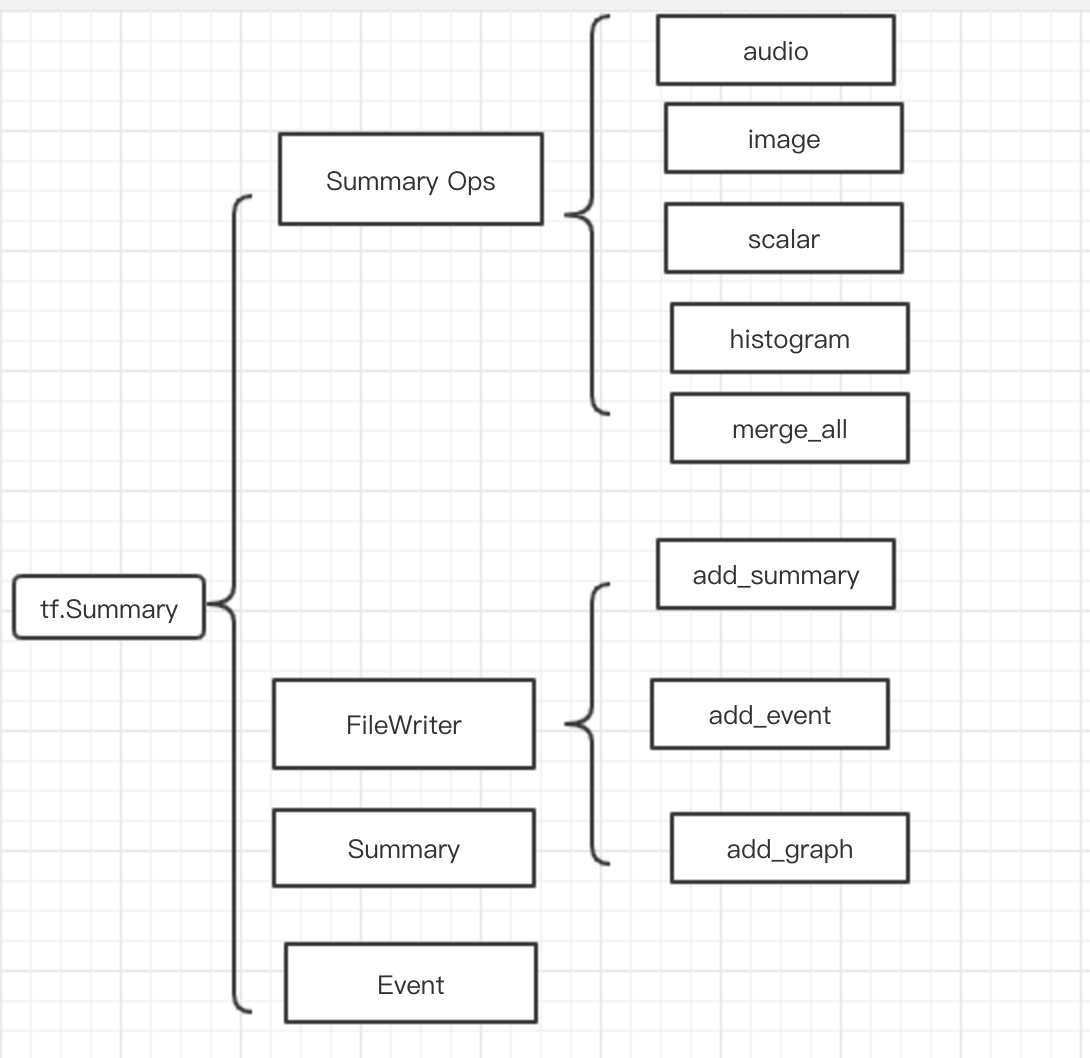
如图所示,tf.summary 模块的功能
2.可视化数据流图
通过with tf.name_scope('sc_name'):定义一个名字可以把一些列操作定义为一个节点,在图上展示为一个节点
点击加号可以展示节点内详情
from __future__ import absolute_import

from __future__ import division

from __future__ import print_function

import tensorflow as tf

from tensorflow.examples.tutorials.mnist import input_data

mnist = input_data.read_data_sets('/Users/quxiaoyuan/work/data/mnist',one_hot=True)

with tf.name_scope('input'):

    x = tf.placeholder(tf.float32,[None,784],name='x-input')

    y_ = tf.placeholder(tf.float32,[None,10],name='y-input')

with tf.name_scope('softmax_layer'):

    with tf.name_scope('weights'):

        weights = tf.Variable(tf.zeros([784,10]))

    with tf.name_scope('biases'):

        biases = tf.Variable(tf.zeros([10]))

    with tf.name_scope('Wx_plus_b'):

        y = tf.matmul(x,weights) + biases

with tf.name_scope('cross_entropy'):

    diff = tf.nn.softmax_cross_entropy_with_logits(labels=y_,logits=y)

    with tf.name_scope('total'):

        cross_entropy = tf.reduce_mean(diff)

        tf.summary.scalar('cross_entropy',cross_entropy)

with tf.name_scope('train'):

    train_step = tf.train.AdamOptimizer(0.001).minimize(cross_entropy)

with tf.name_scope('accuracy'):

    with tf.name_scope('correct_prediction'):

        correct_prediction = tf.equal(tf.argmax(y,1),tf.argmax(y_,1))

    with tf.name_scope('accuracy'):

        accuracy = tf.reduce_mean(tf.cast(correct_prediction,tf.float32))
3.ft.summary操作
add_summay生成折线图
with tf.name_scope('cross_entropy'):

    diff = tf.nn.softmax_cross_entropy_with_logits(labels=y_,logits=y)

    with tf.name_scope('total'):

        cross_entropy = tf.reduce_mean(diff)

        tf.summary.scalar('cross_entropy',cross_entropy)

with tf.name_scope('train'):

    train_step = tf.train.AdamOpimizer(0.01).minimize(cross_entropy)

with tf.name_scope('accuracy'):

    with tf.name_scope('correct_prediction'):

        correct_prediction = tf.equal(tf.argmax(y,1),tf.argmax(y_,1))

    with tf.name_scope('accuracy'):

        accuracy = tf.reduce_mean(tf.cast(correct_prediction,tf.float32))

        tf.summary.scalar('accuracy',accuracy)

merged = tf.summary.merge_all()

for i in range(FLAGS.max_step):

    if i % FLAGS.max_step == 0:

        summary, acc = sess.run([merged,accuracy],feed_dict=feed_dict(False))

        witer.add_summary(summary,i)
histogram生成数据分布图
with tf.name_scope('softmax_layer'):

    with tf.name_scope('weights'):

        weights = tf.Variable(tf.zeros([784,10]))

        tf.summary.histogram('weights',weights)
tf.summary.image生成图像
with tf.name_scope('input'):

    x = tf.placeholder(tf.float32,[None,784],name='x-input')

    y_ = tf.placeholder(tf.float32,[None,10],name='y-input')

with tf.name_scope('input_reshape'):

    image_shaped_input = tf.reshape(x,[-1,28,28,1])

    tf.summary.image('input',image_shaped_input,10)
tensorflow(六)的更多相关文章
- TensorFlow(六):tensorboard网络结构
# MNIST数据集 手写数字 import tensorflow as tf from tensorflow.examples.tutorials.mnist import input_data # ...
- TF Boys (TensorFlow Boys ) 养成记(六)
圣诞节玩的有点嗨,差点忘记更新.祝大家昨天圣诞节快乐,再过几天元旦节快乐. 来继续学习,在/home/your_name/TensorFlow/cifar10/ 下新建文件夹cifar10_train ...
- 第四百一十六节,Tensorflow简介与安装
第四百一十六节,Tensorflow简介与安装 TensorFlow是什么 Tensorflow是一个Google开发的第二代机器学习系统,克服了第一代系统DistBelief仅能开发神经网络算法.难 ...
- TF Boys (TensorFlow Boys ) 养成记(六): CIFAR10 Train 和 TensorBoard 简介
圣诞节玩的有点嗨,差点忘记更新.祝大家昨天圣诞节快乐,再过几天元旦节快乐. 来继续学习,在/home/your_name/TensorFlow/cifar10/ 下新建文件夹cifar10_train ...
- TensorFlow从1到2(六)结构化数据预处理和心脏病预测
结构化数据的预处理 前面所展示的一些示例已经很让人兴奋.但从总体看,数据类型还是比较单一的,比如图片,比如文本. 这个单一并非指数据的类型单一,而是指数据组成的每一部分,在模型中对于结果预测的影响基本 ...
- 第六节,TensorFlow编程基础案例-保存和恢复模型(中)
在我们使用TensorFlow的时候,有时候需要训练一个比较复杂的网络,比如后面的AlexNet,ResNet,GoogleNet等等,由于训练这些网络花费的时间比较长,因此我们需要保存模型的参数. ...
- TensorFlow从入门到理解(六):可视化梯度下降
运行代码: import tensorflow as tf import numpy as np import matplotlib.pyplot as plt from mpl_toolkits.m ...
- 『PyTorch x TensorFlow』第六弹_从最小二乘法看自动求导
TensoFlow自动求导机制 『TensorFlow』第二弹_线性拟合&神经网络拟合_恰是故人归 下面做了三个简单尝试, 利用包含gradients.assign等tf函数直接构建图进行自动 ...
- tensorFlow(六)应用-基于CNN破解验证码
TensorFlow基础见前博客 简介 传统的验证码识别算法一般需要把验证码分割为单个字符,然后逐个识别.本教程将验证码识别问题转化为分类的问题,实现对验证码进行整体识别. 步骤简介 本教程一共分为四 ...
随机推荐
- C#后台执行JavaScript
方法一: Page.RegisterClientScriptBlock 方法 命名空間: System.Web.UI 这个方法现在已经过时.改用ClientScriptManager.Register ...
- [题解] Luogu P5641 【CSGRound2】开拓者的卓识
这个柿子挺别致的......还有信仰膜数998244353 直接讲正解吧...... 首先发现这个柿子从上往下算好像不怎么行,我们从下往上看,(下面令\(Ans_r = sum_{k,1,r}\)). ...
- js获取浏览器窗口大小
摘抄:https://blog.csdn.net/qq_27628085/article/details/81947478 常用: JS 获取浏览器窗口大小 // 获取窗口宽度 if ...
- 洛谷 P5661 公交换乘(队列)
题目传送门 解题思路: 暴力模拟. AC代码: #include<iostream> #include<cstdio> #include<queue> using ...
- linux 安装禅道 和 CentOS 7 开放防火墙端口 命令
linux 安装禅道链接: https://www.cnblogs.com/maohuidong/p/9750202.html CentOS 7 开放防火墙端口 命令 链接:https://www. ...
- JDK8 API离线文档免费下载&JavaEE API文档离线下载&API在线查看链接&常用的JAR包下载
1.JDK8 API离线文档 链接:https://pan.baidu.com/s/1fYc-QesmYRumTEPmnSgEKA 提取码:2bdr 2.JavaEE API文档离线下载 链接:htt ...
- rocketmq 使用
rocketmq 基本使用可以看官网和官网给的demo. https://github.com/apache/rocketmq/tree/master/example 这里主要说明几个点:rocke ...
- Mysql数据库忘记密码找回方法
Mysql数据库忘记密码找回 a 停止mysql服务 /etc/init.d/mysql stop b 使用--skip-grant-tables启动mysql,忽略授权登录验证 mysqld_saf ...
- Linux系统相关命令
时间和日期 date cal 磁盘和目录空间 df du 进程信息 ps top kill 01. 时间和日期 序号 命令 作用 01 date 查看系统时间 02 cal calendar 查看日历 ...
- idHttpServer接收类型
unit Unit1; interface uses Windows, Messages, SysUtils, Variants, Classes, Graphics, Controls, Forms ...