Django1.11配合uni-app发起微信支付!
Django1.11配合uni-app发起微信支付!
经过三天的断断续续的奋战,我终于是干动了微信支付。为了以后不忘记,现在来一篇教程,来来来,开干!!!

一、准备阶段
1、准备阶段我们需要去微信官网申请一个小程序或者公众号。获得AppID和AppSecret。
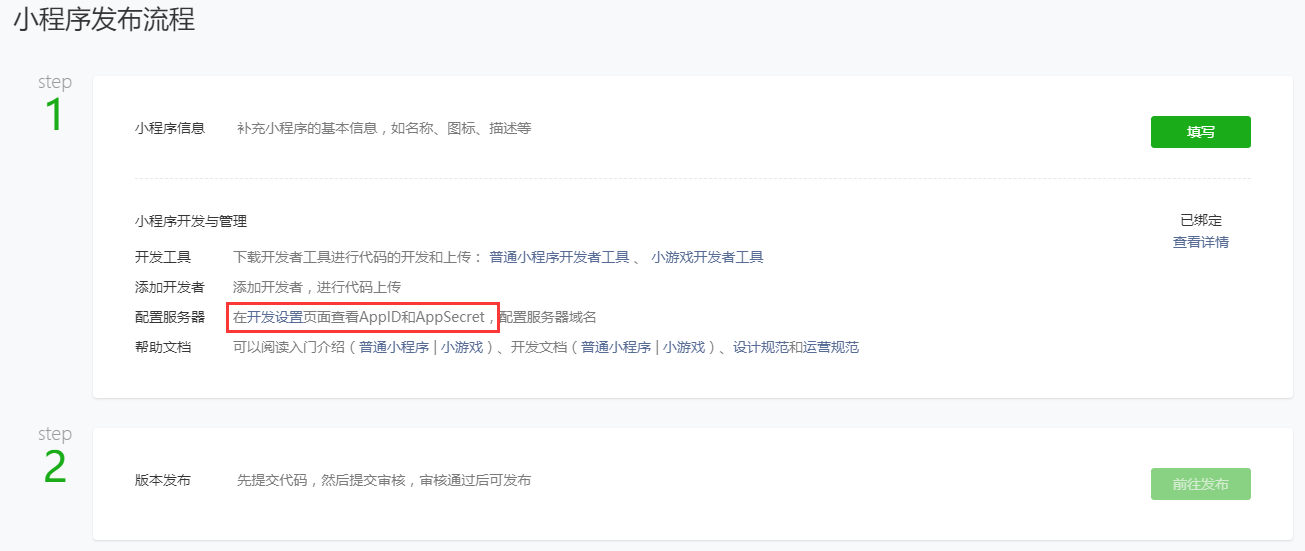
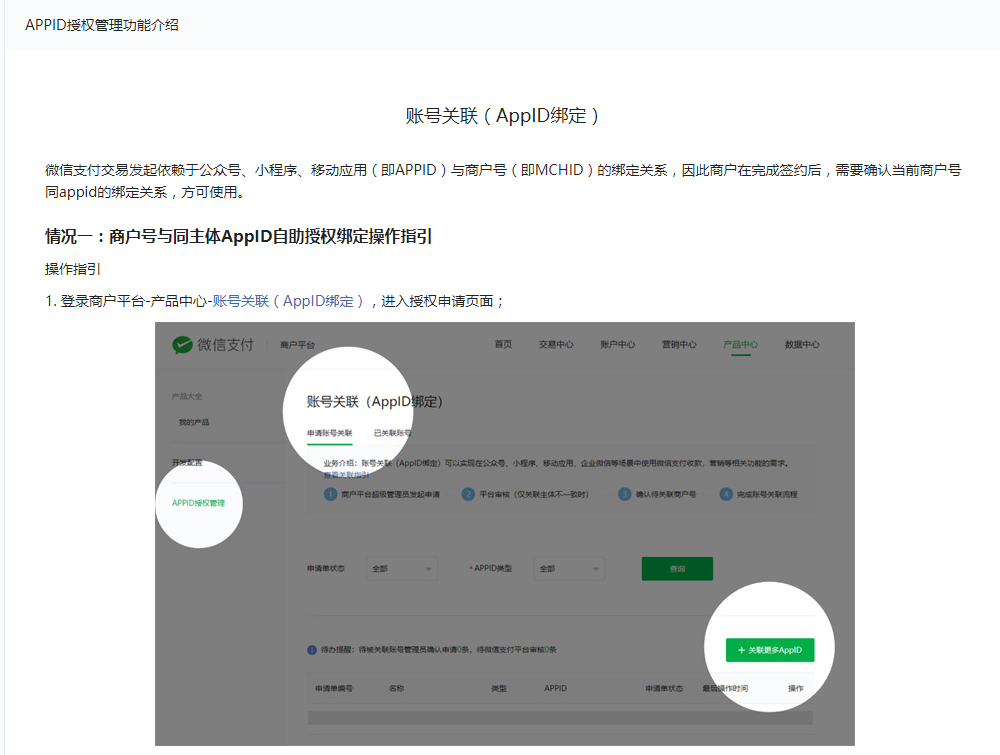
2、去微信商户平台 成为商家,开通JSAPI用来获得商户号和自己配置的钥匙。然后再商户平台上面绑定小程序appid。
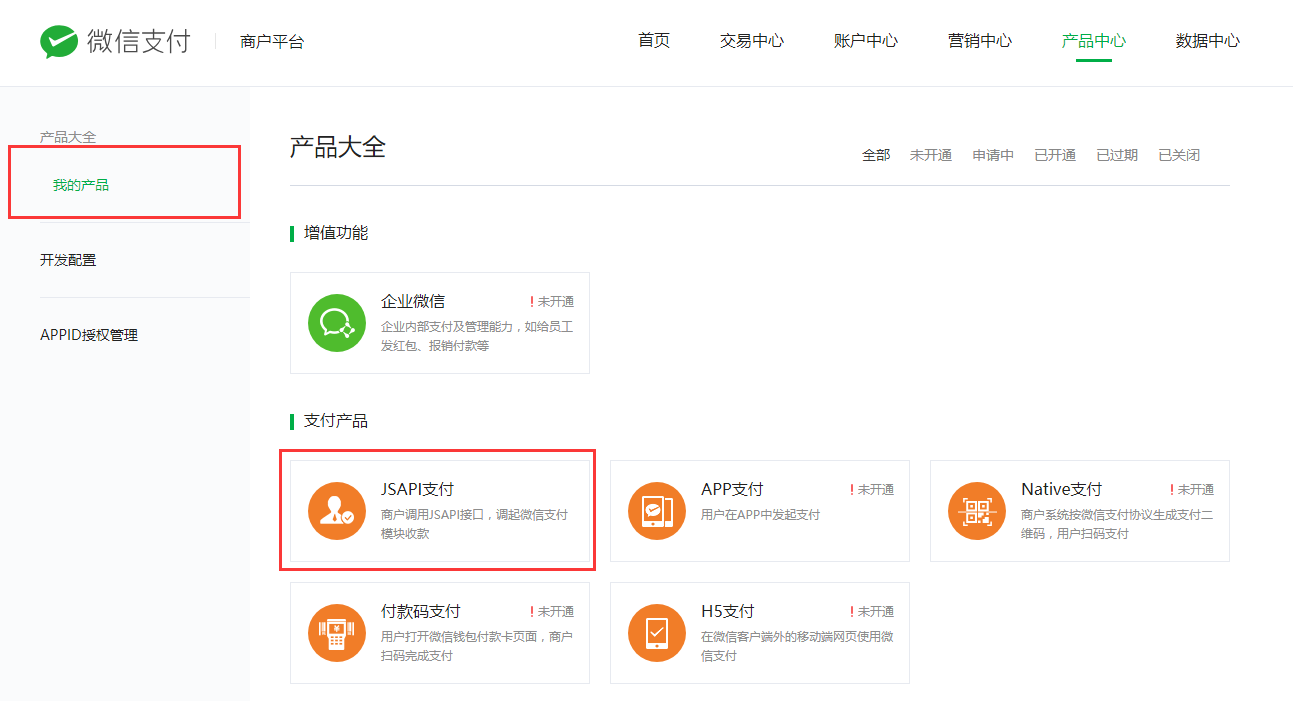
(点击下面图片进入官方链接!)
在配置里面配置一个自己的key,需要记住后台开发的时候需要!

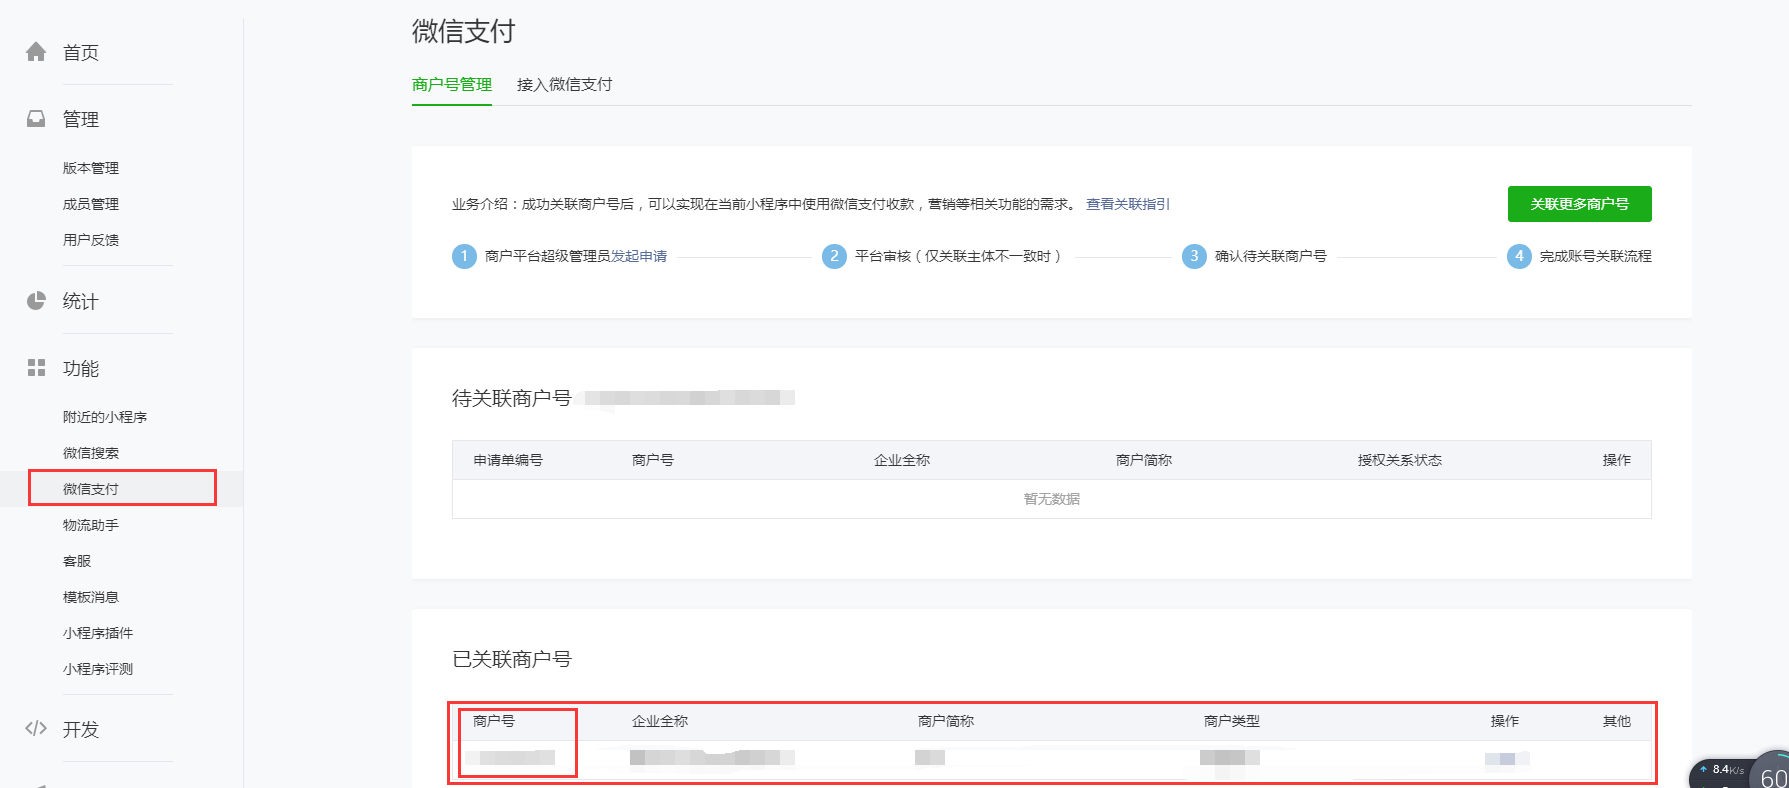
关联后即可在小程序管理页面开通微信支付!
到此,准备阶段完成!
二、梳理流程
在这里我大概写一下流程:首先我们在前端发起微信登陆,此时微信会给我们返回一个openid,这个openid一定要留存在某一个位置。然后前段发起微信支付,向后端发送数据请求,后端对结合前段的数据向微信方面发送一个请求,请求相关数据,得到相关数据之后把数据发送给前段,前段收到数据,利用微信接口再向微信指定连接发送请求,微信返回请求,即可!这个就是全流程,很多人肯定已经懵了。没事,咱一步一步来,别步子跨大了——扯到蛋了!
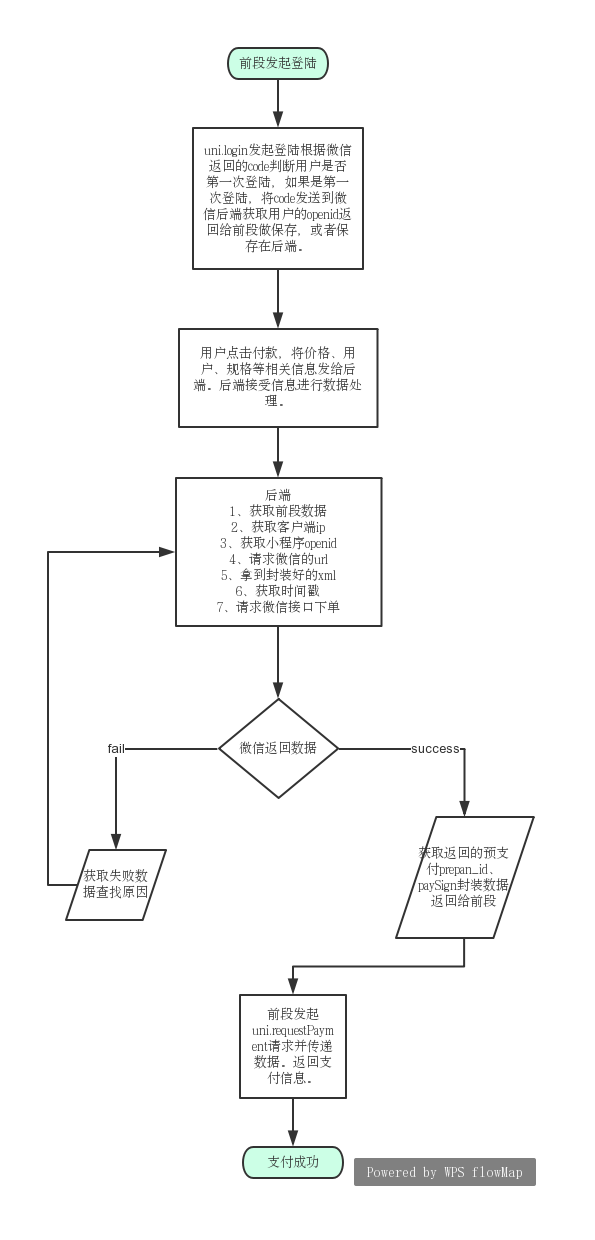
以上就是数据处理阶段大概流程!
三、代码实现
0、用户登录根据用户code获取openid
 uni.login({

                     provider: 'weixin',

                     success: function(loginRes) {

                         let code = loginRes.code;

                         if (!_this.isCanUse) {

                             //非第一次授权获取用户信息

                             uni.getUserInfo({

                                 provider: 'weixin',

                                 success: function(infoRes) {

                           //获取用户信息后向调用信息更新方法

                                     _this.nickName = infoRes.userInfo.nickName; //昵称

                                     _this.avatarUrl = infoRes.userInfo.avatarUrl; //头像

                                         _this.updateUserInfo();//调用更新信息方法

                                 }

                             });

                         }

                         //2.将用户登录code传递到后台置换用户SessionKey、OpenId等信息

                         uni.request({

                             url: 'http://127.0.0.1:8000/users/',

                             data: {

                                 code: code,

                             },

                             method: 'GET',

                             header: {

                                 'content-type': 'application/json'

                             },

                             success: (res) => {

                                 console.log(res.data)

                                 if ( res.data.state== 1001) {

                                     console.log("新注册的用户!")

                                     _this.OpenId = res.data.openid;

                                 } else{

                                     _this.OpenId = res.data.openid;

                                     console.log("注册过的用户!开始设置本地缓存!")

                                     console.log(res.data[0].id)

                                     if ( res.data[0].id ) {

                                         //这里获得登陆状态,然后根据登陆状态来改变用户按钮信息!!!!

                                     } else{

                                     };

                                     _this.user_id = res.data[0].id

                                     uni.setStorage({

                                         key: 'user',

                                         data: res.data,

                                         success: function () {

                                             console.log('设置缓存成功');

                                         }

                                     });

                                     // _this.gotoshopping()

                                     // uni.reLaunch({//信息更新成功后跳转到小程序首页

                                     //     url: '/pages/shopping/shopping'

                                     // });

                                 }

                                 //openId、或SessionKdy存储//隐藏loading

                                 uni.hideLoading();

                             }

                         });

                     },

                 });
uni.login部分代码
         if request.GET.get("code"):

             ret = {"state": 1000}

             code = request.GET.get("code")

             url = "https://api.weixin.qq.com/sns/jscode2session"

             appid = "xxxxxxxxxxxxx"

             secret = "xxxxxxxxxxxxxxxxxxxxx"

             # url一定要拼接,不可用传参方式

             url = url + "?appid=" + appid + "&secret=" + secret + "&js_code=" + code + "&grant_type=authorization_code"

             import requests

             r = requests.get(url)

             print("======", r.json())

             openid = r.json()['openid']

             user = users.objects.filter(openid=openid).all()

             if not user:

                 ret["state"] = 1001

                 ret["msg"] = "用户第一次登陆"

                 ret["openid"] = openid

                 return Response(ret)

             else:

                 serializer = self.get_serializer(user, many=True)

                 return Response(serializer.data)
后端处理登陆
1、首先需要创建一个confige.py的配置文件!然后写路由,让前端找到“门”在哪里!
# 微信支付的配置参数

client_appid = 'xxxxxxxxxxxxxx'  # 小程序appid

client_secret = 'xxxxxxxxxxxxxxxxxxxxxxxxxxx'  # 小程序secret

Mch_id = 'xxxxxxxxxxx'  # 商户号

Mch_key = 'xxxxxxxxxxxxxxxxxxx'  # 商户Key

order_url = 'https://api.mch.weixin.qq.com/pay/unifiedorder'  # 订单地址
config.py
 router = routers.DefaultRouter()

 router.register("users", views.UsersViewSet)

 router.register("goods", views.GoodsViewSet)

 router.register("comments", views.CommentsViewSet)

 router.register("payOrder", views.OrdersViewSet) #这个就是微信支付的接口

 urlpatterns = [

     url(r'^admin/', admin.site.urls),

     url(r'', include(router.urls)),

 ]+ static(settings.STATIC_URL, document_root=settings.STATIC_ROOT)

 urlpatterns += static(settings.MEDIA_URL, document_root=settings.MEDIA_ROOT)
url.py
 class OrdersViewSet(viewsets.ModelViewSet):

     queryset = Order.objects.all()

     serializer_class = OrderModelSerializer

     def create(self, request, *args, **kwargs):

         if request.data.get("user_id"):

             from goods.wxpay.wxpay import payOrder

             data = payOrder(request)

             print(data)

             return Response(data)

         else:

             serializer = self.get_serializer(data=request.data)

             serializer.is_valid(raise_exception=True)

             self.perform_create(serializer)

             headers = self.get_success_headers(serializer.data)

             return Response(serializer.data, status=status.HTTP_201_CREATED, headers=headers)

     def perform_create(self, serializer):

         serializer.save()

     def get_success_headers(self, data):

         try:

             return {'Location': str(data[api_settings.URL_FIELD_NAME])}

         except (TypeError, KeyError):

             return {}
view.py
2、然后创建逻辑文件,获取数据请求数据返回数据!
# -*- coding: utf-8 -*-

from .config import client_appid, client_secret, Mch_id, Mch_key, order_url

import hashlib

import datetime

import xml.etree.ElementTree as ET

import requests

from ..models import users

# 生成签名的函数

def paysign(appid, body, mch_id, nonce_str, notify_url, openid, out_trade_no, spbill_create_ip, total_fee):

    ret = {

        "appid": appid,

        "body": body,

        "mch_id": mch_id,

        "nonce_str": nonce_str,

        "notify_url": notify_url,

        "openid": openid,

        "out_trade_no": out_trade_no,

        "spbill_create_ip": spbill_create_ip,

        "total_fee": total_fee,

        "trade_type": 'JSAPI'

    }

    print(ret)

    # 处理函数,对参数按照key=value的格式,并按照参数名ASCII字典序排序

    stringA = '&'.join(["{0}={1}".format(k, ret.get(k)) for k in sorted(ret)])

    stringSignTemp = '{0}&key={1}'.format(stringA, Mch_key)

    sign = hashlib.md5(stringSignTemp.encode("utf-8")).hexdigest()

    print(sign.upper())

    return sign.upper()

# 生成随机字符串

def getNonceStr():

    import random

    data = "123456789zxcvbnmasdfghjklqwertyuiopZXCVBNMASDFGHJKLQWERTYUIOP"

    nonce_str = ''.join(random.sample(data, 30))

    return nonce_str

# 生成商品订单号

def getWxPayOrdrID():

    date = datetime.datetime.now()

    # 根据当前系统时间来生成商品订单号。时间精确到微秒

    payOrdrID = date.strftime("%Y%m%d%H%M%S%f")

    return payOrdrID

# 获取全部参数信息,封装成xml

def get_bodyData(openid, client_ip, price):

    body = 'Mytest'  # 商品描述

    notify_url = 'https://127.0.0.1:8000/payOrder/'  # 支付成功的回调地址  可访问 不带参数

    nonce_str = getNonceStr()  # 随机字符串

    out_trade_no = getWxPayOrdrID()  # 商户订单号

    total_fee = str(price)  # 订单价格 单位是 分

    # 获取签名

    sign = paysign(client_appid, body, Mch_id, nonce_str, notify_url, openid, out_trade_no, client_ip, total_fee)

    bodyData = '<xml>'

    bodyData += '<appid>' + client_appid + '</appid>'  # 小程序ID

    bodyData += '<body>' + body + '</body>'  # 商品描述

    bodyData += '<mch_id>' + Mch_id + '</mch_id>'  # 商户号

    bodyData += '<nonce_str>' + nonce_str + '</nonce_str>'  # 随机字符串

    bodyData += '<notify_url>' + notify_url + '</notify_url>'  # 支付成功的回调地址

    bodyData += '<openid>' + openid + '</openid>'  # 用户标识

    bodyData += '<out_trade_no>' + out_trade_no + '</out_trade_no>'  # 商户订单号

    bodyData += '<spbill_create_ip>' + client_ip + '</spbill_create_ip>'  # 客户端终端IP

    bodyData += '<total_fee>' + total_fee + '</total_fee>'  # 总金额 单位为分

    bodyData += '<trade_type>JSAPI</trade_type>'  # 交易类型 小程序取值如下:JSAPI

    bodyData += '<sign>' + sign + '</sign>'

    bodyData += '</xml>'

    return bodyData

def xml_to_dict(xml_data):

    '''

    xml to dict

    :param xml_data:

    :return:

    '''

    xml_dict = {}

    root = ET.fromstring(xml_data)

    for child in root:

        xml_dict[child.tag] = child.text

    return xml_dict

def dict_to_xml(dict_data):

    '''

    dict to xml

    :param dict_data:

    :return:

    '''

    xml = ["<xml>"]

    for k, v in dict_data.iteritems():

        xml.append("<{0}>{1}</{0}>".format(k, v))

    xml.append("</xml>")

    return "".join(xml)

# 获取返回给小程序的paySign

def get_paysign(prepay_id, timeStamp, nonceStr):

    pay_data = {

        'appId': client_appid,

        'nonceStr': nonceStr,

        'package': "prepay_id=" + prepay_id,

        'signType': 'MD5',

        'timeStamp': timeStamp

    }

    stringA = '&'.join(["{0}={1}".format(k, pay_data.get(k)) for k in sorted(pay_data)])

    stringSignTemp = '{0}&key={1}'.format(stringA, Mch_key)

    sign = hashlib.md5(stringSignTemp.encode("utf-8")).hexdigest()

    return sign.upper()

# 统一下单支付接口

def payOrder(request):

    import time

    # 获取价格,和用户是谁

    price = request.data.get("price")

    user_id = request.data.get("user_id")

    # 获取客户端ip

    client_ip, port = request.get_host().split(":")

    # 获取小程序openid

    openid = users.objects.get(id=user_id).openid

    # 请求微信的url

    url = order_url

    # 拿到封装好的xml数据

    body_data = get_bodyData(openid, client_ip, price)

    # 获取时间戳

    timeStamp = str(int(time.time()))

    # 请求微信接口下单

    respone = requests.post(url, body_data.encode("utf-8"), headers={'Content-Type': 'application/xml'})

    # 回复数据为xml,将其转为字典

    content = xml_to_dict(respone.content)

    print(content)

    # 返回给调用函数的数据

    ret = {"state": 1000}

    if content["return_code"] == 'SUCCESS':

        # 获取预支付交易会话标识

        prepay_id = content.get("prepay_id")

        # 获取随机字符串

        nonceStr = content.get("nonce_str")

        # 获取paySign签名,这个需要我们根据拿到的prepay_id和nonceStr进行计算签名

        paySign = get_paysign(prepay_id, timeStamp, nonceStr)

        # 封装返回给前端的数据

        data = {"prepay_id": prepay_id, "nonceStr": nonceStr, "paySign": paySign, "timeStamp": timeStamp}

        print('=========',data)

        ret["msg"] = "成功"

        return data

    else:

        ret["state"] = 1001

        ret["msg"] = "失败"

        return ret
wxpay.py
3、前段获取后端返回的数据给微信再次发送数据请求!(包含点击的时候往后端发送数据处理请求)
 pay(){

                 uni.request({

                     url: 'http://127.0.0.1:8000/payOrder/',

                     method: 'POST',

                     header: {

                         'content-type': 'application/json'

                     },

                     data: {

                         user_id:this.user_id,

                         price:128

                     },

                     success: res => {

                         console.log("success")

                         console.log(res.data)

                         uni.requestPayment({

                         provider: 'wxpay',

                         timeStamp: res.data.timeStamp,

                         nonceStr: res.data.nonceStr,

                         package: 'prepay_id='+String(res.data.prepay_id),

                         signType: 'MD5',

                         paySign: res.data.paySign,

                         success: function (res) {

                             console.log('success:' + JSON.stringify(res));

                             // 支付成功,给后台发送数据,保存订单

                         },

                         fail: function (err) {

                             console.log('fail:' + JSON.stringify(err));

                             // 支付失败,给后台发送数据,保存订单

                         }

                         });

                     },

                     fail: (res) => {

                         console.log("fail")

                         console.log(res)

                     },

                     complete: () => {}

                 });

             }
前端代码
至此相信大家也就会了。
附上我的目录结构
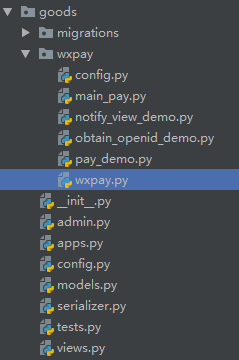
最后,人生苦短,我用Python!
Django1.11配合uni-app发起微信支付!的更多相关文章
- 微信公众号发起微信支付 c#
tenpay.dll: MD5Util.cs using System; using System.Collections.Generic; using System.Linq; using Syst ...
- 两种js方法发起微信支付:WeixinJSBridge,wx.chooseWXPay区别
原文链接:https://www.2cto.com/weixin/201507/412752.html 1.为什么会有两种JS方法可以发起微信支付? 当你登陆微信公众号之后,左边有两个菜单栏,一个是微 ...
- Android app 第三方微信支付接入详解
微信支付做了好几遍了,都没有出现什么棘手的问题,下面一一为大家分享一下,欢迎吐槽. 还是老样子,接入微信的支付要第一步添加微信支付官方的包libammsdk.jar 首先就处理略坑的一个问题,app应 ...
- 微信小程序之wx.requestPayment 发起微信支付
wx.requestPayment 发起微信支付 timeStamp 时间戳 nonceStr 随机字符串 package 统一下单接口返回的 prepay_id 参数值 signType 签名算法 ...
- Python使用JsAPI发起微信支付 Demo
Python使用JsAPI发起微信支付 Demo 这个是基于Django框架. 了解更多,可以关注公众号"轻松学编程" 1.公众号设置.微信商户号设置 这些都可以在官网查得到, 公 ...
- app使用微信支付成功后,点击返回到该app却跳到另外一个app去了
刚接手了公司iOS的两个APP, 现在碰到了这样一个问题: 有一台iPhone在一个APP中使用了微信支付,支付成功后,点击返回到该APP,结果却跳到了另外一个APP去了. 这两个APP都是公司开发的 ...
- app端微信支付(二) - 生成预付单
前一篇文章的时序图中说了,app端调用微信支付必须先由后台调用微信后台生成预付单,再构建参数给手机端,而数据的构建要以xml形式,那么看看代码具体实现吧,代码已经精简过了,自己的业务已经除去,精简的 ...
- PHP APP端微信支付
前面已经写了手机APP支付宝支付,今天再把手机APP微信支付补上,前期的准备工作在这里就不多说了,可以参考微信支付开发文档,一定要仔细阅读开发文档,可以让你少踩点坑:准备工作完成后就是配置参数,调用统 ...
- PHP实现 APP端微信支付功能
1.我封装好的一个支付类文件,多余的东西都去除掉了,并且把配置参数放到了这个支付类中,只需要修改Weixinpayandroid方法内的几个参数就可以直接复制使用: class Wxpayandroi ...
随机推荐
- 正则表达式,字符串中需要两个反斜杠“\\d”
这个正则表达式为什么会有两个反斜杠? "^.*?\\.(jpg|png|bmp|gif)$"上面这个正则表达式为什么有两个反斜杠呢?反斜杠点\.就能表示点.了,为什么还要在\.前面 ...
- 微信获得access-token
微信获得access-token RestTemplate template = new RestTemplate(); String appid = "aa"; String s ...
- 9.JAVA编程思想 多形性
欢迎转载,转载请标明出处:http://blog.csdn.net/notbaron/article/details/51040241 "对于面向对象的程序设计语言,多型性是第三种最主要的特 ...
- jquery文件批量上传控件Uploadify3.2(java springMVC)
人比較懒 有用为主 不怎么排版了 先放上Uploadify的官网链接:http://www.uploadify.com/ -->里面能够看到PHP的演示样例,属性说明,以及控件下载地址.分f ...
- 将tflearn的模型保存为pb,给TensorFlow使用
参考:https://github.com/tflearn/tflearn/issues/964 解决方法: """ Tensorflow graph freezer C ...
- code+12月月赛 火锅盛宴
时间限制: 2.0 秒 空间限制: 512 MB 题目背景 SkyDec和YJQQQAQ都是Yazid的好朋友.他们都非常喜欢吃火锅.有一天,他们聚在一起,享受一场火锅盛宴. 题目描述 在这场火锅盛宴 ...
- mtools 是由MongoDB 官方工程师实现的一套工具集,可以很快速的日志查询分析、统计功能,此外还支持本地集群部署管理.
mtools 是由MongoDB 官方工程师实现的一套工具集,可以很快速的日志查询分析.统计功能,此外还支持本地集群部署管理 https://www.cnblogs.com/littleatp/p/9 ...
- ECharts-热力图实例
1.引入echarts.js 2.页面js代码 //用ajax获取所需要的json数据 $.get("../../../mall/queryPageWtSrPost.do", { ...
- preg_replace数组的用法
$string = 'The quick brown fox jumped over the lazy dog.';$patterns = array();$patterns[2] = '/quick ...
- PL/SQL实现JAVA中的split()方法的小例子
众所周知,java中为String类提供了split()字符串分割的方法,所以很容易将字符串以指定的符号分割为一个字符串数组.但是在pl/sql中并没有提供像java中的split()方法,所以要想在 ...