
SpringBoot(四) Web开发 --- Thymeleaf、JSP
Spring Boot提供了spring-boot-starter-web为Web开发予以支持,spring-boot-starter-web为我们提供了嵌入的Tomcat以及Spring MVC的依赖。
模板引擎
Spring Boot支持多种模版引擎包括:
- FreeMarker
- Groovy
- Thymeleaf(官方推荐)
- Mustache
JSP技术Spring Boot官方是不推荐的,原因有三:
- tomcat只支持war的打包方式,不支持可执行的jar。
- Jetty 嵌套的容器不支持jsp
- Undertow
- 创建自定义error.jsp页面不会覆盖错误处理的默认视图,而应该使用自定义错误页面
Thymeleaf引擎模板
Thymeleaf是一款用于渲染XML/XHTML/HTML5内容的模板引擎。类似JSP,Velocity,FreeMaker等,它也可以轻易的与Spring MVC等Web框架进行集成作为Web应用的模板引擎。与其它模板引擎相比,Thymeleaf最大的特点是能够直接在浏览器中打开并正确显示模板页面,而不需要启动整个Web应用。它的功能特性如下:
- Spring MVC中@Controller中的方法可以直接返回模板名称,接下来Thymeleaf模板引擎会自动进行渲染
- 模板中的表达式支持Spring表达式语言(Spring EL)
- 表单支持,并兼容Spring MVC的数据绑定与验证机制
- 国际化支持
Spring官方也推荐使用Thymeleaf,所以本篇代码整合就使用Thymeleaf来整合。
使用Thymeleaf
1.加入依赖
 1 <dependency>

 2     <groupId>org.springframework.boot</groupId>

 3     <artifactId>spring-boot-starter-thymeleaf</artifactId>2.1.6</dependency>

 4

 5 <properties>

 6         <thymeleaf.version>3.0.9.RELEASE</thymeleaf.version>

 7         <!-- 布局功能的支持程序  thymeleaf3主程序  layout2以上版本 -->

 8         <!-- thymeleaf2   layout1-->

 9         <thymeleaf-layout-dialect.version>2.2.2</thymeleaf-layout-dialect.version>

10   </properties>
只要我们把HTML页面放在classpath:/templates/,thymeleaf就能自动渲染;
2.导入thymeleaf的名称空间
<html lang="en" xmlns:th="http://www.thymeleaf.org">
3.使用thymeleaf语法
<!DOCTYPE html>

<html lang="en" xmlns:th="http://www.thymeleaf.org">

<head>

    <meta charset="UTF-8">

    <title>Title</title>

</head>

<body>

    <h1>成功!</h1>

    <!--th:text 将div里面的文本内容设置为 -->

    <div th:text="${hello}">这是显示欢迎信息</div>

</body>

</html>
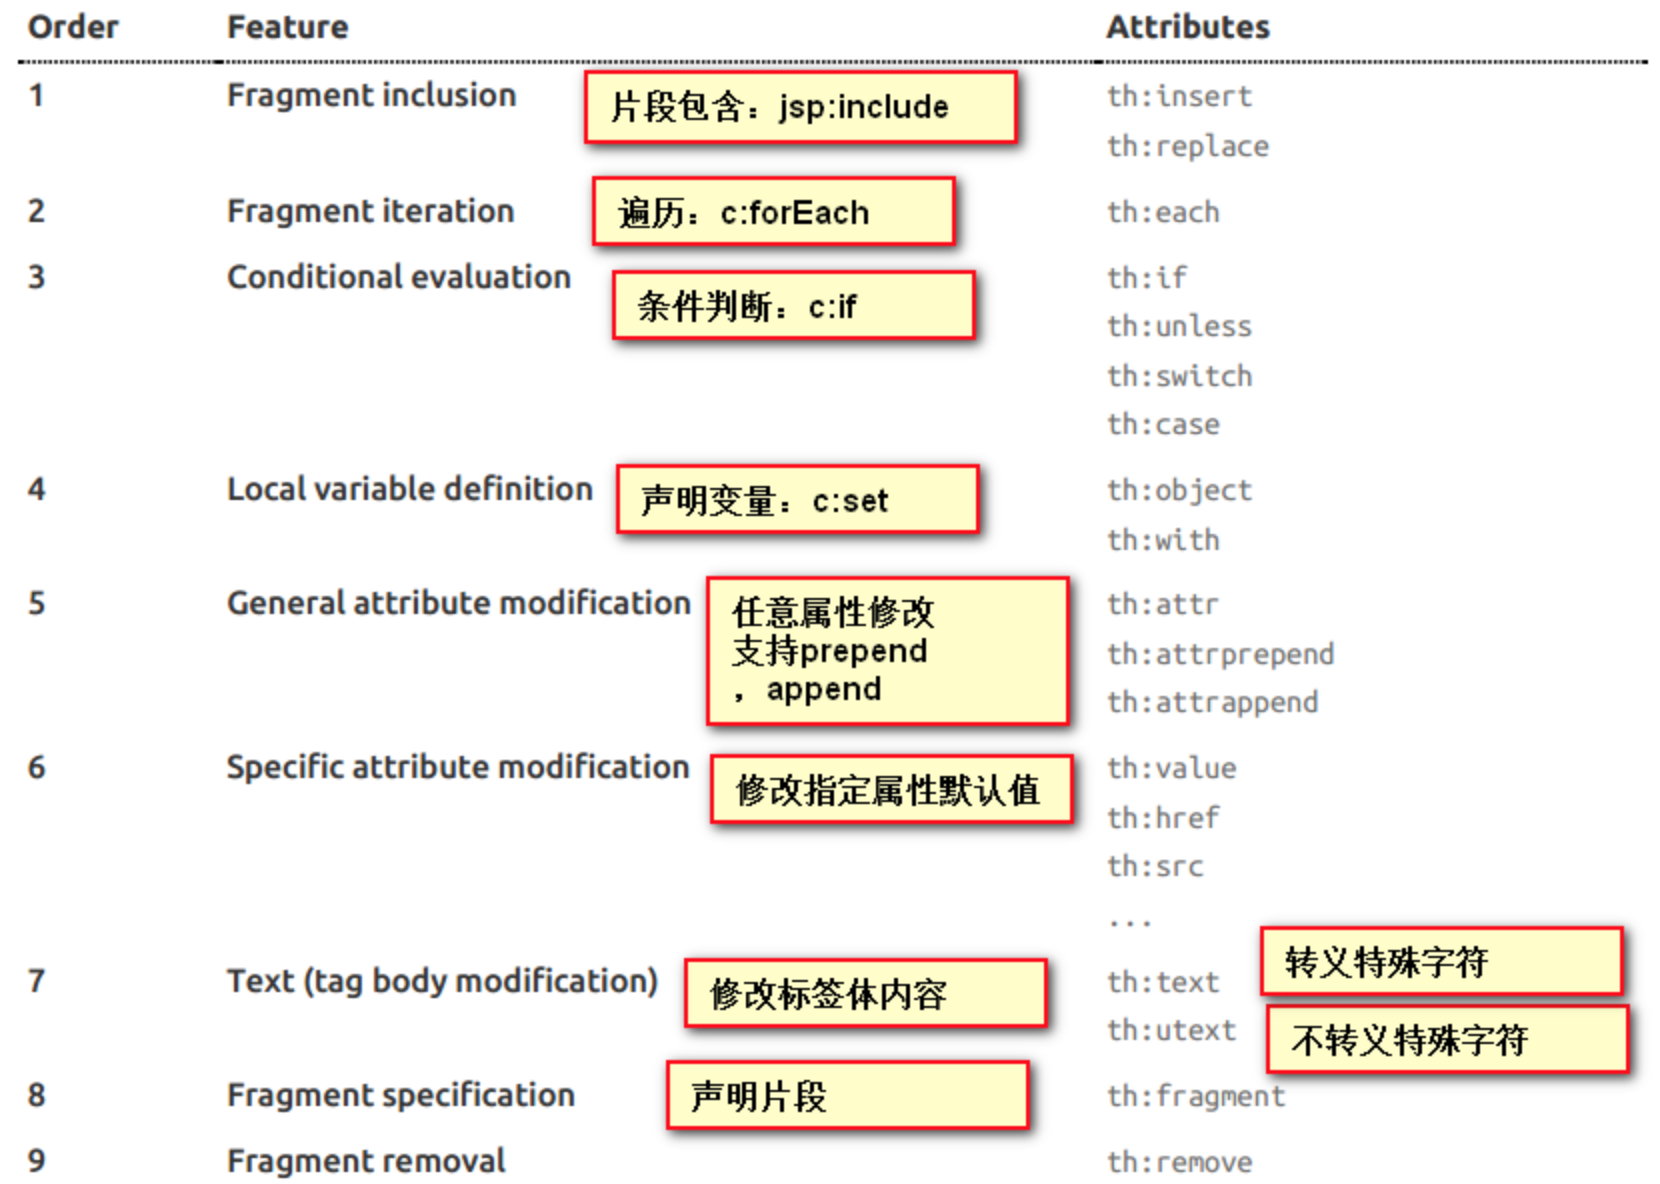
注:通过xmlns:th=”http://www.thymeleaf.org“ 命令空间,将静态页面转换为动态的视图,需要进行动态处理的元素将使用“th:”前缀。
Thymeleaf的默认参数配置和表达式
# THYMELEAF (ThymeleafAutoConfiguration)

#开启模板缓存(默认值:true)

spring.thymeleaf.cache=true

#Check that the template exists before rendering it.

spring.thymeleaf.check-template=true

#检查模板位置是否正确(默认值:true)

spring.thymeleaf.check-template-location=true

#Content-Type的值(默认值:text/html)

spring.thymeleaf.content-type=text/html

#开启MVC Thymeleaf视图解析(默认值:true)

spring.thymeleaf.enabled=true

#模板编码

spring.thymeleaf.encoding=UTF-8

#要被排除在解析之外的视图名称列表,用逗号分隔

spring.thymeleaf.excluded-view-names=

#要运用于模板之上的模板模式。另见StandardTemplate-ModeHandlers(默认值:HTML5)

spring.thymeleaf.mode=HTML5

#在构建URL时添加到视图名称前的前缀(默认值:classpath:/templates/)

spring.thymeleaf.prefix=classpath:/templates/

#在构建URL时添加到视图名称后的后缀(默认值:.html)

spring.thymeleaf.suffix=.html

#Thymeleaf模板解析器在解析器链中的顺序。默认情况下,它排第一位。顺序从1开始,只有在定义了额外的TemplateResolver Bean时才需要设置这个属性。

spring.thymeleaf.template-resolver-order=

#可解析的视图名称列表,用逗号分隔

spring.thymeleaf.view-names=
Simple expressions:(表达式语法)

a. Variable Expressions: ${...}:获取变量值;OGNL;

b. Selection Variable Expressions: *{...}:选择表达式:和${}在功能上是一样;

        补充:配合 th:object="${session.user}:

        <div th:object="${session.user}">

        <p>Name: <span th:text="*{firstName}">Sebastian</span>.</p>

        <p>Surname: <span th:text="*{lastName}">Pepper</span>.</p>

        <p>Nationality: <span th:text="*{nationality}">Saturn</span>.</p>

        </div>

c. Message Expressions: #{...}:获取国际化内容

d. Link URL Expressions: @{...}:定义URL;

            @{/order/process(execId=${execId},execType='FAST')}

f. Fragment Expressions: ~{...}:片段引用表达式

            <div th:insert="~{commons :: main}">...</div>
SpringBoot -- JSP引擎模板
在项目下新建一个webapp目录,webapp这个用来存放jsp的目录,静态资源还是放在resources的static下面。
1.加入依赖
<!--WEB支持-->

<dependency>

    <groupId>org.springframework.boot</groupId>

    <artifactId>spring-boot-starter-web</artifactId>

</dependency>

<!--jsp页面使用jstl标签-->

<dependency>

    <groupId>javax.servlet</groupId>

    <artifactId>jstl</artifactId>

</dependency>

<!--用于编译jsp-->

<dependency>

    <groupId>org.apache.tomcat.embed</groupId>

    <artifactId>tomcat-embed-jasper</artifactId>

    <scope>provided</scope>

</dependency>
2.application.properties配置
spring.mvc.view.prefix: /WEB-INF/jsp/

spring.mvc.view.suffix: .jsp

#配置程序端口,默认为8080

server.port= 8080

#用户绘画session过期时间,以秒为单位

server.session.timeout=

# 配置默认访问路径,默认为/

server.context-path=

# 配置Tomcat编码,默认为UTF-8

server.tomcat.uri-encoding=UTF-8

# 配置最大线程数

server.tomcat.max-threads=1000
3.添加pom.xml配置
<dependency>

    <groupId>org.springframework.boot</groupId>

    <artifactId>spring-boot-starter-tomcat</artifactId>

    <scope>provided</scope>

</dependency>
SpringBoot(四) Web开发 --- Thymeleaf、JSP的更多相关文章
- SpringBoot:Web开发
西部开源-秦疆老师:基于SpringBoot 2.1.6 的博客教程 , 基于atguigu 1.5.x 视频优化 秦老师交流Q群号: 664386224 未授权禁止转载!编辑不易 , 转发请注明出处 ...
- SpringBoot之WEB开发-专题二
SpringBoot之WEB开发-专题二 三.Web开发 3.1.静态资源访问 在我们开发Web应用的时候,需要引用大量的js.css.图片等静态资源. 默认配置 Spring Boot默认提供静态资 ...
- SpringBoot学习(七)-->SpringBoot在web开发中的配置
SpringBoot在web开发中的配置 Web开发的自动配置类:在Maven Dependencies-->spring-boot-1.5.2.RELEASE.jar-->org.spr ...
- springboot java web开发工程师效率
基础好工具 idea iterm2 和 oh-my-zsh git 热加载 java web项目每次重启时间成本太大. 编程有一个过程很重要, 就是试验, 在一次次试验中探索, 积累素材优化调整程序模 ...
- SpringBoot与Web开发
web开发1).创建SpringBoot应用,选中我们需要的模块:2).SpringBoot已经默认将这些场景已经配置好了,只需要在配置文件中指定少量配置就可以运行起来3).自己编写业务代码: 自动配 ...
- 【SpringBoot】Web开发
一.简介 1.1 引入SpringBoot模块 1.2 SpringBoot对静态资源的映射规则 二.模版引擎 2.1 简介 2.2 引入thymeleaf 2.3 Thymeleaf使用 一.简介 ...
- 十二、springboot之web开发之静态资源处理
springboot静态资源处理 Spring Boot 默认为我们提供了静态资源处理,使用 WebMvcAutoConfiguration 中的配置各种属性. 建议大家使用Spring Boot的默 ...
- SpringBoot的Web开发
一.创建Web项目 创建的时候勾选对应web选项即可,会自动引入相应的starter,pom如下: <dependency> <groupId>org.springframew ...
- SpringBoot日记——Web开发篇
准备开始实战啦!~~~~ 我们先来看,SpringBoot的web是如何做web开发的呢?通常的步骤如下: 1.创建springboot应用,指定模块: 2.配置部分参数配置: 3.编写业务代码: 为 ...
随机推荐
- BZOJ 2957 分块
思路: 记录每栋楼楼顶与原点连线的斜率 那么一栋楼可见当且仅当前面所有楼的斜率都小于这栋楼 将n栋楼分为√(0.5*n*logn)块 每一块内维护一个单调上升子序列(注意不是LCS) 比如说4 1 2 ...
- git服务器搭建-gitosis
需求 硬件需求:一台Ubuntu或者debian电脑(虚拟机),能通过网络访问到. 软件需求:git-core, gitosis, openssh-server, openssh-client, Ap ...
- C++中static和const关键字的作用
static关键字至少有下列几个作用: 函数体内static变量的作用范围为该函数体,不同于auto变量,该变量的内存只被分配一次,因此其值在下次调用时仍维持上次的值: 在模块内的static全局变量 ...
- C语言-统计数字、字母、特殊字符
Action() { //统计字符019aBcd8***,4,4,3 int i,z,t; char *str="019aBcd8***"; fun_Count(str,i,z,t ...
- 脚本_统计固定时间段服务器的访问量.sh
#!bin/bash#功能:统计 1:30 到 4:30 所有访问 apache 服务器的请求有多少个#作者:liusingbon#awk 使用-F 选项指定文件内容的分隔符是/或者:#条件判断$7: ...
- 使用其他Java工程导入hadoop源码用于在hadoop工程中查看源码
疑问:在开发hadoop程序的时候,有时候需要查看hadoop的源码,但是开发环境看不到,甚是烦恼,经过网上搜索和琢磨,终于实现了,虽然有点绕,但是目的达到了. 第一步:下载hadoop的源码包:ha ...
- 配置HTTPS加密的快速参考指南
Nginx ssl_protocols TLSv1 TLSv1.1 TLSv1.2 阿帕奇 SSLProtocol All -SSLv2 -SSLv3 密码套房 选择密码套件可能很困难,它们的名称可能 ...
- HDU 1576 A/B( 逆元水 )
链接:传送门 思路: 现在给出 n = A % 9973,n = A - A/9973×9973,已知 B|A ,设 A = Bx,可以得到如下形式的式子:Bx + 9973×y = n ,因为gcd ...
- 六、利用frp穿透连接内网的linx系统和windows系统
服务端的配置 # frps.ini [common] bind_port = 7000 说明:防火墙放行该端口 启动:./frps -c ./frps.ini 后台启动:nohup ./frps -c ...
- Python发行版本Anaconda的安装说明:基于Anaconda2-4.3.1-Windows-x86_64
Anaconda指的是一个开源的Python发行版本,其包含了conda.Python等180多个科学包及其依赖项.因为包含了大量的科学包,Anaconda 的下载文件比较大(约 531 MB),如果 ...