Springboot学习:Web开发介绍
简介
使用SpringBoot;
1)、创建SpringBoot应用,选中我们需要的模块;
2)、SpringBoot已经默认将这些场景配置好了,只需要在配置文件中指定少量配置就可以运行起来
3)、自己编写业务代码;
自动配置原理?
这个场景SpringBoot帮我们配置了什么?能不能修改?能修改哪些配置?能不能扩展?xxx
xxxxAutoConfiguration:帮我们给容器中自动配置组件;

xxxxProperties:配置类来封装配置文件的内容;
SpringBoot对静态资源的映射规则
@ConfigurationProperties(prefix = "spring.resources", ignoreUnknownFields = false)

public class ResourceProperties implements ResourceLoaderAware {

  //可以设置和静态资源有关的参数,缓存时间等
	WebMvcAuotConfiguration:

		@Override

		public void addResourceHandlers(ResourceHandlerRegistry registry) {

			if (!this.resourceProperties.isAddMappings()) {

				logger.debug("Default resource handling disabled");

				return;

			}

			Integer cachePeriod = this.resourceProperties.getCachePeriod();

			if (!registry.hasMappingForPattern("/webjars/**")) {

				customizeResourceHandlerRegistration(

						registry.addResourceHandler("/webjars/**")

								.addResourceLocations(

										"classpath:/META-INF/resources/webjars/")

						.setCachePeriod(cachePeriod));

			}

			String staticPathPattern = this.mvcProperties.getStaticPathPattern();

          	//静态资源文件夹映射

			if (!registry.hasMappingForPattern(staticPathPattern)) {

				customizeResourceHandlerRegistration(

						registry.addResourceHandler(staticPathPattern)

								.addResourceLocations(

										this.resourceProperties.getStaticLocations())

						.setCachePeriod(cachePeriod));

			}

		}

        //配置欢迎页映射

		@Bean

		public WelcomePageHandlerMapping welcomePageHandlerMapping(

				ResourceProperties resourceProperties) {

			return new WelcomePageHandlerMapping(resourceProperties.getWelcomePage(),

					this.mvcProperties.getStaticPathPattern());

		}

       //配置喜欢的图标

		@Configuration

		@ConditionalOnProperty(value = "spring.mvc.favicon.enabled", matchIfMissing = true)

		public static class FaviconConfiguration {

			private final ResourceProperties resourceProperties;

			public FaviconConfiguration(ResourceProperties resourceProperties) {

				this.resourceProperties = resourceProperties;

			}

			@Bean

			public SimpleUrlHandlerMapping faviconHandlerMapping() {

				SimpleUrlHandlerMapping mapping = new SimpleUrlHandlerMapping();

				mapping.setOrder(Ordered.HIGHEST_PRECEDENCE + 1);

              	//所有  **/favicon.ico

				mapping.setUrlMap(Collections.singletonMap("**/favicon.ico",

						faviconRequestHandler()));

				return mapping;

			}

			@Bean

			public ResourceHttpRequestHandler faviconRequestHandler() {

				ResourceHttpRequestHandler requestHandler = new ResourceHttpRequestHandler();

				requestHandler

						.setLocations(this.resourceProperties.getFaviconLocations());

				return requestHandler;

			}

		}
1)、所有 /webjars/** ,都去 classpath:/META-INF/resources/webjars/ 找资源;
webjars:以jar包的方式引入静态资源; http://www.webjars.org/
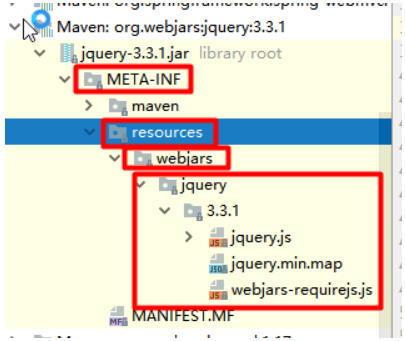
localhost:8080/webjars/jquery/3.3.1/jquery.js:
<!--引入jquery-webjar-->在访问的时候只需要写webjars下面资源的名称即可

		<dependency>

			<groupId>org.webjars</groupId>

			<artifactId>jquery</artifactId>

			<version>3.3.1</version>

		</dependency>
2)、"/**" 访问当前项目的任何资源,都去(静态资源的文件夹)找映射
"classpath:/META-INF/resources/",

"classpath:/resources/",

"classpath:/static/",

"classpath:/public/"

"/":当前项目的根路径
localhost:8080/abc === 去静态资源文件夹里面找abc
3)、欢迎页; 静态资源文件夹下的所有index.html页面;被"/**"映射;
localhost:8080/ 找index页面
4)、所有的 **/favicon.ico 都是在静态资源文件下找;
自己定义静态文件夹的路径:
自己定义了之后,默认的静态资源文件夹就不能使用了

JSON接口开发
在以前的项目中,使用JSON接口需要:
- 添加 jackjson 等相关 jar 包
- 配置 Spring Controller 扫描
- 对接的方法添加 @ResponseBody
Spring Boot只需要类添加 @RestController 即可,默认类中的方法都会以 json 的格式返回
@RestController

public class HelloController {

    @RequestMapping("/getUser")

    public User getUser() {

    	User user=new User();

    	user.setUserName("小明");

    	user.setPassWord("xxxx");

        return user;

    }

}
如果需要使用页面开发只要使用@Controller注解即可
自定义Filter
我们常常在项目中会使用 filters 用于录调用日志、排除有 XSS 威胁的字符、执行权限验证等等。Spring Boot 自动添加了 OrderedCharacterEncodingFilter 和 HiddenHttpMethodFilter,并且我们可以自定义 Filter。
两个步骤:
- 实现 Filter 接口,实现 Filter 方法
- 添加@Configuration 注解,将自定义Filter加入过滤链
@Configuration

public class WebConfiguration {

    @Bean

    public RemoteIpFilter remoteIpFilter() {

        return new RemoteIpFilter();

    }

    @Bean

    public FilterRegistrationBean testFilterRegistration() {

        FilterRegistrationBean registration = new FilterRegistrationBean();

        registration.setFilter(new MyFilter());

        registration.addUrlPatterns("/*");

        registration.addInitParameter("paramName", "paramValue");

        registration.setName("MyFilter");

        registration.setOrder(1);

        return registration;

    }

    public class MyFilter implements Filter {

		@Override

		public void destroy() {

			// TODO Auto-generated method stub

		}

		@Override

		public void doFilter(ServletRequest srequest, ServletResponse sresponse, FilterChain filterChain)

				throws IOException, ServletException {

			// TODO Auto-generated method stub

			HttpServletRequest request = (HttpServletRequest) srequest;

			System.out.println("this is MyFilter,url :"+request.getRequestURI());

			filterChain.doFilter(srequest, sresponse);

		}

		@Override

		public void init(FilterConfig arg0) throws ServletException {

			// TODO Auto-generated method stub

		}

    }

}
自定义 Property
- 配置在 application.properties 中
- 自定义配置类
@Component

public class NeoProperties {

	@Value("${com.neo.title}")

	private String title;

	@Value("${com.neo.description}")

	private String description;

	//省略getter settet方法

	}
log配置
logging.path=/user/local/log

logging.level.com.favorites=DEBUG

logging.level.org.springframework.web=INFO

logging.level.org.hibernate=ERROR
path 为本机的 log 地址,logging.level 后面可以根据包路径配置不同资源的 log 级别
数据库操作
添加 jar 包:
<dependency>

    <groupId>org.springframework.boot</groupId>

    <artifactId>spring-boot-starter-data-jpa</artifactId>

</dependency>

 <dependency>

    <groupId>mysql</groupId>

    <artifactId>mysql-connector-java</artifactId>

</dependency>
添加配置文件:
spring.datasource.url=jdbc:mysql://localhost:3306/test

spring.datasource.username=root

spring.datasource.password=root

spring.datasource.driver-class-name=com.mysql.jdbc.Driver

spring.jpa.properties.hibernate.hbm2ddl.auto=update

spring.jpa.properties.hibernate.dialect=org.hibernate.dialect.MySQL5InnoDBDialect

spring.jpa.show-sql= true
添加实体类和 Dao:
@Entity

public class User implements Serializable {

	private static final long serialVersionUID = 1L;

	@Id

	@GeneratedValue

	private Long id;

	@Column(nullable = false, unique = true)

	private String userName;

	@Column(nullable = false)

	private String passWord;

	@Column(nullable = false, unique = true)

	private String email;

	@Column(nullable = true, unique = true)

	private String nickName;

	@Column(nullable = false)

	private String regTime;

	//省略getter settet方法、构造方法

}
dao 只要继承 JpaRepository 类就可以,几乎可以不用写方法,
可以根据方法名来自动的生成 SQL,比如findByUserName 会自动生成一个以 userName 为参数的查询方法,比如 findAlll 自动会查询表里面的所有数据,比如自动分页等等。
Entity 中不映射成列的字段得加 @Transient 注解,不加注解也会映射成列
public interface UserRepository extends JpaRepository<User, Long> {

    User findByUserName(String userName);

    User findByUserNameOrEmail(String username, String email);

}
测试:
@RunWith(SpringJUnit4ClassRunner.class)

@SpringApplicationConfiguration(Application.class)

public class UserRepositoryTests {

	@Autowired

	private UserRepository userRepository;

	@Test

	public void test() throws Exception {

		Date date = new Date();

		DateFormat dateFormat = DateFormat.getDateTimeInstance(DateFormat.LONG, DateFormat.LONG);

		String formattedDate = dateFormat.format(date);

		userRepository.save(new User("aa1", "aa@126.com", "aa", "aa123456",formattedDate));

		userRepository.save(new User("bb2", "bb@126.com", "bb", "bb123456",formattedDate));

		userRepository.save(new User("cc3", "cc@126.com", "cc", "cc123456",formattedDate));

		Assert.assertEquals(9, userRepository.findAll().size());

		Assert.assertEquals("bb", userRepository.findByUserNameOrEmail("bb", "cc@126.com").getNickName());

		userRepository.delete(userRepository.findByUserName("aa1"));

	}

}
Spring Data Jpa 还有很多功能,比如封装好的分页,可以自己定义 SQL,主从分离等等
Thymeleaf 模板
Thymeleaf 是一款用于渲染 XML/XHTML/HTML5 内容的模板引擎。类似 JSP,Velocity,FreeMaker 等,它也可以轻易的与 Spring MVC 等 Web 框架进行集成作为 Web 应用的模板引擎。与其它模板引擎相比,Thymeleaf 最大的特点是能够直接在浏览器中打开并正确显示模板页面,而不需要启动整个 Web 应用。
Thymeleaf 是与众不同的,因为它使用了自然的模板技术。这意味着 Thymeleaf 的模板语法并不会破坏文档的结构,模板依旧是有效的XML文档。模板还可以用作工作原型,Thymeleaf 会在运行期替换掉静态值。Velocity 与 FreeMarke r则是连续的文本处理器。 下面的代码示例分别使用 Velocity、FreeMarker 与 Thymeleaf 打印出一条消息:
Velocity: <p>$message</p>

FreeMarker: <p>${message}</p>

Thymeleaf: <p th:text="${message}">Hello World!</p>
注意,由于 Thymeleaf 使用了 XML DOM 解析器,因此它并不适合于处理大规模的 XML 文件。
引入webjars:
页面即原型
在 Web 开发过程中一个绕不开的话题就是前端工程师与后端工程师的协作,在传统 Java Web 开发过程中,前端工程师和后端工程师一样,也需要安装一套完整的开发环境,然后各类 Java IDE 中修改模板、静态资源文件,启动/重启/重新加载应用服务器,刷新页面查看最终效果。
但实际上前端工程师的职责更多应该关注于页面本身而非后端,使用 JSP,Velocity 等传统的 Java 模板引擎很难做到这一点,因为它们必须在应用服务器中渲染完成后才能在浏览器中看到结果,而 Thymeleaf 从根本上颠覆了这一过程,通过属性进行模板渲染不会引入任何新的浏览器不能识别的标签,例如 JSP 中的 ,不会在 Tag 内部写表达式。整个页面直接作为 HTML 文件用浏览器打开,几乎就可以看到最终的效果,这大大解放了前端工程师的生产力,它们的最终交付物就是纯的 HTML/CSS/JavaScript 文件。
引入Thymeleaf
<dependency>

    <groupId>org.springframework.boot</groupId>

    <artifactId>spring-boot-starter-thymeleaf</artifactId>

</dependency>

切换thymeleaf版本

<properties>

	<thymeleaf.version>3.0.9.RELEASE</thymeleaf.version>

	<!-- 布局功能的支持程序  thymeleaf3主程序  layout2以上版本 -->

	<!-- thymeleaf2   layout1-->

	<thymeleaf-layout-dialect.version>2.2.2</thymeleaf-layout-dialect.version>

  </properties>
Thymeleaf使用
@ConfigurationProperties(prefix = "spring.thymeleaf")

public class ThymeleafProperties {

	private static final Charset DEFAULT_ENCODING = Charset.forName("UTF-8");

	private static final MimeType DEFAULT_CONTENT_TYPE = MimeType.valueOf("text/html");

	public static final String DEFAULT_PREFIX = "classpath:/templates/";

	public static final String DEFAULT_SUFFIX = ".html";

  	//
只要我们把HTML页面放在classpath:/templates/,thymeleaf就能自动渲染;
- 导入thymeleaf的名称空间
<html lang="en" xmlns:th="http://www.thymeleaf.org">
- 使用thymeleaf语法;
<!DOCTYPE html>

<html lang="en" xmlns:th="http://www.thymeleaf.org">

<head>

    <meta charset="UTF-8">

    <title>Title</title>

</head>

<body>

    <h1>成功!</h1>

    <!--th:text 将div里面的文本内容设置为 -->

    <div th:text="${hello}">这是显示欢迎信息</div>

</body>

</html>
Springboot学习:Web开发介绍的更多相关文章
- SpringBoot学习(七)-->SpringBoot在web开发中的配置
SpringBoot在web开发中的配置 Web开发的自动配置类:在Maven Dependencies-->spring-boot-1.5.2.RELEASE.jar-->org.spr ...
- SpringBoot:Web开发
西部开源-秦疆老师:基于SpringBoot 2.1.6 的博客教程 , 基于atguigu 1.5.x 视频优化 秦老师交流Q群号: 664386224 未授权禁止转载!编辑不易 , 转发请注明出处 ...
- 【墙裂推荐】大学生如何学习WEB开发
每天网络上有上万条Web招聘职位,招聘要求很简单: 会JavaScript,会CSS,能开发网页,能设计网页. 但我们真正面试时才发现:都是些很小很小的知识点! 我们没有实践过,没有碰到过,头脑一片茫 ...
- Java Web开发介绍
转自:http://www.cnblogs.com/pythontesting/p/4963021.html Java Web开发介绍 简介 Java很好地支持web开发,在桌面上Eclipse RC ...
- SpringBoot之WEB开发-专题二
SpringBoot之WEB开发-专题二 三.Web开发 3.1.静态资源访问 在我们开发Web应用的时候,需要引用大量的js.css.图片等静态资源. 默认配置 Spring Boot默认提供静态资 ...
- springboot java web开发工程师效率
基础好工具 idea iterm2 和 oh-my-zsh git 热加载 java web项目每次重启时间成本太大. 编程有一个过程很重要, 就是试验, 在一次次试验中探索, 积累素材优化调整程序模 ...
- 移动web开发介绍——浏览器
前段时间了解学习了一下<移动Web手册>,觉得真的需要这种不是偏向技术.框架或工具的书籍,只是单纯的讲解一些关于移动Web最基本的知识.正好今天整理一部分之前学习过的内容,记录和分享,也方 ...
- 十二、springboot之web开发之静态资源处理
springboot静态资源处理 Spring Boot 默认为我们提供了静态资源处理,使用 WebMvcAutoConfiguration 中的配置各种属性. 建议大家使用Spring Boot的默 ...
- 如何学习web开发环境搭建和脚手架
Web前端的学习路线 第一阶段: HTML+CSS: HTML进阶.CSS进阶.div+css布局.HTML+css整站开发. JavaScript基础: Js基础教程.js内置对象常用方法.常见DO ...
- 【SpringBoot】Web开发
一.简介 1.1 引入SpringBoot模块 1.2 SpringBoot对静态资源的映射规则 二.模版引擎 2.1 简介 2.2 引入thymeleaf 2.3 Thymeleaf使用 一.简介 ...
随机推荐
- 关于layui的日期和时间组件laydate闪屏的坑
https://blog.csdn.net/liangwenli_/article/details/82786713 jsp页面: <input type="text" cl ...
- Virtual Judge POJ 2251 Dungeon Master
三维数组加宽搜 #include <stdlib.h> #include <string.h> #include <stdio.h> ; int c, k, h; ...
- k8s集群应用例如jenkins启动问题排查思路
k8s集群应用例如jenkins启动问题排查思路 待办 rancher上的事件报告>pods日志>pods内容器日志(现获取容器id再查看容器日志,获取容器id 使用的是相应问题pod的名 ...
- SQL Server中使用msdb数据库的存储过程sp_delete_backuphistory和sp_delete_database_backuphistory来删除备份和恢复历史数据
根据微软文档对sp_delete_backuphistory存储过程的介绍,SQL Server在每次备份和恢复数据库后,会向msdb系统数据库的备份和恢复历史表写入数据,如果SQL Server经常 ...
- Go_CSP并发模型
go语言的最大两个亮点,一个是goroutine,一个就是chan了.二者合体的典型应用CSP,基本就是大家认可的并行开发神器,简化了并行程序的开发难度,我们来看一下CSP. 11.1.CSP是什么 ...
- nomon+ pyNmonAnalyzer实现基于python的nmon监控性能数据可视化
pip install pyNmonAnalyzer nnmon for linux from sourceforge:https://sourceforge.net/projects/nmon/ ...
- 《aelf经济和治理白皮书》重磅发布:为DAPP提供治理高效、价值驱动的生态环境
2020年2月17日,aelf正式发布<aelf经济和治理白皮书>,这是aelf继项目白皮书后,在aelf网络经济模型和治理模式方面的权威论述.<aelf经济和治理白皮书>描述 ...
- 【网易官方】极客战记(codecombat)攻略-地牢-辐射光环
关卡连接: https://codecombat.163.com/play/level/radiant-aura 骷髅,恐惧还是回避? 简介: 敬请期待! 默认代码 # 捡起发光石,让骷髅怪远离你一会 ...
- opencv:边缘提取
#include <opencv2/opencv.hpp> #include <iostream> using namespace cv; using namespace st ...
- 用eclipse发布springboot项目
使用eclipse打包springboot项目时一直报错 [ERROR] No compiler is provided in this environment. Perhaps you are ru ...