基于IDEA的SSM配置文件整合基础(有步骤)
今天进行了SSM框架的整合,遇到了很多的错误,但所幸都有解决,以下为基础的整合步骤,后续待完善
1.SSM整合所需要:
spring的jar(包含tx)、springmvc的jar、mybatis.jar、mybatis-spring.jar、tomcat、commons-dbcp.jar等
2.创建Maven项目
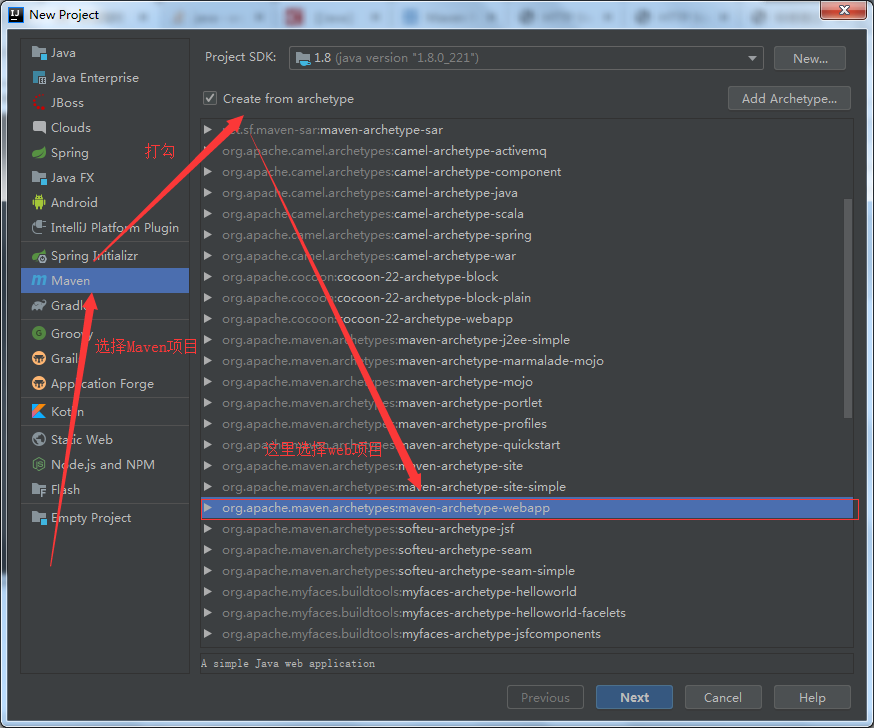
这里选择如下图,否则Maven创建可能不成功 Name:archetypeCatalog Value:internal
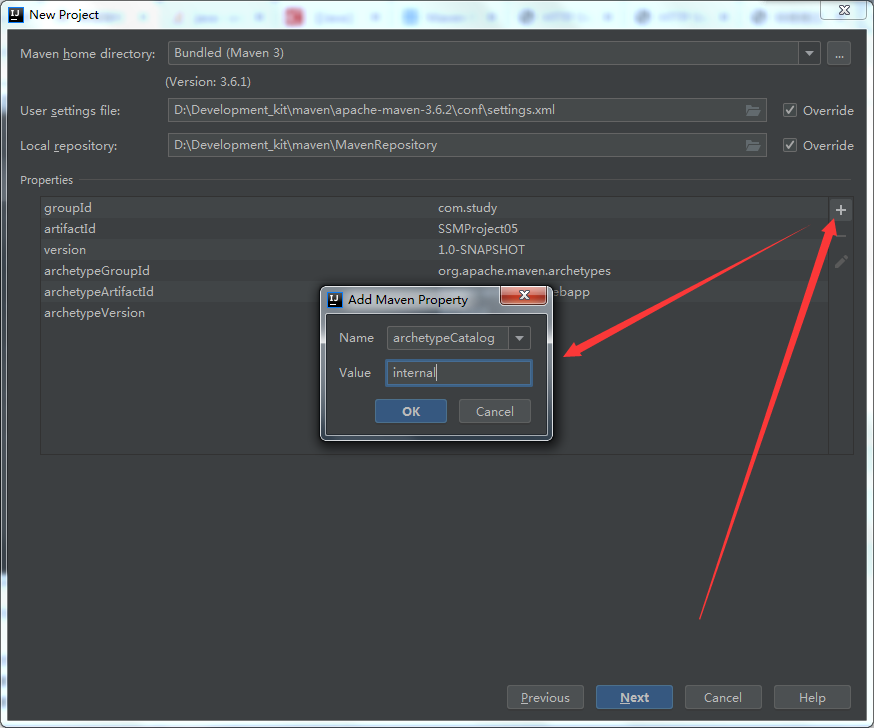
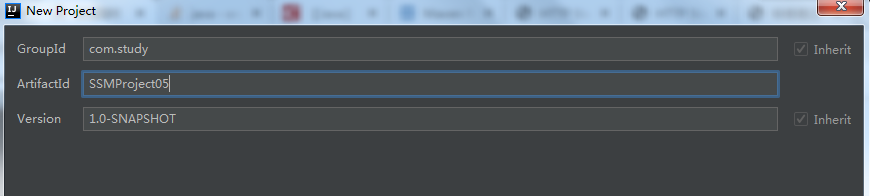
然后一直next,最后Maven项目创建成功,如下图

3.更改web.xml文件,由于默认的是web2.3,这个版本有点老了,这里我选择用4.0
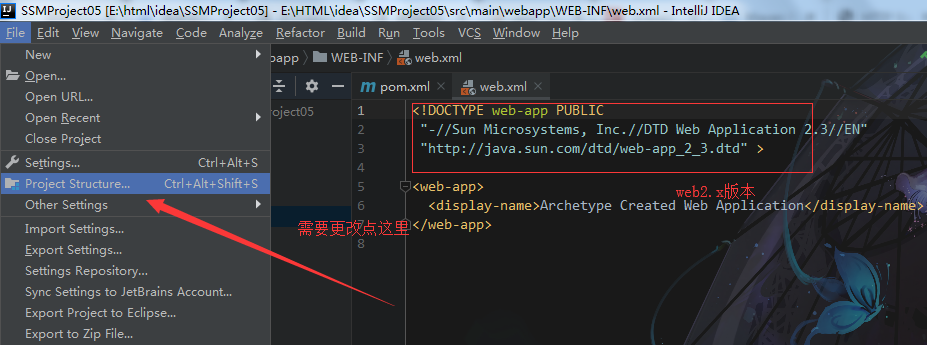
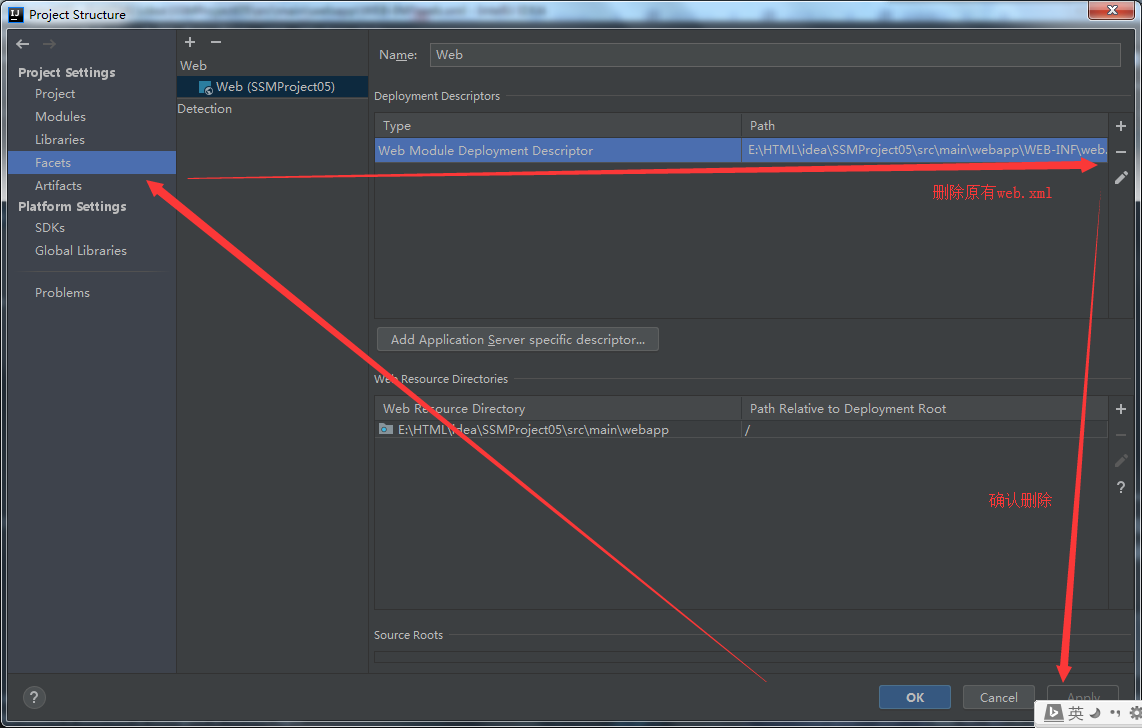
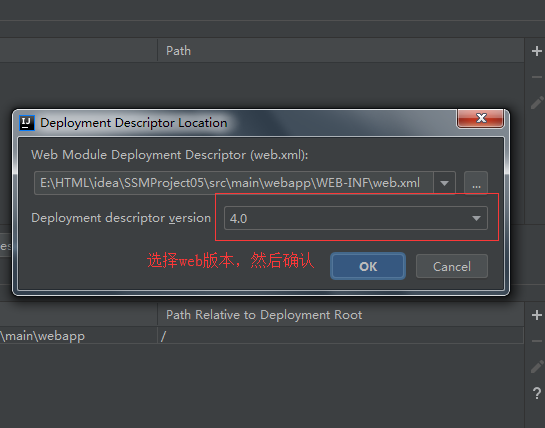
这样web的版本就更改了
4.导入所需要的依赖jar包
 <dependencies>

    <dependency>

      <groupId>junit</groupId>

      <artifactId>junit</artifactId>

      <version>4.11</version>

      <scope>test</scope>

    </dependency>

    <!--springmvc-->

    <!-- https://mvnrepository.com/artifact/org.springframework/spring-webmvc -->

    <dependency>

      <groupId>org.springframework</groupId>

      <artifactId>spring-webmvc</artifactId>

      <version>4.3.18.RELEASE</version>

    </dependency>

    <!-- https://mvnrepository.com/artifact/javax.servlet/javax.servlet-api -->

    <dependency>

      <groupId>javax.servlet</groupId>

      <artifactId>javax.servlet-api</artifactId>

      <version>3.1.0</version>

      <scope>provided</scope>

    </dependency>

    <!--mybatis-->

    <!--Mysql-->

    <dependency>

      <groupId>mysql</groupId>

      <artifactId>mysql-connector-java</artifactId>

      <version>8.0.16</version>

    </dependency>

    <!--Mybatis-->

    <dependency>

      <groupId>org.mybatis</groupId>

      <artifactId>mybatis</artifactId>

      <version>3.5.2</version>

    </dependency>

    <!--Log4j-->

    <!-- https://mvnrepository.com/artifact/log4j/log4j -->

    <dependency>

      <groupId>log4j</groupId>

      <artifactId>log4j</artifactId>

      <version>1.2.17</version>

    </dependency>

    <!--dbcp-->

    <dependency>

      <groupId>commons-dbcp</groupId>

      <artifactId>commons-dbcp</artifactId>

      <version>1.4</version>

    </dependency>

    <!--Mybatis与Spring整合jar-->

    <dependency>

      <groupId>org.mybatis</groupId>

      <artifactId>mybatis-spring</artifactId>

      <version>1.3.2</version>

    </dependency>

    <!--增加事务支持-->

    <!-- https://mvnrepository.com/artifact/org.springframework/spring-tx -->

    <dependency>

      <groupId>org.springframework</groupId>

      <artifactId>spring-tx</artifactId>

      <version>4.3.18.RELEASE</version>

    </dependency>

    <!-- https://mvnrepository.com/artifact/org.springframework/spring-jdbc -->

    <dependency>

      <groupId>org.springframework</groupId>

      <artifactId>spring-jdbc</artifactId>

      <version>4.3.18.RELEASE</version>

    </dependency>

  </dependencies>
注意:IDEA中的Maven项目需要指定读取资源路径,否则可能无法读取资源(.properties、Mapper)
<build>

    <resources>

      <!--指定xml文件位置-->

      <resource>

        <directory>src/main/java</directory>

        <includes>

          <include>**/*.properties</include>

          <include>**/*.xml</include>

        </includes>

        <!--这里写成true会造成编译注释错误-->

        <filtering>false</filtering>

      </resource>

      <!--指定xml文件位置-->

      <resource>

        <directory>src/main/resource</directory>

        <includes>

          <include>**/*.properties</include>

          <include>**/*.xml</include>

        </includes>

        <!--这里写成true会造成编译注释错误-->

        <filtering>false</filtering>

      </resource>

    </resources>

</build>

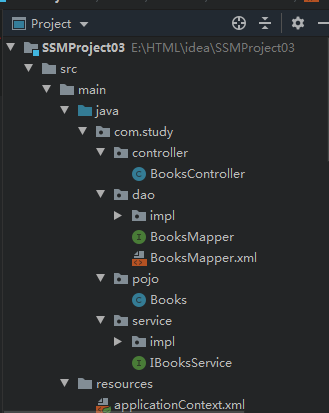
5.建立需要的包,如dao、service、controller、并根据数据库建立对应的类
6.配置Mybatis-config.xml、spring-dao.xml、spring-service.xml、spring-mvc.xml、applicationContext.xml(这里,我将文件分开其实除了Mybatis-config.xml,其余都可以整合一起写)
6.1、Mybatis-config.xml
<?xml version="1.0" encoding="UTF-8" ?>

<!DOCTYPE configuration

        PUBLIC "-//mybatis.org//DTD Config 3.0//EN"

        "http://mybatis.org/dtd/mybatis-3-config.dtd">

<configuration>

    <!--增加日志的支持-->

    <settings>

        <setting name="logImpl" value="log4j"/>

    </settings>

    <!--取别名-->

    <typeAliases>

        <package name="com.study.pojo"/>

    </typeAliases>

    <mappers>

        <package name="com.study.dao"/>

    </mappers>

</configuration>
6.2、spring-dao.xml
<?xml version="1.0" encoding="UTF-8"?>

<beans xmlns="http://www.springframework.org/schema/beans"

       xmlns:xsi="http://www.w3.org/2001/XMLSchema-instance"

       xmlns:context="http://www.springframework.org/schema/context"

       xsi:schemaLocation="http://www.springframework.org/schema/beans

       http://www.springframework.org/schema/beans/spring-beans.xsd

       http://www.springframework.org/schema/context

       http://www.springframework.org/schema/context/spring-context.xsd

">

    <context:component-scan base-package="com.study.dao.impl"/>

    <context:property-placeholder location="classpath:db.properties"/>

    <!--配置数据源-->

    <bean id="dataSource" class="org.apache.commons.dbcp.BasicDataSource">

        <property name="driverClassName" value="${jdbc.driver}"/>

        <property name="url" value="${jdbc.url}"/>

        <property name="username" value="${jdbc.username}"/>

        <property name="password" value="${jdbc.password}"/>

    </bean>

    <!--生成sqlsessionfactory-->

    <bean id="sqlSessionFactory" class="org.mybatis.spring.SqlSessionFactoryBean">

        <property name="dataSource" ref="dataSource"/>

        <property name="configLocation" value="classpath:mybatis-config.xml"/>

    </bean>

    <!--生成方法-->

    <bean id="sqlSession" class="org.mybatis.spring.SqlSessionTemplate">

        <constructor-arg index="0" ref="sqlSessionFactory"/>

    </bean>

</beans>
6.3、spring-service.xml
<?xml version="1.0" encoding="UTF-8"?>

<beans xmlns="http://www.springframework.org/schema/beans"

       xmlns:xsi="http://www.w3.org/2001/XMLSchema-instance"

       xmlns:context="http://www.springframework.org/schema/context"

       xsi:schemaLocation="http://www.springframework.org/schema/beans

       http://www.springframework.org/schema/beans/spring-beans.xsd

       http://www.springframework.org/schema/context

       http://www.springframework.org/schema/context/spring-context.xsd

">

    <import resource="spring-dao.xml"/>

    <context:component-scan base-package="com.study.service.impl"/>

    <bean id="transactionManager" class="org.springframework.jdbc.datasource.DataSourceTransactionManager">

        <property name="dataSource" ref="dataSource"/>

    </bean>

</beans>
6.4、spring-mvc.xml
<?xml version="1.0" encoding="UTF-8"?>

<beans xmlns="http://www.springframework.org/schema/beans"

       xmlns:xsi="http://www.w3.org/2001/XMLSchema-instance"

       xmlns:mvc="http://www.springframework.org/schema/mvc"

       xmlns:context="http://www.springframework.org/schema/context"

       xsi:schemaLocation="http://www.springframework.org/schema/beans

       http://www.springframework.org/schema/beans/spring-beans.xsd

       http://www.springframework.org/schema/mvc

       http://www.springframework.org/schema/mvc/spring-mvc.xsd

       http://www.springframework.org/schema/context

       http://www.springframework.org/schema/context/spring-context.xsd

">

    <!--配置扫描器-->

    <context:component-scan base-package="com.study.controller"/>

    <mvc:annotation-driven/>

    <!--静态-->

    <mvc:default-servlet-handler/>

    <bean class="org.springframework.web.servlet.view.InternalResourceViewResolver">

        <property name="prefix" value="/WEB-INF/jsp/"/>

        <property name="suffix" value=".jsp"/>

    </bean>

</beans>
6.5、applicationContext.xml
<?xml version="1.0" encoding="UTF-8"?>

<beans xmlns="http://www.springframework.org/schema/beans"

       xmlns:xsi="http://www.w3.org/2001/XMLSchema-instance"

       xsi:schemaLocation="http://www.springframework.org/schema/beans

       http://www.springframework.org/schema/beans/spring-beans.xsd

">

    <import resource="spring-mvc.xml"/>

    <import resource="spring-dao.xml"/>

    <import resource="spring-service.xml"/>

</beans>
6.6、db.properties(使用的dbcp数据连接池,不整合时候可以不加jdbc但是整合后不在前面加上jdbc就会出现错误)
jdbc.driver=com.mysql.cj.jdbc.Driver

jdbc.url=jdbc:mysql://localhost:3306/自己的数据库名字?useUnicode=true&characterEncoding=utf-8&autoReconnect=true&failOverReadOnly=false

jdbc.username=账户

jdbc.password=密码
6.7、log4j.properties(这个可以网上找)
log4j.rootLogger=DEBUG,Console

log4j.appender.Console=org.apache.log4j.ConsoleAppender

log4j.appender.Console.layout=org.apache.log4j.PatternLayout

log4j.appender.Console.layout.ConversionPattern=%d [%t] %-5p [%c] - %m%n

log4j.logger.org.apache=INFO
至此,配置文件基本整合完毕
7、根据需求,在对应层面编写对应的代码
提示:
Controller层的注解为@Controller
Service层的注解为 @Service
Dao层的注解为 @Repository
8、关于maven导包问题
建议:尽量使用Maven进行导包,如果手动导包可能会出现一些莫名的错误
9、问题总结
Ⅰ、在创建Maven项目的时候有两点需要注意:①.需要指定资源文件路径、也就是在pom.xml文件的build中添加指定。②.在进行导包的时候尽量使用Maven进行导包
Ⅱ、注解的使用,不同的层使用不同的注解(@Controller、@Service、@Repository),但是这些注解都来自同一个父注解,可以自行网上查看
Ⅲ、关于在配置文件中必须配置的属性(大概):①.DispatcherServlet(SpringMVC的核心) ②、dataSource(数据源)③、DataSourceTransactionManager(事务支持,没这个整合会出错)④、SqlSessionFactoryBean(获取sqlsessionFactory)⑤、SqlSessionTemplate
关于后台传Json到前端乱码问题:
解决方式一:在RequestMapping中添加produces = "application/json;charset=utf- 8"
@RequestMapping(value = "/a",produces = "application/json;charset=utf- 8")
解决方式二:在<mvc:annotation-driven>中加入如下代码
    <!--配置扫描器-->

    <context:component-scan base-package="com.study.controller"/>

    <mvc:annotation-driven>

        <!--解决Json乱码问题-->

        <mvc:message-converters register-defaults="true">

            <bean class="org.springframework.http.converter.StringHttpMessageConverter">

                <property name="supportedMediaTypes" value="text/html;charset=UTF-8" />

            </bean>

            <bean id="jacksonMessageConverter" class="org.springframework.http.converter.json.MappingJackson2HttpMessageConverter">

                <property name="objectMapper">

                    <bean class="org.springframework.http.converter.json.Jackson2ObjectMapperFactoryBean">

                        <property name="failOnEmptyBeans" value="false"/>

                    </bean>

                </property>

            </bean>

        </mvc:message-converters>

    </mvc:annotation-driven>
附:有问题欢迎大家指出
基于IDEA的SSM配置文件整合基础(有步骤)的更多相关文章
- 基于maven的ssm框架整合
基于maven的ssm框架整合 第一步:通过maven建立一个web项目. 第二步:pom文件导入jar包 (1 ...
- IDEA下基于MAVEN的SSM框架整合
源码可以以上传github https://github.com/ingxx/ssm_first 最近把用IDEA把SSM框架整合一遍遇到了不少坑,在这里写出来 这里maven我使用的是自己下载的3. ...
- SSM框架整合模板
SSM框架整合--MAVEN依赖 spring方面(包含了springmvc): spring-webmvc:spring与mvc的整合依赖,主要包括spring的核心包和springmvc需要的包 ...
- SSM框架整合环境构建——基于Spring4和Mybatis3
目录 环境 配置说明 所需jar包 配置db.properties 配置log4j.properties 配置spring.xml 配置mybatis-spring.xml 配置springmvc.x ...
- Spring+SpringMVC+MyBatis+easyUI整合基础篇(六)maven整合SSM
写在前面的话 承接前文<Spring+SpringMVC+MyBatis+easyUI整合基础篇(五)讲一下maven>,本篇所讲述的是如何使用maven与原ssm项目整合,使得一个普 ...
- 整合SSM框架必备基础—SpringMVC(下)
在上一篇文章<整合SSM框架必备基础-SpringMVC(上)>中,胖达介绍了关于SpringMVC的诞生.优势以及执行流程等理论知识点,这篇文章打算在实操中加深一下对SpringMVC的 ...
- idea基于springboot搭建ssm(maven)
版权声明:本文为博主原创文章,遵循CC 4.0 BY-SA版权协议,转载请附上原文出处链接和本声明. 本文链接:https://blog.csdn.net/liboyang71/article/det ...
- SpringMVC--从理解SpringMVC执行流程到SSM框架整合
前言 SpringMVC框架是SSM框架中继Spring另一个重要的框架,那么什么是SpringMVC,如何用SpringMVC来整合SSM框架呢?下面让我们详细的了解一下. 注:在学习SpringM ...
- SSM项目整合基本步骤
SSM项目整合 1.基本概念 1.1.Spring Spring 是一个开源框架, Spring 是于 2003 年兴起的一个轻量级的 Java 开发框架,由 Rod Johnson 在其著作 ...
随机推荐
- python代码自动补全
牛逼了!Python代码补全利器,提高效率告别996! Python之禅 Python之禅 微信号 VTtalk 功能介绍 人生苦短,我用Python,这里是一名老程序员分享Python技术的地方,欢 ...
- django入门 -- 简单流程
django入门 -- 简单流程 简介 通过简单示例,使用django完成基本流程的开发,学习django的主要的知识点,在后续课程中会逐个知识点进行深入讲解 以“图书-英雄”管理为示例 主要知识点介 ...
- JavaWeb学习篇之----EL表达式详解
我们之前的几篇文章中都提到了一个EL表达式,那么这个EL表达式到底是什么东东呢?为什么用处那么大,下面我们就来看看EL表达式的相关内容 EL表达式简介: EL 全名为Expression Langua ...
- CSDN首页> 云计算 孙玄:解析58同城典型技术架构及演变
转:http://www.csdn.net/article/2015-04-09/2824437 在UPYUN主办的“UPYUN Open Talk”第三期北京站上,58同城系统架构师孙玄详细介绍了5 ...
- APC注入DLL(win7下有问题)
void APCKernelRoutine(PKAPC pKAPC, PKNORMAL_ROUTINE pUserAPC, PVOID pContext, PVOID pSysArg1, PVOID ...
- c++-文件分离
实现文件分离 1.头文件中不要使用using namespace,由于c++编译的特性,由于初学还没深入了解,不做具体编译的解释 2.由于没有了命名空间,所以string定义要写成std::strin ...
- LeetCode刷题笔记-回溯法-分割回文串
题目描述: 给定一个字符串 s,将 s 分割成一些子串,使每个子串都是回文串. 返回 s 所有可能的分割方案. 示例: 输入: "aab"输出:[ ["aa", ...
- C#Object与XML文件或二进制文件之间的转化
Object To Xml 文件 public static bool Serializer<T>(object obj, string path) { FileStream xmlfil ...
- 29-Ubuntu-远程管理命令-03-SSH工作方式简介
在Linux中SSH是非常重要的工具,通过SSH客户端可以连接到运行了SSH服务器的远程机器上. 1.SSH客户端是一种使用Secure Shell(SSH)协议连接到远程计算机的软件程序. 2.SS ...
- 004-Java进制转换
整型数据共有4中进制形式 二进制(binary):以0b或者0B开头 十进制(decimal) 八进制(octal):以数字0开头 十六进制(hex):以0x或者0X开头 二进制数据包含原码反码和补码 ...