贪玩ML系列之一个BP玩一天
手写串行BP算法,可调batch_size
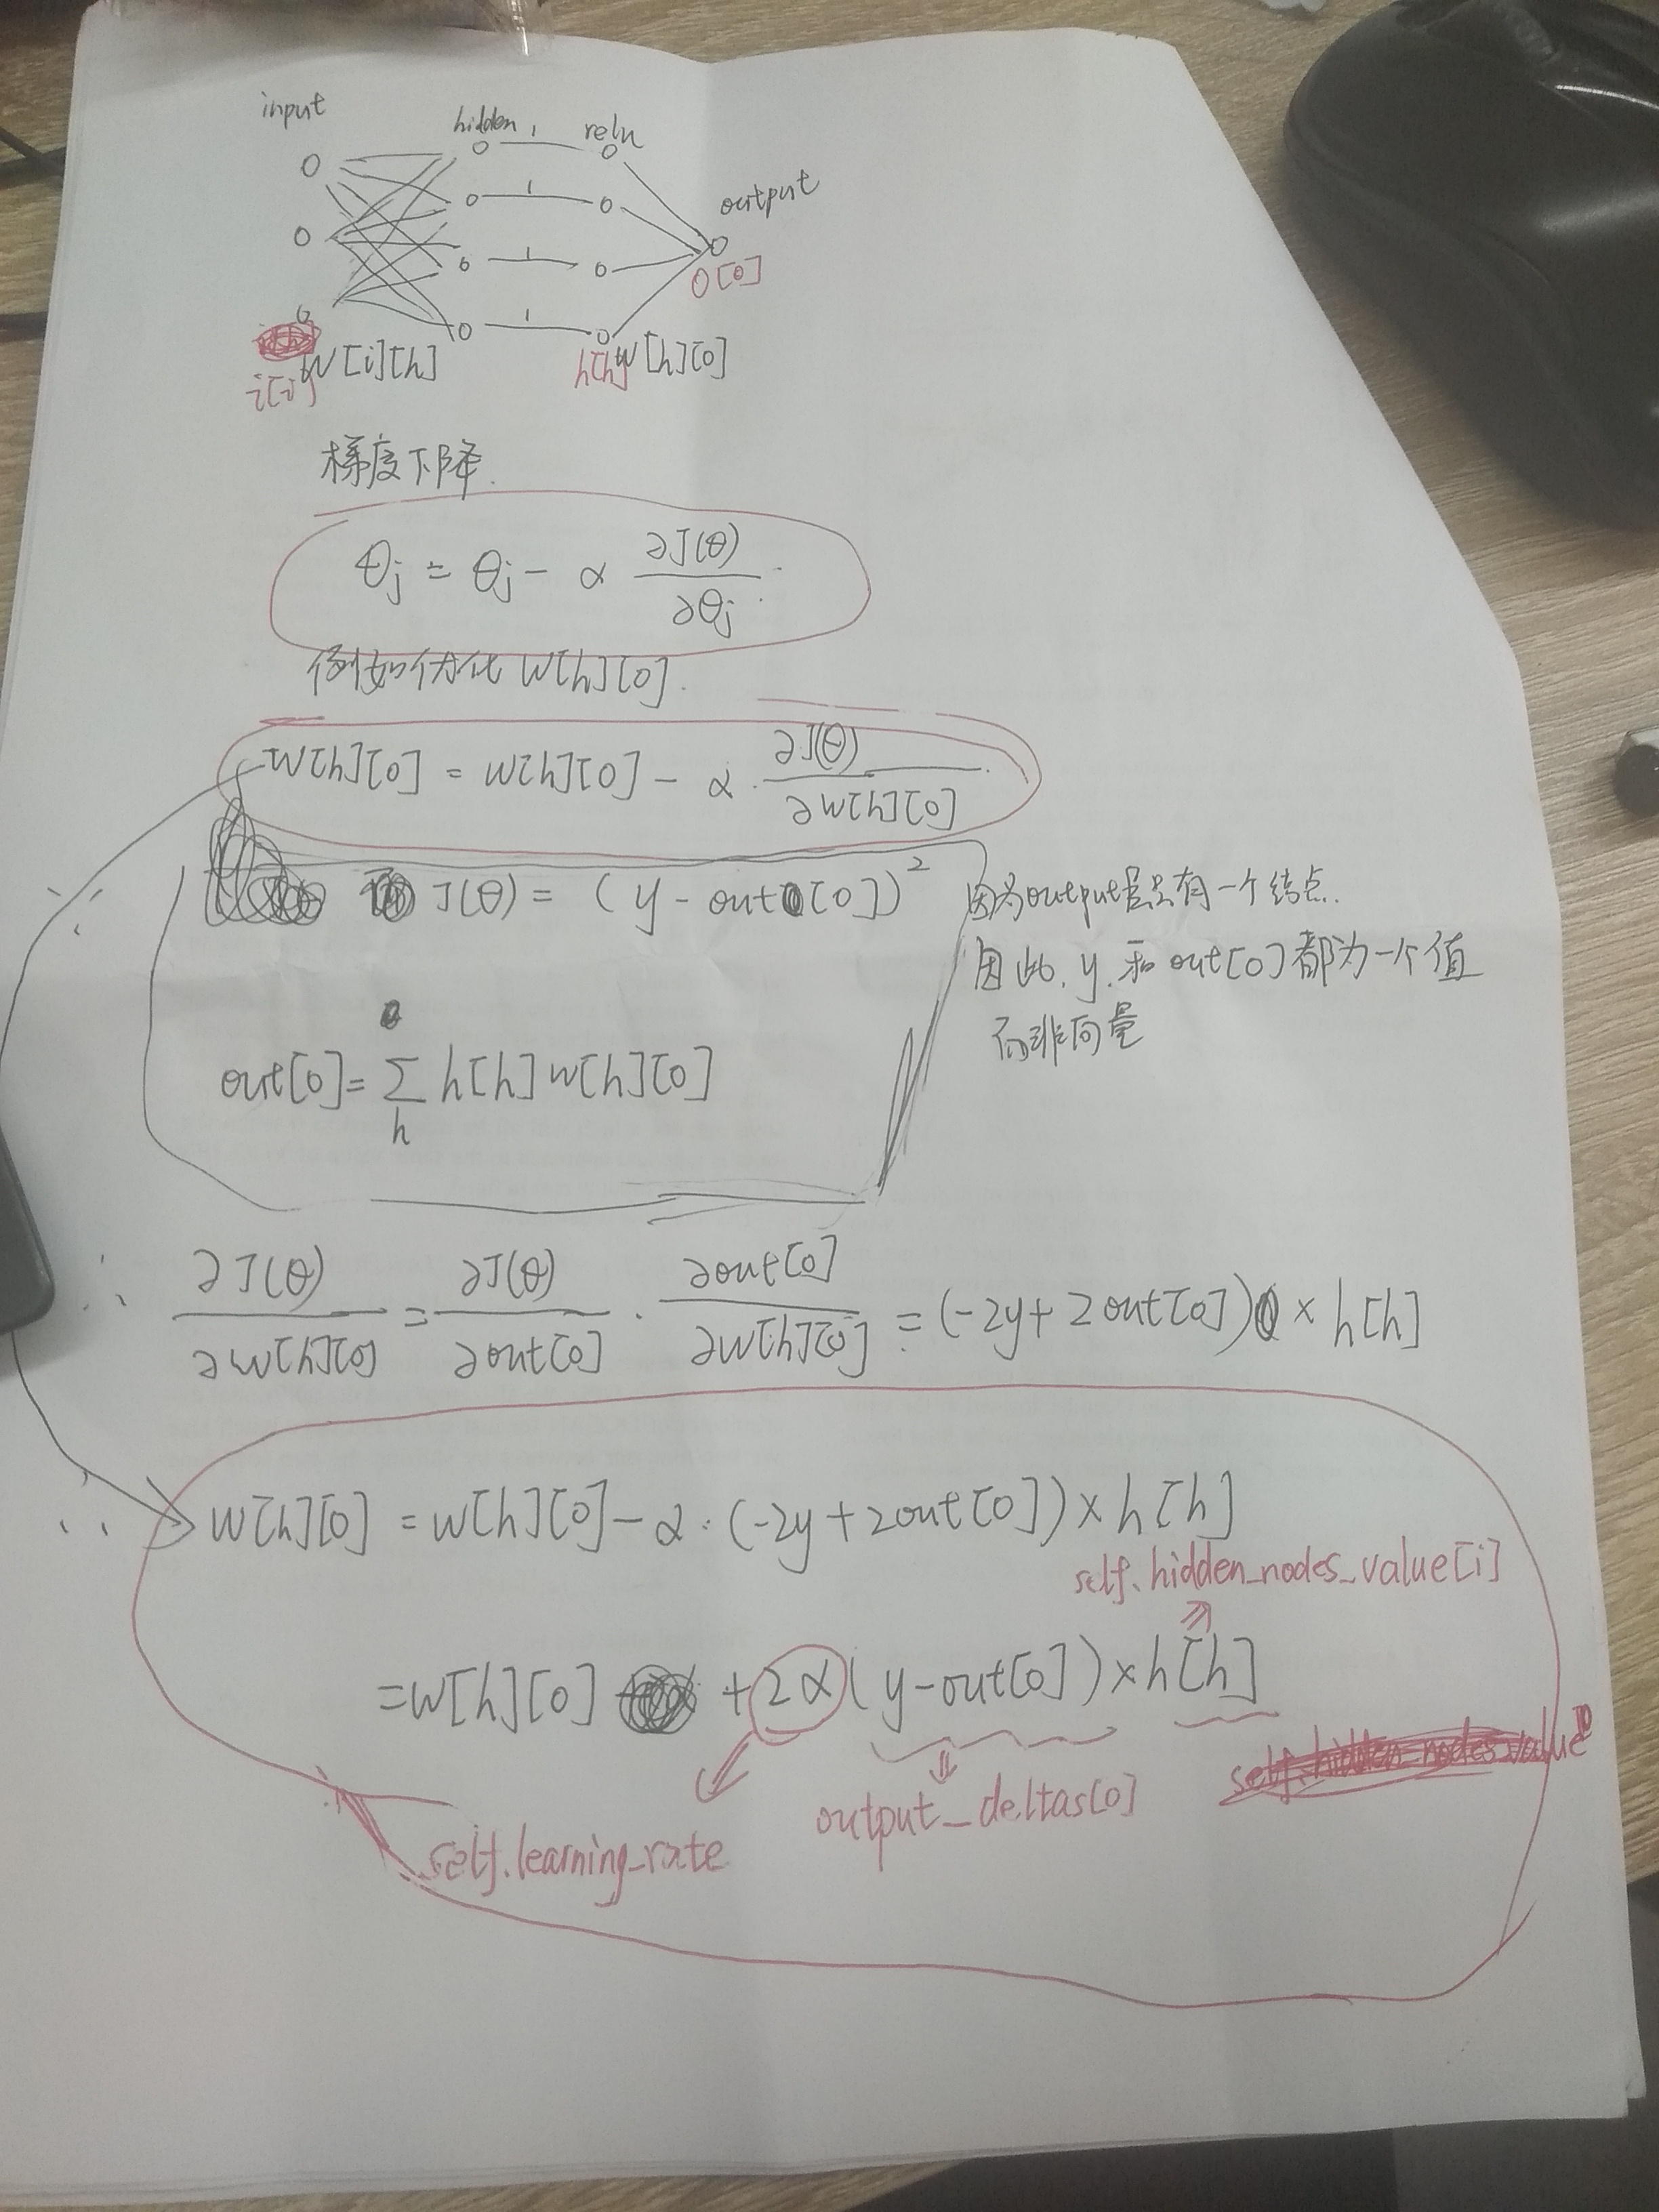
既要:1、输入层f(x)=x 隐藏层sigmoid 输出层f(x)=x
2、run函数实现单条数据的一次前馈
3、train函数读入所有数据for循环处理每条数据。
循环中:
首先调用run函数,得到各层的值
self.input_nodes_value
self.hidden_nodes_value
self.output_nodes_value
然后计算输出层误差和delta
4、关键函数:用于前馈的sigmoid和用于反馈的sigmoid的导数
 self.activation_function = lambda x : 1/(1+np.exp(-x))  # sigmoid函数,用于正向传播

 self.delta_activation_function = lambda x: x-x**2 # sigmoid一阶导,用于反向传播
5、反向传播
使用梯度下降方法
下面是推导隐藏层(实际上为relu层)到输出层的权重w[h][o]的梯度下降公式的过程,对应的几个变量在下面的代码中用红色标出
关于梯度下降公式推导:
https://blog.csdn.net/wfei101/article/details/80807749
https://www.jianshu.com/p/17191c57d7e9
batch_size=1

# 输入层没有激活函数f(x)=x,隐藏层激活函数sigmoid,输出层激活函数f(x)=x

class NeuralNetwork(object):

    def __init__(self, input_nodes, hidden_nodes, output_nodes, learning_rate):

        # 各层节点个数

        self.input_nodes = input_nodes

        self.hidden_nodes = hidden_nodes

        self.output_nodes = output_nodes

#         创建三个一维数组存放三层节点的值

#         print(str(self.input_nodes)+" "+str(self.hidden_nodes)+" "+str(self.output_nodes))

        self.input_nodes_value=[0.0]*input_nodes

        self.hidden_nodes_value=[0.0]*hidden_nodes

        self.output_nodes_value=[0.0]*output_nodes

        # Initialize weights

        self.weights_input_to_hidden = np.random.normal(0.0, self.input_nodes**-0.5, (self.input_nodes, self.hidden_nodes))#输入层>>隐藏层权重矩阵

        self.weights_hidden_to_output = np.random.normal(0.0, self.hidden_nodes**-0.5, (self.hidden_nodes, self.output_nodes))#隐藏层>>输出层权重矩阵

        self.learning_rate = learning_rate#学习率

        self.activation_function = lambda x : 1/(1+np.exp(-x))  # sigmoid函数,用于正向传播

        self.delta_activation_function = lambda x: x-x**2 # sigmoid一阶导,用于反向传播

        self.change_to_fix_weights_h2o=[[0.0]*self.output_nodes]*self.hidden_nodes#存储隐藏层>>输出层权重调整量

        self.change_to_fix_weights_i2h=[[0.0]*self.hidden_nodes]*self.input_nodes#存储输入层>>隐藏层权重调整量

#         print("xxxx")

#         print(self.change_to_fix_weights_h2o)

#         print(self.change_to_fix_weights_i2h)

    def train(self, features, targets):#完成n条数据的一次前向传递和反向传递,每个batch调整一次权重矩阵

        '''

            features: 2D array, each row is one data record, each column is a feature

            targets: 1D array of target values

        '''

        n=features.shape[0]#数据条数

#         print(features)

#         print(targets)

        counter=batch_size

        for ii in range(0,n):

            self.run(features[ii])#调用前向传播

            print(self.output_nodes_value)

            error_o=[0.0]*self.output_nodes#输出层误差

            error_h=[0.0]*self.hidden_nodes#隐藏层误差

            output_deltas=[0.0]*self.output_nodes

            hidden_deltas=[0.0]*self.hidden_nodes

            for o in range(self.output_nodes): # 输 出 层

                error_o[o]=targets[ii][o]-self.output_nodes_value[o]#计算输出层误差

#                 output_deltas[o]=self.delta_activation_function(self.output_nodes_value[o])*error_o[o]#输出层反向传播(求导)

                output_deltas[o]=1*error_o[o]#输出层反向传播(求导)

            for h in range(self.hidden_nodes): # 隐 藏 层

                for o in range(self.output_nodes):

#                     print('weight::',self.weights_hidden_to_output[h][o])

                    error_h[h]+=output_deltas[o]*self.weights_hidden_to_output[h][o]#计算隐藏层误差

#                 print('....')

#                 print(self.hidden_nodes_value[h])

#                 print(error_h[h])

                hidden_deltas[h]=self.delta_activation_function(self.hidden_nodes_value[h])*error_h[h]#隐藏层反向传播

#                 print(hidden_deltas[h])

            for h in range(self.hidden_nodes):

                for o in range(self.output_nodes):

                    self.change_to_fix_weights_h2o[h][o]+=output_deltas[o]*self.hidden_nodes_value[h]#累计隐藏层>>输出层的权重矩阵的调整量

            for i in range(self.input_nodes):

                for h in range(self.hidden_nodes):

#                     print("......")

#                     print(hidden_deltas[h])

#                     print(self.input_nodes_value[i])

#                     print(self.change_to_fix_weights_i2h[i][h])

                    self.change_to_fix_weights_i2h[i][h]+=hidden_deltas[h]*self.input_nodes_value[i]#累计输入层>>隐藏层的权重矩阵的调整量

            counter-=1

            if counter==0:#完成一个batch的输入和计算后,调整一次权重

                #调整隐藏层>>输出层权重

                for h in range(self.hidden_nodes):

                    for o in range(self.output_nodes):

                        self.weights_hidden_to_output[h][o] += self.learning_rate*self.change_to_fix_weights_h2o[h][o]

                #调整输入层>>隐藏层权重

                for i in range(self.input_nodes):

                    for h in range(self.hidden_nodes):

#                         print("......")

#                         print(self.weights_input_to_hidden[i][h])

#                         print(self.learning_rate)

#                         print(self.change_to_fix_weights_i2h[i][h])

                        self.weights_input_to_hidden[i][h] += self.learning_rate*self.change_to_fix_weights_i2h[i][h]

#                         print(self.weights_input_to_hidden[i][h])

                #将权值调整量归零,计数器复位,开始输入下一个batch

                self.change_to_fix_weights_h2o=[[0.0]*self.output_nodes]*self.hidden_nodes

                self.change_to_fix_weights_i2h=[[0.0]*self.hidden_nodes]*self.input_nodes

                counter=batch_size

        return self.weights_hidden_to_output

    def run(self, features):#完成一条数据的一次前向传递

        '''

            features: 1D array of feature values

        '''

#         print(self.input_nodes_value)

        for i in range(self.input_nodes):

            self.input_nodes_value[i]=features[i]

#             self.input_nodes_value[i]=self.activation_function(features[i])

#         print(self.input_nodes_value)

#         print(self.hidden_nodes_value)

        for h in range(self.hidden_nodes):

            temp=0

            for i in range(self.input_nodes):

                temp+=self.input_nodes_value[i]*self.weights_input_to_hidden[i][h]

            temp=self.activation_function(temp)

            self.hidden_nodes_value[h]=temp

#         print(self.hidden_nodes_value)

#         print(self.output_nodes_value)

        for o in range(self.output_nodes):

            temp=0

            for h in range(self.hidden_nodes):

                temp+=self.hidden_nodes_value[h]*self.weights_hidden_to_output[h][o]

#             temp=self.activation_function(temp)

            self.output_nodes_value[o]=temp

#         print(self.output_nodes_value)

        return self.output_nodes_value
单元测试:
import unittest inputs = np.array([[0.5, -0.2, 0.1]])
targets = np.array([[0.4]])
test_w_i_h = np.array([[0.1, -0.2],
[0.4, 0.5],
[-0.3, 0.2]])
test_w_h_o = np.array([[0.3],
[-0.1]]) class TestMethods(unittest.TestCase): ##########
# Unit tests for data loading
########## def test_data_path(self):
# Test that file path to dataset has been unaltered
self.assertTrue(data_path.lower() == 'bike-sharing-dataset/hour.csv') def test_data_loaded(self):
# Test that data frame loaded
self.assertTrue(isinstance(rides, pd.DataFrame)) ##########
# Unit tests for network functionality
########## def test_activation(self):
network = NeuralNetwork(3, 2, 1, 0.5)
# Test that the activation function is a sigmoid
self.assertTrue(np.all(network.activation_function(0.5) == 1/(1+np.exp(-0.5)))) def test_train(self):
# Test that weights are updated correctly on training
network = NeuralNetwork(3, 2, 1, 0.5)
network.weights_input_to_hidden = test_w_i_h.copy()
network.weights_hidden_to_output = test_w_h_o.copy() network.train(inputs, targets)
print('@@@@test_train')
print("$$$$$$$$1")
print(network.weights_hidden_to_output)
print(network.weights_input_to_hidden) # network.train(inputs,targets) # print("$$$$$$$$2")
# print(network.weights_hidden_to_output)
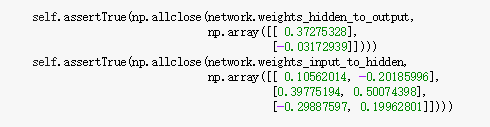
# print(network.weights_input_to_hidden) self.assertTrue(np.allclose(network.weights_hidden_to_output,
np.array([[ 0.37275328],
[-0.03172939]])))
self.assertTrue(np.allclose(network.weights_input_to_hidden,
np.array([[ 0.10562014, -0.20185996],
[0.39775194, 0.50074398],
[-0.29887597, 0.19962801]]))) def test_run(self):
# Test correctness of run method
network = NeuralNetwork(3, 2, 1, 0.5)
network.weights_input_to_hidden = test_w_i_h.copy()
network.weights_hidden_to_output = test_w_h_o.copy() self.assertTrue(np.allclose(network.run(inputs[0]), 0.09998924)) suite = unittest.TestLoader().loadTestsFromModule(TestMethods())
unittest.TextTestRunner().run(suite)
结果:
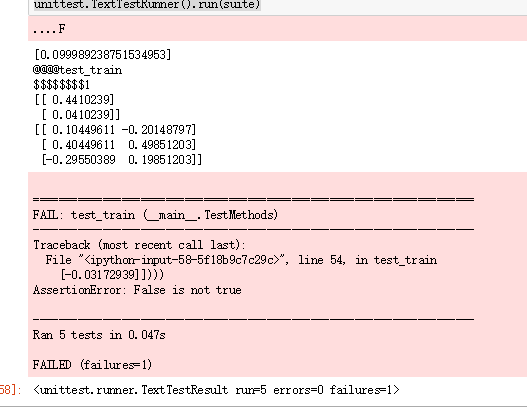
结果虽然比较接近,但是代码比较丑陋,并没有用numpy的矩阵相乘,而是用for循环实现了矩阵乘法,代码复杂,而且都是串行的。
贪玩ML系列之一个BP玩一天的更多相关文章
- 贪玩ML系列之CIFAR-10调参
调参方法:网格调参 tf.layers.conv2d()中的padding参数 取值“same”,表示当filter移出边界时,给空位补0继续计算.该方法能够更多的保留图像边缘信息.当图片较小(如CI ...
- 每日一译系列-模块化css怎么玩(译文)
原文链接:How Css Modules Work 原文作者是Preact的作者 这是一篇关于如何使用Css Modules的快速介绍,使用到的工具是Webpack吊炸的css-loader 首先,我 ...
- ROS与Matlab系列:一个简单的运动控制
ROS与Matlab系列:一个简单的运动控制 转自:http://blog.exbot.net/archives/2594 Matlab拥有强大的数据处理.可视化绘图能力以及众多成熟的算法函数,非常适 ...
- net core天马行空系列: 一个接口多个实现类,利用mixin技术通过自定义服务名,实现精准属性注入
系列目录 1.net core天马行空系列:原生DI+AOP实现spring boot注解式编程 2.net core天马行空系列: 泛型仓储和声明式事物实现最优雅的crud操作 哈哈哈哈,大家好,我 ...
- NET中小型企业项目开发框架系列(一个)
当时的前端,我们开发了基于Net一组结构sprint.NET+NHibernate+MVC+WCF+EasyUI等中小型企业级系统开发平台,如今把整个开发过程中的步步进展整理出来和大家分享,这个系列可 ...
- Office365开发系列——开发一个全功能的Word Add-In
2016年10月我参加了在北京举行的DevDays Asia 2016 - Office 365应用开发”48小时黑客马拉松“,我开发的一个Word Add-In Demo——WordTemplate ...
- http协议学习系列(一个博文链接)
深入理解HTTP协议(转) http协议学习系列(转自:http://www.blogjava.net/zjusuyong/articles/304788.html) 1. 基础概念篇 1.1 介绍 ...
- 造轮子系列(三): 一个简单快速的html虚拟语法树(AST)解析器
前言 虚拟语法树(Abstract Syntax Tree, AST)是解释器/编译器进行语法分析的基础, 也是众多前端编译工具的基础工具, 比如webpack, postcss, less等. 对于 ...
- 爱上MVC3系列~开发一个站点地图(俗称面包屑)
回到目录 原来早在webform控件时代就有了SiteMap这个东西,而进行MVC时代后,我们也希望有这样一个东西,它为我们提供了不少方便,如很方便的实现页面导航的内容修改,页面导航的样式换肤等. 我 ...
随机推荐
- Atitit.执行cmd 命令行 php
Atitit.执行cmd 命令行 php 1. 执行cmd 命令行,调用系统命令的基础 1 1.1. 实际执行模式 1 1.2. 空格的问题 1 1.3. 中文路径的问题,程序文件读取编码设置 1 1 ...
- java中的Closeable接口
一.概述 该接口位于java.io包下,声明例如以下:public interface Closeable Closeable 是能够关闭的数据源或目标. 调用 close 方法可释放对象保存的资源( ...
- python学习之range()和xrange()
在python2中,xrange()返回一个xrange对象,注意这个对象并不是生成器,也不是迭代器,但是是迭代对象. 而range()则返回列表对象. >>> range(10) ...
- CCNA2.0笔记_STP
STP介绍 STP的主要任务是阻止在第二层网络(网桥或交换机)上产生网络环路(通过将特定的端口选为 Blocking state),来实现无环的拓扑 ; STP交换机之间使用Trunk连接 ; Cis ...
- hdu6053 TrickGCD 容斥原理
/** 题目:hdu6053 TrickGCD 链接:http://acm.hdu.edu.cn/showproblem.php?pid=6053 题意:You are given an array ...
- 2016-2017 ACM-ICPC CHINA-Final H Great Cells ans[i]*i看做整体,转化为期望理解来解题
/** 题目:2016-2017 ACM-ICPC CHINA-Final H Great Cells 链接:http://codeforces.com/gym/101194 题意:给定n*m的矩形, ...
- spring cloud 启动报错问题 Input length = 1
Caused by: org.yaml.snakeyaml.error.YAMLException: java.nio.charset.MalformedInputException: Input l ...
- spring mvc 3.0 实现文件上传功能
http://club.jledu.gov.cn/?uid-5282-action-viewspace-itemid-188672 —————————————————————————————————— ...
- Tuning 12 manage statistics
这个 stattistics 对解析 sql 时的优化器有很重要的作用, 优化器是基于 statistics 来进行优化的. desc dbms_stats 包也可以 desc (早期使用 analy ...
- servlet里面拿到common.property的属性
---------------------common.property文件----------------------- kongxc_wx_dinghuo_orderSendMusic=http: ...