
【第三章】 springboot + jedisCluster
如果使用的是redis2.x,在项目中使用客户端分片(Shard)机制。(具体使用方式:第九章 企业项目开发--分布式缓存Redis(1) 第十章 企业项目开发--分布式缓存Redis(2))
如果使用的是redis3.x中的集群,在项目中使用jedisCluster。
redis3.2.5集群搭建:第十二章 redis-cluster搭建(redis-3.2.5)
1、项目结构
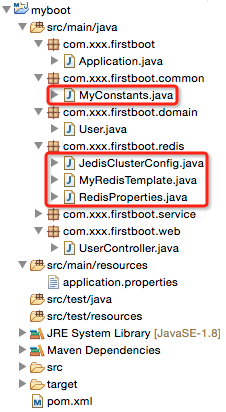
2、pom.xml
<?xml version="1.0" encoding="UTF-8"?>
<project xmlns="http://maven.apache.org/POM/4.0.0" xmlns:xsi="http://www.w3.org/2001/XMLSchema-instance"
    xsi:schemaLocation="http://maven.apache.org/POM/4.0.0 http://maven.apache.org/maven-v4_0_0.xsd">

    <modelVersion>4.0.0</modelVersion>

    <groupId>com.xxx</groupId>
    <artifactId>myboot</artifactId>
    <version>1.0-SNAPSHOT</version>

    <properties>
        <java.version>1.8</java.version><!-- 官方推荐 -->
    </properties>
    <!-- 引入spring-boot-starter-parent做parent是最好的方式,
         但是有时我们可能要引入我们自己的parent,此时解决方式有两种:
         1)我们自己的parent的pom.xml的parent设为spring-boot-starter-parent(没有做过验证,但是感觉可行)
         2)使用springboot文档中的方式:见spring-boot-1.2.5-reference.pdf的第13页
    -->
    <parent>
        <groupId>org.springframework.boot</groupId>
        <artifactId>spring-boot-starter-parent</artifactId>
        <version>1.2.5.RELEASE</version>
    </parent>

    <!-- <dependencyManagement>
        <dependencies>
            <dependency>
                Import dependency management from Spring Boot
                <groupId>org.springframework.boot</groupId>
                <artifactId>spring-boot-dependencies</artifactId>
                <version>1.2.5.RELEASE</version>
                <type>pom</type>
                <scope>import</scope>
            </dependency>
        </dependencies>
    </dependencyManagement> -->

    <!-- 引入实际依赖 -->
    <dependencies>
        <dependency>
            <groupId>org.springframework.boot</groupId>
            <artifactId>spring-boot-starter-web</artifactId>
        </dependency>
        <dependency>
            <groupId>redis.clients</groupId>
            <artifactId>jedis</artifactId>
        </dependency>
        <dependency>
            <groupId>com.alibaba</groupId>
            <artifactId>fastjson</artifactId>
            <version>1.1.15</version>
        </dependency>
        <dependency>
            <groupId>org.apache.commons</groupId>
            <artifactId>commons-lang3</artifactId>
            <version>3.3.2</version>
        </dependency>
    </dependencies>

    <build>
        <plugins>
            <!-- 用于将应用打成可直接运行的jar(该jar就是用于生产环境中的jar) 值得注意的是,如果没有引用spring-boot-starter-parent做parent,
                且采用了上述的第二种方式,这里也要做出相应的改动 -->
            <plugin>
                <groupId>org.springframework.boot</groupId>
                <artifactId>spring-boot-maven-plugin</artifactId>
            </plugin>
        </plugins>
    </build>
</project>
说明:相对于上一章的代码仅仅引入了jedis的依赖jar。
3、application.properties
#user info
user.id=1
user.username=zhaojigang
user.password=123

#redis cluster
redis.cache.clusterNodes=localhost:8080
redis.cache.commandTimeout=5
#unit:second
redis.cache.expireSeconds=120
说明:相对于上一章的代码仅仅引入了redis cluster的配置信息
4、Application.java(springboot启动类,与上一章一样)
5、RedisProperties.java(Redis属性装配)
package com.xxx.firstboot.redis;

import org.springframework.boot.context.properties.ConfigurationProperties;
import org.springframework.stereotype.Component;

@Component
@ConfigurationProperties(prefix = "redis.cache")
public class RedisProperties {

    private int    expireSeconds;
    private String clusterNodes;
    private int    commandTimeout;

    public int getExpireSeconds() {
        return expireSeconds;
    }

    public void setExpireSeconds(int expireSeconds) {
        this.expireSeconds = expireSeconds;
    }

    public String getClusterNodes() {
        return clusterNodes;
    }

    public void setClusterNodes(String clusterNodes) {
        this.clusterNodes = clusterNodes;
    }

    public int getCommandTimeout() {
        return commandTimeout;
    }

    public void setCommandTimeout(int commandTimeout) {
        this.commandTimeout = commandTimeout;
    }

}
说明:与上一章的User类似,采用@ConfigurationProperties注解自动读取application.properties文件的内容并装配到RedisProperties的每一个属性中去。
6、JedisClusterConfig.java(获取JedisCluster单例)
package com.xxx.firstboot.redis;

import java.util.HashSet;
import java.util.Set;

import org.springframework.beans.factory.annotation.Autowired;
import org.springframework.context.annotation.Bean;
import org.springframework.context.annotation.Configuration;

import redis.clients.jedis.HostAndPort;
import redis.clients.jedis.JedisCluster;

@Configuration
public class JedisClusterConfig {

    @Autowired
    private RedisProperties redisProperties;

    /**
     * 注意:
     * 这里返回的JedisCluster是单例的,并且可以直接注入到其他类中去使用
     * @return
     */
    @Bean
    public JedisCluster getJedisCluster() {
        String[] serverArray = redisProperties.getClusterNodes().split(",");//获取服务器数组(这里要相信自己的输入,所以没有考虑空指针问题)
        Set<HostAndPort> nodes = new HashSet<>();

        for (String ipPort : serverArray) {
            String[] ipPortPair = ipPort.split(":");
            nodes.add(new HostAndPort(ipPortPair[0].trim(), Integer.valueOf(ipPortPair[1].trim())));
        }

        return new JedisCluster(nodes, redisProperties.getCommandTimeout());
    }

}
说明:
- 该类注入了RedisProperties类,可以直接读取其属性
- 这里没有对jedis链接池提供更多的配置(jedis-2.5.x好像不支持,jedis-2.6.x支持),具体的配置属性可以查看文章开头第一篇博客
注意:
- 该类使用了Java注解,@Configuration与@Bean,
- 在方法上使用@Bean注解可以让方法的返回值为单例,
- 该方法的返回值可以直接注入到其他类中去使用
- @Bean注解是方法级别的
- 如果使用的是常用的spring注解@Component,
- 在方法上没有注解的话,方法的返回值就会是一个多例,
- 该方法的返回值不可以直接注入到其他类去使用
- 该方式的注解是类级别的
7、MyRedisTemplate.java(具体redis操作)
package com.xxx.firstboot.redis;

import org.slf4j.Logger;
import org.slf4j.LoggerFactory;
import org.springframework.beans.factory.annotation.Autowired;
import org.springframework.stereotype.Component;

import redis.clients.jedis.JedisCluster;

@Component
public class MyRedisTemplate {
    private static final Logger LOGGER    = LoggerFactory.getLogger(MyRedisTemplate.class);

    @Autowired
    private JedisCluster        jedisCluster;

    @Autowired
    private RedisProperties     redisProperties;

    private static final String KEY_SPLIT = ":"; //用于隔开缓存前缀与缓存键值

    /**
     * 设置缓存
     * @param prefix 缓存前缀(用于区分缓存,防止缓存键值重复)
     * @param key    缓存key
     * @param value  缓存value
     */
    public void set(String prefix, String key, String value) {
        jedisCluster.set(prefix + KEY_SPLIT + key, value);
        LOGGER.debug("RedisUtil:set cache key={},value={}", prefix + KEY_SPLIT + key, value);
    }

    /**
     * 设置缓存,并且自己指定过期时间
     * @param prefix
     * @param key
     * @param value
     * @param expireTime 过期时间
     */
    public void setWithExpireTime(String prefix, String key, String value, int expireTime) {
        jedisCluster.setex(prefix + KEY_SPLIT + key, expireTime, value);
        LOGGER.debug("RedisUtil:setWithExpireTime cache key={},value={},expireTime={}", prefix + KEY_SPLIT + key, value,
            expireTime);
    }

    /**
     * 设置缓存,并且由配置文件指定过期时间
     * @param prefix
     * @param key
     * @param value
     */
    public void setWithExpireTime(String prefix, String key, String value) {
        int EXPIRE_SECONDS = redisProperties.getExpireSeconds();
        jedisCluster.setex(prefix + KEY_SPLIT + key, EXPIRE_SECONDS, value);
        LOGGER.debug("RedisUtil:setWithExpireTime cache key={},value={},expireTime={}", prefix + KEY_SPLIT + key, value,
            EXPIRE_SECONDS);
    }

    /**
     * 获取指定key的缓存
     * @param prefix
     * @param key
     */
    public String get(String prefix, String key) {
        String value = jedisCluster.get(prefix + KEY_SPLIT + key);
        LOGGER.debug("RedisUtil:get cache key={},value={}", prefix + KEY_SPLIT + key, value);
        return value;
    }

    /**
     * 删除指定key的缓存
     * @param prefix
     * @param key
     */
    public void deleteWithPrefix(String prefix, String key) {
        jedisCluster.del(prefix + KEY_SPLIT + key);
        LOGGER.debug("RedisUtil:delete cache key={}", prefix + KEY_SPLIT + key);
    }

    public void delete(String key) {
        jedisCluster.del(key);
        LOGGER.debug("RedisUtil:delete cache key={}", key);
    }

}
注意:
这里只是使用了jedisCluster做了一些字符串的操作,对于list/set/sorted set/hash的操作,可以参考开头的两篇博客。
8、MyConstants.java(缓存前缀常量定义类)
package com.xxx.firstboot.common;

/**
 * 定义一些常量
 */
public class MyConstants {
    public static final String USER_FORWARD_CACHE_PREFIX = "myboot:user";// user缓存前缀
}
注意:
- 根据业务特点定义redis的缓存前缀,有助于防止缓存重复导致的缓存覆盖问题
- 缓存前缀使用":"做分隔符,这是推荐做法(这个做法可以在使用redis-desktop-manager的过程看出来)
9、UserController.java(测试)
package com.xxx.firstboot.web;

import org.apache.commons.lang3.StringUtils;
import org.springframework.beans.factory.annotation.Autowired;
import org.springframework.web.bind.annotation.RequestMapping;
import org.springframework.web.bind.annotation.RequestParam;
import org.springframework.web.bind.annotation.RestController;

import com.alibaba.fastjson.JSON;
import com.xxx.firstboot.common.MyConstants;
import com.xxx.firstboot.domain.User;
import com.xxx.firstboot.redis.MyRedisTemplate;
import com.xxx.firstboot.service.UserService;

/**
 * @RestController:spring mvc的注解,
 * 相当于@Controller与@ResponseBody的合体,可以直接返回json
 */
@RestController
@RequestMapping("/user")
public class UserController {

    @Autowired
    private UserService userService;

    @Autowired
    private MyRedisTemplate myRedisTemplate;

    @RequestMapping("/getUser")
    public User getUser() {
        return userService.getUser();
    }

    @RequestMapping("/testJedisCluster")
    public User testJedisCluster(@RequestParam("username") String username){
        String value =  myRedisTemplate.get(MyConstants.USER_FORWARD_CACHE_PREFIX, username);
        if(StringUtils.isBlank(value)){
            myRedisTemplate.set(MyConstants.USER_FORWARD_CACHE_PREFIX, username, JSON.toJSONString(getUser()));
            return null;
        }
        return JSON.parseObject(value, User.class);
    }

}
说明:相对于上一章,只是添加了测试缓存的方法testJedisCluster。
测试:
在Application.properties右击-->run as-->java application,在浏览器输入"localhost:8080/user/testJedisCluster?username=xxx"即可。
附:对于redis的测试,我们有时需要查看执行set后,缓存是否存入redis的db中了,有两种方式
- 执行set后,get数据,之后修改数据,在get数据,比较两次get的数据是否相同即可
- 有时,这些数据是无法修改的(假设该数据是我们从第三方接口得来的),这个时候可以使用redis-desktop-manager这个软件来查看缓存是否存入redis(该软件的使用比较简单,查看官网)
【第三章】 springboot + jedisCluster的更多相关文章
- 第三章 springboot + jedisCluster(转载)
本编博客转发自:http://www.cnblogs.com/java-zhao/p/5347703.html 如果使用的是redis2.x,在项目中使用客户端分片(Shard)机制. 如果使用的是r ...
- 第三章 springboot + jedisCluster
如果使用的是redis2.x,在项目中使用客户端分片(Shard)机制.(具体使用方式:第九章 企业项目开发--分布式缓存Redis(1) 第十章 企业项目开发--分布式缓存Redis(2)) 如果 ...
- 第二十五章 springboot + hystrixdashboard
注意: hystrix基本使用:第十九章 springboot + hystrix(1) hystrix计数原理:附6 hystrix metrics and monitor 一.hystrixdas ...
- spring boot 笔记--第三章
spring boot 笔记 第三章,使用Spring boot 构建系统: 强烈建议支持依赖管理的构建系统,Maven或Gradle 依赖管理: Spring Boot的每版本都会提供它支持的依赖列 ...
- 《精通Spring4.x企业应用开发实战》第三章
这一章节主要介绍SpringBoot的使用,也是学习的重点内容,之后就打算用SpringBoot来写后台,所以提前看一下还是很有必要的. 3.SpringBoot概况 3.1.1SpringBoot发 ...
- 《Django By Example》第三章 中文 翻译 (个人学习,渣翻)
书籍出处:https://www.packtpub.com/web-development/django-example 原作者:Antonio Melé (译者注:第三章滚烫出炉,大家请不要吐槽文中 ...
- 《Linux内核设计与实现》读书笔记 第三章 进程管理
第三章进程管理 进程是Unix操作系统抽象概念中最基本的一种.我们拥有操作系统就是为了运行用户程序,因此,进程管理就是所有操作系统的心脏所在. 3.1进程 概念: 进程:处于执行期的程序.但不仅局限于 ...
- Python黑帽编程3.0 第三章 网络接口层攻击基础知识
3.0 第三章 网络接口层攻击基础知识 首先还是要提醒各位同学,在学习本章之前,请认真的学习TCP/IP体系结构的相关知识,本系列教程在这方面只会浅尝辄止. 本节简单概述下OSI七层模型和TCP/IP ...
- 《Entity Framework 6 Recipes》中文翻译系列 (11) -----第三章 查询之异步查询
翻译的初衷以及为什么选择<Entity Framework 6 Recipes>来学习,请看本系列开篇 第三章 查询 前一章,我们展示了常见数据库场景的建模方式,本章将向你展示如何查询实体 ...
- 《Entity Framework 6 Recipes》中文翻译系列 (19) -----第三章 查询之使用位操作和多属性连接(join)
翻译的初衷以及为什么选择<Entity Framework 6 Recipes>来学习,请看本系列开篇 3-16 过滤中使用位操作 问题 你想在查询的过滤条件中使用位操作. 解决方案 假 ...
随机推荐
- 【python-opencv】对象测量
opencv 中轮廓特征包括: 如面积,周长,质心,边界框等 *弧长与面积测量 *多边形拟合 *获取轮廓的多边形拟合结果 python-opencv API提供方法: cv2.moments()用来计 ...
- PostGIS 快速入门(转)
原文:http://live.osgeo.org/zh/quickstart/postgis_quickstart.html PostGIS 是 PostgreSQL 关系数据库的空间操作扩展.它为 ...
- csrf攻击原理及如何防止csrf攻击
CSRF(Cross-site request forgery)跨站请求伪造,也被称为“One Click Attack”或者Session Riding,是一种对网站的恶意利用,通过伪装来自受信任用 ...
- 【剑指offer】替换空格
一.题目: 请实现一个函数,将一个字符串中的空格替换成“%20”.例如,当字符串为We Are Happy.则经过替换之后的字符串为We%20Are%20Happy. 二.思路: Python代码,先 ...
- Python 使用ctypes调用 C 函数
在python中通过ctypes可以直接调用c的函数,非常简单易用 下面就一步一步解释用法吧,以Linux为例讲解. 1, 首先确定你的python支持不支持ctypes python2.7以后cty ...
- pip第三方模块
在安装好pip的情况下,在cmd窗口调用命令:pip install package -i --trusted-host http://pypi.douban.com/simple(这是豆瓣的源)
- switch语句语法
switch case语句适用于从一组互斥的分支中选择一个执行分支. int day = 0;switch (day) { : dayName = "Sunday"; break ...
- soapUI-DataGen
1.1.1 DataGen 1.1.1.1 概述 – DataGen DataGen TestStep可用于生成要用作TestCases中的输入的数据,例如数字或日期序列,随机选择等.生成的数据可作 ...
- [LeetCode] 851. Loud and Rich_ Medium tag: DFS
In a group of N people (labelled 0, 1, 2, ..., N-1), each person has different amounts of money, and ...
- 常用软件安装及VS插件工具
常用开发工具安装 开发环境 Visual Studio 2013 Microsoft SQL Server 2008 源代码管理 Git TortoiseGit GitScc Provider Cru ...