Python_sklearn机器学习库学习笔记(五)k-means(聚类)
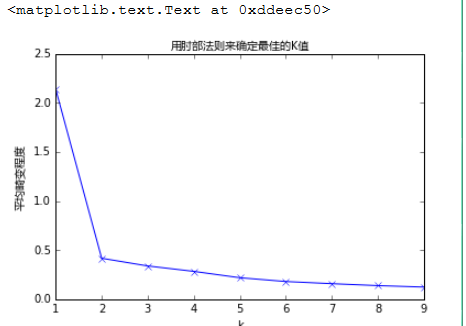
# K的选择:肘部法则
如果问题中没有指定 的值,可以通过肘部法则这一技术来估计聚类数量。肘部法则会把不同 值的
成本函数值画出来。随着 值的增大,平均畸变程度会减小;每个类包含的样本数会减少,于是样本
离其重心会更近。但是,随着 值继续增大,平均畸变程度的改善效果会不断减低。 值增大过程
中,畸变程度的改善效果下降幅度最大的位置对应的 值就是肘部。
import numpy as np
import matplotlib.pyplot as plt
%matplotlib inline
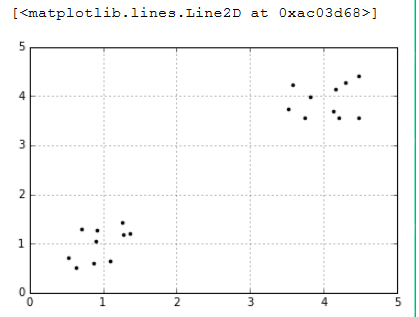
#随机生成一个实数,范围在(0.5,1.5)之间
cluster1=np.random.uniform(0.5,1.5,(2,10))
cluster2=np.random.uniform(3.5,4.5,(2,10))
#hstack拼接操作
X=np.hstack((cluster1,cluster2)).T
plt.figure()
plt.axis([0,5,0,5])
plt.grid(True)
plt.plot(X[:,0],X[:,1],'k.')
%matplotlib inline

import matplotlib.pyplot as plt

from matplotlib.font_manager import FontProperties

font = FontProperties(fname=r"c:\windows\fonts\msyh.ttc", size=10)
#coding:utf-8

#我们计算K值从1到10对应的平均畸变程度:

from sklearn.cluster import KMeans

#用scipy求解距离

from scipy.spatial.distance import cdist

K=range(1,10)

meandistortions=[]

for k in K:

    kmeans=KMeans(n_clusters=k)

    kmeans.fit(X)

    meandistortions.append(sum(np.min(

            cdist(X,kmeans.cluster_centers_,

                 'euclidean'),axis=1))/X.shape[0])

plt.plot(K,meandistortions,'bx-')

plt.xlabel('k')

plt.ylabel(u'平均畸变程度',fontproperties=font)

plt.title(u'用肘部法则来确定最佳的K值',fontproperties=font)
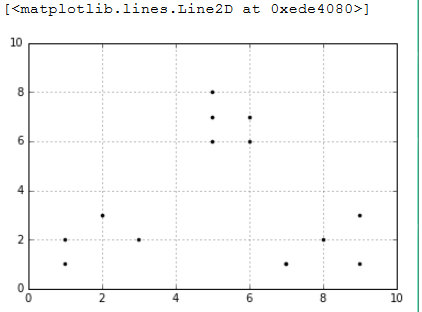
import numpy as np

x1 = np.array([1, 2, 3, 1, 5, 6, 5, 5, 6, 7, 8, 9, 7, 9])

x2 = np.array([1, 3, 2, 2, 8, 6, 7, 6, 7, 1, 2, 1, 1, 3])

X=np.array(list(zip(x1,x2))).reshape(len(x1),2)

plt.figure()

plt.axis([0,10,0,10])

plt.grid(True)

plt.plot(X[:,0],X[:,1],'k.')
from sklearn.cluster import KMeans

from scipy.spatial.distance import cdist

K=range(1,10)

meandistortions=[]

for k in K:

    kmeans=KMeans(n_clusters=k)

    kmeans.fit(X)

    meandistortions.append(sum(np.min(cdist(

            X,kmeans.cluster_centers_,"euclidean"),axis=1))/X.shape[0])

plt.plot(K,meandistortions,'bx-')

plt.xlabel('k')

plt.ylabel(u'平均畸变程度',fontproperties=font)

plt.title(u'用肘部法则来确定最佳的K值',fontproperties=font)

# 聚类效果的评价
#### 轮廓系数(Silhouette Coefficient):s =ba/max(a, b)
import numpy as np

from sklearn.cluster import KMeans

from sklearn import metrics

plt.figure(figsize=(8,10))

plt.subplot(3,2,1)

x1 = np.array([1, 2, 3, 1, 5, 6, 5, 5, 6, 7, 8, 9, 7, 9])

x2 = np.array([1, 3, 2, 2, 8, 6, 7, 6, 7, 1, 2, 1, 1, 3])

X = np.array(list(zip(x1, x2))).reshape(len(x1), 2)

plt.xlim([0,10])

plt.ylim([0,10])

plt.title(u'样本',fontproperties=font)

plt.scatter(x1, x2)

colors = ['b', 'g', 'r', 'c', 'm', 'y', 'k', 'b']

markers = ['o', 's', 'D', 'v', '^', 'p', '*', '+']

tests=[2,3,4,5,8]

subplot_counter=1

for t in tests:

    subplot_counter+=1

    plt.subplot(3,2,subplot_counter)

    kmeans_model=KMeans(n_clusters=t).fit(X)

#     print kmeans_model.labels_:每个点对应的标签值

    for i,l in enumerate(kmeans_model.labels_):

        plt.plot(x1[i],x2[i],color=colors[l],

             marker=markers[l],ls='None')

        plt.xlim([0,10])

        plt.ylim([0,10])

        plt.title(u'K = %s, 轮廓系数 = %.03f' %

                  (t, metrics.silhouette_score

                   (X, kmeans_model.labels_,metric='euclidean'))

                  ,fontproperties=font)

# 图像向量化
import numpy as np

from sklearn.cluster import KMeans

from sklearn.utils import shuffle

import mahotas as mh

original_img=np.array(mh.imread('tree.bmp'),dtype=np.float64)/255

original_dimensions=tuple(original_img.shape)

width,height,depth=tuple(original_img.shape)

image_flattend=np.reshape(original_img,(width*height,depth))

print image_flattend.shape

image_flattend
输出结果:
(102672L, 3L)
array([[ 0.55686275,  0.57647059,  0.61960784],

       [ 0.68235294,  0.70196078,  0.74117647],

       [ 0.72156863,  0.7372549 ,  0.78039216],

       ...,

       [ 0.75686275,  0.63529412,  0.46666667],

       [ 0.74117647,  0.61568627,  0.44705882],

       [ 0.70588235,  0.57647059,  0.40784314]])
然后我们用K-Means算法在随机选择1000个颜色样本中建立64个类。每个类都可能是压缩调色板中的一种颜色
image_array_sample=shuffle(image_flattend,random_state=0)[:1000]

image_array_sample.shape

estimator=KMeans(n_clusters=64,random_state=0)

estimator.fit(image_array_sample)

#之后,我们为原始图片的每个像素进行类的分配

cluster_assignments=estimator.predict(image_flattend)

print cluster_assignments.shape

cluster_assignments
输出结果:
(102672L,)
array([59, 39, 33, ..., 46, 8, 17])
#最后,我们建立通过压缩调色板和类分配结果创建压缩后的图片:

compressed_palette = estimator.cluster_centers_

compressed_img = np.zeros((width, height, compressed_palette.shape[1]))

label_idx = 0

for i in range(width):

    for j in range(height):

        compressed_img[i][j] = compressed_palette[cluster_assignments[label_idx]]

        label_idx += 1

plt.subplot(122)

plt.title('Original Image')

plt.imshow(original_img)

plt.axis('off')

plt.subplot(121)

plt.title('Compressed Image')

plt.imshow(compressed_img)

plt.axis('off')

plt.show()

Python_sklearn机器学习库学习笔记(五)k-means(聚类)的更多相关文章
- Python_sklearn机器学习库学习笔记(一)_一元回归
一.引入相关库 %matplotlib inline import matplotlib.pyplot as plt from matplotlib.font_manager import FontP ...
- Python_sklearn机器学习库学习笔记(一)_Feature Extraction and Preprocessing(特征提取与预处理)
# Extracting features from categorical variables #Extracting features from categorical variables 独热编 ...
- Python_sklearn机器学习库学习笔记(七)the perceptron(感知器)
一.感知器 感知器是Frank Rosenblatt在1957年就职于Cornell航空实验室时发明的,其灵感来自于对人脑的仿真,大脑是处理信息的神经元(neurons)细胞和链接神经元细胞进行信息传 ...
- Python_sklearn机器学习库学习笔记(三)logistic regression(逻辑回归)
# 逻辑回归 ## 逻辑回归处理二元分类 %matplotlib inline import matplotlib.pyplot as plt #显示中文 from matplotlib.font_m ...
- Python_sklearn机器学习库学习笔记(六) dimensionality-reduction-with-pca
# 用PCA降维 #计算协方差矩阵 import numpy as np X=[[2,0,-1.4], [2.2,0.2,-1.5], [2.4,0.1,-1], [1.9,0,-1.2]] np.c ...
- Python_sklearn机器学习库学习笔记(四)decision_tree(决策树)
# 决策树 import pandas as pd from sklearn.tree import DecisionTreeClassifier from sklearn.cross_validat ...
- muduo网络库学习笔记(五) 链接器Connector与监听器Acceptor
目录 muduo网络库学习笔记(五) 链接器Connector与监听器Acceptor Connector 系统函数connect 处理非阻塞connect的步骤: Connetor时序图 Accep ...
- thon_sklearn机器学习库学习笔记(四)decision_tree(决策树)
# 决策树 import pandas as pd from sklearn.tree import DecisionTreeClassifier from sklearn.cross_validat ...
- 机器学习实战(Machine Learning in Action)学习笔记————06.k-均值聚类算法(kMeans)学习笔记
机器学习实战(Machine Learning in Action)学习笔记————06.k-均值聚类算法(kMeans)学习笔记 关键字:k-均值.kMeans.聚类.非监督学习作者:米仓山下时间: ...
随机推荐
- HDU 5776 sum (模拟)
sum 题目链接: http://acm.hdu.edu.cn/showproblem.php?pid=5776 Description Given a sequence, you're asked ...
- java数字保留两位小数四舍五入
import java.math.BigDecimal; import java.text.DecimalFormat; import java.text.NumberFormat; public c ...
- Java封装 properties文件操作
/** * Prop. Prop can load properties file from CLASSPATH or File object. */ public class Prop { priv ...
- Educational Codeforces Round 7 - E. Ants in Leaves
题目链接:http://www.codeforces.com/contest/622/problem/E 题意是给你一棵树,1为根,每个叶子节点有一个蚂蚁,移动到一个邻接节点时间耗费为1,一个节点上不 ...
- 校园网通过路由器开WiFi
闲话少说,为了在一个宿舍内达到一个网口N人上网目的,特地写一篇关于校园网通过路由器开wifi的文章,希望能帮助同学把wifi开起来,请看正文(操作以下步骤前建议先重置路由,也就是初始化复位): 一.一 ...
- Mysql,JDBC封装
1.完成对数据库的表的增删改的操作 2.查询返回单条记录 3.查询返回多行记录 4.可以使用反射机制来封装,查询单条记录 5.反射机制,查询多条记录 package myjdbc; import ja ...
- [置顶] stax解析xml文档的6种方式
原文链接:http://blog.csdn.net/u011593278/article/details/9745271 stax解析xml文档的方式: 基于光标的查询: 基于迭代模型的查找: 基于过 ...
- MDF文件数据恢复
- iOS 抖动动画
-(void)animationWithCell:(WaterLevelCollectionCell *)cell{ // 添加摇晃动画 { CAKeyframeAnimation *frame=[C ...
- 基础数据结构 之 栈(python实现)
栈是编程开发中的两种较为简单的数据结构.栈和队可用于模拟函数的递归.栈的特点是后进先出.其常用操作包括:出栈,入栈等.在出栈前,需判断栈是否为空.在入栈时,需判断栈是否已满. 下面给出一个用pytho ...