
UI-9-UITableView
课程要点:
- UITableView及其两种风格和三部分
- UITableViewController
- UITableViewCell及其四种风格
- 通过代理给UITableView设置cell
- 性能优化
- tableView的其他代理方法
UITableView及其两种风格和三部分
UITableView是一个能滑动,能够承载多个单元格的视图控件,例如下图:能够滑动的是tableView,上面的每一条新闻都放在一个cell里面。

UITableView有两种风格
1、UITableViewStylePlain(普通风格)
2、UITableViewStyleGrouped(分组风格)
    //在设置frame的同时设置一种风格,现在先选择普通风格,后面讲到段的时候会用效果来展示两者的不同
    UITableView *tableView = [[UITableView alloc]initWithFrame:CGRectMake(, , , ) style:UITableViewStylePlain];
    tableView.backgroundColor = [UIColor grayColor];

    [self.view addSubview:tableView];
UITableView由三部分组成
1、表头
2、UITableViewCell(单元格)
3、表尾
    //给tableView设置表头

    tableView.tableHeaderView = [self addHeaderView];

    //给tableView设置表尾

    tableView.tableFooterView = [self addFooterView];
PS:设置表头和表尾是通过点属性来设置的,都需要赋值一个View,所以自己写了两个返回值是View的方法来设置表头和表尾的试图,如果将某个试图作为表头或者表尾,该试图的x,y,width都按照tableView默认的来,只有height会变成表头或表尾的高。
//设置表头

- (UIView *)addHeaderView{

    UILabel *label = [[UILabel alloc]initWithFrame:CGRectMake(, , , )];

    label.text = @"表头";

    label.backgroundColor = [UIColor yellowColor];

    return label;

}

//设置表尾

- (UIView *)addFooterView{

    UILabel *label = [[UILabel alloc]initWithFrame:CGRectMake(, , , )];

    label.text = @"表尾";

    label.backgroundColor = [UIColor yellowColor];

    return label;

}
运行效果如下:
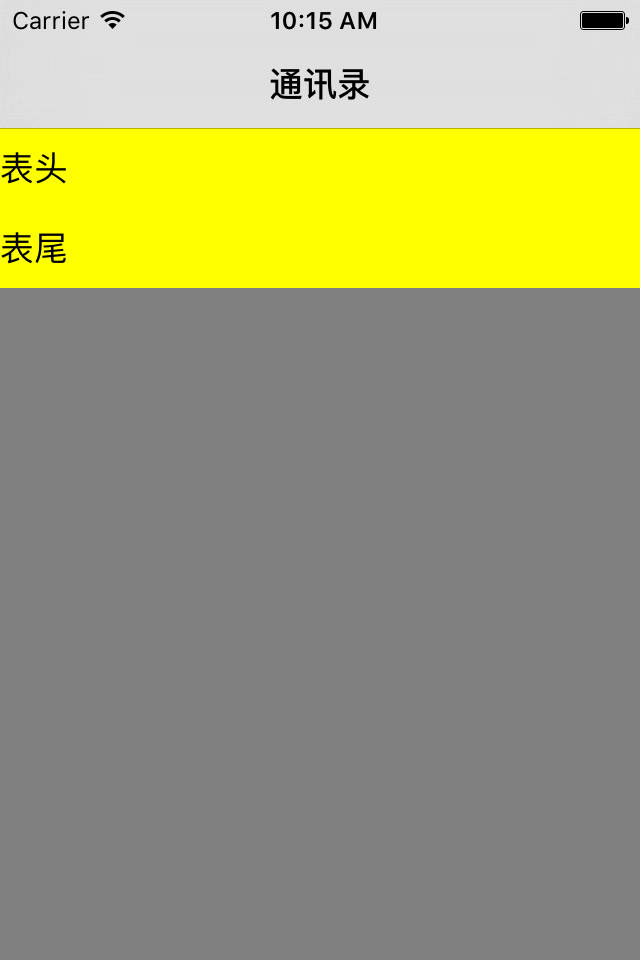
PS:此时只有表头和表尾,中间没有UITableViewCell(单元格)。这是因为目前我只给他设置了表头和表尾,并未设置单元格。
UITableViewController
每个控制器都自带一个视图,UITableViewController自带的试图是一个TableViewController。如果一个页面只有TableView的话可以采用这种控制器。自己可以私下尝试一下。这里不做过多解释了。
UITableViewCell及其四种风格
cell自带textLabel、detailTextLabel、imageView 不同风格的cell,这三种控件的摆放位置不同
1、UITableViewCellStyleDefault
图片居左,textlabel在图片右边,detailTextLabel默认不显示
2、UITableViewCellStyleValue1
图片居左,textlabel在图片的右边,detailTextLabel居右
3、UITableViewCellStyleValue2
左边一个主标题textLabel,挨着右边一个副标题detailTextLabel
4、UITableViewCellStyleSubtitle
图片居左,textLabel在图片的右边,deetailTextlabel在textlabel的下方。
将viewDidiLoad里的代码都给注释了,然后在ViewDidLoad中调用这个方法。
  //addTableViewCell方法是我自己写的,在这个方法内我将创建好的cell放到self.view上面
  [self addTableViewCell];
实现addTableViewCell方法
- (void)addTableViewCell{

    //UITableCell也是一种试图空间,在这里初始化的同时给cell设置风格和标识符

    UITableViewCell *cell = [[UITableViewCell alloc]initWithStyle:UITableViewCellStyleSubtitle reuseIdentifier:@"cellID"];

    cell.frame = CGRectMake(, 150, , );

    cell.backgroundColor = [UIColor brownColor];

    [self.view addSubview:cell];

    //cell自带textLabel、detailTextLabel、imageView 不同风格的cell,这三种控件的摆放位置不同

    /*

     * UITableViewCellStyleDefault

       图片居左,textlabel在图片右边,detailTextLabel默认不显示

     * UITableViewCellStyleValue1

       图片居左,textlabel在图片的右边,detailTextLabel居右

     * UITableViewCellStyleValue2

       左边一个主标题textLabel,挨着右边一个副标题detailTextLabel

     * UITableViewCellStyleSubtitle

       图片居左,textLabel在图片的右边,deetailTextlabel在textlabel的下方。

     */

    cell.textLabel.text = @"张三";

    cell.textLabel.textColor = [UIColor redColor];

    cell.detailTextLabel.text = @"张三是张家人";

    cell.imageView.image = [UIImage imageNamed:@"zhangsan.png"];

    //右边出现小箭头

    cell.accessoryType = UITableViewCellAccessoryDisclosureIndicator;

    //圈i加箭头

    cell.accessoryType = UITableViewCellAccessoryDetailDisclosureButton;

    //对号

    cell.accessoryType = UITableViewCellAccessoryCheckmark;

    //圈i

    cell.accessoryType = UITableViewCellAccessoryDetailButton;

}
运行效果如下:

通过代理给UITableView设置cell
PS:之前我们学习了两种控件,UITableView和UITableViewCell,他两之间的关系应该是UITableView中有很多排列的UITableViewCell。接下俩我们要做的就是通过代理将两者给关联起来。
将viewDidLoad中的内容恢复至此:
    UITableView *tableView = [[UITableView alloc]initWithFrame:CGRectMake(, , , ) style:UITableViewStylePlain];

    //给tableView设置表头

    tableView.tableHeaderView = [self addHeaderView];

    //给tableView设置表尾

    tableView.tableFooterView = [self addFooterView];

    tableView.backgroundColor = [UIColor grayColor];

    [self.view addSubview:tableView];
本模块的标题已经说明咱们是通过代理方法来设置cell。
1、遵守协议
//这两个协议分别有不同的方法
@interface ContactViewController()<UITableViewDataSource,UITableViewDelegate>


@end
2、挂代理
tableView.delegate = self;

tableView.dataSource = self;
3、实现代理方法,给tableView设置cell,有两个属性是必须的
1)tableView里面有多少行.(- (NSInteger)tableView:(UITableView *)tableView numberOfRowsInSection:(NSInteger)section)
2)每一行是个什么样的cell.(- (UITableViewCell *)tableView:(UITableView *)tableView cellForRowAtIndexPath:(NSIndexPath *)indexPath)
//返回tableView有多少行

- (NSInteger)tableView:(UITableView *)tableView numberOfRowsInSection:(NSInteger)section{

    return 10;

}

//给每一行设置一个cell

- (UITableViewCell *)tableView:(UITableView *)tableView cellForRowAtIndexPath:(NSIndexPath *)indexPath{

       UITableViewCell *cell = [[UITableViewCell alloc]initWithStyle:UITableViewCellStyleSubtitle reuseIdentifier:nil];

    cell.textLabel.text = @"张三";

    cell.textLabel.textColor = [UIColor redColor];

    cell.detailTextLabel.text = @"张三是张家人";

    cell.imageView.image = [UIImage imageNamed:@"zhangsan.png"];

    //右边出现小箭头

    cell.accessoryType = UITableViewCellAccessoryDisclosureIndicator;

    return cell;

}
运行效果如下:
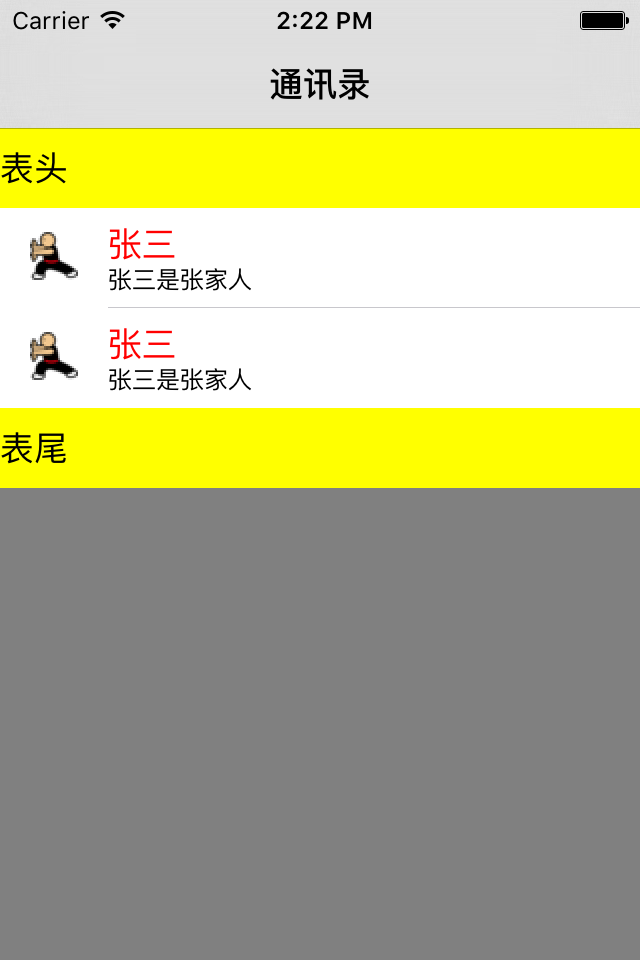
完整代码如下:
//

//  ContactViewController.m

//  UI-No8-UITableView

//

//  Created by  on 15/12/14.

//  Copyright © 2015年 王立广. All rights reserved.

//

#import "ContactViewController.h"

@interface ContactViewController()<UITableViewDataSource,UITableViewDelegate>@end

@implementation ContactViewController

- (void)viewDidLoad{

    [super viewDidLoad];

    UITableView *tableView = [[UITableView alloc]initWithFrame:CGRectMake(, , , ) style:UITableViewStylePlain];

    //给tableView设置表头

    tableView.tableHeaderView = [self addHeaderView];

    //给tableView设置表尾

    tableView.tableFooterView = [self addFooterView];

    tableView.delegate = self;

    tableView.dataSource = self;

    tableView.backgroundColor = [UIColor grayColor];

    [self.view addSubview:tableView];

}

//设置表头

- (UIView *)addHeaderView{

    UILabel *label = [[UILabel alloc]initWithFrame:CGRectMake(, , , )];

    label.text = @"表头";

    label.backgroundColor = [UIColor yellowColor];

    return label;

}

//设置表尾

- (UIView *)addFooterView{

    UILabel *label = [[UILabel alloc]initWithFrame:CGRectMake(, , , )];

    label.text = @"表尾";

    label.backgroundColor = [UIColor yellowColor];

    return label;

}

//返回tableView有多少行

- (NSInteger)tableView:(UITableView *)tableView numberOfRowsInSection:(NSInteger)section{

    return ;

}

//tableView上将要显示一个cell时会调用这个方法,在方法内设置一个cell并返回便可将cell放到tableView上。

- (UITableViewCell *)tableView:(UITableView *)tableView cellForRowAtIndexPath:(NSIndexPath *)indexPath{

    UITableViewCell *cell = [[UITableViewCell alloc]initWithStyle:UITableViewCellStyleSubtitle reuseIdentifier:nil];

    cell.textLabel.text = @"张三";

    cell.textLabel.textColor = [UIColor redColor];

    cell.detailTextLabel.text = @"张三是张家人";

    cell.imageView.image = [UIImage imageNamed:@"zhangsan.png"];

    //右边出现小箭头

    cell.accessoryType = UITableViewCellAccessoryDisclosureIndicator;

    return cell;

}

@end
性能优化
上面学习的东西,咱们已经能够将UItableView和UITableViewCell结合起来了,在上面的代码中有一个问题是每次出现一个新的cell,系统会创建一个新的cell对象。这样是十分浪费内存的,接下来咱们重写优化这个方法。
//tableView上将要显示一个cell时会调用这个方法,在方法内设置一个cell并返回便可将cell放到tableView上。
- (UITableViewCell *)tableView:(UITableView *)tableView cellForRowAtIndexPath:(NSIndexPath *)indexPath{

    /*

     * UITableView每次滑动,必定有消失的cell,系统会自动将这些消失的cell放到缓存池里,需要新cell时,系统先在缓存池里看是否有cell,有的话就利用,没有的话就新建。

     * 前提:UITableView滑动

       1、旧的cell消失,系统自动将这个cell放到缓存池里面。

       2、新的cell要显示,就会代理方法。

          1) 首先看缓存池里面有没有cell

          2)  如果有cell就利用,如果没有就新建

          3) 在代理方法中返回设置的cell

     */

  static NSString *cellID = @"cellID";

    UITableViewCell *cell = [tableView dequeueReusableCellWithIdentifier:cellID];

    if (cell == nil) {

        cell = [[UITableViewCell alloc]initWithStyle:UITableViewCellStyleSubtitle reuseIdentifier:cellID];

    }

    cell.textLabel.text = @"张三";

    cell.textLabel.textColor = [UIColor redColor];

    cell.detailTextLabel.text = @"张三是张家人";

    cell.imageView.image = [UIImage imageNamed:@"zhangsan.png"];

    //右边出现小箭头

    cell.accessoryType = UITableViewCellAccessoryDisclosureIndicator;

    return cell;

}
tableView的其他代理方法
//设置每行的高
- (CGFloat)tableView:(UITableView *)tableView heightForRowAtIndexPath:(NSIndexPath *)indexPath{

    return ;

}
//给tablView设置段数
/*
 *  tableView如果不实现这个代理方法,默认是一段,所以之前是给第一段设置行数,通过这个方法能够给tableView设置多段
 */

- (NSInteger)numberOfSectionsInTableView:(UITableView *)tableView{

    return ;

}
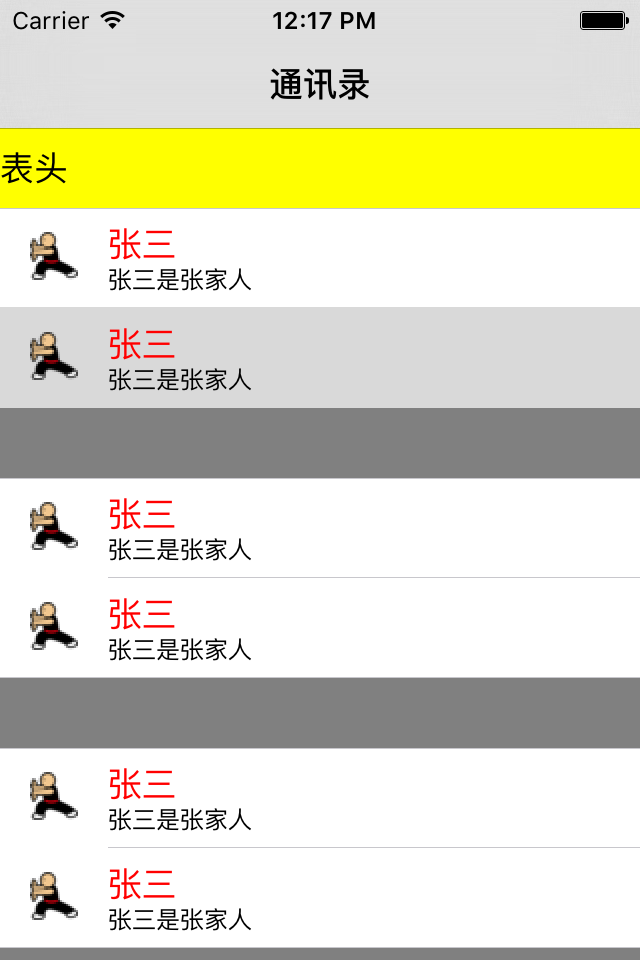
PS:之前讲UITableView时说到有两种风格,现在切换到grouped模式运行看效果,现在看到分段效果即可,后面会慢慢的告诉你分段的用处。
总结:这次只是简单的讲了一些UITableView基本使用,和一些简单的代理方法。后面会继续深入带领大家学习。
UI-9-UITableView的更多相关文章
- iOS开发UI篇—UITableview控件简单介绍
iOS开发UI篇—UITableview控件简单介绍 一.基本介绍 在众多移动应⽤用中,能看到各式各样的表格数据 . 在iOS中,要实现表格数据展示,最常用的做法就是使用UITableView,UIT ...
- iOS开发UI篇—UITableview控件基本使用
iOS开发UI篇—UITableview控件基本使用 一.一个简单的英雄展示程序 NJHero.h文件代码(字典转模型) #import <Foundation/Foundation.h> ...
- iOS开发UI篇—UITableview控件使用小结
iOS开发UI篇—UITableview控件使用小结 一.UITableview的使用步骤 UITableview的使用就只有简单的三个步骤: 1.告诉一共有多少组数据 方法:- (NSInteger ...
- UI:UITableView 编辑、cell重用机制
tableView编辑.tableView移动.UITableViewController tableView的编辑:cell的添加.删除. 使⽤场景: 删除⼀个下载好的视频,删除联系⼈: 插⼊⼀条新 ...
- IOS开发UI基础UITableView的属性
UITableView UITableView内置了两种样式:UITableViewStylePlain,UITableViewStyleGrouped <UITableViewDataSour ...
- UI基础:UITableView的编辑和移动
相对UITableViiew进行编辑,必须设置代理,让代理遵循UITableViewDataSource和UITableViewDelegate协议.因为需要代理实现协议中几个必须的方法. UITab ...
- UI:UITableView表视图
表视图 UITableView,iOS中最重要的视图,随处可⻅见. 表视图通常⽤用来管理⼀一组具有相同数据结构的数据. UITableView继承⾃自UIScrollView,所以可以滚动,表视图的每 ...
- UI之UItableView重用机制的性能问题
*:first-child { margin-top: 0 !important; } body > *:last-child { margin-bottom: 0 !important; } ...
- Swift UI学习UITableView and protocol use
Models: UserModel.swift Views: UserInfoCell.swift Controllers: RootViewController.swift, DetailViewC ...
- UI篇—UITableview
一.基本介绍 在众多移动应⽤用中,能看到各式各样的表格数据 . 在iOS中,要实现表格数据展示,最常用的做法就是使用UITableView,UITableView继承自UIScrollView,因此支 ...
随机推荐
- 【2-SAT(两次DFS版)】BZOJ1823-[JSOI2010]满汉全席
[题目大意] 有n个材料,m个评委.每种材料可以被用来做满族菜或汉族菜,m个评委有两种可以让他满意的猜中.问是否可以满足所有评委要求? [思路] 每天只能做三道题,我已经是一个废人了……(葛优躺.jp ...
- 搭建SSH框架–搭建篇
工具: IDE:My Eclipse 2015 数据库:Orcale 创建Web项目 1.1 名称:PersonalWeb 1.2 勾选创建web.xml 1.3 Finsh 搭建Spring框架 2 ...
- mysql replication 复制的一些问题
1 过大的复制延迟 mysql 的复制延迟是一个常见问题,现在已经有一些解决方案,如淘宝开发的一些工具 2 没有磁盘空间 复制导致磁盘空间塞满,二进制日志.中继日志或临时文件把磁盘塞满,slave ...
- microsoft visual studio遇到了问题,需要关闭
http://www.microsoft.com/zh-cn/download/confirmation.aspx?id=13821 装上这个补丁: WindowsXP-KB971513-x86-CH ...
- 基本的Bootstrap模板
<!DOCTYPE html> <html> <html lang="zh-cn"> <meta charset="UTF-8& ...
- php简单常用的API
1.var_dump($x),查看数据类型,以及数据 var_dump($x); //string(12) "就是就是" 2.memory_get_usage()到当前这一步为止一 ...
- React脚手架
所谓脚手架,是指一套基础的开发环境,你只需要简单的配置或者无需配置,就可以直接开发自己的业务代码,而无需劳神在搭建环境上. 比较出名的就是facebook自己出的的脚手架:create-react-a ...
- 【前后台分离模式下,使用OAuth Token方式认证】
AngularJS is an awesome javascript framework. With it’s $resource service it is super fast and easy ...
- Storm如何保证消息不丢失
storm保证从spout发出的每个tuple都会被完全处理.这篇文章介绍storm是怎么做到这个保证的,以及我们使用者怎么做才能充分利用storm的可靠性特点. 一个tuple被"完全处理 ...
- 解决spring boot启动报错java.lang.NoClassDefFoundError: ch/qos/logback/classic/Level
解决spring boot启动报错java.lang.NoClassDefFoundError: ch/qos/logback/classic/Level 学习了:https://blog.csdn. ...