Django学习---自定义分页
自定义分页
简单例子:
urls.py:
from django.contrib import admin

from django.urls import path

from django.conf.urls import url,include

from app01 import views

urlpatterns = [

    url(r'^user_list/',views.user_list),

]
先固定写死数据:view.py:
LIST = []

for i in range(100):

    LIST.append(i)

def user_list(request):

    current_page = request.GET.get('p',1)

    current_page = int(current_page)

    start = (current_page-1)*10

    end = current_page * 10

    data = LIST[start:end]

    return render(request,'user_list.html',{'li':data})
user_item.py
<!DOCTYPE html>
<html lang="en">
<head>
<meta charset="UTF-8">
<title>Title</title>
</head>
<body>
<ul>
{% for item in li %}
{% include 'li.html' %}
{% endfor %}
</ul>
<div>
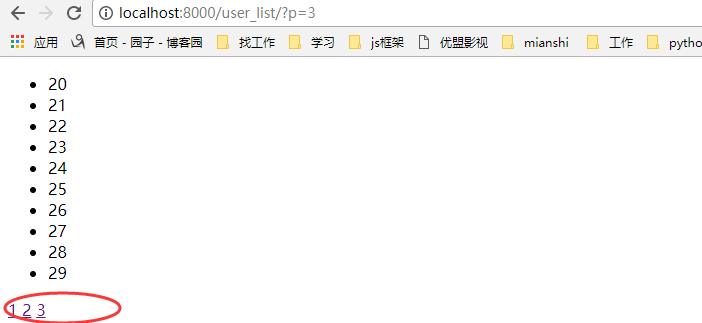
<a href="/user_list/?p=1">1</a>
<a href="/user_list/?p=2">2</a>
<a href="/user_list/?p=3">3</a>
</div>
</body>
</html>
显示效果:
我们都知道后台穿过来的是一个字符串,如果我们把那些a标签从后台传过来,那会是什么样的呢?
views.py:
def user_list(request):

    current_page = request.GET.get('p',1)

    current_page = int(current_page)

    start = (current_page-1)*10

    end = current_page * 10

    data = LIST[start:end]

    page_str = '''

        <a href="/user_list/?p=1">1</a>

        <a href="/user_list/?p=2">2</a>

        <a href="/user_list/?p=3">3</a>

    '''

    #return render(request,'user_list.html',{'li':data})

    return render(request,'user_list.html',{'page_str':page_str,'li':data})
html.py:
<div>

        {{ page_str }}

</div>
显示效果:

这里可以引入一个知识:XSS攻击:即评论,输入框等输入一些脚本,for循环。
如果想要显示的话:
第一种方法:
{{ page_str|safe }}
第二种方法:
from django.utils.safestring import mark_safe

page_str = '''

        <a href="/user_list/?p=1">1</a>

        <a href="/user_list/?p=2">2</a>

        <a href="/user_list/?p=3">3</a>

    '''

page_str = mark_safe(page_str)
分页1.0版本:使用固定的列表数据,然后获得页数,
views.py:
def user_list(request):

    current_page = request.GET.get('p',1)

    current_page = int(current_page)

    start = (current_page-1)*10

    end = current_page * 10

    data = LIST[start:end]

    all_count = len(LIST)

    count,y = divmod(all_count,10)

    if y:

        count+=1

    page_list = []

    for i in range(1,count+1):

        if i == current_page:

            temp = '<a class="page active" href="/user_list/?p=%s">%s</a>' % (i, i)

        else:

            temp = '<a class="page" href="/user_list/?p=%s">%s</a>' %(i,i)

        page_list.append(temp)

    page_str = "".join(page_list)

    return render(request,'user_list.html',{'page_str':page_str,'li':data})
html文件:
<!DOCTYPE html>

<html lang="en">

<head>

    <meta charset="UTF-8">

    <title>Title</title>

    <style>

        .pagination .page{

            display: inline-block;

            padding:5px;

            background-color: seashell;

            margin:5px;

        }

        .pagination .active{

            background-color: coral;

        }

    </style>

</head>

<body>

    <ul>

        {% for item in li %}

            {% include 'li.html' %}

        {% endfor %}

    </ul>

    <div class="pagination">

        {{ page_str|safe }}

    </div>

</body>

</html>
显示效果:
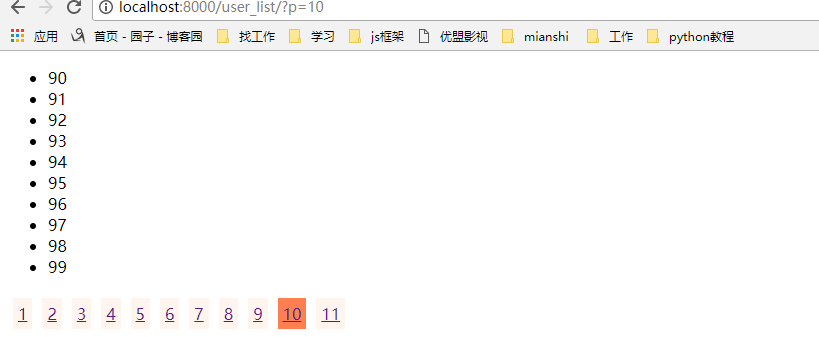
上面的分页代码我们在数据少的时候将就一下,但是如果一旦我们的数据多了,那我们如果一下子把所有的页数都显示在html中,那显然是不合适的,那我们应该要隐藏多的页数
那我们需要该for循环,显示当前页的前五个和后五个,来我们改写一些views里面的函数:
def user_list(request):
current_page = request.GET.get('p',1)
current_page = int(current_page)
page_size = 10#页面一次显示多少条数据
page_num=11#页面显示的页数
start = (current_page-1)*page_size
end = current_page * page_size
data = LIST[start:end] all_count = len(LIST)
count,y = divmod(all_count,page_size)
if y:
count+=1 page_list = []
if count <= 11:
start_index = 1
end_index = count+1
elif count > 11:
if current_page <= (page_num+1)/2:
start_index = 1
end_index = page_num + 1
elif (current_page+(page_num-1)/2) > count :
start_index = count-page_num+1
end_index = count + 1
else:
start_index = current_page - (page_num-1)/2
end_index = current_page + (page_num+1)/2
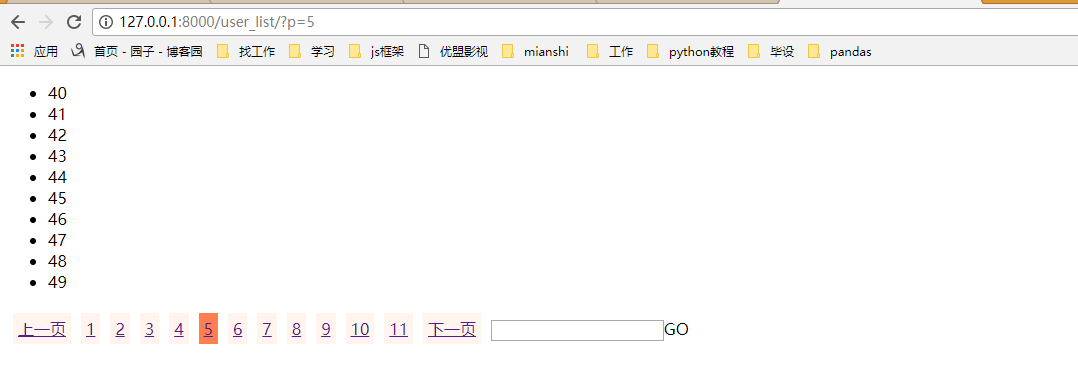
if current_page != 1:
prev_page = '<a class="page" href="/user_list/?p=%s">上一页</a>' % (current_page-1)
page_list.append(prev_page)
for i in range(int(start_index),int(end_index)):
if i == current_page:
temp = '<a class="page active" href="/user_list/?p=%s">%s</a>' % (i, i)
else:
temp = '<a class="page" href="/user_list/?p=%s">%s</a>' %(i,i)
page_list.append(temp)
if current_page != count:
after_page = '<a class="page" href="/user_list/?p=%s">下一页</a>' % (current_page + 1)
page_list.append(after_page) jump = '''
<input type="text" /><a onclick='jumpTo(this,"/user_list/?p=");'>GO</a>
<script>
function jumpTo(ths,base){
var val = ths.previousSibling.value;
location.href = base+val;
}
</script>
'''
page_list.append(jump)
page_str = "".join(page_list) #return render(request,'user_list.html',{'li':data})
return render(request,'user_list.html',{'page_str':page_str,'li':data})
效果显示:这样就实现了上一页下一页,跳转,根据当前页数的不同显示不一样的页码
我们再把这个分页功能封装成一个Page类,以后就可以通过类方法来生成分页:
 class Page(object):

     def __init__(self,current_page,data_count,page_size=10,page_num=11):

         self.current_page = current_page

         self.data_count = data_count

         self.page_size = page_size

         self.page_num = page_num

     @property

     def start(self):

         return (self.current_page-1)*self.page_size

     @property

     def end(self):

         return self.current_page * self.page_size

     @property

     def allCount(self):

         count, y = divmod(self.data_count, self.page_size)

         if y:

             count += 1

         return count

     def pageList(self,count,base_url):

         page_list = []

         if count <= 11:

             start_index = 1

             end_index = count + 1

         elif count > 11:

             if self.current_page <= (self.page_num + 1) / 2:

                 start_index = 1

                 end_index = self.page_num + 1

             elif (self.current_page + (self.page_num - 1) / 2) > count:

                 start_index = count - self.page_num + 1

                 end_index = count + 1

             else:

                 start_index = self.current_page - (self.page_num - 1) / 2

                 end_index = self.current_page + (self.page_num + 1) / 2

         if self.current_page != 1:

             prev_page = '<a class="page" href="%s?p=%s">上一页</a>' % (base_url,self.current_page - 1)

             page_list.append(prev_page)

         for i in range(int(start_index), int(end_index)):

             if i == self.current_page:

                 temp = '<a class="page active" href="%s?p=%s">%s</a>' % (base_url,i, i)

             else:

                 temp = '<a class="page" href="%s?p=%s">%s</a>' % (base_url,i, i)

             page_list.append(temp)

         if self.current_page != count:

             after_page = '<a class="page" href="%s?p=%s">下一页</a>' % (base_url,self.current_page + 1)

             page_list.append(after_page)

         jump = '''

             <input type="text" /><a onclick='jumpTo(this,"%s?p=");'>GO</a>

             <script>

                 function jumpTo(ths,base){

                     var val = ths.previousSibling.value;

                     location.href = base+val;

                 }

             </script>

             ''' % (base_url)

         page_list.append(jump)

         return page_list
然后创建一个utils,把分页类放在里面,用的时候调用就可以了

调用分页类:
from utils.pagination import Page

LIST = []

for i in range(1009):

    LIST.append(i)

def user_list(request):

    current_page = request.GET.get('p',1)

    current_page = int(current_page)

    page = Page(current_page,len(LIST))

    data = LIST[ page.start : page.end ]

    count = page.allCount

    page_list = page.pageList(count,'/user_list/')

    page_str = "".join(page_list)

    #return render(request,'user_list.html',{'li':data})

    return render(request,'user_list.html',{'page_str':page_str,'li':data})
Django学习---自定义分页的更多相关文章
- django上课笔记2-视图CBV-ORM补充-Django的自带分页-Django的自定义分页
一.视图CBV 1.urls url(r'^login.html$', views.Login.as_view()), 2.views from django.views import View cl ...
- Django框架---- 自定义分页组件
分页的实现与使用 class Pagination(object): """ 自定义分页 """ def __init__(self,cur ...
- django【自定义分页】
1. views.py def app(request): page_info = PageInfo(request.GET.get('p'), 6, 100, request.path_info, ...
- 7.django之自定义分页记录
只是大概记录下步骤: 1.表结构: class UserProfile(models.Model): ''' 用户表 ''' user = models.OneToOneField(User,verb ...
- Django之自定义分页
分页功能在每个网站都是必要的,对于分页来说,其实就是根据用户的输入计算出应该显示在页面上的数据在数据库表中的起始位置. 1. 每页显示的数据条数 2. 每页显示页号链接数 3. 上一页和下一页 4. ...
- python 学习笔记十八 django深入学习三 分页,自定义标签,权限机制
django Pagination(分页) django 自带的分页功能非常强大,我们来看一个简单的练习示例: #导入Paginator>>> from django.core.p ...
- Django学习手册 - 初识自定义分页
核心: <a href='http://127.0.0.1:8000/index-%s'>%s<a> 自定义分页 1.前端处理字符 后端的字符 return render(r ...
- Django学习笔记之Cookie、Session和自定义分页
cookie Cookie的由来 大家都知道HTTP协议是无状态的. 无状态的意思是每次请求都是独立的,它的执行情况和结果与前面的请求和之后的请求都无直接关系,它不会受前面的请求响应情况直接影响,也不 ...
- python 全栈开发,Day87(ajax登录示例,CSRF跨站请求伪造,Django的中间件,自定义分页)
一.ajax登录示例 新建项目login_ajax 修改urls.py,增加路径 from app01 import views urlpatterns = [ path('admin/', admi ...
随机推荐
- Linux 去重 先sort再uniq
从uniq命令的帮助信息中可以看到,该命令只过滤相邻的重复行. 如果要去掉所有重复行,需要先排序,或者使用uniq -u $ uniq --h Usage: uniq [OPTION]... [INP ...
- Linux RTC Test Example rtctest.c hacking
/********************************************************************** * Linux RTC Test Example rtc ...
- python中利用类创建的对象来保存信息
在类创建的对象中,一般都是以字典的方式来保存信息 class Student: def __init__(self, name, age, score): self.name = name self. ...
- 日志组件logback的介绍及配置使用方法(一)
一.logback的介绍 Logback是由log4j创始人设计的又一个开源日志组件.logback当前分成三个模块:logback-core,logback- classic和logback-acc ...
- new Date()相关获取当月天数和当月第一天
var myDate = new Date(); //获取本月第一天周几 var monthFirst = new Date(myDate.getFullYear(), parseInt(myDat ...
- 51nod 1244 莫比乌斯函数之和 【杜教筛】
51nod 1244 莫比乌斯函数之和 莫比乌斯函数,由德国数学家和天文学家莫比乌斯提出.梅滕斯(Mertens)首先使用μ(n)(miu(n))作为莫比乌斯函数的记号.具体定义如下: 如果一个数包含 ...
- 让thinkphp 5 支持pathinfo 的 nginx ,去掉index.php
在TP5.0中查阅tp5官方文档,注意:5.0取消了URL模式的概念,并且普通模式的URL访问不再支持.phthinfo 是什么? PHP中的全局变量$_SERVER['PATH_INFO']是一个很 ...
- Linux安装vsftpd总结
我使用的是CentOS6安装的vsftpd,转载请注明出处,以下是我的记录: #查看是否已经安装了vsfptd vsftpd -v #安装 yum -y install vsftpd #创建:chro ...
- 【DUBBO】dubbo的Cluster接口
Directory中的多个Invoker伪装成一个Invoker, 对上层透明,包含集群的容错机制 Cluster可以看做是工厂类, 将目录directory下的invoker合并成一个统一的Invo ...
- Python中super()和__init__()方法
采用新式类,要求最顶层的父类一定要继承于object,这样就可以利用super()函数来调用父类的init()等函数, 每个父类都执行且执行一次,并不会出现重复调用的情况.而且在子类的实现中,不用到处 ...