JAVAEE学习——hibernate01:简介、搭建、配置文件详解、API详解和CRM练习:保存客户
今日学习:hibernate是什么
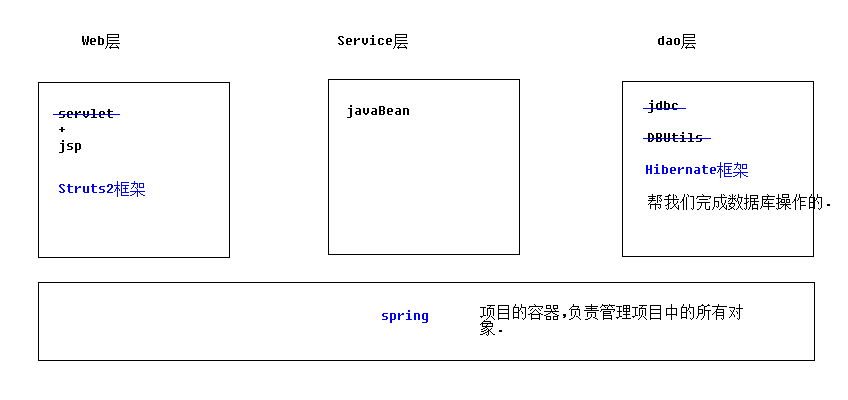
一、hibernate是什么
框架是什么:
1.框架是用来提高开发效率的
2.封装了好了一些功能.我们需要使用这些功能时,调用即可.不需要再手动实现.
3.所以框架可以理解成是一个半成品的项目.只要懂得如何驾驭这些功能即可.
hibernate框架是什么:
hibernate的好处:
操作数据库的时候,可以以面向对象的方式来完成.不需要书写SQL语句
hibernate是一款orm框架:
orm:object relationg mapping. 对象关系映射

orm分4级:
hibernate属于4级:完全面向对象操作数据库
mybatis属于2级
dbutils属于1级
二、hibernate框架的搭建
1.导包

驱动包

2.创建数据库,准备表,实体

3.书写orm元数据(对象与表的映射配置文件)
4.书写主配置文件(hibernate.cfg.xml)
<?xml version="1.0" encoding="UTF-8"?>

<!DOCTYPE hibernate-configuration PUBLIC

    "-//Hibernate/Hibernate Configuration DTD 3.0//EN"

    "http://www.hibernate.org/dtd/hibernate-configuration-3.0.dtd">

<hibernate-configuration>

    <session-factory>

        <!--

        #hibernate.dialect org.hibernate.dialect.MySQLDialect

        #hibernate.dialect org.hibernate.dialect.MySQLInnoDBDialect

        #hibernate.dialect org.hibernate.dialect.MySQLMyISAMDialect

        #hibernate.connection.driver_class com.mysql.jdbc.Driver

        #hibernate.connection.url jdbc:mysql:///test

        #hibernate.connection.username gavin

        #hibernate.connection.password

         -->

         <!-- 数据库驱动 -->

        <property name="hibernate.connection.driver_class">com.mysql.jdbc.Driver</property>

         <!-- 数据库url -->

        <property name="hibernate.connection.url">jdbc:mysql:///hibernate_32</property>

         <!-- 数据库连接用户名 -->

        <property name="hibernate.connection.username">root</property>

         <!-- 数据库连接密码 -->

        <property name="hibernate.connection.password">1234</property>

        <!-- 数据库方言

            不同的数据库中,sql语法略有区别. 指定方言可以让hibernate框架在生成sql语句时.针对数据库的方言生成.

            sql99标准: DDL 定义语言  库表的增删改查

                      DCL 控制语言  事务 权限

                      DML 操纵语言  增删改查

            注意: MYSQL在选择方言时,请选择最短的方言.

         -->

        <property name="hibernate.dialect">org.hibernate.dialect.MySQLDialect</property>

        <!-- #hibernate.show_sql true

             #hibernate.format_sql true

        -->

        <!-- 将hibernate生成的sql语句打印到控制台 -->

        <property name="hibernate.show_sql">true</property>

        <!-- 将hibernate生成的sql语句格式化(语法缩进) -->

        <property name="hibernate.format_sql">true</property>

        <!--

        ## auto schema export  自动导出表结构. 自动建表

        #hibernate.hbm2ddl.auto create        自动建表.每次框架运行都会创建新的表.以前表将会被覆盖,表数据会丢失.(开发环境中测试使用)

        #hibernate.hbm2ddl.auto create-drop 自动建表.每次框架运行结束都会将所有表删除.(开发环境中测试使用)

        #hibernate.hbm2ddl.auto update(推荐使用) 自动生成表.如果已经存在不会再生成.如果表有变动.自动更新表(不会删除任何数据).

        #hibernate.hbm2ddl.auto validate    校验.不自动生成表.每次启动会校验数据库中表是否正确.校验失败.

         -->

        <property name="hibernate.hbm2ddl.auto">update</property>

        <!-- 引入orm元数据

            路径书写: 填写src下的路径

         -->

        <mapping resource="cn/xyp/domain/Customer.hbm.xml" />

    </session-factory>

</hibernate-configuration>
5.书写代码测试
//测试Hibernate框架

public class Demo {

    @Test

    //保存客户

    public void fun1(){

        Configuration conf = new Configuration().configure();

        SessionFactory sessionFactory = conf.buildSessionFactory();

        Session session = sessionFactory.openSession();

        Transaction tx = session.beginTransaction();

        //----------------------------------------------

        Customer c = new Customer();

        c.setCust_name("google公司");

        session.save(c);//执行保存

        //----------------------------------------------

        tx.commit();

        session.close();

        sessionFactory.close();

    }

}
三、配置文件详解
orm元数据
<?xml version="1.0" encoding="UTF-8"?>

<!DOCTYPE hibernate-mapping PUBLIC

    "-//Hibernate/Hibernate Mapping DTD 3.0//EN"

    "http://www.hibernate.org/dtd/hibernate-mapping-3.0.dtd">

   <!-- 配置表与实体对象的关系 -->

   <!-- package属性:填写一个包名.在元素内部凡是需要书写完整类名的属性,可以直接写简答类名了. -->

<hibernate-mapping package="cn.xyp.domain" >

    <!--

        class元素: 配置实体与表的对应关系的

            name: 完整类名

            table:数据库表名

     -->

    <class name="Customer" table="cst_customer" >

        <!-- id元素:配置主键映射的属性

                name: 填写主键对应属性名

                column(可选): 填写表中的主键列名.默认值:列名会默认使用属性名

                type(可选):填写列(属性)的类型.hibernate会自动检测实体的属性类型.

                        每个类型有三种填法: java类型|hibernate类型|数据库类型

                not-null(可选):配置该属性(列)是否不能为空. 默认值:false

                length(可选):配置数据库中列的长度. 默认值:使用数据库类型的最大长度

         -->

        <id name="cust_id"  >

            <!-- generator:主键生成策略(明天讲) -->

            <generator class="native"></generator>

        </id>

        <!-- property元素:除id之外的普通属性映射

                name: 填写属性名

                column(可选): 填写列名

                type(可选):填写列(属性)的类型.hibernate会自动检测实体的属性类型.

                        每个类型有三种填法: java类型|hibernate类型|数据库类型

                not-null(可选):配置该属性(列)是否不能为空. 默认值:false

                length(可选):配置数据库中列的长度. 默认值:使用数据库类型的最大长度

         -->

        <property name="cust_name" column="cust_name" >

            <!--  <column name="cust_name" sql-type="varchar" ></column> -->

        </property>

        <property name="cust_source" column="cust_source" ></property>

        <property name="cust_industry" column="cust_industry" ></property>

        <property name="cust_level" column="cust_level" ></property>

        <property name="cust_linkman" column="cust_linkman" ></property>

        <property name="cust_phone" column="cust_phone" ></property>

        <property name="cust_mobile" column="cust_mobile" ></property>

    </class>

</hibernate-mapping>
hibernate主配置:
必选属性配置(5个)
 <!-- 数据库驱动 -->

        <property name="hibernate.connection.driver_class">com.mysql.jdbc.Driver</property>

         <!-- 数据库url -->

        <property name="hibernate.connection.url">jdbc:mysql:///hibernate_32</property>

         <!-- 数据库连接用户名 -->

        <property name="hibernate.connection.username">root</property>

         <!-- 数据库连接密码 -->

        <property name="hibernate.connection.password">1234</property>

        <!-- 数据库方言

            不同的数据库中,sql语法略有区别. 指定方言可以让hibernate框架在生成sql语句时.针对数据库的方言生成.

            sql99标准: DDL 定义语言  库表的增删改查

                      DCL 控制语言  事务 权限

                      DML 操纵语言  增删改查

            注意: MYSQL在选择方言时,请选择最短的方言.

         -->

        <property name="hibernate.dialect">org.hibernate.dialect.MySQLDialect</property>
可选属性配置(3个)
<!-- #hibernate.show_sql true

             #hibernate.format_sql true

        -->

        <!-- 将hibernate生成的sql语句打印到控制台 -->

        <property name="hibernate.show_sql">true</property>

        <!-- 将hibernate生成的sql语句格式化(语法缩进) -->

        <property name="hibernate.format_sql">true</property>

        <!--

        ## auto schema export  自动导出表结构. 自动建表

        #hibernate.hbm2ddl.auto create        自动建表.每次框架运行都会创建新的表.以前表将会被覆盖,表数据会丢失.(开发环境中测试使用)

        #hibernate.hbm2ddl.auto create-drop 自动建表.每次框架运行结束都会将所有表删除.(开发环境中测试使用)

        #hibernate.hbm2ddl.auto update(推荐使用) 自动生成表.如果已经存在不会再生成.如果表有变动.自动更新表(不会删除任何数据).

        #hibernate.hbm2ddl.auto validate    校验.不自动生成表.每次启动会校验数据库中表是否正确.校验失败.

         -->

        <property name="hibernate.hbm2ddl.auto">update</property>
元数据引入配置
        <!-- 引入orm元数据

            路径书写: 填写src下的路径

         -->

        <mapping resource="cn/xyp/domain/Customer.hbm.xml" />
四、hibernateAPI详解
学习Configuration对象
//学习Configuration对象

// Configuration功能: 配置加载类.用于加载主配置,orm元数据加载

public class Demo {

    @Test

    public void fun1(){

        //1 创建,调用空参构造

        Configuration conf = new Configuration();

        //2 读取指定主配置文件 => 空参加载方法,加载src下的hibernate.cfg.xml文件

        conf.configure();

        //3 读取指定orm元数据(扩展),如果主配置中已经引入映射配置.不需要手动加载

        //conf.addResource(resourceName);

        //conf.addClass(persistentClass);

        //4 根据配置信息,创建 SessionFactory对象

        SessionFactory sf = conf.buildSessionFactory();

    }

}
学习SessionFactory对象
//学习SessionFactory对象

// SessionFactory功能: 用于创建操作数据库核心对象session对象的工厂.

//                     简单说功能就一个---创建session对象

//注意:1.sessionfactory 负责保存和使用所有配置信息.消耗内存资源非常大.

//      2.sessionFactory属于线程安全的对象设计.

//结论: 保证在web项目中,只创建一个sessionFactory.

public class Demo2 {

    @Test

    public void fun1(){

        //1 创建,调用空参构造

        Configuration conf = new Configuration();

        //2 读取指定主配置文件 => 空参加载方法,加载src下的hibernate.cfg.xml文件

        conf.configure();

        //3 读取指定orm元数据(扩展),如果主配置中已经引入映射配置.不需要手动加载

        //conf.addResource(resourceName);

        //conf.addClass(persistentClass);

        //4 根据配置信息,创建 SessionFactory对象

        SessionFactory sf = conf.buildSessionFactory();

        //--------------------------------------------------

        //5 获得session

        //打开一个新的session对象

        sf.openSession();

        //获得一个与线程绑定的session对象(明天讲解)

        sf.getCurrentSession();

    }

}
学习Session对象:增删查改
//学习Session对象

//session对象功能: 表达hibernate框架与数据库之间的连接(会话).session类似于

//                JDBC年代的connection对象. 还可以完成对数据库中数据的增删改查操作.

//                session是hibernate操作数据库的核心对象

public class Demo3 {

    @Test

    //事务操作

    public void fun1(){

        //1 创建,调用空参构造

        Configuration conf = new Configuration().configure();

        //2 根据配置信息,创建 SessionFactory对象

        SessionFactory sf = conf.buildSessionFactory();

        //3 获得session

        Session session = sf.openSession();

        //4 session获得操作事务的Transaction对象

        //获得操作事务的tx对象

        //Transaction tx = session.getTransaction();

        //开启事务并获得操作事务的tx对象(建议使用)

        Transaction tx2 = session.beginTransaction();

        //----------------------------------------------

        //----------------------------------------------

        tx2.commit();//提交事务

        tx2.rollback();//回滚事务

        session.close();//释放资源

        sf.close();//释放资源

    }

    @Test

    //session的新增

    public void fun2(){

        //1 创建,调用空参构造

        Configuration conf = new Configuration().configure();

        //2 根据配置信息,创建 SessionFactory对象

        SessionFactory sf = conf.buildSessionFactory();

        //3 获得session

        Session session = sf.openSession();

        //4 session获得操作事务的Transaction对象

        //获得操作事务的tx对象

        //Transaction tx = session.getTransaction();

        //开启事务并获得操作事务的tx对象(建议使用)

        Transaction tx2 = session.beginTransaction();

        //----------------------------------------------

        Customer c = new Customer();

        c.setCust_name("传智播客");

        session.save(c);

        //----------------------------------------------

        tx2.commit();//提交事务

        session.close();//释放资源

        sf.close();//释放资源

    }

    @Test

    //session的查询

    //查询id为1的customer对象

    public void fun3(){

        //1 创建,调用空参构造

        Configuration conf = new Configuration().configure();

        //2 根据配置信息,创建 SessionFactory对象

        SessionFactory sf = conf.buildSessionFactory();

        //3 获得session

        Session session = sf.openSession();

        //4 session获得操作事务的Transaction对象

        //获得操作事务的tx对象

        //Transaction tx = session.getTransaction();

        //开启事务并获得操作事务的tx对象(建议使用)

        Transaction tx2 = session.beginTransaction();

        //----------------------------------------------

        Customer customer = session.get(Customer.class, 1l);

        System.out.println(customer);

        //----------------------------------------------

        tx2.commit();//提交事务

        session.close();//释放资源

        sf.close();//释放资源

    }

    @Test

    //session的修改

    //修改id为1的customer对象的name属性为黑马程序员

    public void fun4(){

        //1 创建,调用空参构造

        Configuration conf = new Configuration().configure();

        //2 根据配置信息,创建 SessionFactory对象

        SessionFactory sf = conf.buildSessionFactory();

        //3 获得session

        Session session = sf.openSession();

        //4 session获得操作事务的Transaction对象

        //获得操作事务的tx对象

        //Transaction tx = session.getTransaction();

        //开启事务并获得操作事务的tx对象(建议使用)

        Transaction tx2 = session.beginTransaction();

        //----------------------------------------------

        //1 获得要修改的对象

        Customer c = session.get(Customer.class, 1l);

        //2 修改

        c.setCust_name("黑马程序员");

        //3 执行update

        session.update(c);

        //----------------------------------------------

        tx2.commit();//提交事务

        session.close();//释放资源

        sf.close();//释放资源

    }

    @Test

    //session的删除

    //删除id为1的customer对象

    public void fun5(){

        //1 创建,调用空参构造

        Configuration conf = new Configuration().configure();

        //2 根据配置信息,创建 SessionFactory对象

        SessionFactory sf = conf.buildSessionFactory();

        //3 获得session

        Session session = sf.openSession();

        //4 session获得操作事务的Transaction对象

        //获得操作事务的tx对象

        Transaction tx = session.getTransaction();

        tx.begin();

        //开启事务并获得操作事务的tx对象(建议使用)

        Transaction tx2 = session.beginTransaction();

        //----------------------------------------------

        //1 获得要修改的对象

        Customer c = session.get(Customer.class, 1l);

        //2 调用delete删除对象

        session.delete(c);

        //----------------------------------------------

        tx2.commit();//提交事务

        session.close();//释放资源

        sf.close();//释放资源

    }

}
五、CRM练习:保存客户

前面的步骤参考前面的笔记。
5.思路分析

在完成作业之前可以先编写一个方便操作的工具类,免去重复的代码:
public class HibernateUtils {

    private static SessionFactory sf;

    static{

        //1 创建,调用空参构造

        Configuration conf = new Configuration().configure();

        //2 根据配置信息,创建 SessionFactory对象

         sf = conf.buildSessionFactory();

    }

    //获得session => 获得全新session

    public static Session openSession(){

                //3 获得session

                Session session = sf.openSession();

                return session;

    }

    //获得session => 获得与线程绑定的session

    public static Session getCurrentSession(){

        //3 获得session

        Session session = sf.getCurrentSession();

        return session;

    }

    public static void main(String[] args) {

        System.out.println(HibernateUtils.openSession());

    }

}
作业核心代码:
web层:
/**

 * Servlet implementation class AddCustomerServlet

 */

public class AddCustomerServlet extends HttpServlet {

    private static final long serialVersionUID = 1L;

    private CustomerService customerService  = new CustomerServiceImpl();

    protected void doGet(HttpServletRequest request, HttpServletResponse response) throws ServletException, IOException {

        //1 获得参数并封装到Customer对象

        Customer c = new Customer();

        try {

            BeanUtils.populate(c, request.getParameterMap());

        } catch (IllegalAccessException e) {

            e.printStackTrace();

        } catch (InvocationTargetException e) {

            e.printStackTrace();

        }

        //2 调用Service保存客户

        customerService.save(c);

        //3 重定向到客户列表

        response.sendRedirect(request.getContextPath()+"/ListCustomerServlet");

    }

    protected void doPost(HttpServletRequest request, HttpServletResponse response) throws ServletException, IOException {

        doGet(request, response);

    }

}
service层:
public class CustomerServiceImpl implements CustomerService {

    private CustomerDao customerDao = new CustomerDaoImpl();

    public void save(Customer c) {

        //调用Dao保存客户

        customerDao .save(c);

    }

}
dao层:
public class CustomerDaoImpl implements CustomerDao {

    public void save(Customer c) {

        //1 获得session

        Session session = HibernateUtils.openSession();

        //2 打开事务

        Transaction tx = session.beginTransaction();

        //3 执行保存

        session.save(c);

        //4 提交事务

        tx.commit();

        //5 关闭资源

        session.close();

    }

}
JAVAEE学习——hibernate01:简介、搭建、配置文件详解、API详解和CRM练习:保存客户的更多相关文章
- 【JAVAEE学习笔记】hibernate01:简介、搭建、配置文件详解、API详解和CRM练习:保存客户
今日学习:hibernate是什么 一.hibernate是什么 框架是什么: 1.框架是用来提高开发效率的 2.封装了好了一些功能.我们需要使用这些功能时,调用即可.不需要再手动实现. 3.所以框架 ...
- 【JAVAEE学习笔记】hibernate03:多表操作详解、级联、关系维护和练习:添加联系人
一.一对多|多对一 1.关系表达 表中的表达 实体中的表达 orm元数据中表达 一对多 <!-- 集合,一对多关系,在配置文件中配置 --> <!-- name属性:集合属性名 co ...
- JavaEE学习之JPA中配置文件persistence.xml
下面是我从网上找到的关于JPA配置文件persistence.xml的相关描述: <?xml version="1.0" encoding="UTF-8" ...
- JAVAEE学习——hibernate04:查询种类、HQL、Criteria、查询优化和练习为客户列表增加查询条件
一.查询种类 1.oid查询-get 2.对象属性导航查询 3.HQL 4.Criteria 5.原生SQL 二.查询-HQL语法 //学习HQL语法 public class Demo { //基本 ...
- 《从0到1学习Flink》—— Flink 配置文件详解
前面文章我们已经知道 Flink 是什么东西了,安装好 Flink 后,我们再来看下安装路径下的配置文件吧. 安装目录下主要有 flink-conf.yaml 配置.日志的配置文件.zk 配置.Fli ...
- 人工智能之深度学习-初始环境搭建(安装Anaconda3和TensorFlow2步骤详解)
前言: 本篇文章主要讲解的是在学习人工智能之深度学习时所学到的知识和需要的环境配置(安装Anaconda3和TensorFlow2步骤详解),以及个人的心得体会,汇集成本篇文章,作为自己深度学习的总结 ...
- Java学习-007-Log4J 日志记录配置文件详解及实例源代码
此文主要讲述在初学 Java 时,常用的 Log4J 日志记录配置文件详解及实例源代码整理.希望能对初学 Java 编程的亲们有所帮助.若有不足之处,敬请大神指正,不胜感激!源代码测试通过日期为:20 ...
- Logback简介及配置文件logback.xml详解
logback简介及配置文件说明 @author:wangyq @date:2021年3月31日 logback简介 Logback是由log4j创始人设计的另一个开源日志组件,官方网站: htt ...
- 《从0到1学习Flink》—— Flink 中几种 Time 详解
前言 Flink 在流程序中支持不同的 Time 概念,就比如有 Processing Time.Event Time 和 Ingestion Time. 下面我们一起来看看这几个 Time: Pro ...
随机推荐
- HNOI2004 宠物收养所 (Treap)
1285 宠物收养所 http://codevs.cn/problem/1285/ 时间限制: 1 s 空间限制: 128000 KB 题目描述 Description 最近,阿Q开了一间 ...
- [洛谷P2750] [USACO5.5]贰五语言Two Five
洛谷题目链接:[USACO5.5]贰五语言Two Five 题目描述 有一种奇怪的语言叫做"贰五语言".它的每个单词都由A-Y这25个字母各一个组成.但是,并不是任何一种排列都是一 ...
- [Luogu 2486] SDOI2011 染色
[Luogu 2486] SDOI2011 染色 树剖水题,线段树维护. 详细题解不写了. 我只想说我写的线段树又变漂亮了qwq #include <algorithm> #include ...
- java网络传输数据
网络文件传输的问题,实际也是一种IO读写的基本问题.对于网络的文件数据写入到服务器的进程中,然后把进程中的网络IO系统传递到客户机,这个阶段,数据以字节流的形式保存.当该字节流被客户进程接受后,客户进 ...
- 【CodeForces】913 D. Too Easy Problems
[题目]D. Too Easy Problems [题意]给定n个问题和总时限T,每个问题给定时间ti和限制ai,当解决的问题数k<=ai时问题有效,求在时限T内选择一些问题解决的最大有效问题数 ...
- 24、CSS定位
CSS定位方法 driver.find_element_by_css_selector() 1.CSS定位常用策略(方式) 1.id选择器 说明:根据元素id属性来选择 格式:#id 如:#userA ...
- 深入理解Spring系列之三:BeanFactory解析
转载 https://mp.weixin.qq.com/s?__biz=MzI0NjUxNTY5Nw==&mid=2247483824&idx=1&sn=9b7c2603093 ...
- 《secret》读书笔记
这是在从大连到深圳飞机上看完的一本书,也是大学毕业时室友整理书籍给我的.正好回来的途中,一气呵成读完了. 全书讲了几个事情,其中费了很大篇幅就围绕一个主题,当然书题了——秘密,这个秘密就是“吸引力法则 ...
- Codeforces Round #453 (Div. 1)
Codeforces Round #453 (Div. 1) A. Hashing Trees 题目描述:给出一棵树的高度和每一层的节点数,问是否有两棵树都满足这个条件,若有,则输出这两棵树,否则输出 ...
- 阻止MyEclipse启动项目时自动跳转的debug视图
启动web项目时,习惯使用debug方式启动,但此时会自动跳转到debug视图,很不习惯. 通过修改首选项配置,可以禁止跳转