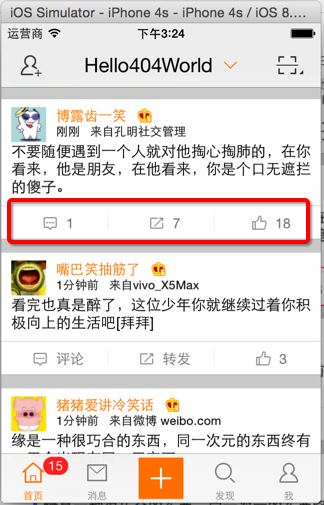
[iOS微博项目 - 4.5] - 每条微博的底部工具条
- 每条微博底部都有一个工具条
- 显示3个按钮:评论、转发、赞
- 按钮间用分割线隔开
- 有评论数、转发数、赞数的时候显示相应数据,没有则显示文本

 //  HVWStatus.h

 /** int 转发数 */

 @property(nonatomic, assign) int reposts_count;

 /** int 评论数 */

 @property(nonatomic, assign) int comments_count;

 /** int 表态数 */

 @property(nonatomic, assign) int attitudes_count;
 //

 //  HVWStatusToolbar.m

 //  HVWWeibo

 //

 //  Created by hellovoidworld on 15/2/12.

 //  Copyright (c) 2015年 hellovoidworld. All rights reserved.

 //

 #import "HVWStatusToolbar.h"

 @interface HVWStatusToolbar()

 /** 按钮数组 */

 @property(nonatomic, strong) NSMutableArray *buttons;

 /** 分割线数组 */

 @property(nonatomic, strong) NSMutableArray *divides;

 /** 转发按钮 */

 @property(nonatomic, strong) UIButton *repostButton;

 /** 评论按钮 */

 @property(nonatomic, strong) UIButton *commentButton;

 /** 点赞按钮 */

 @property(nonatomic, strong) UIButton *attitudeButton;

 @end

 @implementation HVWStatusToolbar

 - (NSMutableArray *)buttons {

     if (nil == _buttons) {

         _buttons = [NSMutableArray array];

     }

     return _buttons;

 }

 - (NSMutableArray *)divides {

     if (nil == _divides) {

         _divides = [NSMutableArray array];

     }

     return _divides;

 }

 /** 代码自定义初始化方法 */

 - (instancetype)initWithFrame:(CGRect)frame {

     self = [super initWithFrame:frame];

     if (self) {

         // 设置toolbar背景

         self.image = [UIImage resizedImage:@"timeline_card_bottom_background"];

         // 为了按钮能够点击,设置父控件可交互

         self.userInteractionEnabled = YES;

         // 添加按钮

         self.commentButton = [self setupButtonWithIcon:@"timeline_icon_comment" title:@"评论"];

         self.repostButton = [self setupButtonWithIcon:@"timeline_icon_retweet" title:@"转发"];

         self.attitudeButton = [self setupButtonWithIcon:@"timeline_icon_unlike" title:@"赞"];

         // 添加分割线

         [self setupDivides];

     }

     return self;

 }

 // 设置按钮

 - (UIButton *) setupButtonWithIcon:(NSString *)icon title:(NSString *)title {

     UIButton *button = [UIButton buttonWithType:UIButtonTypeCustom];

     // 标题

     [button setTitle:title forState:UIControlStateNormal];

     // 图片

     [button setImage:[UIImage imageWithNamed:icon] forState:UIControlStateNormal];

     // 字体颜色

     [button setTitleColor:[UIColor grayColor] forState:UIControlStateNormal];

     // 字体大小

     button.titleLabel.font = [UIFont systemFontOfSize:];

     // 图标、文本之间间隙

     [button setTitleEdgeInsets:UIEdgeInsetsMake(, , , )];

     // 高亮背景

     [button setBackgroundImage:[UIImage imageWithNamed:@"timeline_card_bottom_background_highlighted"] forState:UIControlStateHighlighted];

     // 取消高亮图片调整效果

     [button setAdjustsImageWhenHighlighted:NO];

     // 加入到view中

     [self addSubview:button];

     [self.buttons addObject:button];

     return button;

 }

 // 设置分割线

 - (void) setupDivides {

     for (int i=; i<self.buttons.count; i++) {

         UIImageView *divide = [[UIImageView alloc] init];

         divide.image = [UIImage imageWithNamed:@"timeline_card_bottom_line"];

         divide.contentMode = UIViewContentModeCenter;

         [self addSubview:divide];

         [self.divides addObject:divide];

     }

 }

 /** 设置Frame模型 */

 - (void)setToolbarFrame:(HVWStatusToolbarFrame *)toolbarFrame {

     _toolbarFrame = toolbarFrame;

     // 设置自己的frame

     self.frame = toolbarFrame.frame;

     // 配置toolbar按钮数据

     [self setupToolBarButton];

 }

 // 设置子控件frame

 - (void)layoutSubviews {

     [super layoutSubviews];

     // 配置按钮frame

     CGFloat buttonWidth = self.width / self.buttons.count;

     CGFloat buttonHeight = self.height;

     CGFloat buttonY = ;

     for (int i=; i<self.buttons.count; i++) {

         CGFloat buttonX = i * buttonWidth;

         UIButton *button = self.buttons[i];

         button.frame = CGRectMake(buttonX, buttonY, buttonWidth, buttonHeight);

     }

     // 配置分割线frame

     CGFloat divideWidth = ;

     CGFloat divideHeight = self.height;

     for (int i=; i<self.divides.count; i++) {

         CGFloat divideX = (i + ) * buttonWidth;

         UIImageView *imageView = self.divides[i];

         imageView.size = CGSizeMake(divideWidth, divideHeight);

         imageView.center = CGPointMake(divideX, self.height * 0.5);

     }

 }

 /** 设置toolbar按钮数据 */

 - (void) setupToolBarButton {

     HVWStatus *status = self.toolbarFrame.status;

     // 评论

     [self setupButtonTitle:self.commentButton withOriginalTitle:@"评论" titleCount:status.comments_count];

     // 转发

     [self setupButtonTitle:self.repostButton withOriginalTitle:@"转发" titleCount:status.reposts_count];

     // 点赞

     [self setupButtonTitle:self.attitudeButton withOriginalTitle:@"赞" titleCount:status.attitudes_count];

 }

 /** 设置按钮标题 */

 - (void) setupButtonTitle:(UIButton *) button withOriginalTitle:(NSString *)buttonTitle titleCount:(int)titleCount {

     // 当数量超过1万的时候,使用“万”作为单位

     if (titleCount >= ) {

         buttonTitle = [NSString stringWithFormat:@"%.1f万", (titleCount / 10000.0)];

         buttonTitle = [buttonTitle stringByReplacingOccurrencesOfString:@".0" withString:@""]; // 去除".0"小数

     } else if (titleCount) {

         buttonTitle = [NSString stringWithFormat:@"%d", titleCount];

     }

     [button setTitle:buttonTitle forState:UIControlStateNormal];

 }

 @end
[iOS微博项目 - 4.5] - 每条微博的底部工具条的更多相关文章
- [iOS微博项目 - 3.0] - 手动刷新微博
github: https://github.com/hellovoidworld/HVWWeibo A.下拉刷新微博 1.需求 在“首页”界面,下拉到一定距离的时候刷新微博数据 刷新数据的时候使 ...
- [iOS微博项目 - 4.2] - 设置转发微博背景
github: https://github.com/hellovoidworld/HVWWeibo A.转发微博部分的淡灰色背景 1.需求 转发微博部分需要设置背景色 使用图片作为背景 2.思路 ...
- [iOS微博项目 - 4.1] - cell的frame模型
github: https://github.com/hellovoidworld/HVWWeibo A.cell的frame模型设计 1.需求 每个cell都有一个frame实例引用 frame模型 ...
- [ExtJS5学习笔记]第八节 Extjs5的Ext.toolbar.Toolbar工具条组件及其应用
本文地址:http://blog.csdn.net/sushengmiyan/article/details/38515499 本文作者:sushengmiyan ------------------ ...
- 黄聪:自定义WordPress前台、后台顶部菜单栏管理工具条的技巧
使用WordPress开发网站项目,很多时候都需要对进行后台定制,今天倡萌主要分享下自定义顶部管理工具条的使用技巧. 注:如无特殊说明,请将下面的代码添加到主题的 functions.php 或者插 ...
- 黄聪:自定义WordPress顶部管理工具条的技巧(转)
使用WordPress开发网站项目,很多时候都需要对进行后台定制,今天倡萌主要分享下自定义顶部管理工具条的使用技巧. 注:如无特殊说明,请将下面的代码添加到主题的 functions.php 或者插 ...
- 积累的VC编程小技巧之工具条和状态条
1.工具条和状态条中控件的添加: 方法⑴.只能在ToolBar里创建控件:首先,在ToolBar中创建一个Button,其ID为ID_TOOL_COMBO(我们要将创建的控件放在该Button的位置上 ...
- SWIFT显示底部的工具条
有以下页面显示我的讯息,用户可以点击右上角的编辑按钮进入删除状态.点击编辑按钮后,按钮文字改为“取消”,左上角的按钮变为“全选”,同时显示底部工具条带有“删除”按钮 实现起来挺简单的,在正常状态下点击 ...
- iOS开发小技巧--微博项目中的键盘工具条
微博项目中的键盘工具条 项目中的键盘工具条不能使用inputAccessoryView,因为inputAccessoryView不能实现键盘隐藏的时候,工具条还显示在眼前,如图: 所以,果断决定将工具 ...
随机推荐
- MongoDB 学习 第八节 驱动实践
作为系列的最后一篇,得要说说C#驱动对mongodb的操作,目前驱动有两种:官方驱动和samus驱动,不过我个人还是喜欢后者, 因为提供了丰富的linq操作,相当方便. 官方驱动:https://gi ...
- initWithNibName和viewDidLoad执行顺序
转自:http://justsee.iteye.com/blog/1626231 众所周知,IB在加载nib的过程中存在着一些undocument行为,有的行为确实是不可理喻的,因此程序员对IB产生了 ...
- Hbase脚本小结
脚本使用小结: 1.开启集群,start-hbase.sh 2.关闭集群,stop-hbase.sh 3.开启/关闭所有的regionserver.zookeeper,hbase-daemons.sh ...
- 示例 - C#脚本代码采集搜狐NBA球员, 球队和比赛实况
最近 @甜瓜 (QQ:1069629945) 开发了一套NBA数据采集脚本, 我觉得很赞. 经他允许发布出来和大家分享一些经验: 球员球队: http://data.sports.sohu.com/n ...
- Spark的操作列表
Action 操作1. collect() ,返回值是一个数组,返回dataframe集合所有的行2. collectAsList() 返回值是一个java类型的数组,返回dataframe集合所有的 ...
- ssh配置authorized_keys后仍然需要输入密码的问题
前阵子搭建Hadoop时,配置了本机(localhost)的ssh的公钥到authorized_keys文件中,但是在ssh连接localhost时仍然提示需要输入密码,后来发现是$HOME/.ssh ...
- CSS常用样式说明
background-attachment: fixed 随着页面的滚动轴背景图片不会移动 background-attachment: scroll 随着页面的滚动轴背景图片将移动 backgrou ...
- CSS旋转&翻转,兼容方案
CSS代码,高级浏览器使用transform,ie用滤镜实现. 转自http://aijuans.iteye.com/blog/19364921 /*水平翻转*/ 2 .flipx { 3 -moz- ...
- 编译内核出现"mkimage" command not found - U-Boot images will not be built
参考链接: http://spyker729.blogspot.com/2010/07/mkimage-command-not-found-u-boot-images.html 制作uImage的工具 ...
- Mongodb的性能优化问题
摘要 数据库性能对软件整体性能有着至关重要的影响,对于Mongodb数据库常用的性能优化方法主要有: 范式化与反范式化: 填充因子的使用: 索引的使用: 一. 范式化与反范式化 范式是为了消除重复数据 ...
