
ubuntu18.04开机后NVIDIA显卡驱动加载失败
1.开机按esc进入ubuntu高级选项,选择内核版本,之后回车
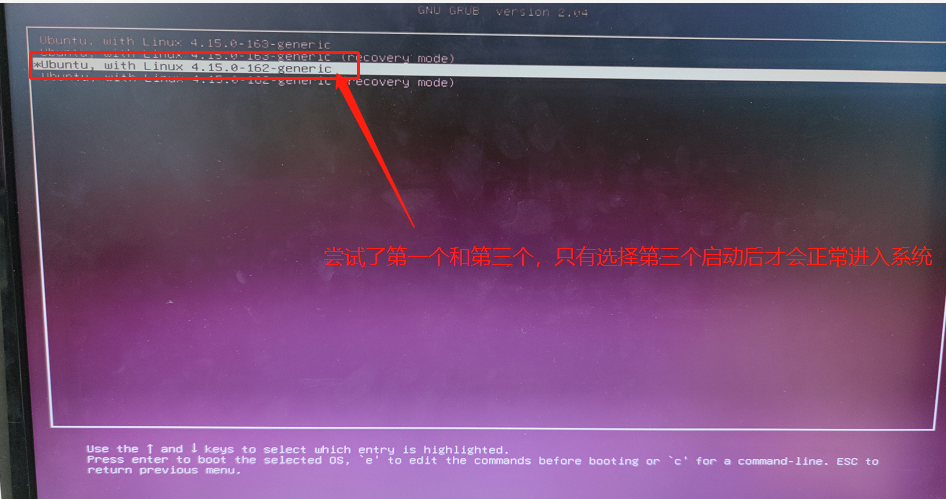
注意:记住此版本号
2.接下来按照如下操作
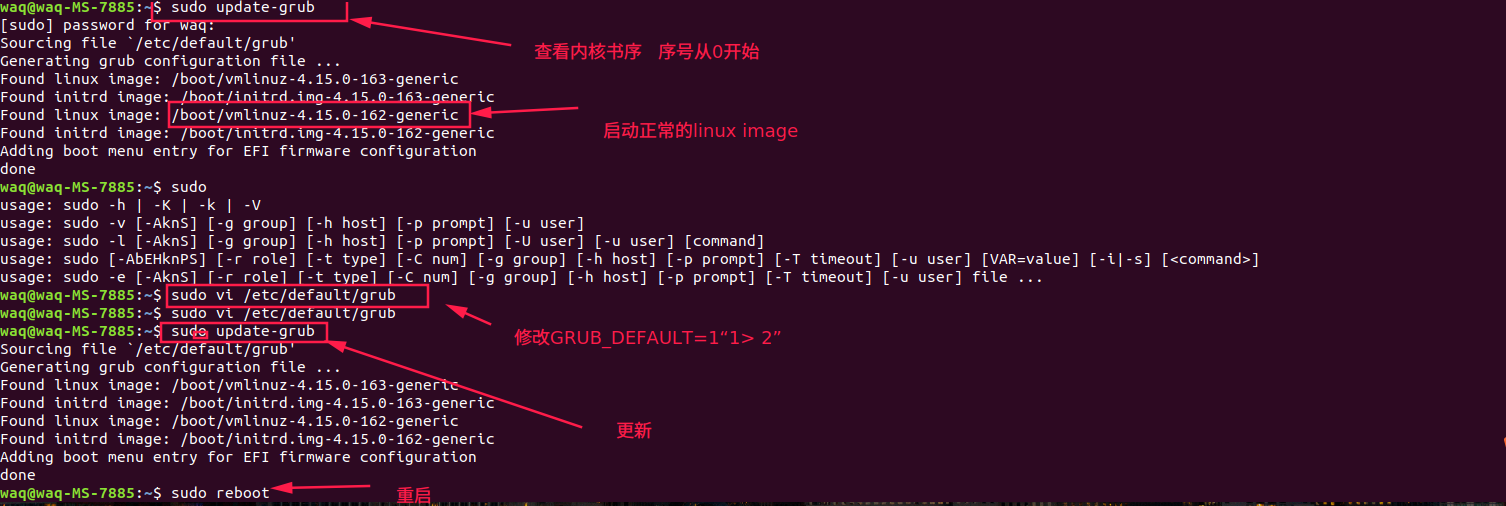
# If you change this file, run 'update-grub' afterwards to update

# /boot/grub/grub.cfg.

# For full documentation of the options in this file, see:

#   info -f grub -n 'Simple configuration'

# GRUB_DEFAULT=0

GRUB_DEFAULT="1> 2"  # 修改后的配置

GRUB_TIMEOUT_STYLE=hidden

GRUB_TIMEOUT=0

GRUB_DISTRIBUTOR=`lsb_release -i -s 2> /dev/null || echo Debian`

GRUB_CMDLINE_LINUX_DEFAULT="quiet splash"

GRUB_CMDLINE_LINUX=""

# Uncomment to enable BadRAM filtering, modify to suit your needs

# This works with Linux (no patch required) and with any kernel that obtains

# the memory map information from GRUB (GNU Mach, kernel of FreeBSD ...)

#GRUB_BADRAM="0x01234567,0xfefefefe,0x89abcdef,0xefefefef"

# Uncomment to disable graphical terminal (grub-pc only)

#GRUB_TERMINAL=console

# The resolution used on graphical terminal

# note that you can use only modes which your graphic card supports via VBE

# you can see them in real GRUB with the command `vbeinfo'

#GRUB_GFXMODE=640x480

# Uncomment if you don't want GRUB to pass "root=UUID=xxx" parameter to Linux

#GRUB_DISABLE_LINUX_UUID=true

# Uncomment to disable generation of recovery mode menu entries

#GRUB_DISABLE_RECOVERY="true"

# Uncomment to get a beep at grub start

#GRUB_INIT_TUNE="480 440 1"
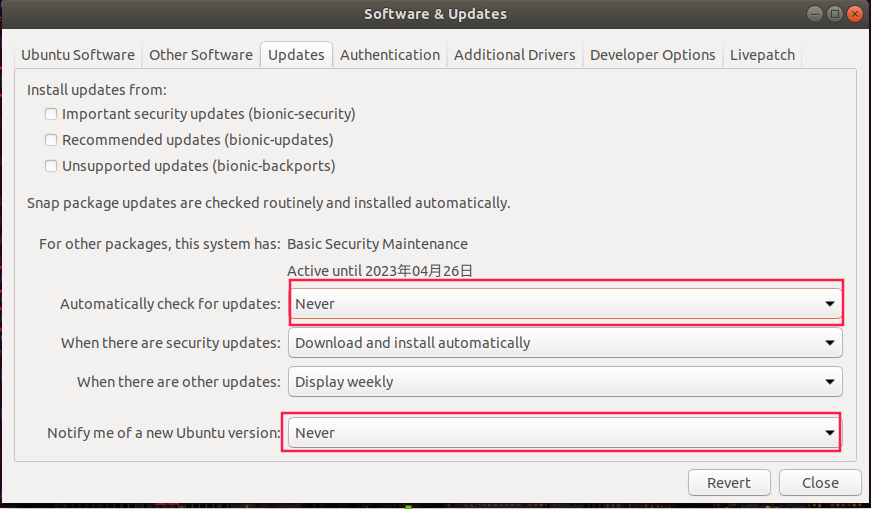
3.重启之后采用uname -r 查看当前的内核版本
参考链接:https://www.toutiao.com/i7023555532728353294/
执行darknet下面的文件后出现新的问题
(yolov4) waq@waq-MS-7885:~/Downloads/ai/Vitis-AI-1.3.2/yolo_dploy/darknet-master$ ./darknet detector train  cfg/voc.data cfg/yolov4.cfg  yolov4.weights -map

CUDA status Error: file: ./src/dark_cuda.c : () : line: 38 : build time: Nov 22 2021 - 20:42:38

 CUDA Error: unknown error

Darknet error location: ./src/dark_cuda.c, check_error, line #69

CUDA Error: unknown error: Bad file descriptor

(yolov4) waq@waq-MS-7885:~/Downloads/ai/Vitis-AI-1.3.2/yolo_dploy/darknet-master$
搜集资料发现是cuda的问题,哎,再重新装一次cuda!!!
1.官网下载安装文件,我这里下载的是run文件,安装之前卸载掉之前安装的旧版本cuda10.1(具体版本查看nvcc --version)
一般默认安装路径是/usr/local/ 下面,卸载旧版本 进入到 /usr/local/cuda-10.1/bin下面,执行 sudo ./cuda-uninstaller文件,最后成功卸载,可以紧接着删除文件夹即可
2.安装新下载的run文件
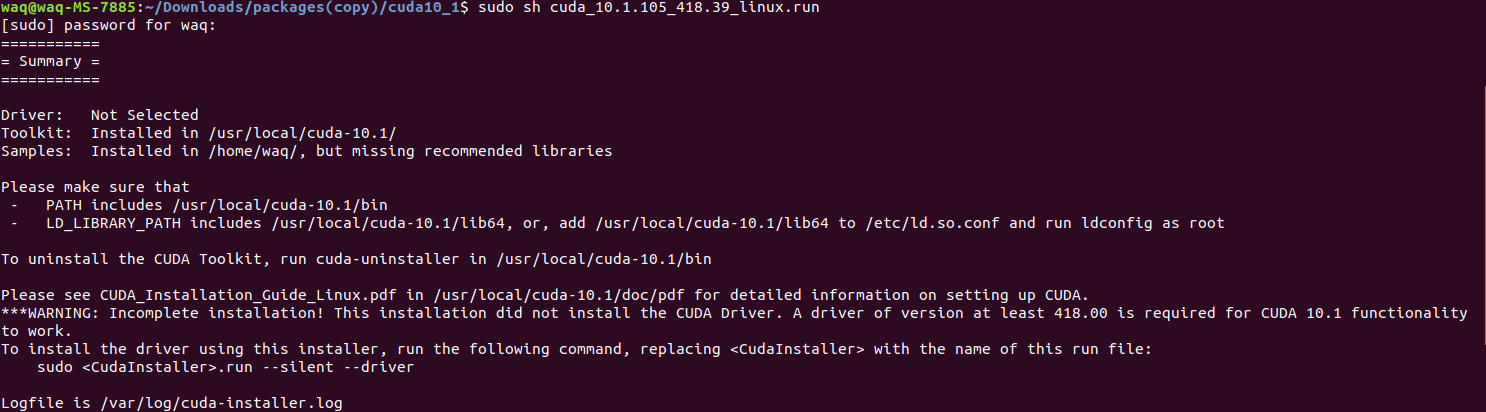
注意选择安装的时候不要勾选驱动,去掉x即可,其他的勾选,安装完之后会有一个summary:
  ===========

= Summary =

===========

Driver:   Not Selected

Toolkit:  Installed in /usr/local/cuda-10.1/

Samples:  Installed in /home/waq/, but missing recommended libraries

Please make sure that

 -   PATH includes /usr/local/cuda-10.1/bin

 -   LD_LIBRARY_PATH includes /usr/local/cuda-10.1/lib64, or, add /usr/local/cuda-10.1/lib64 to /etc/ld.so.conf and run ldconfig as root

To uninstall the CUDA Toolkit, run cuda-uninstaller in /usr/local/cuda-10.1/bin

Please see CUDA_Installation_Guide_Linux.pdf in /usr/local/cuda-10.1/doc/pdf for detailed information on setting up CUDA.

***WARNING: Incomplete installation! This installation did not install the CUDA Driver. A driver of version at least 418.00 is required for CUDA 10.1 functionality to work.

To install the driver using this installer, run the following command, replacing <CudaInstaller> with the name of this run file:

    sudo <CudaInstaller>.run --silent --driver

Logfile is /var/log/cuda-installer.log
3.安装完成之后添加环境变量,在home目录下,ctrl+H打开隐藏的文件,找到.bashrc,打开添加路径(vi ~/vim .bashrc)
4.完成之后测试官方的例子,一直失败
  ./deviceQuery Starting...

 CUDA Device Query (Runtime API) version (CUDART static linking)

cudaGetDeviceCount returned 999

-> unknown error

Result = FAIL
5.只好重新装一遍驱动了。。。。。。。。。。
https://www.jianshu.com/p/8594771c7d5e
Loading new nvidia-495.44 DKMS files...
Building for 4.15.0-162-generic 4.15.0-163-generic
Building for architecture x86_64
Building initial module for 4.15.0-162-generic
Error! Bad return status for module build on kernel: 4.15.0-162-generic (x86_64)
Consult /var/lib/dkms/nvidia/495.44/build/make.log for more information.
Setting up nvidia-compute-utils-495 (495.44-0ubuntu0.18.04.1) ...
Warning: The home dir /nonexistent you specified can't be accessed: No such file or directory
Adding system user nvidia-persistenced' (UID 121) ... Adding new group nvidia-persistenced' (GID 127) ...
Adding new user nvidia-persistenced' (UID 121) with group nvidia-persistenced' ...
pam_tally2: /var/log/tallylog is either world writable or not a normal file
pam_tally2: Authentication error
useradd: failed to reset the tallylog entry of user "nvidia-persistenced"
Not creating home directory `/nonexistent'.
(哎,可能是上次跑一个程序的时候由于修改了gcc版本,导致安装失败),接下里重新修改gcc版本。。。。
参考:
https://blog.csdn.net/JerryZhang__/article/details/108865176
https://forum.xanmod.org/thread-3635.html
sudo apt-get update

sudo apt-get install gcc-8

sudo apt-get install g++-8

cd /usr/bin

sudo rm gcc g++

sudo ln -s gcc-8 gcc

sudo ln -s g++-8 g++

https://blog.csdn.net/weixin_44128857/article/details/108554751
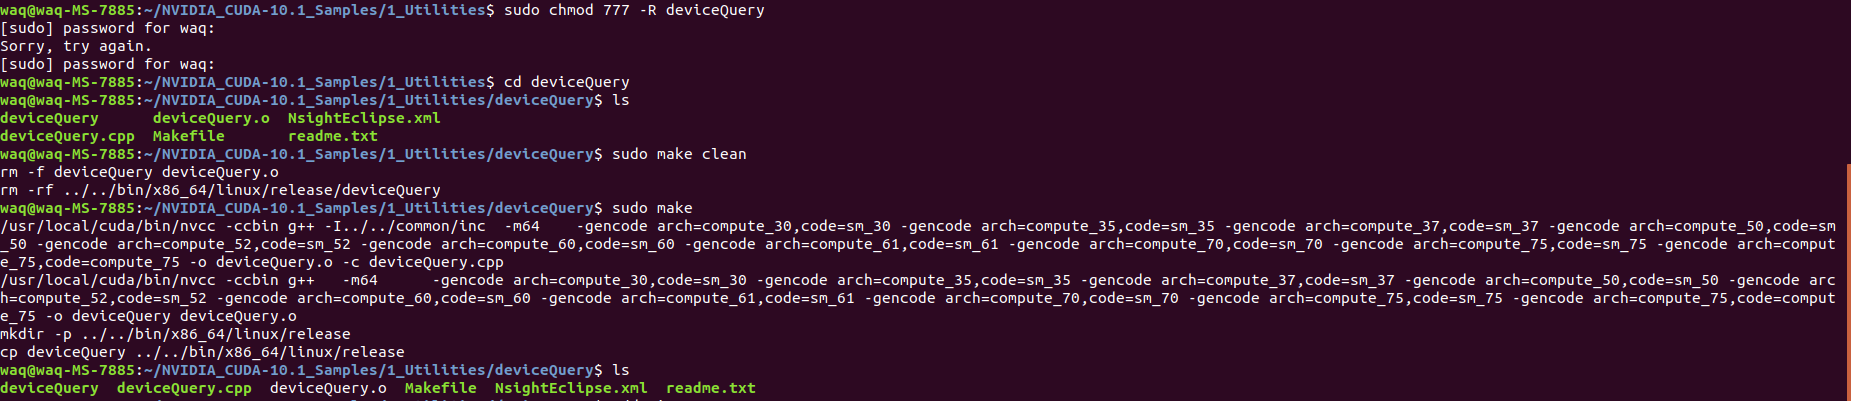
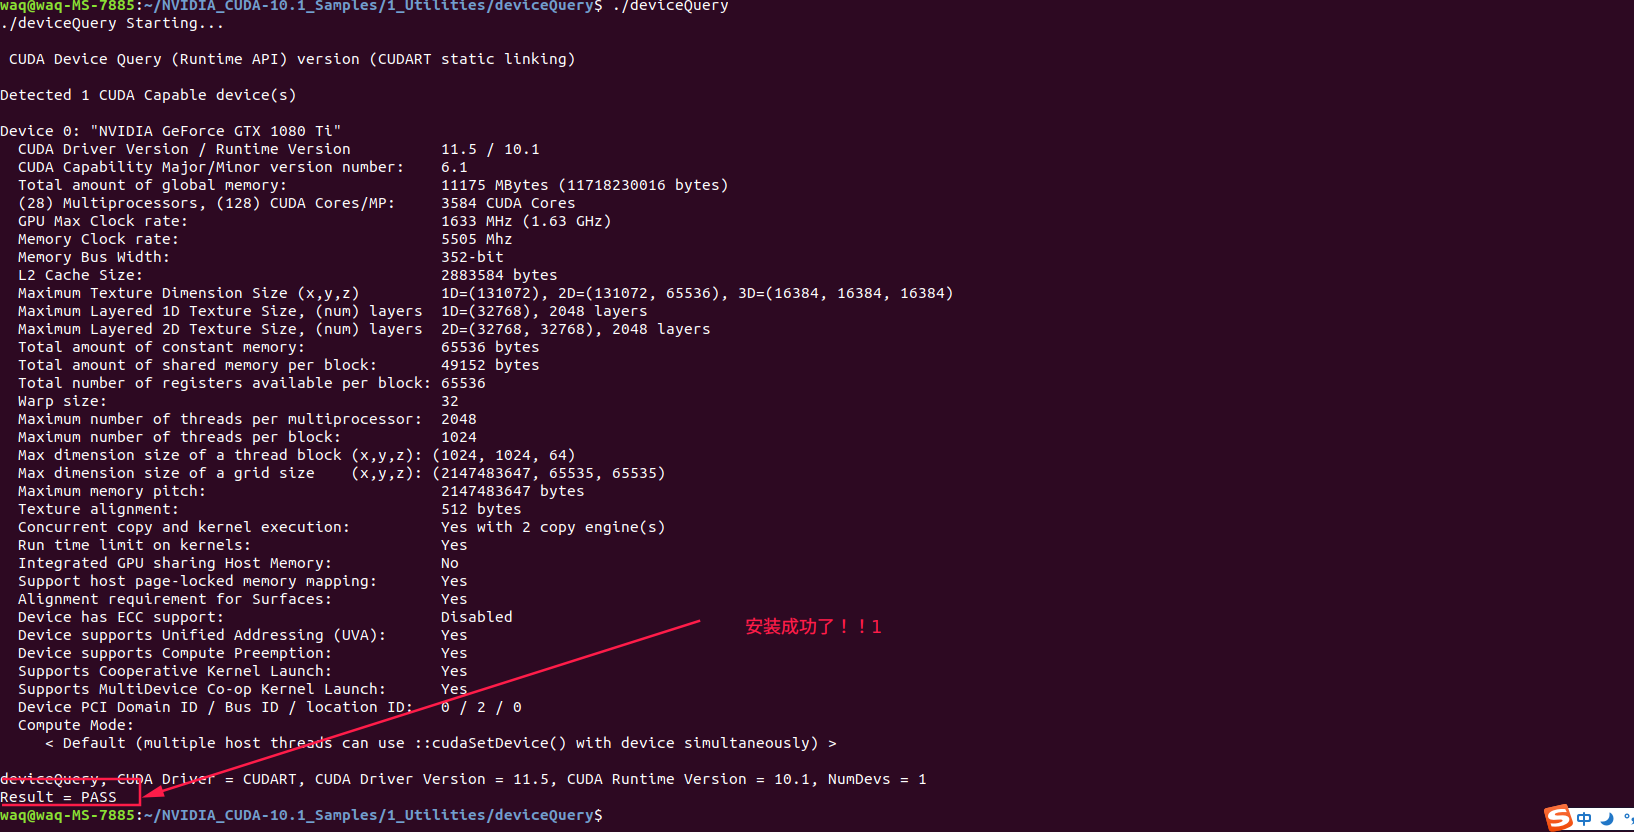
3.修改完gcc版本之后,安装cuda,然后再添加环境变量,最后测试

注意cuda版本需要对应,我截图中版本不同,所以需要将环境变量里面的版本修改为具体安装的版本
4.安装cudnn
安装cudnn
进入https://developer.nvidia.com/cudnn 下载对应的文件夹,解压,
注意:一定要和cuda的版本对应!!!
下载完成后解压并进入文件夹:
sudo cp cuda/include/cudnn.h /usr/local/cuda/include/

sudo cp cuda/lib64/libcudnn* /usr/local/cuda/lib64/

sudo chmod a+r /usr/local/cuda/include/cudnn.h

sudo chmod a+r /usr/local/cuda/lib64/libcudnn*
在终端查看CUDNN版本:
cat /usr/local/cuda/include/cudnn.h | grep CUDNN_MAJOR -A 2
输出结果:
  #define CUDNN_MAJOR 7

#define CUDNN_MINOR 5

#define CUDNN_PATCHLEVEL 0

--

#define CUDNN_VERSION (CUDNN_MAJOR * 1000 + CUDNN_MINOR * 100 + CUDNN_PATCHLEVEL)

#include "driver_types.h"
ubuntu18.04开机后NVIDIA显卡驱动加载失败的更多相关文章
- Ubuntu18.04安装/卸载NVIDIA显卡驱动
1 显卡驱动下载 官网:NVIDIA 搜索适合本机的驱动 获取最新版本驱动 立即下载 文件 以上,显卡驱动下载完成. 2 显卡驱动安装 2.1 添加可执行权限 进入驱动文件目录sudo chmod a ...
- 关于Eclipse在servlet中连接数据库时出现驱动加载失败的解决
问题:在队友发来的项目中想将他获取到的数据通过数据库储存,出现驱动加载失败问题 解决:首先百度了下相关情况,大多数都是说下载mysql-connector-java-5.1.39-bin.jar包,然 ...
- Ubuntu 14.04 LTS 安装 NVIDIA 显卡驱动后的屏幕亮度调节问题
安装 Ubuntu,对于 NVIDIA 显卡,默认情况下会使用第三方开源驱动,并且一般情况下,第三方开源驱动和系统兼容性更好.由于 NVIDIA 显卡驱动不是开放的,所以对 Linux 系统的原生支持 ...
- ubuntu14.04安装、NVIDIA显卡驱动安装及CUDA8.0、Cudnn5.1的环境搭建
安装环境:hp-Z440工作站.64位Ubuntu14.04(64位Ubuntu16.04).Cuda8.0.Cudnn5.1.Nvidia GeForce GT 705.Tesla K40c 本文可 ...
- ubuntu 14.04 如何安装nvidia显卡驱动 [转载]
我的机子装的是64位ubuntu 14.04 LTS系统,显卡是GeForce 405 ,想使用cuda所以需要装NVidia官方驱动,但是总是碰到 nouveau 驱动正在使用的问题.找了好久,网上 ...
- ubuntu14.04安装使用NviDIA显卡驱动
想给自己的ubuntu换N卡驱动的原因: 一方面,由于自己电脑在编译源代码8线程全开(make -j8)时,CPU温度呼呼涨到八九十度,从而常常导致系统保护自动关机,让人有点不爽.网上有说ubuntu ...
- Ubuntu13.04手动安装nvidia显卡驱动
1. 下载最新版的nVidia驱动,命名为NVIDIA.run. http://www.nvidia.com/page/drivers.html 2.编辑blacklist.conf. sudo ge ...
- Ubuntu18.04.2下安装 RTX2080 Nvidia显卡驱动
转载请注明出处:BooTurbo https://www.cnblogs.com/booturbo/p/11261903.html 不久前入手了蓝天P870TM1G准系统,配置如下: 1. Z370 ...
- Ubuntu 18.04安装NVIDIA显卡驱动教程
最近遇到了在Ubuntu 18.04上安装NVIDIA显卡驱动的情况,看到一篇教程讲解的很好,拿来收藏. 安装NVIDIA显卡驱动风险极大,新手注意. 在Ubuntu 18.04上安装 ...
- vs2008包加载失败
由于安装vs2008sp1后,新建项目报错,解决未遂,于是重装vs2008,装完后又出现包加载失败问题: Microsoft.Data.Entity.Design.Package.MicrosoftD ...
随机推荐
- 如何用 30s 给面试官讲清楚跳表
查找 假设有如下这样一个有序链表: 想要查找 24.43.59,按照顺序遍历,分别需要比较的次数为 2.4.6 目前查找的时间复杂度是 O(N),如何提高查找效率? 很容易想到二分查找,将查找的时间复 ...
- uniapp解析后端返回的html标签
<rich-text :nodes="data.content"></rich-text>
- DNS欺骗
原理: dns欺骗又可以叫作中间人人攻击,主要是通过拦截受害人在访问某个网站时设备向外发送的dns请求,然后给出伪造的dns应答,实现欺骗过程. 实验脚本如下: from scapy.layers.d ...
- 使用腾讯云部署war包
目录 1.前期准备 2.springboot打war包 3.部署war包 4.导入数据库 5.修改Tomcat启动端口 6.启动服务器 7.设置腾讯云服务器防火墙规则 8.从外部访问 9.总结 10. ...
- [深度学习] CNN的基础结构与核心思想
1. 概述 卷积神经网络是一种特殊的深层的神经网络模型,它的特殊性体现在两个方面,一方面它的神经元间的连接是非全连接的, 另一方面同一层中某些神经元之间的连接的权重是共享的(即相同的).它的非全连接和 ...
- [编程基础] Python谷歌翻译库googletrans总结
1 使用说明 本文介绍python谷歌翻译库接口googletrans的使用.具体见官方文档: https://py-googletrans.readthedocs.io/en/latest/#goo ...
- 学习.NET MAUI Blazor(五)、修改Window窗口标题
由于Blazor属于SPA(single-page application),所以页面标题需要使用PageTitle组件来实现.但是在MAUI Blazor中,Blazor所在的位置是WebView, ...
- 可持久化并查集学习笔记 | 题解P3402 可持久化并查集
简要题意 你需要维护一个并查集,支持版本回退,查连通性,合并两个点. 特别的,没进行一次操作都要新建一个版本. 前置知识 可持久化数组,如果您不会,出门左转 [模板]可持久化线段树 1(可持久化数组) ...
- ac自动姬
字符串 ac自动姬 前言 省选临近,不能再颓了! 说着开始研究起moonlight串流.真香 本期博客之所以在csdn上发了一份,因为没有图床!如果有图床我一定会自力更生的! 好像和字符串没有毛关系 ...
- vulnhub靶场之VULNCMS: 1
准备: 攻击机:虚拟机kali.本机win10. 靶机:VulnCMS: 1,下载地址:https://download.vulnhub.com/vulncms/VulnCMS.ova,下载后直接vb ...