spring aop与aspectj
AOP:面向切面编程
简介
AOP解决的问题:将核心业务代码与外围业务(日志记录、权限校验、异常处理、事务控制)代码分离出来,提高模块化,降低代码耦合度,使职责更单一。
AOP应用场景:
日志记录、权限校验、异常处理、事务控制等
相关概念
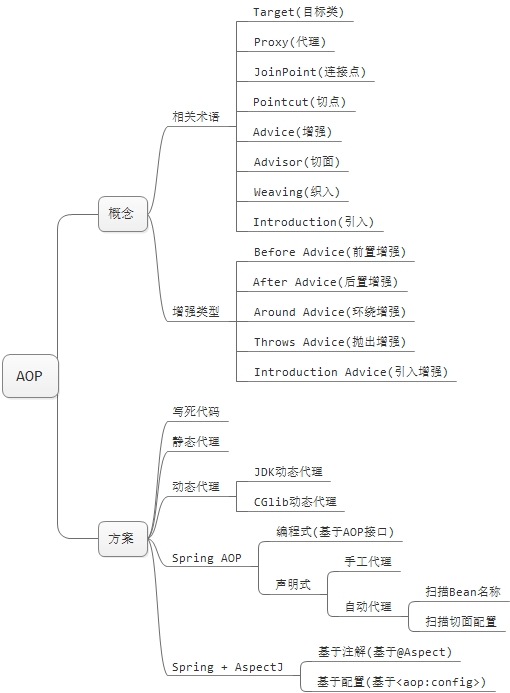
图片来源:
https://raw.githubusercontent.com/WarframePrimer/mysmart4j/master/img/AOP.jpg
joinPoint:连接点。在spring中只支持方法连接点,连接点指的是可以使用advice(增强)的地方,例如一个类中有5个方法,那么这5个方法,那么这5个方法都可以是连接点。
pointcut:切点。可理解为实实在在的连接点,即切入advice(增强)的点。例如
一个类中有5个方法,其中有3个方法(连接点)需要织入advice(增强),那么这3个需要织入advice的连接点就是切点。
advice:增强。实际中想要添加的功能,如日志、权限校验。
before:前置增强,目标方法执行前之前执行。
after:后置增强,目标方法执行后执行。
around:环绕增强,在目标方法执行时执行,可控制目标方法是否执行。
after throwing:异常增强,目标方法抛出异常时执行。
weaving:织入。即对方法的增强,将切面的代码织入(应用)到目标函数的过程。
introduction advice:引入增强。即对类的增强。
advisor:切面。由切点和增强相结合而成,定义增强应用到哪些切点上。
Aop的两种实现
pom.xml依赖
<?xml version="1.0" encoding="UTF-8"?>

<project xmlns="http://maven.apache.org/POM/4.0.0"

         xmlns:xsi="http://www.w3.org/2001/XMLSchema-instance"

         xsi:schemaLocation="http://maven.apache.org/POM/4.0.0 http://maven.apache.org/xsd/maven-4.0.0.xsd">

    <modelVersion>4.0.0</modelVersion>

    <groupId>com.lnjecit</groupId>

    <artifactId>chapter4</artifactId>

    <version>1.0-SNAPSHOT</version>

    <properties>

        <spring.version>4.1.7.RELEASE</spring.version>

    </properties>

    <dependencies>

        <dependency>

            <groupId>cglib</groupId>

            <artifactId>cglib</artifactId>

            <version>3.2.0</version>

        </dependency>

        <dependency>

            <groupId>org.springframework</groupId>

            <artifactId>spring-aop</artifactId>

            <version>${spring.version}</version>

        </dependency>

        <dependency>

            <groupId>org.springframework</groupId>

            <artifactId>spring-aspects</artifactId>

            <version>${spring.version}</version>

        </dependency>

        <dependency>

            <groupId>org.springframework</groupId>

            <artifactId>spring-beans</artifactId>

            <version>${spring.version}</version>

        </dependency>

        <dependency>

            <groupId>org.springframework</groupId>

            <artifactId>spring-context</artifactId>

            <version>${spring.version}</version>

        </dependency>

        <dependency>

            <groupId>org.springframework</groupId>

            <artifactId>spring-context-support</artifactId>

            <version>${spring.version}</version>

        </dependency>

        <dependency>

            <groupId>org.springframework</groupId>

            <artifactId>spring-core</artifactId>

            <version>${spring.version}</version>

        </dependency>

    </dependencies>

</project>
Spring aop
基于代理(jdk动态代理、cglib动态代理)实现的aop
Spring aop使用了两种代理机制。一种是jdk动态代理,另一种是cglib动态代理。
Jdk动态代理只支持接口代理,cglib支持类的代理。
编程式
前置增强 before advice
前置增强:实现MethodBeforeAdvice接口,执行目标方法前执行before方法
/**

 * 编程式前置增强

 */

public class UserBeforeAdvice implements MethodBeforeAdvice {

    @Override

    public void before(Method method, Object[] args, Object target) throws Throwable {

        System.out.println("Before");

    }

}
后置增强 after advice
后置增强:实现AfterReturningAdvice接口,执行目标方法后执行afterReturning方法
/**

 * 编程式后置增强

 */

public class UserAfterAdvice implements  AfterReturningAdvice  {

    @Override

    public void afterReturning(Object returnValue, Method method, Object[] args, Object target) throws Throwable {

        System.out.println("After");

    }

}
环绕增强 around advice
环绕增强:实现MethodInterceptor接口,执行目标方法前后执行invoke方法
/**

 * 编程式环绕增强

 **/

public class UserAroundAdvice implements MethodInterceptor{

    @Override

    public Object invoke(MethodInvocation invocation) throws Throwable {

        System.out.println("Before");

        Object result = invocation.proceed();

        System.out.println("After");

        return result;

    }

}
用户服务接口类:
public interface UserService {

    void queryAll();

}
用户服务接口实现类:
public class UserServiceImpl implements UserService {

    @Override

    public void queryAll() {

        System.out.println("查询全部用户并返回");

    }

}
测试代码:
public class Test {

    public static void main(String[] args) {

        /**

         * 测试前置增强和后置增强

         */

        ProxyFactory proxyFactory = new ProxyFactory();//创建代理工厂

        proxyFactory.setTarget(new UserServiceImpl());//射入目标类对象

        proxyFactory.addAdvice(new UserBeforeAdvice());//添加前置增强

        proxyFactory.addAdvice(new UserAfterAdvice());//添加后置增强

        UserService userService = (UserService) proxyFactory.getProxy();//从代理工厂获取代理

        userService.queryAll();//调用代理的方法

        /**

         * 测试环绕增强

         */

        ProxyFactory proxyFactory2 = new ProxyFactory();//创建代理工厂

        proxyFactory2.setTarget(new UserServiceImpl());//射入目标类对象

        proxyFactory2.addAdvice(new UserAroundAdvice());//添加环绕增强

        UserService userService2 = (UserService) proxyFactory2.getProxy();//从代理工厂获取代理

        userService2.queryAll();//调用代理的方法

    }

}
声明式(基于xml配置)
环绕增强 around advice
spring-aop.xml配置文件如下:
<?xml version="1.0" encoding="UTF-8"?>

<beans xmlns="http://www.springframework.org/schema/beans"

       xmlns:xsi="http://www.w3.org/2001/XMLSchema-instance"

       xmlns:context="http://www.springframework.org/schema/context"

       xsi:schemaLocation="http://www.springframework.org/schema/beans

      http://www.springframework.org/schema/beans/spring-beans.xsd

      http://www.springframework.org/schema/context

      http://www.springframework.org/schema/context/spring-context.xsd">

    <!--扫描指定包-->

    <context:component-scan base-package="com.lnjecit.chapter4.user"/>

    <!--配置代理-->

    <bean id="userServiceProxy" class="org.springframework.aop.framework.ProxyFactoryBean">

        <!--需要代理的接口-->

        <property name="interfaces" value="com.lnjecit.chapter4.user.UserService"/>

        <!--接口实现类-->

        <property name="target" ref="userServiceImpl"/>

        <!--拦截器名称(即增强类名称)-->

        <property name="interceptorNames">

            <list>

                <value>userAroundAdvice</value>

            </list>

        </property>

    </bean>

</beans>
用户服务接口类:
public interface UserService {

    void queryAll();

}
用户服务接口实现类:
@Component

public class UserServiceImpl implements UserService {

    @Override

    public void queryAll() {

        System.out.println("查询全部用户并返回");

    }

}
测试环绕增强代码:
public class Test {

    public static void main(String[] args) {

        // 获取spring context

        ApplicationContext applicationContext = new ClassPathXmlApplicationContext("spring-aop.xml");

        // 从context中获取id为userServiceProxy的代理对象

        UserService userServiceProxy = (UserService) applicationContext.getBean("userServiceProxy");

        // 调用代理的方法

        userServiceProxy.queryAll();

    }

}
抛出增强 throws advice
抛出增强:实现ThrowsAdvice接口。当执行目标方法出现异常会执行抛出增强中的afterThrowing方法。
/**

 * 抛出增强

 */

@Component

public class UserThrowAdvice implements ThrowsAdvice {

    public void afterThrowing(Method method, Object[] args, Object target, Exception e) {

        System.out.println("Throw exception:");

        System.out.println("Target class name:" + target.getClass().getName());

        System.out.println("Method name: " + method.getName());

        System.out.println("Exception message:" + e.getMessage());

    }

}
将UserServiceImpl类修改如下:故意抛出运行时异常,用于测试抛出增强
@Component

public class UserServiceImpl implements UserService {

    @Override

    public void queryAll() {

        System.out.println("查询全部用户并返回");

        throw new RuntimeException("Error");

    }

}
Spring-aop.xml配置文件修改如下:
<?xml version="1.0" encoding="UTF-8"?>

<beans xmlns="http://www.springframework.org/schema/beans"

       xmlns:xsi="http://www.w3.org/2001/XMLSchema-instance"

       xmlns:context="http://www.springframework.org/schema/context"

       xsi:schemaLocation="http://www.springframework.org/schema/beans

      http://www.springframework.org/schema/beans/spring-beans.xsd

      http://www.springframework.org/schema/context

      http://www.springframework.org/schema/context/spring-context.xsd">

    <!--扫描指定包-->

    <context:component-scan base-package="com.lnjecit.chapter4.user"/>

    <!--配置代理-->

    <bean id="userServiceProxy" class="org.springframework.aop.framework.ProxyFactoryBean">

        <!--需要代理的接口-->

        <property name="interfaces" value="com.lnjecit.chapter4.user.UserService"/>

        <!--接口实现类-->

        <property name="target" ref="userServiceImpl"/>

        <!--拦截器名称(即增强类名称)-->

        <property name="interceptorNames">

            <list>

                <value>userThrowAdvice</value>

            </list>

        </property>

    </bean>

</beans>
测试代码与环绕增强的测试代码相同,不再复制。
切面 advisor
advisor(切面)封装了advice(增强)和pointcut(切点)
在UserService接口中添加两个方法query、save.
UserService代码如下:
public interface UserService {

    void queryAll();

    void query();

    void save();

}
UserServiceImpl代码如下:
@Component

public class UserServiceImpl implements UserService {

    @Override

    public void queryAll() {

        System.out.println("查询全部用户并返回");

    }

    @Override

    public void query() {

        System.out.println("根据条件查询用户");

    }

    @Override

    public void save() {

        System.out.println("新增用户");

    }

}
spring-aop.xml配置文件如下:
<?xml version="1.0" encoding="UTF-8"?>

<beans xmlns="http://www.springframework.org/schema/beans"

       xmlns:xsi="http://www.w3.org/2001/XMLSchema-instance"

       xmlns:context="http://www.springframework.org/schema/context"

       xsi:schemaLocation="http://www.springframework.org/schema/beans

      http://www.springframework.org/schema/beans/spring-beans.xsd

      http://www.springframework.org/schema/context

      http://www.springframework.org/schema/context/spring-context.xsd">

    <!--扫描指定包-->

    <context:component-scan base-package="com.lnjecit.chapter4.user"/>

    <!--配置一个切面-->

    <bean id="userServiceAdvisor" class="org.springframework.aop.support.RegexpMethodPointcutAdvisor">

        <!--增强-->

        <property name="advice" ref="userAroundAdvice"/>

        <!--切点(正则表达式:匹配UserServiceImpl类中以query开头的方法)-->

        <property name="pattern" value="com.lnjecit.chapter4.user.UserServiceImpl.query.*"/>

    </bean>

    <!--配置代理-->

    <bean id="userServiceProxy" class="org.springframework.aop.framework.ProxyFactoryBean">

        <!--目标类-->

        <property name="target" ref="userServiceImpl"/>

        <!--切面-->

        <property name="interceptorNames" value="userServiceAdvisor"/>

        <!--代理目标类-->

        <property name="proxyTargetClass" value="true"/>

    </bean>

</beans>
测试代码:
public class Test {

    public static void main(String[] args) {

        // 获取spring context

        ApplicationContext applicationContext = new ClassPathXmlApplicationContext("spring-aop.xml");

        // 从context中获取id为userServiceProxy的代理对象

        UserService userServiceProxy = (UserService) applicationContext.getBean("userServiceProxy");

        // 调用代理的方法

        userServiceProxy.queryAll();

        userServiceProxy.query();

        userServiceProxy.save();

    }

}
测试结果如下:
Before
查询全部用户并返回
After
Before
根据条件查询用户
After
新增用户
可以看出UserService中的queryAll、query方法被拦截,执行这两个方法前后执行了环绕增强代码。而save方法没有被拦截。
自动代理
aspectj
基于注解
环绕增强 around advice
使用@Aspect注解定义切面类UserAdvisor
/**

 * 切面

 */

@Aspect

@Component

public class UserAdvisor {

    @Around("execution(* com.lnjecit.chapter4.user.UserServiceImpl.*(..))")

    public Object arount(ProceedingJoinPoint joinPoint) throws Throwable {

        before();

        Object result = joinPoint.proceed();

        after();

        return result;

    }

    public void before() {

        System.out.println("Before");

    }

    public void after() {

        System.out.println("After");

    }

}
切点表达式:
execution(* com.lnjecit.chapter4.user.UserServiceImpl.*(..))
l Execution表示要拦截的方法
l 第一个“*”表示方法返回值任意
l 第二个“*”表示匹配类中的所有方法
l (..)表示方法参数任意
spring-aspectj.xml配置文件:
<?xml version="1.0" encoding="UTF-8"?>

<beans xmlns="http://www.springframework.org/schema/beans"

       xmlns:xsi="http://www.w3.org/2001/XMLSchema-instance"

       xmlns:context="http://www.springframework.org/schema/context"

       xmlns:aop="http://www.springframework.org/schema/aop"

       xsi:schemaLocation="http://www.springframework.org/schema/beans

      http://www.springframework.org/schema/beans/spring-beans.xsd

      http://www.springframework.org/schema/context

      http://www.springframework.org/schema/context/spring-context.xsd

      http://www.springframework.org/schema/aop

      http://www.springframework.org/schema/aop/spring-aop.xsd">

    <!--扫描指定包-->

    <context:component-scan base-package="com.lnjecit.chapter4.user"/>

    <!--默认为false,使用JDK动态代理 设置为true,启用cglib动态代理-->

    <aop:aspectj-autoproxy proxy-target-class="true"/>

</beans>
测试代码:
public class Test {

    public static void main(String[] args) {

        // 获取spring context

        ApplicationContext applicationContext = new ClassPathXmlApplicationContext("spring-aspectj.xml");

        // 从context中获取id为userServiceImpl的对象

        UserService userServiceImpl = (UserService) applicationContext.getBean("userServiceImpl");

        userServiceImpl.queryAll();

        userServiceImpl.query();

        userServiceImpl.save();

    }

}
拦截指定注解
简单案例:使用@Annotation注解拦截Log注解,记录日志
定义Log注解
/**

 * 日志注解

 */

@Retention(RetentionPolicy.RUNTIME)

@Target(ElementType.METHOD)

@Documented

public @interface Log {

}
定义切面LogAspect
@Aspect
@Component

public class LogAspect {
   @Before(value = "@annotation(com.lnjecit.chapter4.user.Log)")

    public void before(JoinPoint joinPoint) {

        // 目标类名称

        String targetClazzName = joinPoint.getTarget().getClass().getName();

        // 目标方法名称

        String targetMethodName = joinPoint.getSignature().getName();

        System.out.println("执行目标方法" + targetClazzName + "." + targetMethodName +"前,记录日志");

        // 可在此处将日志异步存储到数据库表中

    }

}
在UserServiceImpl类的save方法上加上Log注解
@Component

public class UserServiceImpl implements UserService {

    @Override

    public void queryAll() {

        System.out.println("查询全部用户并返回");

//        throw new RuntimeException("Error");

    }

    @Override

    public void query() {

        System.out.println("根据条件查询用户");

    }

    @Log

    @Override

    public void save() {

        System.out.println("新增用户");

    }

}
测试代码:
public class Test {

    public static void main(String[] args) {

        // 获取spring context

        ApplicationContext applicationContext = new ClassPathXmlApplicationContext("spring-aspectj.xml");

        // 从context中获取id为userServiceImpl的对象

        UserService userServiceImpl = (UserService) applicationContext.getBean("userServiceImpl");

        userServiceImpl.save();

    }

}
测试结果如下:
执行目标方法com.lnjecit.chapter4.user.UserServiceImpl.save前,记录日志
新增用户
根据结果可以看出执行save方法之前,执行了LogAspect中的前置增强。
基于配置
除了使用Aspect注解外,还可以使用xml配置的方式来实现aspect的应用
环绕增强 around advice
切面类UserAdvisor
/**

 * 切面

 */

public class UserAdvisor {

    public Object arount(ProceedingJoinPoint joinPoint) throws Throwable {

        before();

        Object result = joinPoint.proceed();

        after();

        return result;

    }

    public void before() {

        System.out.println("Before");

    }

    public void after() {

        System.out.println("After");

    }

}
spring-aspectj.xml配置:
<?xml version="1.0" encoding="UTF-8"?>

<beans xmlns="http://www.springframework.org/schema/beans"

       xmlns:xsi="http://www.w3.org/2001/XMLSchema-instance"

       xmlns:context="http://www.springframework.org/schema/context"

       xmlns:aop="http://www.springframework.org/schema/aop"

       xsi:schemaLocation="http://www.springframework.org/schema/beans

      http://www.springframework.org/schema/beans/spring-beans.xsd

      http://www.springframework.org/schema/context

      http://www.springframework.org/schema/context/spring-context.xsd

      http://www.springframework.org/schema/aop

      http://www.springframework.org/schema/aop/spring-aop.xsd">

    <!--扫描指定包-->

    <context:component-scan base-package="com.lnjecit.chapter4.user"/>

    <bean id="userServiceImpl" class="com.lnjecit.chapter4.user.UserServiceImpl"/>

    <bean id="userAdvisor" class="com.lnjecit.chapter4.user.UserAdvisor"/>

    <aop:config>

        <!--切面-->

        <aop:aspect ref="userAdvisor">

            <!--环绕增强-->

            <aop:around method="arount" pointcut="execution(* com.lnjecit.chapter4.user.UserServiceImpl.*(..))"></aop:around>

        </aop:aspect>

    </aop:config>

</beans>
UserServiceImpl:
public class UserServiceImpl implements UserService {

    @Override

    public void queryAll() {

        System.out.println("查询全部用户并返回");

    }

    @Override

    public void query() {

        System.out.println("根据条件查询用户");

    }

    @Log

    @Override

    public void save() {

        System.out.println("新增用户");

    }

}
测试代码:
public class Test {

    public static void main(String[] args) {

        // 获取spring context

        ApplicationContext applicationContext = new ClassPathXmlApplicationContext("spring-aspectj.xml");

        // 从context中获取id为userServiceImpl的对象

        UserService userServiceImpl = (UserService) applicationContext.getBean("userServiceImpl");

        userServiceImpl.queryAll();

        userServiceImpl.query();

        userServiceImpl.save();

    }

}
测试结果与使用注解实现效果相同。
拦截指定注解
Log注解:
/**

 * 日志注解

 */

@Retention(RetentionPolicy.RUNTIME)

@Target(ElementType.METHOD)

@Documented

public @interface Log {

}
切面LogAspect:
/**

 * 日志切面

 */

public class LogAspect {

    public void before(JoinPoint joinPoint) {
    // 目标类名称
    String targetClazzName = joinPoint.getTarget().getClass().getName();
    // 目标方法名称
    String targetMethodName = joinPoint.getSignature().getName();
    System.out.println("执行目标方法" + targetClazzName + "." + targetMethodName +"前,记录日志");
    // 可在此处将日志异步存储到数据库表中
}
spring-aspectj.xml配置:
<?xml version="1.0" encoding="UTF-8"?>

<beans xmlns="http://www.springframework.org/schema/beans"

       xmlns:xsi="http://www.w3.org/2001/XMLSchema-instance"

       xmlns:context="http://www.springframework.org/schema/context"

       xmlns:aop="http://www.springframework.org/schema/aop"

       xsi:schemaLocation="http://www.springframework.org/schema/beans

      http://www.springframework.org/schema/beans/spring-beans.xsd

      http://www.springframework.org/schema/context

      http://www.springframework.org/schema/context/spring-context.xsd

      http://www.springframework.org/schema/aop

      http://www.springframework.org/schema/aop/spring-aop.xsd">

    <bean id="userServiceImpl" class="com.lnjecit.chapter4.user.UserServiceImpl"/>

    <bean id="logAspect" class="com.lnjecit.chapter4.user.LogAspect"/>

    <aop:config>

        <!--切面-->

        <aop:aspect ref="logAspect">

            <!--前置增强-->

            <aop:before method="before" pointcut="@annotation(com.lnjecit.chapter4.user.Log)"></aop:before>

        </aop:aspect>

    </aop:config>

</beans>
UserService、UserServiceImpl类与环绕通知中代码中相同。
测试代码:
public class Test {

    public static void main(String[] args) {

        // 获取spring context

        ApplicationContext applicationContext = new ClassPathXmlApplicationContext("spring-aspectj.xml");

        // 从context中获取id为userServiceImpl的对象

        UserService userServiceImpl = (UserService) applicationContext.getBean("userServiceImpl");

        userServiceImpl.queryAll();

        userServiceImpl.query();

        userServiceImpl.save();

    }

}
测试结果与基于注解测试结果相同。
Spring aop与aspectJ的区别
1、织入的时期不同
spring aop采用的动态织入,而aspectJ是静态织入。
静态织入:指在编译时期就织入,即:编译出来的class文件,字节码就已经被织入了。
动态织入:分静动两种,静则指织入过程只在第一次调用时执行;动则指根据代码动态运行的中间状态来决定如何操作,每次调用target的时候都执行。
Spring aspectJ简单应用案例
日志记录
可参考前面案例中的定义日志记录,使用切面记录日志。
性能监控
定义性能监控切面:
/**

 * 性能监控切面

 */

@Aspect

@Component

public class MonitorAspect {

    @Around("execution(* com.lnjecit.chapter4.user.UserServiceImpl.*(..))")

    public Object arount(ProceedingJoinPoint joinPoint) throws Throwable {

        // 目标类名称

        String targetClazzName = joinPoint.getTarget().getClass().getName();

        // 目标类方法名称

        String targetMethodName = joinPoint.getSignature().getName();

        // 计时并调用目标函数

        long start = System.currentTimeMillis();

        Object result = joinPoint.proceed();

        long time = System.currentTimeMillis() - start;

        System.out.println("执行" + targetClazzName + "." + targetMethodName + "方法耗时" + time + "毫秒");

        // 可在此处将监控信息存储

        return result;

    }

}
UserService:
public interface UserService {

    void queryAll();

    void query();

    void save();

}
UserServiceImpl:
@Component

public class UserServiceImpl implements UserService {

    @Override

    public void queryAll() {

        System.out.println("查询全部用户并返回");

    }

    @Override

    public void query() {

        System.out.println("根据条件查询用户");

    }

     @Override

    public void save() {

        System.out.println("新增用户");

    }
spring-aspectj.xml配置:
<?xml version="1.0" encoding="UTF-8"?>

<beans xmlns="http://www.springframework.org/schema/beans"

       xmlns:xsi="http://www.w3.org/2001/XMLSchema-instance"

       xmlns:context="http://www.springframework.org/schema/context"

       xmlns:aop="http://www.springframework.org/schema/aop"

       xsi:schemaLocation="http://www.springframework.org/schema/beans

      http://www.springframework.org/schema/beans/spring-beans.xsd

      http://www.springframework.org/schema/context

      http://www.springframework.org/schema/context/spring-context.xsd

      http://www.springframework.org/schema/aop

      http://www.springframework.org/schema/aop/spring-aop.xsd">

    <!--扫描指定包-->

    <context:component-scan base-package="com.lnjecit.chapter4.user"/>

    <!--默认为false,使用JDK动态代理 设置为true,启用cglib动态代理-->

    <aop:aspectj-autoproxy proxy-target-class="true"/>

</beans>
测试代码:
public class Test {

    public static void main(String[] args) {

        // 获取spring context

        ApplicationContext applicationContext = new ClassPathXmlApplicationContext("spring-aspectj.xml");

        // 从context中获取id为userServiceImpl的对象

        UserService userServiceImpl = (UserService) applicationContext.getBean("userServiceImpl");

        userServiceImpl.queryAll();

        userServiceImpl.query();

        userServiceImpl.save();

    }

}
测试结果如下:
查询全部用户并返回
执行com.lnjecit.chapter4.user.UserServiceImpl.queryAll方法耗时54毫秒
根据条件查询用户
执行com.lnjecit.chapter4.user.UserServiceImpl.query方法耗时0毫秒
新增用户
执行com.lnjecit.chapter4.user.UserServiceImpl.save方法耗时1毫秒
参考资料:
1、 https://blog.csdn.net/javazejian/article/details/56267036
2、 《架构探险 从零开始写javaweb框架》
spring aop与aspectj的更多相关文章
- Spring AOP With AspectJ
一.AOP和拦截器 某些情况下,AOP和拦截器包括Filter能够实现同样的功能,一般都是请求即controller层的操作,这三个执行顺序为Filter>Interceptor>AOP, ...
- Comparing Spring AOP and AspectJ
AOP 概念 在我们开始之前 , 让我们做一个快速.高级别审查的核心术语和概念 : 方面 — —标准 / 特征代码被分散在多个场所中的应用 , 通常不同于实际的业务逻辑 (例如 , 交易管理) .各方 ...
- 比较 Spring AOP 与 AspectJ
本文翻译自博客Comparing Spring AOP and AspectJ(转载:https://juejin.im/post/5a695b3cf265da3e47449471) 介绍 如今有多个 ...
- Spring AOP 和 AspectJ
现如今有许多个可用的 AOP 库,使用这些库需要能够回答以下问题: 是否与现有的或新的应用程序兼容? 在哪里可以使用 AOP ? 如何迅速与应用程序集成? 性能开销是多少? 在本文中,我们将回答这些问 ...
- 比较分析 Spring AOP 和 AspectJ 之间的差别
面向方面的编程(AOP) 是一种编程范式,旨在通过允许横切关注点的分离,提高模块化.AOP提供方面来将跨越对象关注点模块化.虽然现在可以获得许多AOP框架,但在这里我们要区分的只有两个流行的框架:Sp ...
- Spring aop与AspectJ的区别?
根据我看spring官方文档的理解(不出意外是最正确的答案): ①选择spring的AOP还是AspectJ? spring确实有自己的AOP.功能已经基本够用了,除非你的要在接口上动态代理或者方法拦 ...
- 曹工说Spring Boot源码(22)-- 你说我Spring Aop依赖AspectJ,我依赖它什么了
写在前面的话 相关背景及资源: 曹工说Spring Boot源码(1)-- Bean Definition到底是什么,附spring思维导图分享 曹工说Spring Boot源码(2)-- Bean ...
- Spring错误——Spring AOP——org.aspectj.weaver.reflect.ReflectionWorld$ReflectionWorldException
背景:学习切面,测试前置通知功能,xml配置如下 <?xml version="1.0" encoding="UTF-8"?> <beans ...
- spring---aop(10)---Spring AOP中AspectJ
写在前面 在之前的文章中有写到,Spring在配置中,会存在大量的切面配置.然而在很多情况下,SpringAOP 所提供的切面类真的不是很够用,比如想拦截制定的注解方法,我们就必须扩展DefalutP ...
随机推荐
- vue2.0 Axios 的简单用法
安装 使用 npm: $ npm install axios 使用 bower: $ bower install axios 使用 cdn: <script src="https:// ...
- linux c 出错集
2018.7.8 1.声明结构体时,结构体内部不能赋值.比如 struct student{ char id=0; char score=0; }; 这样大错特错! 2.字符数组 char a[10] ...
- JVM内存管理机制和垃圾回收机制
JVM内存管理机制和垃圾回收机制 JVM结构 图片描述: java源码编译成class文件 class文件通过类加载器加载到内存 其中方法区存放的是运行时的常量.静态变量.类信息等,被所有线程共享 堆 ...
- LeetCode:7. Reverse Integer(Easy)
题目要求:将给出的整数进行逆序输出 注意:整数的最大范围-2147483648-2147483647,当翻转后的数超出范围后返回0 思路:对给出的整数除以10,取余和取整:然后对取整部分继续取余和取整 ...
- loj2587 「APIO2018」铁人两项
圆方树orz,参见猫的课件(apio和wc的)以及这里那里 #include <iostream> #include <cstdio> using namespace std; ...
- Putty的设置保存
用了好几年都不知道这功能, 以前每次在连接时只能手工更改字符为utf-8,当时在想怎么这么弱呢 后来才知道... 1 字符 Translation下 字体Appearance下 颜色Colours下 ...
- django中判断当前user具有是否有对模块的增删改查权限
首先简单了解一下user的一些属性 User对象 User对象是认证系统的核心.用户对象通常用来代表网站的用户,并支持例如访问控制.注册用户.关联创建者和内容等.在Django认证框架中只有一个用户类 ...
- 七天入门C++
- 目标检测之Faster-RCNN的pytorch代码详解(数据预处理篇)
首先贴上代码原作者的github:https://github.com/chenyuntc/simple-faster-rcnn-pytorch(非代码作者,博文只解释代码) 今天看完了simple- ...
- this.getClass().getResource()示例详解
public class ResourceTest extends TimerTask{ @Override public void run() { System.out.prin ...