基于windows的resin配置
Resin 与 Eclipse for JavaEE 的整合方法:
1.新建一个项目,将web application配置到resin.conf中
附上resin_struts2-111.conf文件:(为方便区分我将这个conf文件命名为resin_项目名.conf)
<!--

   -  Resin 3.1 配置文件.

  -->

<resin xmlns="http://caucho.com/ns/resin"

       xmlns:resin="http://caucho.com/ns/resin/core">

  <!-- 加载resin/lib下的所有.jar文件 -->

  <class-loader>

    <tree-loader path="${resin.home}/ext-lib"/>

    <tree-loader path="${resin.root}/ext-lib"/>

    <tree-loader path="${resin.home}/lib"/>

    <tree-loader path="${resin.root}/lib"/>

  </class-loader>

  <!--

     管理配置

    -->

  <management path="${resin.root}/admin">

    <user name="admin" password="password" disable="true"/>

    <resin:if test="${resin.professional}">

      <deploy-service/>

      <jmx-service/>

      <log-service/>

      <xa-log-service/>

    </resin:if>

  </management>

  <!--

    -JDK日志接口的配置

     -

    -->

  <log name="" level="info" path="stdout:"

       timestamp="[%H:%M:%S.%s] {%{thread}} "/>

  <!--

     日志信息的级别:'info' 生产环境 'fine' 开发环境 'finer' 调试环境

    -->

  <logger name="com.caucho" level="info"/>

  <logger name="com.caucho.java" level="config"/>

  <logger name="com.caucho.loader" level="config"/>

  <!--

     - 环境上下文的检测时间,对于生产站点, 这个要设置长一点,例如600秒,10分钟

    -->

  <dependency-check-interval>2s</dependency-check-interval>

  <!--

     - 发送邮件通知的SMTP服务器

    -->

  <system-property mail.smtp.host="127.0.0.1"/>

  <system-property mail.smtp.port="25"/>

  <!--

     - Sets the default character encoding to utf-8

     -

     - <character-encoding>utf-8</character-encoding>

    -->

  <!--

     -你可以把编译器改成 "javac", "eclipse" 或者 "internal".

    -->

  <javac compiler="internal" args="-source 1.5"/>

  <!-- Security providers.

     - <security-provider>

     -    com.sun.net.ssl.internal.ssl.Provider

     - </security-provider>

    -->

  <!-- 去掉注释,如果你使用resin提供的xml应用

     -

     - <system-property javax.xml.parsers.DocumentBuilderFactory

     -                 ="com.caucho.xml.parsers.XmlDocumentBuilderFactory"/>

     - <system-property javax.xml.parsers.SAXParserFactory

     -                 ="com.caucho.xml.parsers.XmlSAXParserFactory"/>

    -->

  <cluster id="app-tier">

    <!-- 设置集群上下文的根, 相对于server.root -->

    <root-directory>.</root-directory>

    <server-default>

      <!--  HTTP服务的端口 -->

      <http address="*" port=""/>

      <!--

         - SSL端口配置:

         -

         - <http address="*" port="8443">

         -   <openssl>

         -     <certificate-file>keys/gryffindor.crt</certificate-file>

         -     <certificate-key-file>keys/gryffindor.key</certificate-key-file>

         -     <password>test123</password>

         -   </openssl>

         - </http>

        -->

      <!--

         - JVM参数设置

        -->

      <jvm-arg>-Xmx256m</jvm-arg>

      <jvm-arg>-Xss1m</jvm-arg>

      <jvm-arg>-Xdebug</jvm-arg>

      <jvm-arg>-Dcom.sun.management.jmxremote</jvm-arg>

      <!--

         - Uncomment to enable admin heap dumps

         去掉这个如果你想管理内存堆的倾倒

         - <jvm-arg>-agentlib:resin</jvm-arg>

        -->

      <!--

         - arguments for the watchdog process

        -->

      <watchdog-jvm-arg>-Dcom.sun.management.jmxremote</watchdog-jvm-arg>

      <watchdog-port>6600</watchdog-port>

      <!--

         - 强制resin强制重起时的最小空闲内存

        -->

      <memory-free-min>1M</memory-free-min>

      <!-- 最大线程数量 -->

      <thread-max>256</thread-max>

      <!-- 套接字等待时间  -->

      <socket-timeout>65s</socket-timeout>

      <!--  配置 keepalive-->

      <keepalive-max>128</keepalive-max>

      <keepalive-timeout>15s</keepalive-timeout>

      <!--

         -如果使用的是UNIX,这里是启动的帐号和用户组.

         -

         - <user-name>resin</user-name>

         - <group-name>resin</group-name>

        -->

    </server-default>

    <!--定义群集服务器-->

    <server id="" address="127.0.0.1" port="6800"/>

    <!--

       -配置独立服务器或者群集的持久化存储,专业版的功能

      -->

    <resin:if test="${resin.professional}">

      <persistent-store type="cluster">

        <init path="session"/>

      </persistent-store>

    </resin:if>

    <!--

       -为了安全, 你可以为SSL会话(SSL sessions)定义一个不同的cookie.

       - <ssl-session-cookie>SSL_JSESSIONID</ssl-session-cookie>

      -->

    <!--

       - 缓存启用 (专业版的功能)

      -->

    <resin:if test="${resin.professional}">

      <cache path="cache" memory-size="64M">

        <!-- Vary header rewriting for IE -->

        <rewrite-vary-as-private/>

      </cache>

    </resin:if>

    <!--

       - 启用周期性的服务器状态检查和死锁检查,所有的服务器可以添加 <url> 来检查。

      -->

    <resin:if test="${resin.professional}">

      <ping>

        <!-- <url>http://localhost:8080/test-ping.jsp</url> -->

      </ping>

    </resin:if>

    <!--

       - Defaults applied to each web-app.

      -->

    <web-app-default>

      <prologue>

        <!--

           -扩展库的公共jar文件,扩展是安全的即使没有类装载器知道的jars,装载的类将为每个应用分别装载,也就是这些类都是不同的

          -->

        <class-loader>

          <tree-loader path="${resin.root}/ext-webapp-lib"/>

        </class-loader>

        <!--

           - 启用EL表达式

          -->

        <allow-servlet-el/>

      </prologue>

      <!--

         - 设置缓存页、静态也的延时值

        -->

      <cache-mapping url-pattern="/" expires="5s"/>

      <cache-mapping url-pattern="*.gif" expires="60s"/>

      <cache-mapping url-pattern="*.jpg" expires="60s"/>

      <cache-mapping url-pattern="*.png" expires="60s"/>

      <!--

         - 安全原因, 默认禁用了会话的URLs

        -->

      <session-config>

        <enable-url-rewriting>false</enable-url-rewriting>

      </session-config>

      <!--

         - 安全原因, 在cookies中设置HttpOnly标志

         - <cookie-http-only/>

        -->

      <!--

         -一些JSP包有不正确的 .tld文件。可以把validate-taglib-schema设置成false,可能继续正常工作

        -->

        <jsp>

          <validate-taglib-schema>true</validate-taglib-schema>

          <fast-jstl>true</fast-jstl>

        </jsp>

    </web-app-default>

    <!-- includes the app-default for default web-app behavior -->

    <resin:import path="${resin.home}/conf/app-default.xml"/>

    <!--

       - 简单的数据池配置

       -

       - The JDBC name is java:comp/env/jdbc/test

         <database>

           <jndi-name>jdbc/mysql</jndi-name>

           <driver type="org.gjt.mm.mysql.Driver">

             <url>jdbc:mysql://localhost:3306/test</url>

             <user></user>

             <password></password>

            </driver>

            <prepared-statement-cache-size>8</prepared-statement-cache-size>

            <max-connections>20</max-connections>

            <max-idle-time>30s</max-idle-time>

          </database>

      -->

    <!--

       - 定义所有虚拟主机的默认配置

      -->

    <host-default>

      <!--

         -如果和别的web服务器整合,这个可以被去掉,因为web服务器也可以记录这些信息。

        -->

      <access-log path="logs/access.log"

            format='%h %l %u %t "%r" %s %b "%{Referer}i" "%{User-Agent}i"'

            rollover-period="1W"/>

      <!-- war 文件的布置目录 -->

      <web-app-deploy path="webapps"/>

      <!--  ear文件的布置目录 -->

      <ear-deploy path="deploy">

        <ear-default>

          <ejb-server>

            <config-directory>WEB-INF</config-directory>

          </ejb-server>

        </ear-default>

      </ear-deploy>

      <!-- rar文件的布置目录 -->

      <resource-deploy path="deploy"/>

    </host-default>

    <!-- 虚拟主机的布置目录 -->

    <host-deploy path="hosts">

      <host-default>

        <resin:import path="host.xml" optional="true"/>

      </host-default>

    </host-deploy>

    <!--  默认的虚拟主机配置 -->

    <host id="" root-directory=".">

      <!--

         -  配置默认的应用 webapp's ROOT

        -->
<!--
注意:若使用myeclipse/eclipse创建项目,会有一个项目名(projectName),而此处的root-directory并非项目路径,而是一个特殊的目录,该目录的子目录以及文件必须符合Servlet规范,通常就是eclipse默认创建的WebContent,这个名字可以随便改。btw,这个规范的层级结构主要有三个元素:
/WEB-INF/web.xml
/WEB-INF/classes/
/WEB-INF/lib/
必须包含有上面三个东西。配置文件(*.properties, *.xml等等)需要放在classes下
-->


      <web-app id="/struts2" root-directory="D:\RuahoDemo\projectWorkpace\struts2-111\WebContent"/>

      <web-app id="/resin-admin" root-directory="${resin.home}/php/admin">

        <!--

           - 管理应用程序 /resin-admin

          -->

        <prologue>

          <resin:set var="resin_admin_external" value="false"/>

          <resin:set var="resin_admin_insecure" value="true"/>

        </prologue>

      </web-app>

    </host>

  </cluster>

  <!--

     - Configuration for the web-tier/load-balancer

    -->

  <resin:if test="${resin.professional}">

    <cluster id="web-tier">

      <server-default>

        <!-- The http port -->

        <http address="*" port="9080"/>

      </server-default>

      <server id="web-a" address="127.0.0.1" port="6700"/>

      <cache path="cache" memory-size="64M"/>

      <host id="">

        <web-app id="/">

           <rewrite-dispatch>

             <load-balance regexp="" cluster="app-tier"/>

           </rewrite-dispatch>

        </web-app>

      </host>

    </cluster>

  </resin:if>

</resin>
2.Run – Run Configurations(在本地调试的话,选择Debug Configurations)
弹出的会话中,双击“Java Application”创建一个Configuration,在右边的Name中随意填写一个名字,标签页Main中,Project选择待运行web application,Main class填写resin的主类,查找该类有两种方法:
- 该类可以在${RESIN_HOME}/lib/resin.jar中的META-INF/MANIFEST.MF文件中找到,即Main-Class的值;
- 将${RESIN_HOME}/lib添加到项目的classpath后,即在Main标签页点击“搜索”,在弹出的对话框中搜索“resin”,如果是3.0.x,选择com.caucho.server.resin.Resin,如果是3.1.x,选择com.caucho.boot.ResinBoot,具体的选择,还是要参考META-INF/MANIFEST.MF文件的Main-Class值,如图:

标签页 Arguments中:
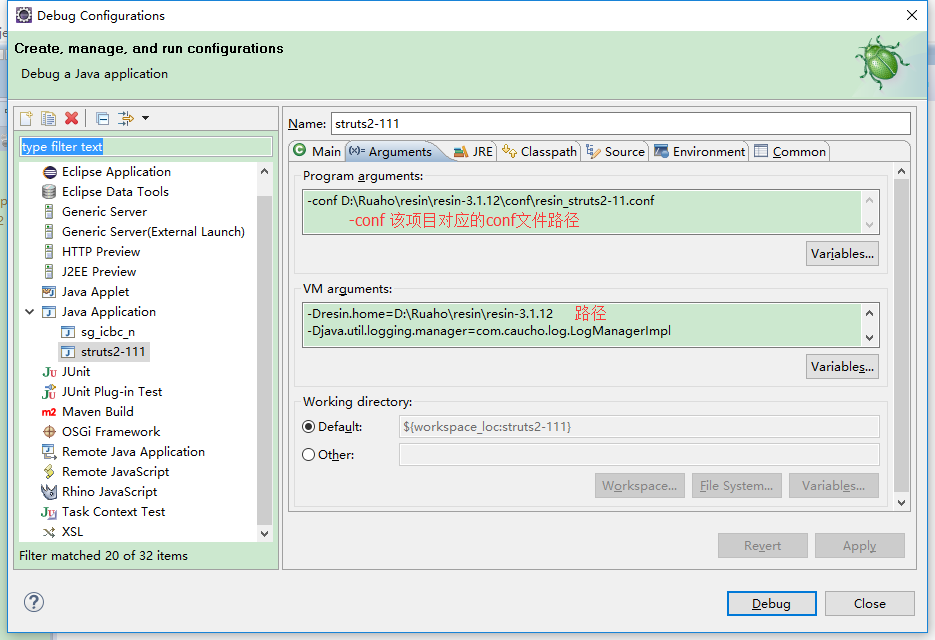
VM Arguments中:
-Dresin.home=D:\Ruaho\resin\resin-3.1.12 (实际路径)

-Djava.util.logging.manager=com.caucho.log.LogManagerImpl

-Xmx1024m
ClassPath标签页中:导入jar包 
完成以上各步之后,点击Run即可启动resin。
基于windows的resin配置的更多相关文章
- 为什么基于Windows Server 2008 R2的网络负载均衡(NLB)配置的时候总会报错“主机不可访问”?
配置基于Windows的网络负载均衡是很容易的,操作也很简单,点点鼠标基本上就能完成,但是在进行节点(真实服务器)操作的过程中有时候会遇到一些主机不可访问的报错信息.这个又是为什么呢? Figure ...
- 基于windows server 2016和sqlserver 2016 AlwaysOn的群集配置
文档:基于windows server 2016和sqlserver 2...链接:http://note.youdao.com/noteshare?id=4f07c1c3f7d0e32b7631d7 ...
- 在windows下安装配置Ulipad
在windows下安装配置Ulipad 今天推荐一款轻便的文本编辑器Ulipad,用来写一些小的Python脚本非常方便. Ulipad下载地址: https://github.com/limodou ...
- VC中基于 Windows 的精确定时[转]
在工业生产控制系统中,有许多需要定时完成的操作,如定时显示当前时间,定时刷新屏幕上的进度条,上位 机定时向下位机发送命令和传送数据等.特别是在对控制性能要求较高的实时控制系统和数据采集系统中,就更需要 ...
- 如何使用新浪微博账户进行应用登录验证(基于Windows Azure Mobile Service 集成登录验证)
使用三方账号登录应用应该对大家来说已经不是什么新鲜事儿了,但是今天为什么还要在这里跟大家聊这个话题呢,原因很简单 Windows Azure Mobiles Service Authenticatio ...
- 在使用Kettle的集群排序中 Carte的设定——(基于Windows)
本片文章主要是关于使用Kettle的UI界面: Spoon来实现基于集群的对数据库中的数据表数据进行排序的试验. 以及在实验过程中所要开启的Carte服务的一些配置文件的设置, 还有基于Windows ...
- VC中基于 Windows 的精确定时
在工业生产控制系统中,有许多需要定时完成的操作,如定时显示当前时间,定时刷新屏幕上的进度条,上位 机定时向下位机发送命令和传送数据等.特别是在对控制性能要求较高的实时控制系统和数据采集系统中,就更需要 ...
- MapReduce编程模型详解(基于Windows平台Eclipse)
本文基于Windows平台Eclipse,以使用MapReduce编程模型统计文本文件中相同单词的个数来详述了整个编程流程及需要注意的地方.不当之处还请留言指出. 前期准备 hadoop集群的搭建 编 ...
- .NET Core微服务之基于Apollo实现统一配置中心
Tip: 此篇已加入.NET Core微服务基础系列文章索引 一.关于统一配置中心与Apollo 在微服务架构环境中,项目中配置文件比较繁杂,而且不同环境的不同配置修改相对频繁,每次发布都需要对应修改 ...
随机推荐
- 今天升级Xcode 7.0 bata发现网络访问失败。
今天升级Xcode 7.0 bata发现网络访问失败.输出错误信息 The resource could not be loaded because the App Transport Securit ...
- mysql-connector-java-6日期存储时差的问题解决方法
在my.ini文件中的[mysqld]下面加入 default-time_zone = '+8:00' 重启mysql 修改driver连接路径 这样日期保存到mysql就是正确的了,但是mysql- ...
- nodeJs+socket.io
1.先安装npm和node 2.安装socket.io npm install socket.io 3.html <!DOCTYPE html> <html lang="e ...
- Java集合之保持compareTo和equals同步
在Java中我们常使用Comparable接口来实现排序,其中compareTo是实现该接口方法.我们知道compareTo返回0表示两个对象相等,返回正数表示大于,返回负数表示小于.同时我们也知道e ...
- [Java基础] Java多线程-工具篇-BlockingQueue
转载自: http://www.cnblogs.com/jackyuj/archive/2010/11/24/1886553.html 前言: 在新增的Concurrent包中,BlockingQue ...
- 怎样在点击li时添加样式,移除兄弟样式
<style type="text/css"> .add{ color:#ff0} </style> <div> <ul> < ...
- http://www.cnblogs.com/monian/p/3822980.html
http://www.cnblogs.com/monian/p/3822980.html
- DataGridView拖动到TreeView
很多时候我们会有这样的需求:一个窗体中有两个GRID,两个GRID中数据表结构差不多,我们要把一个GRID中的数据加入到另一个GRID中.一般的做法是新增一个导入或导出按钮,选择目标行后,通过按钮来触 ...
- 支付宝支付系统繁忙,请稍后再试(ALI64)错误解决
解决方法:将商户支付參数的seller邮箱换成与partner同样的数字串,依然无法支付请检查所给參数
- 万字总结:学习MySQL优化原理(转)
本文转自:https://www.tuicool.com/wx/2eMBfmq 前言 说起MySQL的查询优化,相信大家收藏了一堆奇技淫巧:不能使用SELECT *.不使用NULL字段.合理创建索引. ...